Table of Contents
Advertisement
Quick Links
Advertisement
Table of Contents

Related Manuals for Zoom RhythmTrak 234


Summary of Contents for Zoom RhythmTrak 234
- Page 1 OPERATION MANUAL...
-
Page 2: Usage And Safety Precautions
AC adapter. When using the RhythmTrak 234 in an area with a ••• different line voltage, please consult your local ZOOM distributor about acquiring a proper AC adapter. • Environment Avoid using your RhythmTrak 234 in environments •••... -
Page 3: Table Of Contents
CONTENTS USAGE AND SAFETY PRECAUTIONS Creating Songs (Song Mode) • • • • • • • • What is a song? • • • • • • • • • • • • • • • • • • • • • • • • • • • • • • • Recording and playing a song Introduction •... -
Page 4: Introduction
Great for making guitar or keyboard demo tapes, too. • LINE IN jack allows connection of external instruments. Mix the sound from an instrument, processed by a multi-effect such as the ZOOM 503, with the backing sound provided by the RhythmTrak 234. -
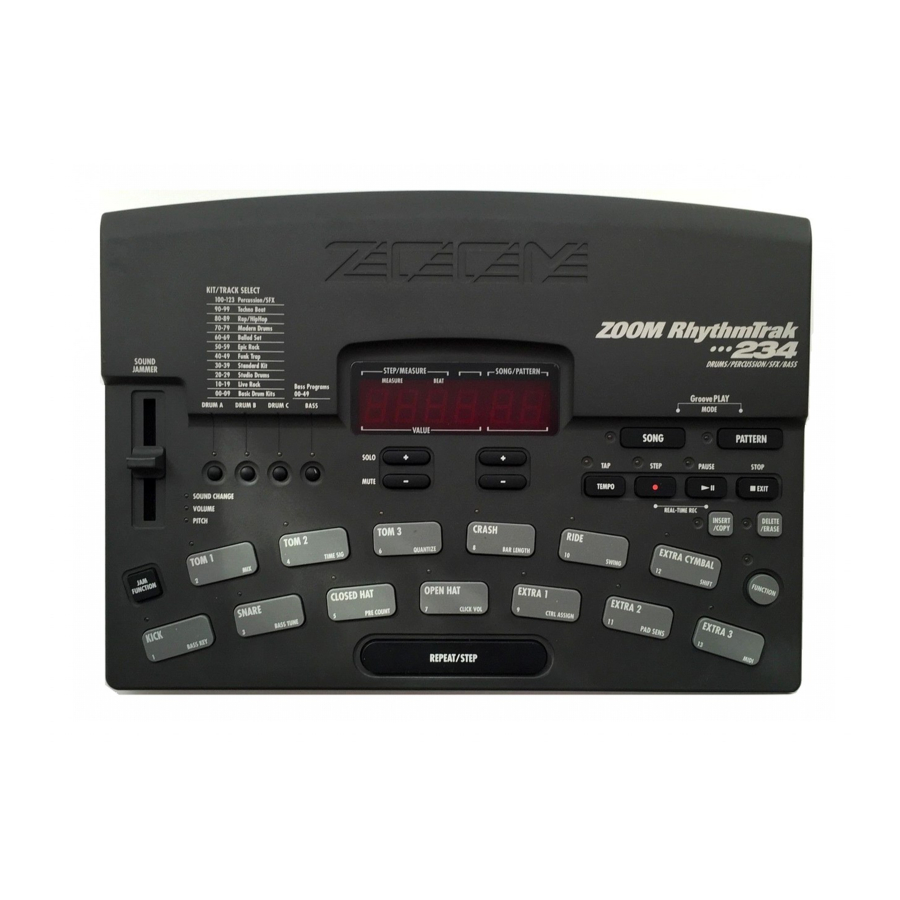
Page 5: Names Of Parts
[R OUT] jack [CTRL1 IN/CTRL2 IN] jacks [PHONES] jack [L/MONO OUT] jack [DC IN] connector [MIDI IN] connector [LINE IN] jack [POWER] switch [VOLUME] control ZOOM CORPORATION VOLUME PHONES L/MONO LINE IN CTRL IN CTRL IN DC 9V POWER MADE IN JAPAN... -
Page 6: Getting Connected
MADE IN JAPAN OUTPUT MIDI IN 300mA DC INPUT Connection to Headphones multi-effect (ZOOM 503 etc.) FS01 FP01 By connecting the optional foot pedal FP01 to the [CTRL1 IN] or When a guitar or other AC adapter [CTRL2 IN] jack, pitch, volume,... -
Page 7: Quick Guide
Quick Guide This Quick Guide shows how to operate your RhythmTrak 234, using a few representative ••• examples. Some of terms and concepts used in this manual are also explained here. Quick Guide (1) Listening to the Demo The RhythmTrak 234 comes with a •••... - Page 8 Press the [PATTERN] key or [SONG] key. • [PATTERN] key: RhythmTrak 234 switches ••• to pattern mode (for playing and recording patterns). DRUMS/PERCUSSION/SFX/BASS SONG/PATTERN 1 01 Groove PLAY MODE • [SONG] key: RhythmTrak 234 switches to ••• SONG PATTERN song mode (for creating backing songs which are sequences of patterns).
-
Page 9: Quick Guide
Quick Guide (2) Playing the Pads The top panel of the RhythmTrak 234 has 13 pads ••• which serve to play drum kits and bass programs. Turn the power KIT/TRACK SELECT 100-123 Percussion/SFX 90-99 Techno Beat 80-89 Rap/HipHop 70-79 Modern Drums 60-69 Ballad Set 50-59... - Page 10 Press the [BASS] key. The [BASS] key LED lights up and the current bass program can be played with the pads. Give it a try ! You will notice that different pads produce sound of a different pitch. DRUMS/PERCUSSION/SFX/BASS SONG/PATTERN Unlike with the drum kit, the bass program does Groove PLAY not consist of different instrument sounds.
-
Page 11: Quick Guide
Quick Guide (3) Playing a Pattern The RhythmTrak 234 already contains many preprogrammed patterns ••• (backing sequence of several bars). Each pattern combines up to three drum kits and a bass program. Here's how you can play a pattern. Turn the power on. Press the [PATTERN] key. - Page 12 Press one of the [UP/DOWN] keys • [+] key: Selects next higher pattern number. • [-] key: Selects next lower pattern number. STEP/MEASURE SONG/PATTERN MEASURE BEAT 0 1 1 02 VALUE DRUMS/PERCUSSION/SFX/BASS SONG/PATTERN Pattern number Groove PLAY MODE SONG PATTERN STEP PAUSE STOP...
-
Page 13: Quick Guide
Quick Guide (4) Using Groove Play Groove play is a special feature of the RhythmTrak 234 which lets you ••• switch among various patterns simply by tapping the pads. This makes it easy to play with patterns like a DJ spinning records. Turn the power on. - Page 14 Push several pads together. In groove play mode, up to 4 patterns can be played simultaneously. For example, while DRUMS/PERCUSSION/SFX/BASS SONG/PATTERN playing a basic drum pattern, you can hit another pad to overlay a bass pattern and then add a Groove PLAY MODE snare fill-in.
-
Page 15: Playing The Pads (Manual Play)
Playing the Pads (Manual Play) The RhythmTrak 234 lets you not only play back existing patterns and songs, it also allows you to ••• manually play the unit by tapping the pads and using the [SOUND JAMMER] slider. This section describes how to manually play the unit Playing by tapping the pads The RhythmTrak... -
Page 16: Using The Slider (Modify Function)
Using the slider (modify function) By moving the [SOUND JAMMER] slider while using the pads, you can change the pitch, volume, or tone continuously. SOUND JAMMER STEP/MEASURE SONG/PATTERN MEASURE BEAT Groove PLAY DRUM A DRUM B DRUM C BASS MODE VALUE SONG PATTERN... -
Page 17: Selecting A Kit/Program For Manual Play
Selecting a kit/program for manual play For manual play, you can select among100 drum kits, 24 percussion/SFX kits, and 50 bass programs. SOUND STEP/MEASURE SONG/PATTERN JAMMER MEASURE BEAT Groove PLAY DRUM A DRUM B DRUM C BASS MODE VALUE SONG PATTERN 1, 2 SOLO... -
Page 18: Playing The Patterns
Playing the Patterns (Pattern Mode) This section describes how to play patterns that are built into the RhythmTrak •••234 or that have been recorded by the user. Pattern play The RhythmTrak 234 incorporates 99 preset patterns (P01 - P99) which cannot be changed by the user, •••... -
Page 19: Changing The Kit/Program Of A Track
Changing the kit/program of a track The patterns of the RhythmTrak 234 are made up of drum track A - C and the bass track. The drum ••• tracks contain a drum kit each, and the bass track contains a bass program. The steps below can be used to change the kit or program assigned to a track. -
Page 20: Changing The Tempo Of Pattern Playback
Changing the tempo of pattern playback When playing a pattern in pattern mode, the playback tempo for the pattern can be varied over the range of 40 - 250 BPM (BPM = beats per minute, using quarter notes). SOUND JAMMER STEP/MEASURE SONG/PATTERN MEASURE... -
Page 21: Pattern Recording (Real-Time Recording)
Pattern Recording (Real-Time Recording) The RhythmTrak 234 has 99 user pattern slots which can be filled with your own patterns. Creating and ••• recording a pattern is possible in two ways: by actually playing the pattern on the pads (real-time recording), or by entering each sound individually (step recording). -
Page 22: Real-Time Recording Of A Drum Track
Real-time recording of a drum track Real-time recording refers to the process of playing the pads while listening to a metronome sound and recording what you play. First, let's record drum tracks in real time. 3, 5 SOUND JAMMER STEP/MEASURE SONG/PATTERN MEASURE BEAT... - Page 23 While holding the [KIT/TRACK SELECT] key for the desired track down, use the [VALUE UP/DOWN] keys or the [SOUND JAMMER] slider to select the kit for the STEP selected track. For recording a pattern, the [KIT/TRACK SELECT] keys are used to STEP/MEASURE SONG/PATTERN MEASURE...
- Page 24 To erase the sound from a specific pad, push the pad while holding the STEP [DELETE/ERASE] key down. While the key is held down, the sound from that pad is erased from [DELETE/ERASE] the pattern. To erase the entire track, push the respective [KIT/TRACK SELECT] key while holding the [DELETE/ERASE] key down.
- Page 25 Record drum tracks B and C using the same procedure. STEP When recording is completed, press the [STOP] key. STEP Operation of the RhythmTrak 234 stops. ••• • If a MIDI clock signal is being received, real-time recording is NOTE not possible.
-
Page 26: Real-Time Recording Of A Bass Track
Real-time recording of a bass track Next, let's add a bass track to the drum track pattern recorded in the previous section. 2, 5, 6 SOUND STEP/MEASURE SONG/PATTERN 2, 1 JAMMER MEASURE BEAT Groove PLAY DRUM A DRUM B DRUM C BASS MODE VALUE... - Page 27 Among pads 2 - 13, press the one whose pitch you want to change. STEP While the pad is being pressed, the assigned pitch name (E1 - A4) STEP/MEASURE SONG/PATTERN MEASURE BEAT is shown on the VALUE indicator. 2 01 VALUE Pitch name assigned to When pad 2 - 13 is released, the pitch name assigned to pad 1 is...
- Page 28 To shift the pitch of all pads, operate the [VALUE UP/DOWN] keys or the [SOUND STEP JAMMER] slider while no pad is pushed. When the pitch assigned to pad 1 is changed, the pitch of pads 2 - 13 also changes accordingly. For example, if the E minor scale is assigned and you shift pad 1 from "E 2"...
- Page 29 To erase the sound from a specific pad, push the pad while holding the STEP [DELETE/ERASE] key down. While the key is held down, the sound from that pad is erased from the pattern. To erase the entire bass track, push the [BASS] key of [DELETE/ERASE] the [KIT/TRACK SELECT] keys while holding the [DELETE/ERASE] key down.
-
Page 30: Pattern Recording (Step Recording)
Pattern Recording (Step Recording) This section describes step recording, which is another recording type that is possible with the RhythmTrak 234. ••• What is step recording? Step recording allows you to enter and record each sound separately, step by step, while the RhythmTrak 234 is in the stop condition. -
Page 31: Step Recording Of A Drum Track
Step recording of a drum track This section describes how to record drum tracks A - C using step recording. SOUND JAMMER STEP/MEASURE SONG/PATTERN 2, 4 MEASURE BEAT Groove PLAY DRUM A DRUM B DRUM C BASS MODE VALUE SONG PATTERN SOLO STEP... - Page 32 Press the [REC] key. STEP [REC] The [REC] key LED and [START] key LED light up, indicating that the RhythmTrak 234 is ready for recording. ••• To enter a note, press the pad corresponding to the desired sound. To enter a rest, STEP press the [REPEAT/STEP] key.
-
Page 33: Step Recording Of A Bass Track
Step recording of a bass track Now let's add a bass track to the drum tracks recorded as described in the previous section. Because pitch and duration must be specified for the bass track, the procedure is slightly different from step recording of the drum track. - Page 34 • Enter a note longer than the minimum unit: Hold the pad down and repeatedly press the [REPEAT/STEP] key. With each push of the [REPEAT/STEP] key, the immediately preceding note is extended by one unit. [PAD] Hold down [STEP] [STEP] [STEP] When you press a pad, its LED lights up, indicating that the note has been input.
-
Page 35: Pattern Copy
Pattern Copy The current pattern (preset pattern or user pattern) can be copied to another user pattern. This is useful for example when wishing to change only a part of pattern, such as adding percussion or changing only the bass track phrasing. The copy source can be either a preset pattern or a user pattern, but because preset patterns are read-only, the copy destination can only be a user pattern. -
Page 36: Creating Songs (Song Mode)
Creating Songs (Song Mode) This section describes how to line up user patterns in a desired order to create the backing for an entire song. This mode of operation is called the song mode. What is a song? A song is a sequence of user patterns (preset patterns cannot be used). A song consists of multiple slots (called "steps") each of which contains one pattern. -
Page 37: Recording And Playing A Song
Recording and playing a song Let's collect a number of patterns into a song. SOUND JAMMER STEP/MEASURE SONG/PATTERN MEASURE BEAT Groove PLAY DRUM A DRUM B DRUM C BASS MODE VALUE SONG PATTERN SOLO STEP PAUSE STOP 9, 11 – –... - Page 38 Use the [UP/DOWN] keys to select the user pattern number to be assigned to the STEP first step. During song recording, the [UP/DOWN] keys select the user pattern [UP/DOWN ] to be assigned to the step. (Preset patterns cannot be selected.) The selected pattern number is shown on the [SONG/PATTERN] display.
- Page 39 When one song is completed, press the [STOP] key. STEP The [REC] key LED goes out, and song recording stops. The song [STOP] position returns to step 1. EXIT To listen to the song, press the [START] key. STEP The [START] key LED lights up and the song is played back. The [START] [TEMPO] key LED flashes according to the tempo of the song.
-
Page 40: Editing A Song
Editing a song This section describes how you can alter parameters such as tempo or volume for a song that has already been recorded. SOUND JAMMER STEP/MEASURE SONG/PATTERN 3, 5 MEASURE BEAT Groove PLAY DRUM A DRUM B DRUM C BASS MODE VALUE... -
Page 41: Deleting A Song
Deleting a song When you wish to delete a song, for example to make room for new recordings, proceed as follows. SOUND JAMMER STEP/MEASURE SONG/PATTERN MEASURE BEAT Groove PLAY DRUM A DRUM B DRUM C BASS MODE VALUE SONG PATTERN SOLO STEP PAUSE... -
Page 42: Using Pads To Play Patterns (Groove Play)
Using Pads to Play Patterns (Groove Play) This section describes the groove play mode. In this mode, the 13 pads are used to play patterns assigned to them. This allows quick switching between patterns during a performance. Up to 4 patterns can be played simultaneously, letting you for example play two patterns with a different beat, or the same pattern twice, shifted by 1 beat, to create a complex rhythm. - Page 43 To play several patterns simultaneously, push several pads together. STEP Up to 4 patterns can be played simultaneously, using the same tempo. Slightly shifting the timing when you hit the pads is also possible. If 5 or more pads are pushed, only the patterns of the last 4 pads will NOTE be played.
-
Page 44: Function Key Settings
FUNCTION Key Settings The [FUNCTION] key is used to make various settings for the RhythmTrak 234. The 13 pads on the ••• top panel of the RhythmTrak 234 are also used to select setting items for the [FUNCTION] key. These •••... - Page 45 The [VALUE] display shows the setting of the item selected with the pad. For some items, the sound or track that is to be set must be NOTE selected after selecting the item. Change the setting with the [VALUE UP/DOWN] keys. STEP STEP/MEASURE SONG/PATTERN...
-
Page 46: [Function] Key Items
[FUNCTION] key items The setting range of the various items controlled with the [FUNCTION] key is described below. Shifting bass program pitch in semitones (BASS KEY) Setting Range Pad 1 pitch: A1 - A2 Pad 2 - 13 pitch: E1 - A4 Sets the pitch of the tones assigned to the pads for a bass program in semitones. - Page 47 Tuning a bass program (BASS TUNE) Setting Range: 435 - 445 (Default value: 440) Allows tuning the bass pitch with the [VALUE UP/DOWN] keys in the range of 435 Hz - 445 Hz. Setting the beat of a pattern (TIME SIG) Setting Range: 2, 3, 4 Use the [VALUE UP/DOWN] keys to set the beat for the pattern to 2 (2/4 beat), 3 (3/4 beat), or 4 (4/4 beat).
- Page 48 • Pad push/release detection timing during groove play The following 9 settings are available for the quantize value. 4 ......Quarter note 16 .......Sixteenth note 48 ..Thirty-second triplet note 8 ......Eighth note 24 ....Sixteenth triplet note Hi ...Quantize function off 12 ....Eighth triplet note 32 ....Thirty-second note During step recording: 1 tick (1/96 quarter note)
- Page 49 the same way as the [SOUND JAMMER] slider to continuously adjust pitch, volume, or tone (see page 13). The selected function is shown on the [VALUE] display as "Pit", "Vol", or "SndC". It is not possible to set the [SOUND JAMMER] control and the pedal connected to [CTRL1 IN] or [CTRL2 IN] to a different function.
- Page 50 Setting the playback timing shift (SHIFT) Setting Range: -192 to +192 (Default value: 0) Shifts the playback timing of a specific track in the currently selected pattern back or forth in 1-tick units (1/96 of a quarter note). The maximum shift is 2 measures. After selecting this item, use the [VALUE UP/DOWN] keys or the [SOUND JAMMER] slider to set the shift value.
-
Page 51: Rhythmtrak
RhythmTrak 234 Application Examples ••• This section describes examples for combining the RhythmTrak 234 with optional equipment and ••• external components. Controlling the RhythmTrak 234 with the FP01 ••• When the separately available foot pedal FP01 is connected to the [CTRL1 IN] or [CTRL2 IN] jack on the rear panel, it can be used in the same way as the [SOUND JAMMER] slider to control pitch or tone. -
Page 52: Controlling The Rhythmtrak
Controlling the RhythmTrak 234 with the FS01 ••• When the separately available foot switch FS01 is connected to the [CTRL1 IN] or [CTRL2 IN] jack on the rear panel, it can be used to operate the bass drum or switch between open and closed hi-hat sound. The switch can also be used in place of the [START] key and [STOP] key to control operation of the RhythmTrak 234 with your foot. -
Page 53: Synchronized Midi Operation
Synchronized MIDI operation Operation of the RhythmTrak 234 can be synchronized with a sequencer or other rhythm machine ••• equipped with a MIDI jack. This allows playback of the patterns or songs of the RhythmTrak 234 with ••• the tempo determined by the sequencer. SOUND JAMMER STEP/MEASURE... -
Page 54: Using Midi Equipment To Play The Rhythmtrak
Using MIDI equipment to play the RhythmTrak ••• Using a MIDI sequencer, MIDI keyboard, or similar MIDI Device you can play the built-in sound sources of the RhythmTrak 234. ••• SOUND JAMMER STEP/MEASURE SONG/PATTERN MEASURE BEAT Groove PLAY DRUM A DRUM B DRUM C BASS... -
Page 55: Returning The Rhythmtrak
Returning the RhythmTrak 234 to the factory default condition (initialization) ••• You can reset the RhythmTrak 234 to the factory default condition. Use this function with care, because ••• it will erase all patterns and songs that have been recorded by the user. SOUND STEP/MEASURE SONG/PATTERN... -
Page 56: Listening To The Demo
Listening to the demo 2, 3 SOUND JAMMER STEP/MEASURE SONG/PATTERN MEASURE BEAT Groove PLAY DRUM A DRUM B DRUM C BASS MODE VALUE SONG PATTERN SOLO STEP PAUSE STOP – – MUTE TEMPO EXIT SOUND CHANGE VOLUME REAL-TIME REC INSERT DELETE PITCH /COPY... -
Page 57: Troubleshooting
Troubleshooting Check the following items first if there seems to be a problem with the RhythmTrak 234. ••• Symptom Remedy Check Connect AC adapter as described in Is supplied AC adapter connected "Getting Connected" (page 3). Use only the properly? supplied AC adapter. -
Page 58: Specifications
SPECIFICATIONS • Drum Kits: 124 (Including Percussion, SFX kit) • Bass Programs: • Rhythm Patterns: Preset; 99/User; 99/Preset Groove; 99 • Songs: • Maximum Notes: 13,000 notes • Maximum Polyphony: 32 voices • Resolution: 96 PPQN • Tempo: 40 to 250 BPM •... -
Page 59: Reference
Reference MIDI ProgramChange# to DRUM/Percussion/SFX KIT Assign KIT# KIT# KIT# Drum #9 Standard 7 Rap/HipHop 3 Standerd 10 Standard 8 Rap/HipHop 4 Live Rock Standard 9 Rap/HipHop 5 Studio Funk Trap 1 Rap/HipHop 6 Standard Funk Trap 2 Rap/HipHop 7 Funk Trap Orchestral Set Rap/HipHop 8... - Page 60 MIDI ProgramChange# to BASS PROGRAM Assign PROGRAM PROGRAM PROGRAM PROGRAM# PROGRAM# PROGRAM# Live Bass Picked Funk Bass Digi Slap Bass Studio Bass Picked Jazz Tumba Tones Epic Bass Picked Techno Conga Keys Funk Bass Acoustic Techno PowerTom Bass Ballad Bass Power Funk Becoming Bass Acoustic Bass...
- Page 61 DRUM KITs Live Rock Funk Trap 1 Rap/HipHop 1 Studio Funk Trap 2 Rap/HipHop 2 Standard Funk Trap 3 Rap/HipHop 3 Funk Trap Funk Trap 4 Rap/HipHop 4 Epic Rock Funk Trap 5 Rap/HipHop 5 Ballad Funk Trap 6 Rap/HipHop 6 Modern Funk Trap 7 Rap/HipHop 7...
- Page 62 BASS Programs Live Bass AnalogOctaves Studio Bass SynthTomBass Epic Bass Lo Sine Funk Bass Digi Slap Bass Ballad Bass Tumba Tones Acoustic Bass Conga Keys Modern Bass PowerTom Bass Synth Bass Becoming Bass Techno Bass Harmonics Bass Big Bottom Bass Bass with Harmonics SubSlap Bass Picked Funk Bass...
- Page 63 Preset Pattern List Rock / Pops Rock / Pops Dance Rock 1 Ska 1 Dance 1 Rock 2 Ska 2 Dance 2 Rock 3 Ballad 1 Jungle Rock 4 Ballad 2 Techno 1 Rock 5 Ballad 3 Techno 2 Rock 6 Ballad 4 Techno 3 Rock 7...
- Page 64 Preset Groove List Groove Patterns Default bars Groove Patterns Default bars G01 JUNGLE G53 KICK 1 [PAD 1] Drums G02 FUNK G54 KICK 2 G03 REGGAE G55 KICK 3 G04 16BEAT G56 KICK 4 G05 ROCK G57 KICK 5 G06 PERSIAN G58 KICK 6 G07 RAP 1 G59 KICK 7...
- Page 65 ZOOM RhythmTrak MIDI Implementation ••• 1.TRANSMITTED DATA NONE. 2.RECOGNIZED DATA 1) CHANNEL VOICE MESSAGES STATUS SECOND THIRD Description 1000 nnnn 0kkk kkkk 0vvv vvvv NOTE OFF (See NOTE 1) kkk kkkk : Note No. vvv vvvv : Note Off Velocity (ignored)
- Page 66 2) CHANNEL MODE MESSAGE STATUS SECOND THIRD DESCRIPTION 1011 nnnn 0111 1000 0000 0000 ALL SOUNDS OFF 1011 nnnn 0111 1001 0000 0000 RESET ALL CONTROLLERS 1011 nnnn 0111 1011 0000 0000 All NOTES OFF 1011 nnnn 0111 1100 0000 0000 ALL NOTES OFF NOTE: nnnn = MIDI Channel Number ( 0000 - 1111 ) 3) SYSTEM COMMON MESSAGE,SYSTEM REAL TIME MESSAGE...
- Page 67 [ MultiTrack Rhythm Machine Date : 1.Jan.,1998 Model RhythmTrack MIDI Implementation Chart Version :1.00 ••• +---------------------+--------------------+--------------------+---------------------+ Transmitted Recognized Remarks Function ... +---------------------+--------------------+--------------------+---------------------+ |Basic Default | 1-16 | Memorized |Channel Changed | 1-16 | for every tracks +---------------------+--------------------+--------------------+---------------------+ Default |Mode Messages Altered | ****************** | +---------------------+--------------------+--------------------+---------------------+...
- Page 68 MEMO...
- Page 69 MEMO...
- Page 70 ZOOM CORPORATION NOAH Bldg., 2-10-2, Miyanishi-cho, Fuchu-shi, Tokyo 183-0022, Japan PHONE: 0423-69-7116 FAX: 0423-69-7115 Printed in Japan 234-5000...
Need help?
Do you have a question about the RhythmTrak 234 and is the answer not in the manual?
Questions and answers