Table of Contents
Advertisement
Quick Links
Advertisement
Table of Contents

Subscribe to Our Youtube Channel
Related Manuals for Zoom RhythmTrak RT-123


Summary of Contents for Zoom RhythmTrak RT-123
-
Page 1: Quick Guide
OPERATION MANUAL... -
Page 3: Usage And Safety Precautions
• Alterations Never open the case of the RT-123 or attempt to modify the Caution product in any way since this can result in damage to the unit. -
Page 4: Table Of Contents
(Groove Play) [FUNCTION] Key Settings Basic [FUNCTION] key operation steps [FUNCTION] key items RT-123 Application Examples Controlling the RT-123 with the FS01 Synchronized MIDI operation Using MIDI equipment to play the RT-123 Returning the RT-123 to the factory default condition(initialization) Listening to the demo •... -
Page 5: Introduction
RT-123 from other MIDI equipment. Please take the time to read this manual carefully so as to get the most out of your RT-123 and to ensure optimum performance and reliability. Retain this manual, the warranty card and all other documentation... -
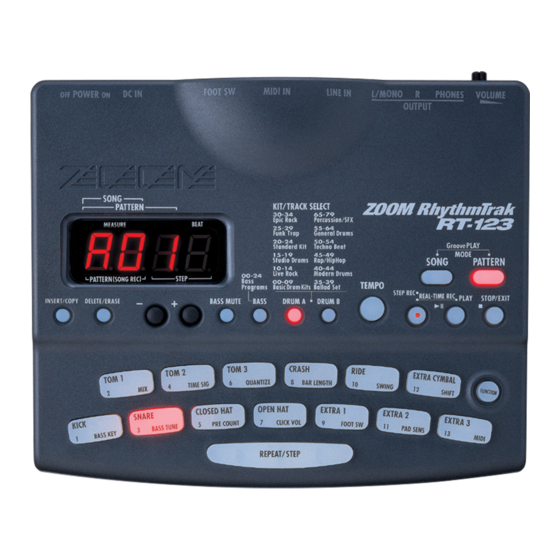
Page 6: Top Panel
Ballad Set STEP REC REAL-TIME REC PLAY STOP/EXIT DRUM A DRUM B [REC] key (LED) [PLAY] key (LED) [STOP/EXIT] key [FUNCTION] key (LED) [FOOT SW] jack [DC IN] connector ZOOM POWER CORPORATION MADE IN JAPAN FOOT SW 300mA DC9V [POWER] switch... -
Page 7: Getting Connected
Turn power to the playback system on. STEP While tapping a pad to produce sound, adjust the [VOLUME] control of the RT-123 and the volume control on the playback system to a suitable position. Connection to MIDI sequencer/computer MIDI interface... -
Page 8: Quick Guide
This Quick Guide shows how to operate your RT-123, using a few representative examples. Some of terms and concepts used in this manual are also explained here. Quick Guide (1) RT-123 comes with a demo song already built in. Hear for yourself what RT-123 can do. -
Page 9: Drum Kits And Bass Programs
STOP/EXIT DRUM B • [PATTERN] key: RT-123 switches to pattern mode (for playing and recording patterns). • [SONG] key: RT-123 switches to song mode (for creating backing songs which are sequences of patterns). Drum kits and bass programs The backup sound provided by the RT-123 consists of up to two drum kits and one bass program. -
Page 10: Turn The Power On
Quick Guide (2) The top panel of the RT-123 has 13 pads which serve to play drum kits and bass programs. Turn the power on. Press the [PATTERN] key. The [PATTERN] key LED lights up and the RT-123 is in pattern mode. - Page 11 LINE IN L/MONO PHONES VOLUME OUTPUT rcussion/SFX Groove PLAY chno Beat MODE p/HipHop SONG PATTERN TEMPO STEP REC REAL-TIME REC PLAY STOP/EXIT Press and hold the [DRUM A] key... While the [DRUM A] key is being pressed, the display shows the currently selected kit number (0 - 79).
-
Page 12: Quick Guide
Press the [PLAY ] key ( Playback of the currently selected pattern starts. The patterns of the RT-123 can be thought of as "recordings" of up to 2 drum kits and 1 bass program. These are recorded on tracks that are combined to form the pattern. - Page 13 LINE IN L/MONO PHONES VOLUME OUTPUT cussion/SFX Groove PLAY hno Beat MODE SONG PATTERN dern Drums TEMPO lad Set STEP REC REAL-TIME REC PLAY STOP/EXIT Press the [BASS MUTE] key once. Press the key once more to turn the bass on again.
-
Page 14: Play Mode
Quick Guide (4) Groove play is a special feature of the RT-123 which lets you switch among various patterns simply by tapping the pads. This makes it easy to play with patterns like a DJ spinning records. Turn the power on. - Page 15 By using the right timing when pushing the pads, you can create complex rhythms. • [PATTERN] key was pressed: RT-123 switches to pattern mode. • [SONG] key was pressed: RT-123 switches to song mode. The pattern will continue to play also when the pad is released.
-
Page 16: Playing The Pads (Manual Play)
Playing the Pads The RT-123 lets you not only play back existing patterns and songs, it also allows you to manually play the unit by tapping the pads. This section describes how to manually play the unit. Playing by tapping the pads The RT-123 assigns various sounds to the pads, depending on the currently selected drum kit. -
Page 17: Selecting A Kit/Program For Manual Play
Selecting a kit/program for manual play For manual play, you can select among 80 drum kits and 25 bass programs to create your own combinations. PATTERN(SONG REC) INSERT/COPY DELETE/ERASE – Press one of the [DRUM A], [DRUM B], or [BASS] keys to select the track, and hold STEP the key down. -
Page 18: Playing The Patterns (Pattern Mode)
Playing the Patterns This section describes how to play patterns that are built into the RT-123 or that have been recorded by the user. Pattern play The RT-123 incorporates 297 preset patterns (A01 - A99, B01 - B99, C01 - C99) which cannot be changed by the user, as well as 99 user-definable patterns (U01 - U99). -
Page 19: Changing The Tempo Of Pattern Playback
Changing the tempo of pattern playback When playing a pattern in pattern mode, the playback tempo for the pattern can be varied over the range of 40 - 250 BPM (BPM = beats per minute, using quarter notes). PATTERN(SONG REC) INSERT/COPY DELETE/ERASE –... -
Page 20: Pattern Recording (Real-Time Recording)
Pattern Recording The RT-123 has 99 user pattern slots which can be filled with your own patterns. Creating and recording a pattern is possible in two ways: by actually playing the pattern on the pads (real-time recording), or by entering each sound individually (step recording). The procedure for real-time recording of a drum track and bass track is described below. - Page 21 Use the [VALUE +/-] keys to set the quantize value (shortest note to be recorded). STEP Quarter note • • • • • • • • • • • • • • • • • • • • • • • • • • • • • • • • • Eighth note •...
- Page 22 Tap the pads in accordance with the metronome sound. STEP The sound of the respective pad is heard, and it is recorded for the duration set with the quantize value. You can verify the current position in the pattern by checking the display. When the end of the pattern is reached, the recording loops back to the beginning and continues, allowing you to add to the recording as often as desired.
- Page 23 STEP Tap the pads while holding the [REPEAT/STEP] key down. By holding the [REPEAT/STEP] key down while hitting a pad, a percussion sound can be recorded. Record drum track B using the same procedure. STEP When recording is completed, press the [STOP/EXIT] key. STEP Recording stops.
-
Page 24: Real-Time Recording Of A Bass Track
Real-time recording of a bass track Next, let's add a bass track to the drum track pattern recorded in the previous section. MEASURE 2, 5, PATTERN(SONG REC) INSERT/COPY DELETE/ERASE – 4, 5, 9,10 Press the [BASS] key and hold the key down. STEP The bass track is selected for recording. - Page 25 Among pads 2 - 13, press the one whose pitch you want to change. STEP While the pad is being pressed, the assigned pitch name (E1 - A4) is shown on the display. When pad 2 - 13 is released, the pitch name assigned to pad 1 is NOTE shown again.
- Page 26 To shift the pitch of all pads, operate the [VALUE +/-] keys while no pad is pushed. STEP When the pitch assigned to pad 1 is changed, the pitch of pads 2 - 13 also changes accordingly in semitone steps. For example, if the E minor scale is assigned and you shift pad 1 from "E 2"...
- Page 27 When the [REC] key is pressed during real-time recording, the HINT HINT [REC] key LED starts to flash and pattern recording is suspended. In this condition, tapping the pads will produce sound, but it is not recorded. This is useful to check phrasing and sound before actually recording.
-
Page 28: Pattern Recording (Step Recording)
What is step recording? Step recording allows you to enter and record each sound separately, step by step, while the RT-123 is in the stop condition. Even without mastering how to play the pads in real time, you can easily create complex drum and bass patterns. -
Page 29: Step Recording Of A Drum Track
Step recording of a drum track This section describes how to record drum tracks A/B using step recording. PATTERN(SONG REC) INSERT/COPY DELETE/ERASE – 6, 7 In pattern mode, select an empty user pattern. STEP When wishing to use a pattern where a track has already been HINT HINT recorded, the pattern must be erased first. - Page 30 Press the [REC] key. STEP The [REC] key LED and [PLAY] key LED light up, indicating that the RT-123 is ready for recording. To enter a note, press the pad corresponding to the desired sound. To enter a rest, STEP press the [REPEAT/STEP] key.
-
Page 31: Step Recording Of A Bass Track
Press the [REC] key. STEP The [REC] key LED and [PLAY] key LED light up, indicating that the RT-123 is ready for recording. If step 4 is carried out without pressing the [FUNCTION] key, the NOTE quantize value of the pattern already recorded in that track will also be changed. - Page 32 that pad is entered, and the position proceeds to the next step. • Enter the minimum unit rest: Briefly tap the [REPEAT/STEP] key and release it. A rest of the selected minimum duration is entered, and the position proceeds to the next step. •...
-
Page 33: Pattern Copy/Erase
Copying a Pattern The patterns in the RT-123 (preset patterns or user patterns) can be copied to a different user pattern number. This is useful for example when wishing to change only a part of a pattern, such as changing the bass track phrasing while keeping the drum track. -
Page 34: Erasing A Pattern
Erasing a Pattern A user pattern can be erased when it is no longer needed. This serves to make way for storing new user patterns or to free up memory space. PATTERN(SONG REC) INSERT/COPY DELETE/ERASE 2, 3 In pattern mode, select the user pattern to be erased (U01 - U99). STEP The pattern number is shown on the display. -
Page 35: Creating Songs (Song Mode)
(called "steps") each of which contains one pattern. The maximum length of a song is 99 steps. The maximum number of songs that can be stored in the RT-123 is 99. (The actual number of available steps and songs will depend on the number of distinct sounds used for user patterns and other songs.) In song mode, you can change also the tempo and volume during a song. -
Page 36: Recording And Playing A Song
Press the [REC] key. STEP The [REC] key LED lights up, indicating that the RT-123 is ready for song recording. The lower two digits of the display show the step number, and the upper two digits the pattern number selected for that step. - Page 37 When wishing to hear the currently selected pattern, you can use HINT HINT the [PLAY] and [STOP/EXIT] keys to play it. While a pattern is playing, you can also switch the step number back and forth to check the patterns in other steps. To proceed to the next step, press the [REPEAT/STEP] key.
- Page 38 [VALUE +/-] keys to adjust the tempo value (BPM). As in pattern mode, the tempo can also be specified by tapping the [TEMPO] key 2 times. The RT-123 automatically stores a so-called "master tempo" for HINT HINT each song. When a song is switched, the tempo last set for that song will be used.
-
Page 39: Editing A Song
Editing a song This section describes how you can alter parameters such as tempo or volume for a song that has already been recorded. 3, 5 PATTERN(SONG REC) INSERT/COPY DELETE/ERASE – 4, 5 4, 5 In song mode, select the song to which you want to make alterations. STEP Press the [REC] key. -
Page 40: Deleting A Song
Deleting a song When you wish to delete a song, for example to make room for new recordings, proceed as follows. PATTERN(SONG REC) INSERT/COPY DELETE/ERASE 2, 3 In song mode, select the song you want to delete. STEP Press the [DELETE/ERASE] key. STEP The [DELETE/ERASE] key LED flashes, and the song number and the indication "dEL"... -
Page 41: Using Pads To Play Patterns (Groove Play)
4, 5 Press the [SONG] key and the [PATTERN] together. STEP The RT-123 switches to groove play mode, and the [SONG] key LED and [PATTERN] key LED light up. The song number is shown on the display. In groove play mode, all patterns are played with the master tempo of NOTE the currently selected song. - Page 42 It only affects the song that is being played back. When wishing to terminate the groove play mode, press the [SONG] key or STEP [PATTERN] key. The RT-123 returns to the song mode or pattern mode. REPEAT/STEP – PLAY Release...
-
Page 43: Function Key Settings
FUNCTION Key Settings The [FUNCTION] key is used to make various settings for the RT-123. The basic steps for using the [FUNCTION] key and the setting items are described below. Basic [FUNCTION] key operation steps The [FUNCTION] key is used in the same way for most setting items. - Page 44 Press the [FUNCTION] key once more. STEP The setting changed at step 3 is now determined, and the RT-123 puts the function settings to an end. The beat (TIME SIG) and measure (BAR LENGTH) setting can be returned to the original setting by pressing the [EXIT] key instead of the [FUNCTION] key in step 4.
-
Page 45: [Function] Key Items
After pressing the [FUNCTION] key and then pad 1 (BASS KEY), hold down one of pads 2 - 13, and then use the [VALUE +/-] keys to set the pitch (E1 - A4) for that pad. This will not affect the pitch of other pads. The RT-123 stores this setting for each pattern individually when HINT HINT the [FUNCTION] key is pressed once more to terminate the mode. - Page 46 The excess duration of each measure is cut off. Once the [FUNCTION] key is pressed to accept the setting, it will not be possible to restore the cut-off sections. The RT-123 stores this setting for each pattern individually when HINT HINT the [FUNCTION] key is pressed once more to terminate the mode.
- Page 47 The excess measures at the end of the pattern are cut off. Once the [FUNCTION] key is pressed to accept the setting, it will not be possible to restore the cut-off measures. The RT-123 stores this setting for each pattern individually when HINT HINT the [FUNCTION] key is pressed once more to terminate the mode.
- Page 48 between open hi-hat and closed hi-hat with your foot, push the FS01 and press pad 5 (CLOSED HAT). Then release the FS01 and press pad 7 (OPEN HAT). The sound of the first pad will be heard as soon as the FS01 is pushed, also when the pad itself is not pressed. Using the FS01 to set the tempo Press the [FUNCTION] key followed by pad 9 (FOOT SW) and then press the [TEMPO] key.
- Page 49 Setting MIDI input on/off (MIDI) Setting Range: Int, Midi (Default value: Int) When this item is set to "Midi", the RT-123 can receive the following MIDI messages from external components. • MIDI clock • Start • Stop • Continue • Song select When this item is set to "Midi", real-time recording is not possible.
- Page 50 Setting the MIDI receive channel for each track (MIDI) Setting Range: oFF, 1 – 16 (Default values, drum track A: 10, drum track B: oFF, bass track: 9) This item sets the MIDI channel for each track. Available settings for drum tracks are oFF (not received) and 1 - 16.
-
Page 51: Rt-123 Application Examples
When the separately available foot switch (FS01) is connected to the [FOOT SW] jack on the rear panel, it can be used to operate for example the bass drum or switch between open and closed hi-hat sound. The switch can also be used to start and stop playback of the RT-123 with your foot. INSERT/COPY DELETE/ERASE –... -
Page 52: Synchronized Midi Operation
Synchronized MIDI operation Operation of the RT-123 can be synchronized with a sequencer or other rhythm machine equipped with a MIDI jack. This allows playback of the patterns or songs of the RT-123 with the tempo determined by the sequencer. -
Page 53: Using Midi Equipment To Play The
[MIDI IN] connector of the RT-123, using a MIDI cable. Use the [FUNCTION] key and pad 13 (MIDI) to assign the tracks of the RT-123 to receive MIDI channels which are matched to the send channels of the external MIDI STEP component. -
Page 54: Returning The Rt-123 To The Factory Default Condition(Initialization)
Returning the RT-123 to the factory default condition (initialization) You can reset the RT-123 to the factory default condition. Use this function with care, because it will erase all patterns and songs that have been recorded by the user. MEASURE... -
Page 55: Listening To The Demo
To stop the demo, press the [SONG] key or [PATTERN] key. STEP The RT-123 goes into song mode if the [SONG] key is pressed, and into pattern mode if the [PATTERN] key is pressed. Clearing all user patterns... -
Page 56: Troubleshooting
Troubleshooting Check the following items first if there seems to be a problem with the RT-123. Symptom Is supplied AC adapter connected properly? Is [OUTPUT] jack connected correctly to the playback system? No sound or Is there a problem with the shielded very low volume. -
Page 57: Specifications
SPECIFICATIONS • Drum Kits: 80 (Including Percussion, SFX kit) • Bass Programs: • Rhythm Patterns: Preset; 297/User; 99 • Songs: • Maximum Notes: 10,000 notes • Maximum Polyphony: 30 voices • Resolution: 96 PPQN • Tempo: 40 to 250 BPM •... -
Page 58: Reference
MIDI ProgramChange# to DRUM/percussion/SFX KIT Assign General Drum General Drum 1 Live Rock Studio Standard Funk Trap Epic Rock Ballad General Drum 3 Modern Rap/HipHop Techno Beat General Drum Live Rock 1 Live Rock 2 Live Rock 3 General Drum 4 Live Rock 4 Live Rock 5 Studio 1... - Page 59 MIDI ProgramChange# to BASS PROGRAM Assign Live Bass Studio Bass Epic Bass Funk Bass Ballad Bass Acoustic Bass Modern Bass Synth Bass Techno Bass Big Bottom Bass SubSlap Bass Digital Acoustic Bass Harmonics No Frets Acoustic Jazz Digital Pick Techno Analog Analog Touch Lo Sine Harmonics Bass...
- Page 60 DRUM KITs Live Rock Studio Standard Funk Trap Epic Rock Ballad Modern Rap/HipHop Techno Beat General Drum Live Rock 1 Live Rock 2 Live Rock 3 Live Rock 4 Live Rock 5 Studio 1 Studio 2 Studio 3 Studio 4 Studio 5 Standard 1 Standard 2...
-
Page 61: Preset Pattern List
PRESET PATTERN LIST Name BPM DrumA Rock01 Rock02 Rock03 Rock04 Rock05 Rock06 Rock07 Rock08 Rock09 Rock10 Rock11 Rock12 Rock13 Rock14 Rock15 Rock16 Rock17 Rock18 Rock19 Rock20 Rock21 Rock22 Rock23 Rock24 Rock25 Rock26 Rock27 HardRock01 HardRock02 HardRock03 HardRock04 HardRock05 HardRock06 HardRock07 HardRock08 Metal01 Metal02... - Page 62 Pop02 Pop03 Pop04 Pop05 Pop06 Pop07 Pop08 Pop09 Pop10 Pop11 Pop12 Pop13 R&B01 R&B02 R&B03 R&B04 R&B05 R&B06 R&B07 R&B08 R&B09 R&B10 R&B11 R&B12 R&B13 Funk01 Funk02 Funk03 Funk04 Funk05 Funk06 Funk07 Funk08 Funk09 Funk10 Funk11 Funk12 Funk13 Funk14 Funk15 Funk16 RapHipHop01 RapHipHop02...
- Page 63 RapHipHop21 RapHipHop22 RapHipHop23 RapHipHop24 RapHipHop25 RapHipHop26 RapHipHop27 RapHipHop28 RapHipHop29 RapHipHop30 RapHipHop31 RapHipHop32 RapHipHop33 RapHipHop34 RapHipHop35 Dance01 Dance02 Dance03 Dance04 Dance05 Dance06 Dance07 Dance08 Dance09 Dance10 Dance11 Dance12 House01 House02 House03 House04 House05 House06 House07 House08 Techno01 Techno02 Techno03 Techno04 Techno05 Techno06 Techno07 Techno08...
- Page 64 Jungle01 Jungle02 Jungle03 TripHop01 TripHop02 TripHop03 TripHop04 TripHop05 TripHop06 TripHop07 TripHop08 TripHop09 Ambient01 Ambient02 Ambient03 Ambient04 Ambient05 Ambient06 Ballad01 Ballad02 Ballad03 Ballad04 Ballad05 Ballad06 Ballad07 Ballad08 Ballad09 Blues01 Blues02 Blues03 Blues04 Blues05 Blues06 Blues07 Triple01 Triple02 Triple03 Triple04 Triple05 Country01 Country02 Country03 Country04...
- Page 65 Reggae02 Reggae03 Reggae04 Reggae05 Reggae06 Reggae07 Reggae08 Afro01 Afro02 Afro03 Afro04 Afro05 Afro06 Afro07 Afro08 Afro09 Afro10 Afro11 Afro12 Latin01 Latin02 Latin03 Latin04 Latin05 Latin06 Latin07 Latin08 Latin09 Latin10 Latin11 Latin12 Latin13 MiddleEast01 MiddleEast02 MiddleEast03 Celtic01 Celtic02 Polyrhythm01 Polyrhythm02 Riff01 Riff02 Riff03 Riff04...
- Page 66 ZOOM RhythmTrak RT-123 Note Number Table Note No DRUM A,B DRUM A,B KIT 65 - KIT 00 - 64 PERCUSS & SE High Q Slap Scratch Push Scratch Pull Sticks Square Click Metronome Click Metronome Bell Kick Drum 2 Kick Drum 1...
- Page 67 Reference...
- Page 68 Reference...
-
Page 69: Midi Implementation
ZOOM RhythmTrak RT-123 MIDI Implementation 1.TRANSMITTED DATA NONE. 2.RECOGNIZED DATA 1) CHANNEL VOICE MESSAGES STATUS SECOND 1000 nnnn 0kkk kkkk 1001 nnnn 0kkk kkkk 1001 nnnn 0kkk kkkk 1011 nnnn 0ccc cccc 1100 nnnn 0ppp pppp 1110 nnnn 0vvv vvvv NOTE: nnnn = MIDI Channel Number ( 0000 - 1111 ) 1. - Page 70 2) CHANNEL MODE MESSAGE STATUS SECOND 1011 nnnn 0111 1000 1011 nnnn 0111 1001 1011 nnnn 0111 1011 1011 nnnn 0111 1100 NOTE: nnnn = MIDI Channel Number ( 0000 - 1111 ) 3) SYSTEM COMMON MESSAGE,SYSTEM REAL TIME MESSAGE STATUS SECOND 1111 0011...
-
Page 71: Midi Implementation Chart
[ MultiTrack Rhythm Machine Model RhythmTrak RT-123 +---------------------+--------------------+--------------------+---------------------+ Function ... +---------------------+--------------------+--------------------+---------------------+ |Basic Default |Channel Changed +---------------------+--------------------+--------------------+---------------------+ Default |Mode Messages Altered | ****************** | +---------------------+--------------------+--------------------+---------------------+ |Note |Number | True voice | ****************** | +---------------------+--------------------+--------------------+---------------------+ |Velocity Note ON Note OFF +---------------------+--------------------+--------------------+---------------------+ |After... - Page 72 ZOOM CORPORATION NOAH Bldg., 2-10-2, Miyanishi-cho, Fuchu-shi, Tokyo 183-0022, Japan PHONE: 042-369-7116 FAX: 042-369-7115 Printed in Japan 123-5000...
Need help?
Do you have a question about the RhythmTrak RT-123 and is the answer not in the manual?
Questions and answers