
Related Manuals for Kramer VP-725NA


Summary of Contents for Kramer VP-725NA
- Page 1 K R A ME R E LE CT R O N IC S L T D . USER MANUAL MODEL: VP-725NA Presentation Switcher/Scaler P/N: 2900-000739 Rev 4...
-
Page 4: Table Of Contents
Locking and Unlocking the Front Panel Freezing the Image Displaying a Blank Screen Configuring and Controlling the VP-725NA Configuring the VP-725NA via the OSD MENU Screens Operating via the LCD Display Operating via ETHERNET/Serial Port Operating via the Infrared Remote Control Transmitter... - Page 5 Figures Figure 1: VP-725NA Presentation Switcher/Scaler Front Panel Figure 2: VP-725NA Presentation Switcher/Scaler Rear Panel Figure 3: Connecting to the VP-725NA Presentation Switcher/Scaler Figure 4: Crossed Cable RS-232 Connection Figure 5: Straight Cable RS-232 Connection with a Null Modem Adapter...
-
Page 6: Introduction
Introduction Welcome to Kramer Electronics! Since 1981, Kramer Electronics has been providing a world of unique, creative, and affordable solutions to the vast range of problems that confront the video, audio, presentation, and broadcasting professional on a daily basis. In recent years, we have redesigned and upgraded... -
Page 7: Getting Started
(often associated with low quality cables) • Avoid interference from neighboring electrical appliances that may adversely influence signal quality • Position your Kramer VP-725NA away from moisture, excessive sunlight and dust VP-725NA - Getting Started... -
Page 8: Overview
Overview The VP-725NA is a presentation scaler/switcher with multiple signal format sections and balanced stereo audio. The unit has five independent 4x1 video sections: composite, s-Video (Y/C), component (RGB), computer graphics, and HDMI, plus a single USB input. Each section can be operated as an individual switcher contained in one box. - Page 9 A microphone input that can be used by mixing, switching or talk-over • Built-in ProcAmp: color, hue, sharpness, contrast, and brightness are set individually for each input • A built-in time base corrector that stabilizes the sync in unstable video sources VP-725NA - Overview...
-
Page 10: Defining Edid
The Extended Display Identification Data (EDID) is a data-structure provided by a display, to describe its capabilities to a graphics card (that is connected to the display’s source). The EDID enables the VP-725NA to “know” what kind of monitor is connected to the output. The EDID includes the manufacturer’s name, the product type, the timing data supported by the display, the display size, luminance data and (for digital displays only) the pixel mapping data. -
Page 11: About Hdmi
HDMI ensures an all-digital rendering of video without the losses associated with analog interfaces and their unnecessary digital-to-analog conversions. It delivers the maximum high-definition image and sound quality in use today. Note that Kramer Electronics Limited is an HDMI Adopter and an HDCP Licensee. -
Page 12: About Hdcp
To protect copyright holders (such as movie studios) from having their programs copied and shared, the HDCP standard provides for the secure and encrypted transmission of digital signals. D efining the VP-725NA Presentation Switcher/Scaler 1 4 B This section defines the VP-725NA. -
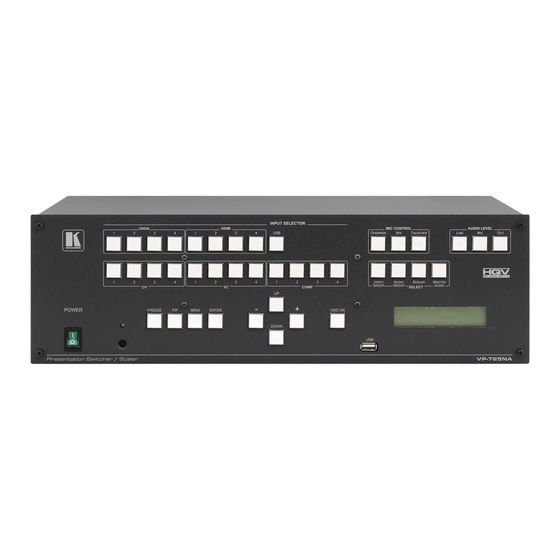
Page 13: Figure 1: Vp-725Na Presentation Switcher/Scaler Front Panel
Figure 1: VP-725NA Presentation Switcher/Scaler Front Panel... - Page 14 Front Panel Feature Function Selects one of the s-Video (Y/C) sources (from 1 to 4) Selects one of the CV sources (from 1 to 4) INPUT UXGA Selects one of the UXGA sources (from 1 to 4) SELECT HDMI Selects one of the HDMI sources (from 1 to 4) Press to select the USB source Buttons JPEG files on a USB memory stick, up to a maximum size of 2048x1536...
- Page 15 Front Panel Feature Function Override Routes the signal from the microphone to the Master output instead of from the Line, whose signal is blocked When no MIC CONTROL button is selected, the audio input is routed to the MASTER output, ignoring the Mic input MIC CONTROL Routes the combined signals from the Mic and the Line to the Master output...
-
Page 16: Figure 2: Vp-725Na Presentation Switcher/Scaler Rear Panel
Figure 2: VP-725NA Presentation Switcher/Scaler Rear Panel Rear Panel Feature Function AUDIO Connects to the balanced audio acceptor (for composite) OUTPUT Connects to the balanced audio acceptor (for s-Video) Terminal UXGA Connects the balanced audio acceptor (for UXGA) Block Connector... - Page 17 Rear Panel Feature Function PROGRAM USB Connector Connect to upgrade to the latest audio firmware ETHERNET port Connects to your LAN RS-232 9-pin D-sub Connector Connects to a PC or Serial Controller MASTER OUT Terminal Block Connector Connects to the routed balanced audio channel COND.
-
Page 18: Installing In A Rack
Installing in a Rack This section provides instructions for rack mounting the unit. VP-725NA - Installing in a Rack... -
Page 19: Connecting The Vp-725Na Presentation Switcher/Scaler
Audio inputs/outputs (see Section 5.5) Using the VP-725NA you can select any one of the 21 inputs and scale that input to up to three scaled outputs (at the identical resolution). Connecting the VP-725NA To connect the VP-725NA, connect the following to the rear panel, as the example... - Page 20 Connect the RGBHV connectors (G/Y, B/Pb, R/Pr, H, and V) to the RGBHV acceptor (for example, a projector) Connect the HDMI connector to the HDMI acceptor (for example, an LCD display) VP-725NA - Connecting the VP-725NA Presentation Switcher/Scaler...
-
Page 21: Figure 3: Connecting To The Vp-725Na Presentation Switcher/Scaler
We recommend that you use only the power cord that is supplied with this machine. 9. If required connect: A PC (see Section 5.3). The Ethernet port (see Section 5.4). Figure 3: Connecting to the VP-725NA Presentation Switcher/Scaler VP-725NA - Connecting the VP-725NA Presentation Switcher/Scaler... -
Page 22: The Rgbs And Rgsb Pinouts
2, and pin to pin need be connected) to the RS-232 9-pin D-sub port on the PC. Note: There is no need to connect any other pins. Figure 4: Crossed Cable RS-232 Connection VP-725NA - Connecting the VP-725NA Presentation Switcher/Scaler... -
Page 23: Connecting The Vp-725Na Via The Ethernet Port
Connecting the ETHERNET Port directly to a PC (Crossover Cable) You can connect the Ethernet port of the VP-725NA to the Ethernet port on your PC, via a crossover cable with RJ-45 connectors. This type of connection is recommended for identification of the factory default IP Address of the VP-725NA during the initial configuration. -
Page 24: Figure 6: Local Area Connection Properties Window
5. Select Use the following IP Address, and fill in the details as shown in Figure This IP address is compatible with the factory default IP address of the unit. Figure 7: Internet Protocol (TCP/IP) Properties Window 6. Click OK. VP-725NA - Connecting the VP-725NA Presentation Switcher/Scaler... -
Page 25: Connecting The Balanced/Unbalanced Stereo Audio Input/Output
Connecting the ETHERNET Port via a Network Hub (Straight- Through Cable) You can connect the Ethernet port of the VP-725NA to the Ethernet port on a network hub or network router, via a straight-through cable with RJ-45 connectors. Connecting the Balanced/Unbalanced Stereo Audio... -
Page 26: Operating The Vp-725Na Presentation Switcher/Scaler
Section 6.7) Using the Operating Modes The VP-725NA operates as five independent 4x1 switchers and as a scaler that switches one of the 21 inputs to the scaled outputs. These modes operate simultaneously, as well as independently. Composite video, s-Video, component video (RGB or YPbPr), HDMI and UXGA... -
Page 27: Figure 11: Connecting An Unbalanced Stereo Audio Output
USB signal via the OSD menu Scaler Video and Master Audio: select one of the 20 audio and video inputs to switch to the scaled outputs and Master Audio output Figure 11: Connecting an Unbalanced Stereo Audio Output VP-725NA - Operating the VP-725NA Presentation Switcher/Scaler... -
Page 28: Switching An Input To An Output
Switching an Input to an Output This section describes how to switch an input to an output when the VP-725NA operates as five independent switchers (see Section 6.2.1) and when it functions as a scaler (see Section 6.2.2). To switch an input to an output you have to first select the operating mode via the SELECT button and then select the desired inputs via the INPUT SELECTOR buttons. -
Page 29: Understanding The Audio Features
6.2.2 Switching the VP-725NA as a Scaler To operate the VP-725NA as a scaler, press the SCALER button (it illuminates) and then switch one of the 21 inputs to the scaled video outputs. If you also press the MASTER AUDIO button, the audio follows the scaled video output. -
Page 30: Figure 12: Adjusting The Audio Input And Audio Output Levels
5 in the MASTER AUDIO mode, the audio level will still be 5 (not 2) when returning to the AUDIO GROUP mode. Figure 12: Adjusting the Audio Input and Audio Output Levels VP-725NA - Operating the VP-725NA Presentation Switcher/Scaler... -
Page 31: Understanding The Pip Feature
In this case the PIP appears over a blank screen.) PIP Source VIDEO GRAPHIC Main Source HDMI COMP HDMI COMP In this machine COMP is considered a graphic source even in the case where it is at video resolutions. VP-725NA - Operating the VP-725NA Presentation Switcher/Scaler... -
Page 32: Locking And Unlocking The Front Panel
PC) and/or ETHERNET is still available The LCD displays: Keypad Lock On. To unlock the front panel buttons (releasing the protection mechanism), press and hold the ENTER front panel button for about 3 seconds. VP-725NA - Operating the VP-725NA Presentation Switcher/Scaler... -
Page 33: Freezing The Image
(see Figure 29). You can set the blank color to blue or black and also define the function of the Blank key via the OSD menu (blank and mute, blank or mute.) VP-725NA - Operating the VP-725NA Presentation Switcher/Scaler... -
Page 34: Configuring And Controlling The Vp-725Na
The OSD superimposes a menu on the screen from which you can configure and control each input signal on your VP-725NA, using the MENU, ENTER, -, +, UP and DOWN OSD buttons on the front panel and the remote transmitter. -
Page 35: Figure 14: Input Screen
Adjust the phase: 0 to 31 Auto image Assesses the image and improves the quality accordingly, by automatically adjusting the phase, frequency and position. Upon completion, the relevant OSD values are updated (Hpos, Vpos, Phase and Frequency) VP-725NA - Configuring and Controlling the VP-725NA... -
Page 36: Figure 15: Picture Screen
Set to Off for VGA and HDMI inputs; set to Medium for CV/YC/YUV inputs Luma Transition Enhance Set the luminance transition enhance level: Off, Low, High Chroma Transition Enhance Set the chrominance transition enhance level: Off, Low, High VP-725NA - Configuring and Controlling the VP-725NA... -
Page 37: Figure 16: Output Screen
1920x1200 and 1920x1080. (It is available for 1080p) If the custom resolution is set to be the same as the default resolution, the scaler refers to the default resolution HDMI Type Set the HDMI type: Auto, HDMI, DVI auto VP-725NA - Configuring and Controlling the VP-725NA... - Page 38 Not available if the zoom is set to 100% Zoom V-Pan -16 to 16 Not available if the zoom is set to 100% HQV Color Color saturation: Adjust RGB and CMY (Cyan, Setting Magenta and Yellow) individually (-100 to 100) VP-725NA - Configuring and Controlling the VP-725NA...
- Page 39 Selecting the Correct Aspect Ratio You can configure the aspect ratio of any output image to fit your application. The VP-725NA offers six different aspect ratio settings: Best Fit, Letterbox, Follow Output, Virtual Wide, Follow Input, and Custom. Here is how each of these settings works.
-
Page 40: Figure 17: Pip Screen
Set custom size: 1 to 255 The actual range depends upon the input resolution Frame Turn the PIP frame on or off: On/Off Frame Color Select the color of the PIP frame: Red, Green or Blue Blue VP-725NA - Configuring and Controlling the VP-725NA... -
Page 41: Figure 18: Audio Screen
The audio level range for the Master Out and for the Mic In is from -100 to 24; for the Master In and group inputs and outputs it is from -30 to 10 VP-725NA - Configuring and Controlling the VP-725NA... -
Page 42: Figure 19: Audio Level Screen
Figure 19: Audio Level Screen VP-725NA - Configuring and Controlling the VP-725NA... -
Page 43: Figure 20: Geometry Screen
Available settings for each application are listed here: Application Available Settings Keystone Location, horizontal keystone, vertical keystone, pincushion/barrel and Reset all Anyplace Location, Diagonal Projection and Reset all Rotation Location, pincushion/barrel, Rotation and Reset all VP-725NA - Configuring and Controlling the VP-725NA... -
Page 44: Figure 21: Setup Screen
Seamle Mode which is faster but may cause glitches on the output (applies only when switching between analog inputs): Seamless, Fast Factory Reset Reset your VP-725NA to its preset default settings: Confirm, Yes, Advanced Open the advanced setups (see Figure 22): Mode Set, OSD, Misc.,... - Page 45 7.1.6 The Slideshow Feature The VP-725NA lets you run a slideshow via the USB input and set the slideshow speed via the slideshow feature. To prepare a slideshow: 1. Load the slideshow JPEG images to a USB memory stick.
-
Page 46: Figure 22: Advanced Setup Screen
Set the location of the OSD menu: Center, Top Left, Top Right Top Right Bottom Left, Bottom Right Time Out (sec) Set the OSD menu timeout: 5, 10, 20, 30, 60, 90 or Off VP-725NA - Configuring and Controlling the VP-725NA... -
Page 47: Figure 23: Misc Setup Screen
Select the correct file from the memory stick and Confirm. Do not press any buttons during firmware download. Logo Download a new logo via the USB connection Download Available when input is not set to USB Blank Freeze VP-725NA - Configuring and Controlling the VP-725NA... -
Page 48: Figure 24: Input Setup Screen
Horizontal active start point Horizontal active region 1024 Horizontal polarity Vertical Total Vertical sync pulse width Vertical active start point Vertical active region Vertical polarity OCLK Output clock Enable Apply Press to apply settings VP-725NA - Configuring and Controlling the VP-725NA... -
Page 49: Figure 25: Output Setup Screen
Vertical active start point Vertical active region Vertical polarity OCLK Output clock Apply Press to apply the settings Set Current Import the values of the currently selected output resolution into the User Mode Setting VP-725NA - Configuring and Controlling the VP-725NA... -
Page 50: Figure 26: Active Video Functions
PIP source, the video group source, the output resolution, the SYNC mode (Frame lock or Free run), as well as the firmware version number and the audio board firmware version (for example, 1.2): Figure 27: Information Screen VP-725NA - Configuring and Controlling the VP-725NA... -
Page 51: Operating Via The Lcd Display
Figure 28 illustrates how to adjust the Keystone via the OSD Menu 1. Turn the VP-725NA unit ON, and press the OSD ON button (if selected) to deselect it. 2. Press the appropriate front panel OSD buttons (as defined in Figure 28). -
Page 52: Operating Via The Infrared Remote Control Transmitter
Operating via the Infrared Remote Control Transmitter You can control the VP-725NA remotely, from the infrared remote control transmitter (that has a range of up to 15 meters and is powered by two AAA size 1.5V DC batteries), as defined in... -
Page 53: Using Text Overlay
You can download the latest software from our Web site: http://www.kramerelectronics.com. Running this AP with the PC connected to the VP-725NA lets you display text over the screen, with features including text color and speed, transparency, text position and repetition. Current text overlay settings can be saved and loaded to the AP. - Page 54 Click to display the text on screen Stop Button Click to stop scrolling on screen Quit Button Click to quit the program Load Setting Button Click to load a previously saved setting Save Setting Button Click to save the current setting VP-725NA - Using Text Overlay...
-
Page 55: Technical Specifications
IR remote control, power cord, rack “ears”, null-modem adaptor, control application programs via RS-232 (PC) and via Ethernet (i-Phone® and PC) Specifications are subject to change without notice For the most up-to-date resolution list, go to our Web site at http://www.kramerelectronics.com VP-725NA - Technical Specifications... - Page 56 Technical Specifications of the HDMI Input Signal (for RGB or YUV Colorspace) Resolution Vertical Frequency (Hz) Notes 1080i YPbPr 1080i YPbPr 1080p YPbPr 1080p YPbPr 1080P 24fps YPbPr 720p YPbPr 720p YPbPr 480i YPbPr 480p YPbPr 576i YPbPr 576p YPbPr VP-725NA - Technical Specifications...
- Page 57 VESA 1600x1200 VESA 1024x768 1920x1080 VESA 1024x768 VESA 1920x1200 VESA 1024x768 VESA 1680x1050 VESA 1280x720 VESA 1080i 1280x768 1080i 1280x768 VESA 720p 1280x800 VESA 720p Comp/YPb 1280x1024 480p 1280x1024 VESA 576p 1280x1024 VESA 1080p 1366x768 1080p VP-725NA - Technical Specifications...
- Page 58 VESA 1600x1200 VESA 1024x768 1920x1080 VESA 1024x768 VESA 1920x1200 VESA 1024x768 VESA 1680x1050 VESA 1280x720 VESA 1080i 1280x768 1080i 1280x768 VESA 720p 1280x800 VESA 720p HDMI 1280x1024 480p 1280x1024 VESA 576p 1280x1024 VESA 1080p 1366x768 1080p VP-725NA - Technical Specifications...
-
Page 59: Vp-725Na Communication Protocol
: ASCII Code 0x20 CR: ASCII Code 0x0D After a set type Command setting, system responds with a string “Done”. The default data rate is 9600 Baud, with no parity, 8 data bits and 1 stop bit. VP-725NA - VP-725NA Communication Protocol... - Page 60 Communication Protocol of the VP-725NA Control Type Function Parameter Description 0: Auto 1: RGB Input Color Format 2: YUV 0: Auto 1: NTSC 2: PAL 3: PAL-M Input Video Standard 4: PAL-N 5: NTSC 4.43 6: SECAM 7: PAL-60 Input H-Position (the parameter range is set...
- Page 61 Communication Protocol of the VP-725NA Control Type Function Parameter Description 0 : Native HDMI 1 : 640x480@60Hz 2 : 640x480@75Hz 3 : 800x600@50Hz 4 : 800x600@60Hz 5 : 800x600@75Hz 6 : 1024x768@50Hz 7 : 1024x768@60Hz 8 : 1024x768@75Hz 9 : 1280x768@50Hz 10: 1280x768@60Hz 11.
- Page 62 Communication Protocol of the VP-725NA Control Type Function Parameter Description -8 ~ 8 H-Zoom -8 ~ 8 V-Zoom 0: 100% 1: 150% 2: 200% 3: 225% 4: 250% 5: 275% Zoom 6: 300% 7: 325% 8: 350% 9: 375% 10: 400%...
- Page 63 Communication Protocol of the VP-725NA Control Type Function Parameter Description -40~0~+40 Audio Treble -25~25 Audio Balance 0: Off Audio Loudness 1: On 0: Dynamic Audio Delay 1: User Define 0~120 Audio User Delay 0: No audio 1: VGA1 2: VGA2...
- Page 64 Communication Protocol of the VP-725NA Control Type Function Parameter Description 0: Profile 1 1: Profile 2 2: Profile 3 3: Profile 4 Save Setting 4: Profile 5 5: Profile 6 6: Profile 7 7: Profile 8 0: Profile 1 1: Profile 2...
- Page 65 Communication Protocol of the VP-725NA Control Type Function Parameter Description 0: Off Freeze 1: On 0: Off Blank 1: On 0: Off Power 1: On Info Menu Down Volume- (left - button) Volume+ (right + button) Enter Picture Swap 0: Off...
- Page 66 Communication Protocol of the VP-725NA Control Type Function Parameter Description 36: 1080p 37: 1080p 38: 720p 39: 720p 40: 480i 41: 480p 42: 576i 43: 576p 44: 1280x800 60 (R) 45: 1920x1200 60 46: 1920x1080 60 47: 1280x720 60 48: 1080p...
- Page 67 Communication Protocol of the VP-725NA Control Type Function Parameter Description 23: 1280x960 60, 24: 1280x960 85 25: 1280x768 60 26: 1280x1024 60 27: 1280x1024 75 28: 1280x1024 76, Sun 29: 1280x1024 85 30: 1400x1050 60 31: 1400x1050 75 32: 1600x1200 60...
- Page 68 Communication Protocol of the VP-725NA Control Type Function Parameter Description 15~(VT-VA-1) Advance Input Mode: VS 480~1200 Advance Input Mode: VA <= (VT-16) 0: Negative polarity Advance Input Mode: VP 1: Positive polarity 25 < OCLK < 165 Advance Input Mode: OCLK(Integer) 25 <...
- Page 69 Communication Protocol of the VP-725NA Control Type Function Parameter Description 4: Max 5: Off 0: 1280x768x60 Mode Set – Mode 3 1: 1366x768x60 0: Off EDID Write Protect 1: On Group/Master SELECT 0: Video Group Note : 1: Audio Group 2: AV Group Error when SELECT ≠...
- Page 70 Communication Protocol of the VP-725NA Control Type Function Parameter Description 0: 1/25 (for Get Command) Hot key PIP size, same as remote control key 1: 1/16 (for Get Command) - PIP Size 2: 1/9 (for Get Note: For set function command, parameter is...
-
Page 71: Error Codes
Communication Protocol of the VP-725NA Control Type Function Parameter Description 0 : DVD/Normal HDMI3 Switching Behavior 1 : PC/Bypass 0 : Normal HDMI4 Switching Behavior 1 : Bypass (Win7) 0: Off Custom Output read HDMI monitor ‘s EDID 1: On... - Page 72 VP-725NA - VP-725NA Communication Protocol...
- Page 73 For the latest information on our products and a list of Kramer distributors, visit our Web site where updates to this user manual may be found. We welcome your questions, comments, and feedback. Web site: www.kramerelectronics.com E-mail: info@kramerel.com SAFETY WARNING...
Need help?
Do you have a question about the VP-725NA and is the answer not in the manual?
Questions and answers