Sign In
Upload
Download
Table of Contents
Contents
Add to my manuals
Delete from my manuals
Share
URL of this page:
HTML Link:
Bookmark this page
Add
Manual will be automatically added to "My Manuals"
Print this page
×
Bookmark added
×
Added to my manuals
Manuals
Brands
Kramer Manuals
Switch
VP-719xl
User manual
Kramer VP-719xl User Manual
Hide thumbs
1
Table Of Contents
2
3
4
5
6
7
8
9
10
11
12
13
14
15
16
17
18
19
20
21
22
23
24
25
26
27
28
29
30
31
32
33
34
35
36
37
38
39
40
41
42
43
44
45
46
47
48
page
of
48
Go
/
48
Contents
Table of Contents
Bookmarks
Table of Contents
User Manual
Table of Contents
1 Introduction
2 Getting Started
3 Overview
4 Your Presentation Switcher / Scaler
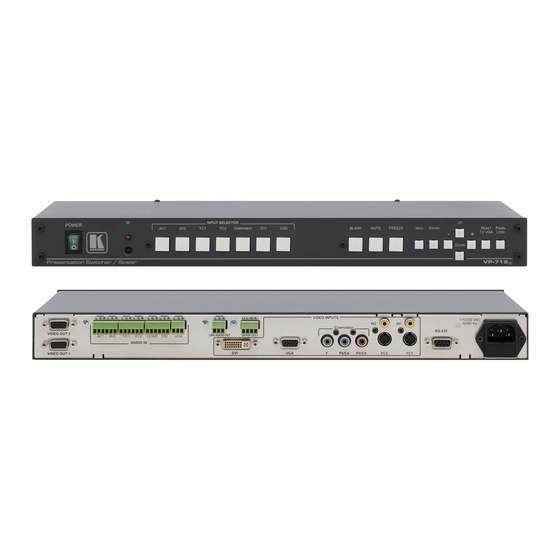
Figure 1: VP-719Xl Presentation Switcher / Scaler Front Panel
Figure 2: VP-719Xl Presentation Switcher / Scaler Rear Panel
Figure 3: VP-720Xl Presentation Switcher / Scaler Front Panel
Figure 4: VP-720Xl Presentation Switcher / Scaler Rear Panel
Figure 5: VP-723Xl Presentation Switcher / Scaler Front Panel
Figure 6: VP-723Xl Presentation Switcher / Scaler Rear Panel
Figure 7: VP-724Xl Presentation Switcher / Scaler Front Panel
Figure 8: VP-724Xl Presentation Switcher / Scaler Rear Panel
Table 1: Front Panel Presentation Switcher / Scaler Features
Table 2: Rear Panel Presentation Switcher / Scaler Features
5 Connecting Your Presentation Switcher / Scaler
Figure 9: Connecting the VP-724Xl Rear Panel
Connecting a PC
Figure 10: Connecting the PC
6 Presentation Switcher / Scaler Buttons
Switching an Input
Figure 11: OSD Input Status
The PIP Button Feature
Selecting the PIP Source
Figure 12: PIP Source
Activating the PIP Feature
The PIP Source (Orange) Frame
Table 3: PIP Source Appearance Availability
Toggling between the PIP and the Screen Source (SWAP)
PIP Characteristics
Figure 13: OSD SWAP Status
Resizing the PIP
Moving the Position of the PIP
Figure 14: PIP Size - Split Screen
Figure 15: Moving the Position of the PIP
Locking and Unlocking the Front Panel
The Infra-Red Remote Control Transmitter
Figure 16: Infra-Red Remote Control Transmitter
Table 4: Infra-Red Remote Control Transmitter Functions
7 Configuring the VP-724Xl Via the OSD MENU Screens
Figure 17: MENU Screen
Figure 18: Menu Screen Icons
Controlling the Brightness and Contrast
Figure 19: Brightness and Contrast Screen
Table 5: Brightness and Contrast Screen Functions
Controlling the Gamma and Color
Selecting the Source
Figure 20: Gamma and Color Screen
Figure 21: Source Selection Screen
Table 6: Gamma and Color Screen Functions
Controlling the Scale Geometry
Setting the Scale Features
Figure 22: Geometry (Scale and Zoom) Screen
Figure 23: Geometry (Scale: Aspect Ratio) Screen
Adjusting the Zoom Ratio and Position
Figure 24: Geometry (Zoom) Screen
Table 7: Geometry Scale Functions
Table 8: Geometry Zoom Functions
Adjusting the Zoom Ratio
Figure 25: OSD Enlarge Status
Figure 26: Geometry (Zoom Ratio) Screen
Adjusting the Zoom Position
Figure 27: Preset Position Control Keys
Figure 28: Navigation Control Keys
Figure 29: Geometry (Zoom Position Adjustment) Screen
Configuring Via the Utility Screens
Choosing the Graphic Utility Settings
Figure 30: Utility Screen
Figure 31: Graphic Setting Utility Screen
Choosing the Video Utility Settings
Figure 32: Video Setting Utility Screen
Table 9: Graphic Setting Utility Screen Features
Table 10: Video Setting Utility Screen Features
Choosing the Audio Utility Settings
Choosing the PIP Utility Settings
Figure 33: Audio Setting Utility Screen
Figure 34: PIP Utility Screen
Table 11: PIP Setting Utility Screen Features
Choosing the Seamless Switch Utility Settings
Figure 35: Seamless Switch Utility Screen
Table 12: Seamless Switch Utility Screen Features
Choosing the OSD Utility Settings
Figure 36: OSD Setting Utility Screen
Table 13: OSD Setting Utility Screen Features
Choosing the Output Utility Settings
Figure 37: Output Setting Utility Screen
Figure 38: OSD Output Status
Table 14: Output Setting Utility Screen Features
The User Mode Setting
Figure 39: Output Setting User Mode Setting Utility Screen
Table 15: User Mode Setting Definitions
Choosing Factory Reset
Choosing Advanced Utility Settings
Figure 40: Factory Reset Utility Screen
Figure 41: Advanced Utility Screen
Table 16: Advanced Utility Screen Features
Verifying Configuration Details Via the Information Screen
Figure 42: Information Screen
Table 17: User Define Measure Features
8 Technical Specifications
Table 18: Technical Specifications of the Presentation Switchers / Scalers
9 VP-724Xl Communication Protocol
Table 19: RS-232 Protocol
Table 20: RS-232 Communication Code
Table 21: RS-232 Read Command
Advertisement
Quick Links
1
Introduction
2
Figure 7: Vp-724Xl Presentation Switcher / Scaler Front Panel
Download this manual
Kramer Electronics, Ltd.
PRELIMINARY
USER MANUAL
Models:
-
VP
719xl,
Presentation Switcher / Scaler
-
VP
720xl,
Presentation Switcher / Scaler
-
VP
723xl,
Presentation Switcher / Scaler
-
VP
724xl,
Presentation Switcher / Scaler
Table of
Contents
Previous
Page
Next
Page
1
2
3
4
5
Advertisement
Table of Contents
Need help?
Do you have a question about the VP-719xl and is the answer not in the manual?
Ask a question
Questions and answers
Related Manuals for Kramer VP-719xl
Switch Kramer VP-724xl Technical Specifications
Proscale presentation scaler / switcher (4 pages)
Switch Kramer VP-719x1 User Manual
Presentation switcher / scaler (59 pages)
Switch Kramer VP-719DS User Manual
Samless switcher/scaler (41 pages)
Switch Kramer VP-730 User Manual
Presentation switcher/scaler (68 pages)
Switch Kramer VP-728 User Manual
Presentation switcher/scaler (69 pages)
Switch Kramer VP-771 User Manual
Presentation switcher/scaler (77 pages)
Switch Kramer VP-720DS User Manual
Seamless switcher/scaler (45 pages)
Switch Kramer VP-720DS User Manual
Seamless switcher/ scaler (23 pages)
Switch Kramer VP-725XLA User Manual
Presentation switcher / scaler (67 pages)
Switch Kramer VP-731 User Manual
Presentation switcher, scaler (69 pages)
Switch Kramer VP-774AMP User Manual
Presentation switcher/scaler (85 pages)
Switch Kramer VP-725N User Manual
Presentation switcher/scaler (62 pages)
Switch Kramer VP-773A User Manual
Switcher/scaler (119 pages)
Switch Kramer VP-732 Preliminary User's Manual
Presentation switcher/dual scaler (100 pages)
Switch Kramer VP-796A User Manual
Scaler-switcher (84 pages)
Switch Kramer VP-733 User Manual
Presentation switcher/dual scaler (116 pages)
This manual is also suitable for:
Vp-720xl
Vp-723xl
Vp-724xl
Vp-724x
Table of Contents
Print
Rename the bookmark
Delete bookmark?
Delete from my manuals?
Login
Sign In
OR
Sign in with Facebook
Sign in with Google
Upload manual
Upload from disk
Upload from URL


Need help?
Do you have a question about the VP-719xl and is the answer not in the manual?
Questions and answers