
Subscribe to Our Youtube Channel
Related Manuals for Kramer VP-725xl


Summary of Contents for Kramer VP-725xl
-
Page 1: User Manual
Kramer Electronics, Ltd. USER MANUAL Model: VP-725xl Presentation Switcher / Scaler... -
Page 2: Table Of Contents
Switching an Input in the Video Group Mode/Scaler Mode Understanding the PIP Feature Locking and Unlocking the Front Panel Freezing the Image Displaying a Blank Screen Configuring and Controlling the VP-725xl Configuring the VP-725xl via the OSD MENU Screens 8.1.1 The Input Screen 8.1.2 The Picture Screen 8.1.3 The Output Screen 8.1.4... - Page 3 Table 17: Infrared Remote Control Transmitter Functions Table 18: Features and Functions of the TextOverlay Application Table 19: Technical Specifications of the VP-725xl Presentation Switcher / Scaler Table 20: Technical Specifications of the RGBHV / RGBS (PC) / RGsB (PC) Input Signal...
- Page 4 Table 22: Technical Specifications of the HDMI Input Signal (for RGB or YUV Colorspace) 38 Table 23: Technical Specifications of the Component Input Signal Table 24: Technical Specifications of the RGBHV/Comp/YPbPr Output Signal Table 25: Communication Protocol of the VP-725xl Table 26: The Error Codes...
-
Page 5: Introduction
2 We recommend that you use only the power cord that is supplied with the machine 3 Download up-to-date Kramer user manuals from the Internet at this URL: http://www.kramerelectronics.com 4 The complete list of Kramer cables is on our Web site at http://www.kramerelectronics.com... - Page 6 Getting Started KRAMER: SIMPLE CREATIVE TECHNOLOGY...
-
Page 7: Overview
Overview Overview The VP-725xl is a presentation scaler/switcher with multiple signal format sections. The unit has five independent 4x1 video sections: composite, s-Video (Y/C), component (YUV), computer graphics, and HDMI, plus a single USB input. It also scales any video input up or down to a selectable graphics or HDTV output resolution and provides glitch-free switching between sources through FTB™... - Page 8 Rack "ears" included • HDMI channel supports up to 2.25Gbps bandwidth per graphic channel Control the VP-725xl from the front panel and a user-friendly menu-driven OSD (see section 8.1), or: • From the front panel high contrast LCD Display (see section 8.2) •...
-
Page 9: About Hdmi
High-Definition Multimedia Interface (HDMI) is an uncompressed all-digital audio/video interface, widely supported in the entertainment and home cinema industry. It delivers the highest high-definition image and sound quality. Note that Kramer Electronics Limited is an HDMI Adopter and an HDCP Licensee. In particular, HDMI •... -
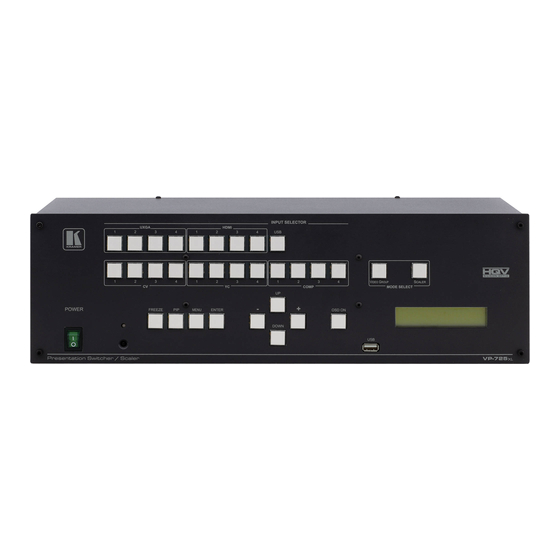
Page 10: Figure 1: Vp-725Xl Presentation Switcher / Scaler Front Panel
Your VP-725xl Presentation Switcher / Scaler Figure 1: VP-725xl Presentation Switcher / Scaler Front Panel KRAMER: SIMPLE CREATIVE TECHNOLOGY... -
Page 11: Table 1: Front Panel Vp-725Xl Presentation Switcher / Scaler Features
Your VP-725xl Presentation Switcher / Scaler Table 1: Front Panel VP-725xl Presentation Switcher / Scaler Features Feature Function Selects one of the s-Video (Y/C) sources (from 1 to 4) Selects one of the CV sources (from 1 to 4) INPUT... -
Page 12: Figure 2: Vp-725Xl Presentation Switcher / Scaler Rear Panel
Your VP-725xl Presentation Switcher / Scaler Figure 2: VP-725xl Presentation Switcher / Scaler Rear Panel KRAMER: SIMPLE CREATIVE TECHNOLOGY... -
Page 13: Table 2: Rear Panel Vp-725Xl Presentation Switcher / Scaler Features
Your VP-725xl Presentation Switcher / Scaler Table 2: Rear Panel VP-725xl Presentation Switcher / Scaler Features Feature Function CV IN BNC Connectors Connects to the composite video sources (from 1 to 4) CV OUT BNC Connector Connects to the composite video acceptor... -
Page 14: Installing In A Rack
Installing in a Rack Installing in a Rack This section provides instructions for rack mounting the unit. KRAMER: SIMPLE CREATIVE TECHNOLOGY... -
Page 15: Connecting The Vp-725Xl Presentation Switcher / Scaler
LCD monitor. 1 Switch OFF the power on each device before connecting it to your VP-725xl. After connecting your VP-725xl, switch on its power and then switch on the power on each device... -
Page 16: Figure 3: Connecting The Vp-725Xl Presentation Switcher / Scaler
A PC (see section 6.3). The Ethernet port (see section 6.4). Figure 3: Connecting the VP-725xl Presentation Switcher / Scaler 1 We recommend that you use only the power cord that is supplied with this machine KRAMER: SIMPLE CREATIVE TECHNOLOGY... -
Page 17: The Rgbs And Rgsb Pinouts
Connecting the VP-725xl Presentation Switcher / Scaler 6.2 The RGBS and RGsB PINOUTs Table 3 defines the input progressive and interlaced RGBS and RGsB pinouts: Table 3: RGBS and RGsB PINOUTS Input Color Space PINOUT RGsB Red to PIN 1... -
Page 18: Connecting The Vp-725Xl Via The Ethernet Port
Ethernet configuration. 6.4.1 Connecting the ETHERNET Port directly to a PC (Crossover Cable) You can connect the Ethernet port of the VP-725xl to the Ethernet port on your PC, via a crossover cable with RJ-45 connectors. This type of connection is recommended for identification of the factory default... -
Page 19: Connecting The Ethernet Port Via A Network Hub (Straight-Through Cable)
6. Click OK. 6.4.2 Connecting the ETHERNET Port via a Network Hub (Straight-Through Cable) You can connect the Ethernet port of the VP-725xl to the Ethernet port on a network hub or network router, via a straight-through cable with RJ-45 connectors. -
Page 20: Operating The Presentation Switcher / Scaler
The Scaler mode, in which you can select one of the 21 input buttons to switch to the scaled outputs When the VP-725xl is in use, both modes operate simultaneously, as well as independently. That is, the Scaler output is available even when switching in the Video Group mode, and visa-versa. -
Page 21: Table 4: Pip Source Appearance Availability
Operating the Presentation Switcher / Scaler When selecting a PIP source, the Presentation Switcher / Scaler automatically recognizes and can display the selected graphic PIP source on any video source or the selected video source on any graphic source, compliant to Table Table 4: PIP Source Appearance Availability PIP Source... -
Page 22: Locking And Unlocking The Front Panel
1 Does not apply to the ENTER key on the infrared remote control transmitter 2 However, operation via the infrared remote transmitter or RS-232 serial commands (remote controller or PC) and/or ETHERNET is still available 3 Blank and mute, blank or mute KRAMER: SIMPLE CREATIVE TECHNOLOGY... -
Page 23: Configuring And Controlling The Vp-725Xl
The OSD superimposes a menu on the screen from which you can configure and control each input signal on your VP-725xl, using the MENU, ENTER, -, +, UP and DOWN OSD buttons on the front panel and the remote transmitter. -
Page 24: The Input Screen
Configuring and Controlling the VP-725xl 8.1.1 The Input Screen Figure 9 Table 5 define the Input screen. Figure 9: Input Screen Table 5: Input Screen Functions Setting Function Selection/Range Default Select Select the group Video Group, Scaler Scaler VGA Group... -
Page 25: The Picture Screen
Configuring and Controlling the VP-725xl 8.1.2 The Picture Screen Figure 10 Table 6 define the Picture screen. Figure 10: Picture Screen Table 6: Picture Screen Functions Setting Function Selection/Range Default Brightness Adjust the brightness -50 to 50 Contrast Adjust the contrast... -
Page 26: The Output Screen
Configuring and Controlling the VP-725xl 8.1.3 The Output Screen Figure 11 Table 7 define the Output screen. Figure 11: Output Screen Table 7: Output Screen Functions Setting Function Selection/Range Default Resolution Set the Native HDMI , 640x480x60Hz, 640x480x75Hz, If Native HDMI is... - Page 27 Configuring and Controlling the VP-725xl Setting Function Selection/Range Default H-Pan Horizontal pan -16 to 16 V-Pan Vertical pan -16 to 16 H-Zoom Horizontal zoom -8 to 8 V-Zoom Vertical zoom -8 to 8 Zoom Set the Zoom 100%, 150%, 200%, 225%, 250%, 275%, 300%,...
-
Page 28: The Pip Screen
Configuring and Controlling the VP-725xl 8.1.4 The PIP Screen Figure 12 Table 8 define the PIP screen. Figure 12: PIP Screen Table 8: PIP Screen Functions Setting Function Selection/Range Default On/Off Activate/deactivate the PIP On/Off feature Type Select the PIP type... -
Page 29: The Geometry Screen
Configuring and Controlling the VP-725xl 8.1.5 The Geometry Screen Figure 13 Table 9 define the Geometry screen, allowing the user flexibility in positioning his projector relative to the screening surface. Figure 13: Geometry Screen Table 9: Geometry Screen Functions Setting... -
Page 30: The Setup Screen
Black) or fast switching which is faster but may cause glitches on the output (applies only when switching between analog inputs) Factory Reset Reset your VP-725xl to its preset default Confirm, Yes, No settings Advanced Open the advanced setups (see... -
Page 31: The Slideshow Feature
Normal Behavior 8.1.7 The Slideshow Feature The VP-725xl lets you run a slideshow via the USB input and set the slideshow speed via the slideshow feature. To prepare a slideshow: 1. Load the slideshow JPEG images to a USB memory stick. -
Page 32: The Advanced Setup Screen
Configuring and Controlling the VP-725xl 8.1.7.1 The Advanced Setup Screen Figure 15 Figure 18, and Table 13 Table 16 define the Advanced Setup screens. Figure 15: Advanced Setup Screen The Mode Set functions define the desired working resolution and refresh rate... -
Page 33: Table 14: Misc Functions
Configuring and Controlling the VP-725xl Table 14: Misc Functions Setting Function Selection/Range Default Logo Choose ON for the start up logo On, Off or Custom Kramer Logo to appear on the screen (On) OFF for it not to appear Set to Custom to download a... -
Page 34: Figure 17: Input Setup Screen
Configuring and Controlling the VP-725xl Figure 17: Input Setup Screen Table 15: Input Functions Setting Function Range Default Horizontal Total 1344 Horizontal sync pulse width Horizontal active start point Horizontal active region 1024 Horizontal polarity Vertical Total Vertical sync pulse width... -
Page 35: Verifying Configuration Details Via The Info Screen
Configuring and Controlling the VP-725xl Table 16: Output Functions Setting Function Default Horizontal total 1344 Horizontal sync pulse width Horizontal active start point Horizontal active region 1024 Horizontal polarity Vertical total Vertical sync pulse width Vertical active start point Vertical active region... -
Page 36: Operating Via The Lcd Display
For example, to set the Keystone to 6 via the LCD Display, using the front panel buttons, do the following: 1. Turn the VP-725xl unit ON, and press the OSD ON button (if selected) to deselect it. 2. Press the appropriate front panel OSD buttons (as defined in Figure 20). -
Page 37: Operating Via The Infrared Remote Control Transmitter
Configuring and Controlling the VP-725xl Table 17: Infrared Remote Control Transmitter Functions Function Freeze Pauses the output video Power Cycles power Toggles between a blank screen (blue or black Blank screen) and the display Mute Talk Over Over Ride PIP Size... -
Page 38: Operating Via Ethernet/Serial Port
Text Overlay Application Screen: Figure 22: TextOverlay Application Screen 1 Or connect the serial port of your VP-725xl to the serial port of your PC (see section 6.3) 2 You can download the latest software from our Web site: http://www.kramerelectronics.com... -
Page 39: Table 18: Features And Functions Of The Textoverlay Application
Using Text Overlay Table 18: Features and Functions of the TextOverlay Application Feature Function Parameter Setting Area Select the Text color Text Color Dropdown Box Set the text background color Background Color Dropdown Box Transparency Dropdown Box Select On for a transparent background or Off for a non-transparent background Display Height Check Box Set the thickness of the background stripe (72 or 36) -
Page 40: Technical Specifications
Table 19 includes the technical specifications: Table 19: Technical Specifications of the VP-725xl Presentation Switcher / Scaler INPUTS: 4 x CV 1Vpp/75Ω on BNC connectors; 4 x YC 1Vpp (Y); 0.3Vpp (C)/75Ω on 4-pin connectors; 4 x Component (Y/G, Pb/B, Pr/R or RGsB ) on BNC connectors;... -
Page 41: Table 20: Technical Specifications Of The Rgbhv / Rgbs (Pc) / Rgsb (Pc) Input Signal
Technical Specifications Table 20: Technical Specifications of the RGBHV / RGBS (PC) / RGsB (PC) Input Signal Resolution Vertical Frequency (Hz) Notes Resolution Vertical Frequency (Hz) Notes 640x480 (480p) VESA 1152x870 Mac21 640x480 Mac13 1152x900 640x480 VESA 1152x900 640x480 VESA 1280x720 VESA 640x480... -
Page 42: Table 23: Technical Specifications Of The Component Input Signal
VESA 1600x1200 VESA 1024x768 1920x1080 VESA 1024x768 VESA 1920x1200 VESA 1024x768 VESA 1680x1050 VESA 1280x720 VESA 1080i 1280x768 1080i 1280x768 VESA 720p 1280x800 VESA 720p Comp/YPbPr 1280x1024 480p 1280x1024 VESA 576p 1280x1024 VESA 1080p 1366x768 1080p KRAMER: SIMPLE CREATIVE TECHNOLOGY... -
Page 43: Vp-725Xl Communication Protocol
VP-725xl Communication Protocol 11 VP-725xl Communication Protocol Communication Confirmation: Send: Reply: CR> Set and Get command: Set Command: YControl_TypeFunctionParamCR Reply: ZControl_TypeFunctionParamCR> Get Command: YControl_TypeFunctionCR Reply: ZControl_TypeFunctionParamCR> Example 1 (select VGA1 as video input channel): "Y01570CR" "Z01570CR>" Example 2 (get selected current input channel): "Y... -
Page 44: Table 25: Communication Protocol Of The Vp-725Xl
VP-725xl Communication Protocol Table 25 includes the Communication Protocol: Table 25: Communication Protocol of the VP-725xl Control Type Function Parameter Description 0: Auto 1: RGB Input Color Format 2: YUV 0: Auto 1: NTSC 2: PAL 3: PAL-M Input Video Standard 4: PAL-N 5: NTSC 4.43... - Page 45 VP-725xl Communication Protocol Control Type Function Parameter Description 0 : Native HDMI 1 : 640x480@60Hz 2 : 640x480@75Hz 3 : 800x600@50Hz 4 : 800x600@60Hz 5 : 800x600@75Hz 6 : 1024x768@50Hz 7 : 1024x768@60Hz 8 : 1024x768@75Hz 9 : 1280x768@50Hz 10: 1280x768@60Hz 11.
- Page 46 1: On 0: Red PIP Frame Color 1: Green 2: Blue -40~0~+40 Audio Bass (not available for VP-725xl) -40~0~+40 Audio Treble (not available for VP-725xl) -25~25 Audio Balance (not available for VP-725xl) 0: Off Audio Loudness (not available for VP-725xl)
- Page 47 4: VGA4 5: HDMI1 6: HDMI2 7: HDMI3 8: HDMI4 9: COMP1 Audio Input For USB (Not available for VP-725xl) 10: COMP2 (HDMI1 / HDMI2 / HDMI3 / HDMI4 are Not Allowed) 11: COMP3 12: COMP4 13: YC1 14: YC2...
- Page 48 VP-725xl Communication Protocol Control Type Function Parameter Description 0: Profile 1 1: Profile 2 2: Profile 3 3: Profile 4 Recall Setting 4: Profile 5 5: Profile 6 6: Profile 7 7: Profile 8 0: Off Frame Lock 1: On...
- Page 49 VP-725xl Communication Protocol Control Type Function Parameter Description Volume- (left - button) not available for VP-725xl Volume+ (right + button) not available for VP-725xl Enter Picture Swap 0: Off Mute (not available for VP-725xl) 1: On 0: Off Lock 1: On...
- Page 50 VP-725xl Communication Protocol Control Type Function Parameter Description 48: 1080p 49: 1280x800 60 50: 1440x900 51: 1440x900 60(R) 52: 1280x768 53: 1680x1050 60 (R) 54: 1366x768 55: 1366x768 60 (R) 94: Custom1 95: Custom2 96: Custom3 97: Custom4 98: No Input detected...
- Page 51 VP-725xl Communication Protocol Control Type Function Parameter Description 36: 1080p 37: 1080p 38: 720p 39: 720p 40: 480i 41: 480p 42: 576i 43: 576p 44: 1280x800 60 (R) 45: 1920x1200 60 46: 1920x1080 60 47: 1280x720 60 48: 1080p 49: 1280x800 60...
- Page 52 VP-725xl Communication Protocol Control Type Function Parameter Description 0: Negative polarity Advance Output Mode: HP 1: Positive polarity 384~2047 Advance Output Mode: VT 2~(HS-13) Advance Output Mode: VW 15~(VT-VA-1) Advance Output Mode: VS 480~1200 Advance Output Mode: VA <= (VT-16)
- Page 53 MIC Control (not available for VP-725xl) 2: Mix 3: Talk Over -30 ~ +10 VGA Group In Volume (not available for VP-725xl) -30 ~ 10 VGA Group Out Volume (not available for VP-725xl) -30 ~ +10 HDMI Group In Volume (not available for VP-725xl)
- Page 54 Note : parameter must be in the range of 13: Audio Level = Off 10 ~ 13, or it will have no effect (not available for VP-725xl) Hot key Override, same as remote control / Keypad - Override Hot key Talk Over, same as remote control / Keypad...
-
Page 55: Error Codes
VP-725xl Communication Protocol Control Type Function Parameter Description -100 ~ +100 HQV Color Setting - Red -100 ~ +100 HQV Color Setting - Green -100 ~ +100 HQV Color Setting - Blue -100 ~ +100 HQV Color Setting - Cyan... - Page 56 EXCLUSION OF DAMAGES The liability of Kramer for any effective products is limited to the repair or replacement of the product at our option. Kramer shall not be liable for: 1. Damage to other property caused by defects in this product, damages based upon inconvenience, loss of use of the product, loss of time, commercial loss;...
- Page 57 For the latest information on our products and a list of Kramer distributors, visit our Web site: www.kramerelectronics.com, where updates to this user manual may be found. We welcome your questions, comments and feedback. Safety Warning: Disconnect the unit from the power supply before opening/servicing.
Need help?
Do you have a question about the VP-725xl and is the answer not in the manual?
Questions and answers