Advertisement
CONTROLS AND FUNCTIONS
ENGLISH
1. Battery cover
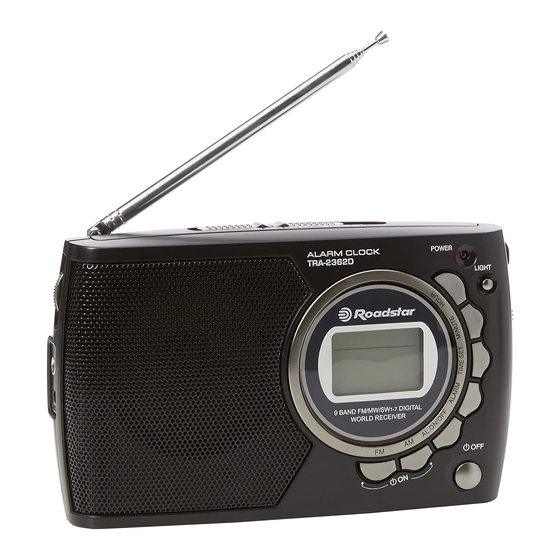
TRA-2362D
2. Hour setting button
3. Minute setting button
Portable SW / MW / FM radio.
4. Power OFF button
5. VOLUME control
6. Earphone socket
7. Tuning knob
8. Time set buttton
9. Alarm set button
10. Light button
11. Power ON / BAND Button
12. SW 1-7 Band Selector
13. Antenna
14. LCD Indicator
15. Speaker
16. Handle
17. External 3V input
18. Alarm ON / OFF
19. Power ON Indicator
BATTERY OPERATION
1. Open battery cover on the rear (1).
2. Insert two 1.5V D batteries as
indicated on the case.
Alkaline cells are recommended.
BEDIENUNG UND FUNKTIONEN
DEUTSCH
1. Batteriefach
2. Stunden-Einstellungstaste
TRA-2362D
3. Minuten-Einstellungstaste
Tragbarer SW / MW / UKW-
4. AUS Schalter
5. Lautstärke-Kontrolle
Radio
6. Kopfhörer-Buchse
7. Abstimmtaste
8
Zeit-Einstelltaste
9. Alarm-Einstelltaste
10. Licht-Taste
11. Ein-/Aus-/Alarm-Schalter
12. SW 1-7 Band-Wahl-Schalter
13. Teleskopantenne
14. LCD-Anzeige
15. Lautsprecher
16. Tragegriff
17. Extern 3V Buchse
18. Alarm EIN / AUS
19. Power ON Indicator
I
BATTERIEN
1. Den Deckel des Batteriefachs auf
der Rückseite entfernen (1).
2. Vier 1.5V Batterien des Typs D
richtig gepolt ins Batteriefach
einlegen. (Wir empfehlen Alkali-
Batterien).
3. Den Deckel des Batteriefachs
wieder schliessen.
COMMANDES
FRANCAIS
1. Logement des piles
2. Touche réglage des heures
3. Touche réglage des minutes
TRA-2362D
4. Touche Arrêt
5. Contrôle VOLUME
Radio SW / MW / FM portable
6. Prise écouteur
7. Contrôle SYNTONISATION
8. Touche réglage du temps
9. Touche réglage de l'alarme
10. Touche illumination
11. Sélecteur M/A/Alarme
12. Sélecteur de bande SW 1-7
13. Antenne téléscopique
14. Viseur LCD
15. Haut-parleur
16. Poignée
17. Entrée 3V externe
18. Alarme ON / OFF
19. Indicateur Marche
PILES
1. Ouvrir le logement des piles sur
l'arrière de l'appareil (1).
2. Introduire quatre piles de type D
dans le logement en veillant à les
bien placer conformément au schéma
indiqué à l'interieur du logement
(nous recommandons des piles Alcal).
3. Fermer le logement.
3. Replace battery cover.
TIME SETTING
1. Keep pressed the TIME SET button
Note: Check your batteries regularly.
(8).
Old or discharged batteries must be
2. Adjust with Hour (2) and Minute
replaced to avoid acid leaking that may
(3) buttons the time.
damage your unit. If the unit is not to be
used for a long time, remove the
ALARM SETTING
batteries from their compartment.
1. Keep pressed the Alarm set button
(9)
RADIO OPERATION
2. Adjust with Hour (2) and Minute
1. Turn the unit ON (11).
(3) buttons the desired time.
3. Press again the Alarm set (9) to
2. Extend the telescopic antenna for
switch the alarm ON or OFF.
FM Band. To optimize MW/SW
reception turn horizontally the radio
SPECIFICATIONS
until reaching the best reception
position.
Batteries: 2 X 1.5V DC , "D" size
3. Select the desired radio Band: AM
Frequency range:
(MW/SW) or FM (4) - (12).
FM (87.2 - 108.9MHz)
MW (532 - 1600kHz)
4. Tune to the desired station with the
SW1 (5.71 - 18.65MHz)
Tuning knob (7).
Dimensions: 160 x 100 x 48 mm.
5. Adjust the volume by turning the
VOLUME control (5).
Features and design could be
HEADPHONES
subject to variations without prior
For private listening this radio is equipped
notice.
with a 3.5 mm headphone socket (6).
UHREINSTELLEN
Anmerkung: Die Batterien
1. Halten Sie die Taste TIME SET
regelmässig prüfen. Alte oder entla-
gedrückt (8).
dene Batterien sofort auswech-
seln, um eine Beschädigung des
2. Drücken Sie die Stunden- (2) und
Minuten-Taste (3), um die Zeit
Geräts durch auslaufende Säure
zu vermeiden.
einzustellen.
RUNDFUNKEMPFANG
ALARM SETTING
1. Um das Radio einzuschalten wählen
1. Halten Sie die Taste ALARM SET
Sie "ON" (11).
gedrückt (9).
2. Drücken Sie die Stunden- (2) und
2. Ziehen Sie die Teleskop-Antenne für
Minuten-Taste (3), um die Alarm-
UKW aus. Um die optimale MW-SW
Zeit einzustellen.
Empfangsqualität zu erreichen, dre-
3. Drücken Sie die Alarm Set-Taste
hen Sie das Radio horizontal.
(9) um die Alarm Ein- oder
Auszuschalten.
3. Wählen Sie das gewünschte Band:
AM (MW/SW) oder FM (4) - (12).
TECHNISCHE DATEN
4. Stimmen Sie die gewünschte
Station mit der Frequenz-Abstimm
Batterien: 2 x 1.5V DC, Typ „D"
knopf (7).
Frequenzbereich:
FM (87.2 - 108.9MHz)
5. Stellen Sie die gewünschte
MW (532 - 1600kHz)
Lautstärke durch Drehen des
SW1 (5.71 - 18.65MHz)
Lautstärke-Reglers (5).
Abmessungen: 160 x 100 x 48 mm..
KOPFHÖRER
Dieses Gerät ist mit einer 3.5 mm
Änderungen der technischen Daten
Kopfhörer-Buchse (6) ausgestattet.
und des Designs sind ohne Voran
kündigung vorbehalten.
stéréo de 3.5 mm (6).
Note: Contrôlez vos piles
régulièrement. Les piles trop vieilles ou
REGLAGE HORAIRE
déchargées devront être remplacées
1. Tenir pressée la touche TIME SET (8).
afin d'éviter un endommagement
2. Regler l'horaire en pressant la
résultant de fuites d'acide. Si l'appareil
touche Hour (2) et Minute (3).
ne doit pas être utilisé pendant une
longue période de temps, enlevez les
REGLAGE ALARME
piles du logement.
1. Tenir pressée la touche Alarm Set (9).
2. Regler l'horaire de l'Alarme en pressant
OPERATIONS GENERALES
la touche Hour (2) et Minute (3).
ECOUTE DE LA RADIO
1. Allumer l'appareil sur "ON" (11).
3. Presser de nouveau la touche
Alarm Set (9) pour sélectionner
2. Détendre l'antenne télescopique
Alarm ON (Marche) ou OFF (Arrêt).
pour la réception des ondes FM.
Tourner l'appareil horizontalement
ATTENTION ! A pleine puissance
pour une réception des ondes MW /
l'écoute prolongée de la radio peut
SW.
endommager l'oreille de l'utilisateur.
3. Sélectionner la bande souhaitée:
SPECIFICATIONS
AM (MW/SW) ou FM (4) - (12).
Piles: 2 X 1.5V DC dimension "D"
4. Syntoniser la station souhaitée avec
Fréquences:
le contrôle de Syntonisation (7).
FM (87.2 - 108.9MHz)
6. Ajuster le contrôle de VOLUME (5)
MW (532 - 1600kHz)
au niveau désiré.
SW1 (5.71 - 18.65MHz)
CASQUE
Dimensions :
Pour permettre l'écoute privé, l'appareil
est doté d'une entrée pour casques
Modifications sans préavis .
Correct Disposal of ThisProduct(Waste
Electrical &Electronic Equipment)This
marking shown on the product orits
literature, indicates that it should notbe
disposed with other householdwastes at
the end of its working life. Toprevent
possible harm to theenvironment or human
health fromuncontrolled waste disposal,
pleaseseparate this from other types
ofwastes and recycle it responsibly
topromote the sustainable reuse ofmaterial
resources.Household users should contact
eitherthe retailer where they purchased
thisproduct, or their local
governmentoffice, for details of where
and howthey can take this item
forenvironmentally safe
recycling.Business users should contact
theirsupplier and check the terms
andconditions of the purchase
contract.This product should not be mixed
withother commercial wastes for disposal.
Korrekte Entsorgungdieses
Produkts(Elektromüll)Die Kennzeichnung
auf dem Produktbzw. auf der
dazugehörigen Literaturgibt an, dass es
nach seinerLebensdauer nicht zusammen
mit demnormalen HaushaltsmüIl
entsorgtwerden darf. Entsorgen Sie
diesesGerat bitte getrennt von
anderenAbfallen, um der Umwelt bzw.
dermenschlichen Gesundheit nicht
durchunkontrollierte Müllbeseitigung
zuschaden. Recyceln Sie das Gerät,
umdie nachhaltige Wiederverwertung
vonstofflichen Ressourcen zu
fördern.Private Nutzer sollten den Händler,
beidem das Produkt gekauft wurde,
oderdie zuständigen Behördenkontaktieren,
um in Erfahrung zubringen, wie sie das
Gerät aufumweltfreundliche Weise
recycelnkönnen. Gewerbliche Nutzer
sollten sich anIhren Lieferanten wenden
und dieBedingungen des
Verkaufsvertragskonsultieren. Dieses
Produkt darf nichtzusammen mit anderem
Gewerbemüllentsorgt werden.
Comment éliminer ceproduit -
(déchetsd'équipements électriqueset
électroniques)Ce symbole sur le produit ou
sadocumentation indique qu'il ne doit
pasêtre éliminé en fin de vie avec
lesautres déchets ménagers.
L'éliminationincontrôlée des déchets
pouvantporter préjudice a l'environnement
ou ala santé humaine, veuillez le
séparerdes autres types de déchets et
lerecycler de façon responsable.
Vousfavoriserez ainsi la réutilisation
durabledes ressources matérielles.Les
particuliers sont invites acontacter le
distributeur leur ayantvendu le produit ou a
se renseignerauprès de leur mairie pour
savoir ou etcomment ils peuvent se
débarrasserde ce produit afin qu'il soit
recyclé enrespectant l'environnement.Les
entreprises sont invitées acontacter leurs
fournisseurs et aconsulter les conditions
de leur contratde vente. Ce produit ne doit
pas êtreéliminé avec les autres
déchetscommerciaux.
160 x 100 x 48 mm.
Advertisement
Table of Contents

Subscribe to Our Youtube Channel
Related Manuals for Roadstar TRA-2362D


Summary of Contents for Roadstar TRA-2362D
- Page 1 Electrical &Electronic Equipment)This 1. Battery cover marking shown on the product orits Note: Check your batteries regularly. (8). TRA-2362D 2. Hour setting button literature, indicates that it should notbe Old or discharged batteries must be 2. Adjust with Hour (2) and Minute 3.
- Page 2 2. Regolare l'orario coi tasti Hour (2) e Che il modello Radio portatile SW/MW/FM Minute (3). TRA-2362D, della Roadstar è prodotto in Nota: Controllate le batterie regolar- conformità al D.M. no. 548 datato 28/08/95 mente. Le batterie vecchie o scariche REGOLAZIONE ALLARME (G.U.
Need help?
Do you have a question about the TRA-2362D and is the answer not in the manual?
Questions and answers