Advertisement
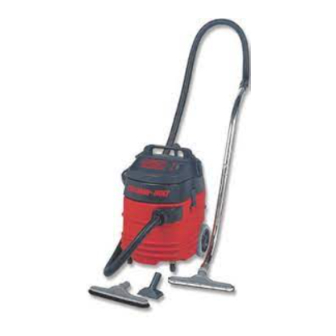
Evacuator Series
15 & 20 Gallon Wet/Dry Vacuum Cleaner
This vacuum cleaner is a high quality, precision made product. All
parts used in the manufacturing of this vacuum cleaner have passed
rigid quality control standards prior to assembly and an "each unit"
final inspection prior to packaging is your assurance of proper
assembly. This vacuum cleaner was protectively packed to prevent
possible damage in transit. Should damage occur, please notify the
transporting carrier immediately for loss and/or claim.
TO ASSEMBLE
The handle must be installed on the 20-gallon model prior to use. To
install the handle, push the handle over the two steel handle recep-
tacles mounted on the tank, making sure that the spring loaded pins
extend completely through all four of the holes in the handle pipe.
The 15-gallon model does not require assembly.
TO COnnECT HOSE
Insert the swivel end of the hose into the tank inlet with a slight
twisting motion. To remove the hose grasp the knurled ring on the
swivel end of the hose and twist while pulling out.
TO OpErATE
The vacuum cleaner is designed to perform as a wet/dry unit with no
component changes required.
CAUTION
Do not use this vacuum to pick up hazardous materials.
HOSE STOrAgE
The hose should be coiled and secured to the side of the vacuum
cleaner with the hose storage strap when the unit is not in use.
FiLTrATiOn SySTEM
The two-stage filtration system can be used wet or dry without
changing any components.
Operation & Care Instructions
Save For Future Reference
ABOUT THE MACHINE
FiLTEr CLEAning DEviCE
The filter utilizes a unique filter cleaning system designed to clean
the outer surface of the Never-Clog bag without removing the motor
head. To use the filter cleaner:
1. Shut off the vacuum to stop the airflow through the filter system
2. Move the knob mounted on the top of the motor head up and
down 3-4 times. The debris removed from the filter will fall into
the tank.
3. Restart the motor to resume cleaning.
The filter can also be completely removed for cleaning or replace-
ment.
1. Remove the stainless steel pin securing the filter cleaning ring.
2. Slide the ring off the filter.
3. Remove the filter retaining thumbscrews.
4. Pull the filter off the motorhead.
5. Remove the Never-Clog bag from the cartridge filter.
6. To reinstall the Never-Clog bag, slide the slots near the rim of the
bag over the ears of the cartridge filter. Pull the top layer of elastic
over the top rim of the filter, taking care not to place the bag over
the opening of the filter.
7. Reinstall the cartridge filter by pushing it over the wet shutoff
mechanism.
8. Reinstall thumbscrews. The thumbscrews should be finger tight.
CAUTION
Never lubricate the vacuum cleaner motor. The motor
bearings are permanently sealed. This vacuum is intended
for indoor or outdoor use and for wet pickup, but it is not
intended to be exposed to rain.
Advertisement
Table of Contents

Related Manuals for Pullman Holt Evacuator Series


Summary of Contents for Pullman Holt Evacuator Series
-
Page 1: Hose Storage
Operation & Care Instructions Save For Future Reference Evacuator Series 15 & 20 Gallon Wet/Dry Vacuum Cleaner This vacuum cleaner is a high quality, precision made product. All parts used in the manufacturing of this vacuum cleaner have passed rigid quality control standards prior to assembly and an “each unit” final inspection prior to packaging is your assurance of proper assembly. -
Page 2: Important Safety
IMPORTANT SAFETY IMPORTANTES MESURES INSTRUCTIONS DE SÉCURITÉ L’utilisation d’un appareil électrique demande certaines précautions: When using an electrical appliance, basic precautions should always be followed, including the following:. LirE TOUTES LES inSTrUCTiOnS AvAnT DE FAirE FOnCTiOnnEr CET AppArEiL rEAD ALL inSTrUCTiOnS AVERTISSEMENT: BEFOrE USing THiS vACUUM CLEAnEr pour réduire les risques d’incendie, de choc éle-... -
Page 3: Grounding Instructions
INSTRUCTIONS VISANT GROUNDING INSTRUCTIONS LA MISE À LA TERRE This appliance must be grounded. If it should malfunction or breakdown, grounding provides a path of least resistance for elec- tric current to reduce the risk of electric shock. This appliance is Cet appareil doit être mis à... -
Page 4: Limited Warranty
LIMITED WARRANTY In NO circumstance should you return a failed unit to the factory. The vacuum cleaner is warrantied for 1 year from the date of purchase as shown on your distributor’s invoice. Parts not cov- If you experience any problems with your vacuum during the ered under warranty are power cords, filters, motor brushes warranty period, contact the Customer Service. - Page 5 Evacuator Vacuum Squeegee Installation 1. Remove the motor head. 2. Turn the can upside down. 3. Place the squeegee lift assembly on the can with the two forks facing toward the front of the can. The round tube on the mounting place should be firmly engaged with the pocket near the front of the can.
Need help?
Do you have a question about the Evacuator Series and is the answer not in the manual?
Questions and answers