Fluke 1735 User Manual
Power logger
Hide thumbs
Also See for 1735:
- User manual (82 pages) ,
- Getting started (50 pages) ,
- Manual supplement (6 pages)

Related Manuals for Fluke 1735


Summary of Contents for Fluke 1735
- Page 1 ® 1735 Power Logger Users Manual 2560330 March 2006 Rev.1, 4/06 © 2006 Fluke Corporation, All rights reserved. All product names are trademarks of their respective companies.
- Page 2 Fluke's warranty obligation is limited, at Fluke's option, to refund of the purchase price, free of charge repair, or replacement of a defective product which is returned to a Fluke authorized service center within the warranty period.
- Page 3 à offrir une garantie plus étendue ou différente au nom de Fluke. Le support de garantie est offert uniquement si le produit a été acquis par l’intermédiaire d’un point de vente agréé par Fluke ou bien si l’acheteur a payé...
- Page 4 Vertriebsstelle erworben oder der jeweils geltende internationale Preis gezahlt wurde. Fluke behält sich das Recht vor, dem Käufer Einfuhrgebühren für Ersatzteile in Rechnung zu stellen, falls der Käufer das Produkt nicht in dem Land zur Reparatur einsendet, in dem er das Produkt ursprünglich erworben hat.
-
Page 5: Garanzia Limitata E Limitazione Di Responsabilit
Fluke autorizzato. Sono esclusi i fusibili, le pile monouso e i prodotti che, a parere della Fluke, siano stati adoperati in modo improprio, alterati, trascurati, contaminati o danneggiati in seguito a incidente o condizioni anomale d’uso e maneggiamento. - Page 6 A obrigação da Fluke no tocante a esta garantia é limitada, a critério da Fluke, à devolução da importância correspondente ao preço pago pelo produto, a consertos gratuitos, ou à...
- Page 7 90 días. Esta garantía se extiende sólo al comprador original o al cliente usuario final de un revendedor autorizado por Fluke y no es válida para fusibles, baterías desechables ni para ningún producto que, en opinión de Fluke, haya sido utilizado incorrectamente, modificado, maltratado, contaminado, o sufrido daño accidental...
- Page 8 有限担保和有限责任 Fluke 担保在正常使用和保养的情况下,其产品没有材料和工艺上的缺陷。 两年的担保期间由产品发货之日算起。部件、产品修理和服务的担保期限为 90 天。 本担保仅限于 Fluke 授权零售商的原购买人或最终用户,并且不适用 于一次性电池、电缆接头、电缆绝缘转换接头或 Fluke 认为由于误用、改装、 疏忽、污染及意外或异常操作或处理引起的任何产品损坏。Fluke 担保软件能 依照功能规格正常运行 90 天,并且软件是记录在无缺陷的媒介上。Fluke 并不 担保软件毫无错误或在运行中不会中断。 Fluke 授权的零售商应仅对最终用户就新的和未使用的产品提供本担保,但 无权代表Fluke 公司提供额外或不同的担保。 只有通过 Fluke 授权的销售店购 买的产品或者买方已经按适用的国际价格付款才能享受 Fluke 的担保支持。 在一国购买的产品需在他国修理时,Fluke 有权向买方要求负担重大修理/零 件更换费用。 Fluke 的担保为有限责任,由 Fluke 决定是否退还购买金额、免费修理或更换 在担保期间退还 Fluke 授权服务中心的故障产品。 如需要保修服务,请与您就近的 Fluke 授权服务中心联系,获得退还授权信息;...
-
Page 9: Table Of Contents
Table of Contents Title Page Introduction ..................1 Symbols ....................1 Safety Instructions ................2 Standard and Optional Accessories............3 Software and Information CD............... 5 Instrument Familiarity ................5 Current Probes .................. 5 Control Elements, Display ..............5 Display Symbols ................6 Description of the Control Elements.......... - Page 10 Installing Power Log Software ............40 Starting Power Log................40 Using Power Log................41 Energy Recording with Fluke Power Log ........42 Recording Power (Demand) with 1735 Power Logger..... 44 Inside the Logger.................. 45 Line Power or Battery Mode ............45 Replacing the Battery Pack ..............
- Page 11 (continued) Contents Temperature ranges................50 EMC ....................51 Safety ....................51 Specifications..................51 PF Power Factor................53 Frequency Measurement ............... 54 Harmonics..................54 Appendix A Values Recorded by the Power Logger ......57...
- Page 12 1735 Users Manual...
- Page 13 List of Tables Table Title Page Symbols....................2 Standard Equipment ................4 Optional Accessories................4 Maximum Possible Measuring Periods ..........45...
- Page 14 1735 Users Manual...
- Page 15 Split Phase Connections ..............23 Three-Phase Wye Connections ............24 Three-Phase Delta Connections ............25 Fluke Power Log Screen ..............41 Fluke Power Log Displaying Three Phases of Voltage and Current ................42 Replacing the Battery Pack ..............46 Flexi-probe Lock................56...
- Page 16 1735 Users Manual viii...
-
Page 17: Introduction
Please use the Windows Flash Update utility to do this. You will find it on the supplied 1735 CD-ROM. If there is a firmware update, it can be found on the Fluke website: www.fluke.com. Symbols... -
Page 18: Safety Instructions
Canadian Standards Association is the certified body used for testing compliance to safety standards. Do not dispose of this product as unsorted municipal waste. Contact Fluke or a qualified recycler for disposal. Conforms to relevant Australian Standards. Safety Instructions Please read this section carefully. It will make you familiar with the most important safety instructions for handling your Logger. - Page 19 Power Logger Standard and Optional Accessories Maintenance work must be done only by qualified service personnel. Use only specified current probes. If you use flexible current probes, wear suitable protective gloves or work on de-energized conductors. Protect the Logger against wetness and humidity. To prevent electrical shock, always connect voltage and current test leads to the Logger before connecting to the load.
-
Page 20: Standard And Optional Accessories
1642656 CD ROM,FLUKE-1735 MANUAL AND SOFTWARE 2583487 Includes: manuals, PC application software, firmware upgrade utility (English, French, German, Italian, Spanish, Portuguese, Chinese) 1735 Users Manual (English only) 2560330 Table 3. Optional Accessories Description Accessory 3-Phase Flexi Set (15A/150A/1500A) MBX 3FLEX... -
Page 21: Software And Information Cd
Current Probes Fluke flexi-sets or current clamps are automatically detected by the Logger when the Logger is turned on. If you change current probes, turn the Logger off and on again so the Logger can recognize the new probe. -
Page 22: Display Symbols
1735 Users Manual Display Symbols Figure 1 shows the display symbols the Power Logger uses. Status Display Power Supply Current Measuring Function Date/Time Volts/Amps/Hertz 2001-03-21, 20:50 Battery Measuring Mode Mains operation Memory Mode Record Switch with: Measure Pause in Measuring Mode Pause in Memory Mode Hold Activate with:... -
Page 23: Description Of The Control Elements
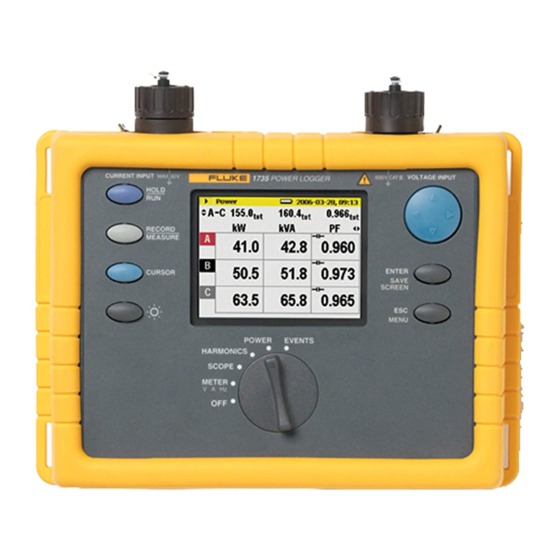
Power Logger Instrument Familiarity Description of the Control Elements Figure 2 indicates the control elements of the Power Logger. Activation - Adjustment of the background lighting Activating the appropriate cursor function Switching between measuring and recording function Stopping and continuing the measurement CURRENT INPUT MAX 30V 600 V CAT... -
Page 24: Using The Save And Cursor Keys
Screenshots can also be taken in cursor mode. Pressing ESC exits cursor mode and returns to the hold mode. Connectors Battery RS-232 Interface compartment AC - adapter Fluke flex inputs Voltage inputs for L1, L2, L3, N edx006.eps Figure 3. Power Logger Connectors... -
Page 25: Rs-232 Interface
Power Logger Instrument Familiarity RS-232 Interface The serial RS232 interface is used for communication with an external PC. Use Power Log software (included) to download and analyze logged data. This interface is also used for updating firmware using the 1735 Upgrade Utility. Basic Adjustments (Menu) Menu Structuring You make all basic adjustments of the Logger in the main menu. -
Page 26: Short Overview Of The Menu
1735 Users Manual Short Overview of the Menu MENU Logging Averaging Time Event Thresholds View/Delete Screens Memory loc. 10.10 Memory loc. 11.20 Memory loc. 21.30 View Auto Screens Memory loc. 31.40 Memory loc. 41.50 Memory loc. 01..06 Display Contrast Instrument Setup Current Probes Voltage Transformers Backlight... -
Page 27: Basic Operation
Power Logger Basic Operation Basic Operation The following examples show how to select parameters in the menu. Entering the main menu: M Selecting menu options with the cursor control keys: 2 1 <Enter>go to marked submenu <ESC> back to the previous menu level edx008.eps Changing parameters: The displayed parameters can be modified with the cursor control... -
Page 28: Parameter Configuration
1735 Users Manual Parameter Configuration Logging Menu If you call the logging menu, then you can select between two further submenus: Menu for adjusting the averaging time and for adjusting the event threshold in recording adjustments. In the menu Averaging you select the time over which the data are to be averaged. -
Page 29: View/Delete Screenshots
Power Logger Basic Operation edx010.bmp View/Delete Screenshots Select one of the saved screenshots. Press ENTER to view it. All screenshots include the date and time and the measuring mode, in which they were saved. Each page lists 10 events. -
Page 30: View Auto Screenshots
1735 Users Manual Use the 4 5to change the page. edx011.bmp View Auto Screenshots With this menu item, you can view the screenshots of a recording session, which have been automatically saved in the Save mode. 6 screenshots are available (01 to 06). -
Page 31: Display Contrast
Power Logger Basic Operation Select one of the pictures with the cursor key and press ENTER to view it. edx012.bmp Note Saved Auto Screenshots always show the currently displayed parameters. Example: If you selected phase L2 in the Volt/Ampere/Hertz function and the recording reaches the margin of the picture, a screenshot of the current picture, i.e., phase L2, is saved. -
Page 32: Instrument Setup
1735 Users Manual Instrument Setup In this menu option you can make adjustments in the submenu for: Current Probes Voltage Transformers Phase Identification Backlight Version and Calibration These are described individually in the following: Current Probes When a Flexi set or Current Probe is connected to the instrument it is automatically recognized, but only at power-up. - Page 33 Power Logger Basic Operation edx014.bmp Use 4 5 to select digit and 21 to adjust the value edx015.bmp The effect of the ratio is shown at the foot of the display with the primary of the interposing transformer displayed above the secondary current (input to probe).
-
Page 34: Voltage Transformers
1735 Users Manual Voltage Transformers If you use voltage transformers, select transformation ratio with ENTER. Press the 4 5 key and enter any transformation ratio with 21. For transformation ratio details see information on the voltage transformer. Phase Identification Here you can choose whether the display shows “A, B, C” for phase identification or “L1, L2, and L3.”... -
Page 35: Power Network
Power Logger Measuring Functions Power Network Select the Power Type (Single phase, split phase, wye, 2-element delta, 3- element delta), here. This is also where you select the nominal phase voltage and frequency. edx016.bmp Date & Time Here you can enter the current date and the current time. Language Presents a menu of the provided languages for the Logger displays. -
Page 36: Meter Volts / Amps / Hz
1735 Users Manual Meter Volts / Amps / Hz This function displays the voltage and current values at the same time, plus the frequency and the neutral-conductor current. You can also use this measuring function to get an overview of these values before you analyze the signal in detail in the other functions. -
Page 37: Events
Power Logger Measuring Functions Events Events are voltage dips, swells and interruptions. This measuring mode automatically records all events for later evaluation. The threshold values for starting the recording are freely configurable in the menu. Connecting the Power Logger to the Network XWWarning To prevent the risk of electric shock, when connecting current circuits, the corresponding test leads must first be... - Page 38 1735 Users Manual Current: Network Test Leads A (L1) Not connected B (L2) Not connected C (L3) Not connected L2 L3 N edx040.eps Figure 5. Single Phase Connections...
-
Page 39: Split Phase
Power Logger Measuring Functions Split Phase For Split Phase, the Neutral is center-tapped and there are two hot legs which correspond to A and B test Leads. AB is the voltage from phase to phase, which is twice that of each individual hot leg. Refer to Figure 6 and connect the leads as follows: Voltage: Network... -
Page 40: Measurement In A Three-Phase Power Network
1735 Users Manual L2 L3 N edx041.eps Figure 6. Split Phase Connections Measurement in a Three-Phase Power Network In order to measure all phases in the three-phase power network with the Logger you attach your Logger to the measuring power network according to the following figures. - Page 41 Power Logger Measuring Functions Voltage: Mains Line Test Leads A (L1) A (L1) B (L2) B (L2) C (L3) C (L3) Current: Mains Line Test Leads A (L1) A (L1) B (L2) B (L2) C (L3) C (L3) L2 L3 N edx042.eps Figure 7.
-
Page 42: Volts / Amps / Hertz
1735 Users Manual L2 L3 N edx043.eps Figure 8. Three-Phase Delta Connections Volts / Amps / Hertz Select Meter with the rotary switch. In this mode you can measure values for each phase (A, B, C) of Voltage (V) Current (I) Frequency (F) Neutral-conductor current (In) You can determine and store the values. -
Page 43: Measurement
Current (I) and the value of the Frequency (F) These values can be recorded in the instrument, downloaded and evaluated with the Fluke Power Log software package Measurement If you select this measuring mode you will see the following display: edx024.bmp... -
Page 44: Logging Function
1735 Users Manual Logging Function With Record/Measure you can start the logging function or you can get back into the measuring mode. Before the start, the maximum logging time is indicated and you can change this value with Esc followed by entering using the Cursor key. -
Page 45: Power
Note The Cursor functions are only available in the “Hold” mode. These values can be recorded in the instrument, downloaded and evaluated with Fluke Power Log software package. Power Select Power with the rotary switch. In this measuring mode you can get the following values for each phase (A, B,... - Page 46 1735 Users Manual edx026.bmp Switch between the individual phases (detailed view: min- max- values and distorted power and Energy values. Switch between the representation modes: - P, S and PF - P, S and Q - P, S and D - P, S and EP - P, S and EQ - P, S and cos...
-
Page 47: Three-Phase Power Theory
Power Logger Measuring Functions edx027.bmp The accumulation time is indicated at the top of the measurement display. A further press of 21 gives a detail view of the individual phase values. Capacitor or inductance symbols issue information about capacitive or inductive reactive power. -
Page 48: Save
1735 Users Manual In the Blondel (or Aron) circuit, phase L2 becomes the return line for L1 and L3 causing the current I to be obtained as the sum of the two negative currents I i2 (t) =-[i1(t)+ i3(t)] In general, the instantaneous total power is: Ptot(t)=v1(t) i1(t)+ v2(t) i2(t)+ v3(t) i3(t) Ptot(t)= v1(t) i1(t)- v2 [i1(t)+ i3(t)]+ v3(t)i3(t)= =[v1(t)- v2(t)] i1(t)+[ v3(t)-v2(t)]i3(t) -
Page 49: Logging Function
Power Logger Measuring Functions Logging Function With Record/Measure you can start the logging (recorder) function or you can get back into the measuring mode. Before the start, maximum recording time is indicated and you can change this value with cursor. Changes in the averaging time, cause corresponding changes in the recording time of the measurement (double averaging time = double recording time). -
Page 50: Logging
Cosine (cos ) Distortion power (D) Accumulated values (kWh, kVAh, kVARh) These values can be recorded in the instrument, downloaded and evaluated with Fluke Power Log software package. Note The cursor functions are only available in the Hold mode. Events... - Page 51 Power Logger Measuring Functions This measuring mode records the voltage of every phase (L ) in cases of voltage dips, swells or interruptions (recorder function). This function exclusively works with the recorder function. Before you start the measurement, select the desired threshold value with Menu/Esc (under recording adjustments).
-
Page 52: Save
Logged Events You can download logged events using Fluke Power Log software package. The Fluke Power Log software presents the event data in a variety of formats: graphs similar to those displayed on the instrument statistical format with number of events, range of duration and range... - Page 53 Power Logger Measuring Functions edx030.bmp 21 Switch between the individual phases. 4 5 Switch between V and I. With Hold/Run the values displayed at the moment “freeze” and the measurement is stopped or started again. By pressing the cursor key, you will go into cursor mode, where you can read additional values of the individual harmonics.
-
Page 54: Logger Function
1735 Users Manual edx031.bmp Logger Function Record/Measure starts the logging function or toggles from logging to measurement mode, respectively. edx032.bmp 21 Switching between individual phases 4 5 Switching between V and I... -
Page 55: Logging
Power Logger Measuring Functions When the recorder graphics reach the screen margin during recording, a picture of this screen is saved. The display is then deleted and the recording is continued. Up to 6 auto screens are saved in the course of a recording. The saved screenshots can be retrieved via the View Auto Screenshots menu. -
Page 56: Measurement
1735 Users Manual Current (I) Angle ( ) for all three phases (L1, L2, L3). Measurement If you select the measuring mode with the rotary switch the following figure appears on the display. The three phase voltages and current values are plotted for the time of one period. -
Page 57: Power Log Pc Software
Starting Power Log 1. Click the Start button. 2. From the start menu, point to programs, point to Fluke Power Log then click Fluke Power Log. For 3 seconds there is a screen that identifies the program:... -
Page 58: Using Power Log
The Main Toolbar also comprises of 4 items, but only 1 is active at start-up: Open data from File: To retrieve previously saved data files from the PC hard drive. The other 3 buttons are active when the Fluke Power Log has data stored in memory: Save data to File. Print Current Screen. -
Page 59: Energy Recording With Fluke Power Log
Energy Recording with Fluke Power Log The supplied software Fluke Power Log enables analysis of energy data in two modes. The first mode shows the energy as an incremental graph:... - Page 60 1735 Users Manual edx036.bmp The second mode allows a time aggregation period to be set. The minimum aggregation time is the same as the recorded average period. Values greater than the recorded period may also be set.
-
Page 61: Recording Power (Demand) With 1735 Power Logger
Power Logger Power Log PC Software edx037.bmp Recording Power (Demand) with 1735 Power Logger This section provides an example of using the logging function to record 15- minute demand averages over 30 days. However, this is only one example of the types of recordings that you can make. -
Page 62: Inside The Logger
1735 Users Manual Table 4. Maximum Possible Measuring Periods Measurement Average Interval Recording Time Function V/A/Hz, 1 sec 1 hour, 12 minutes Harmonics, 2 sec 2 hours, 24 minutes Power 5 sec 6 hours 10 sec 12 hours 30 sec 1 day, 12 hours 1 min 3 days... -
Page 63: Replacing The Battery Pack
Power Logger Inside the Logger Replacing the Battery Pack If the battery life is noticeably low (see technical specification), then it has to be replaced. Replace the battery as follows: 1. Turn off the Logger 2. Disconnect all measuring leads 3. -
Page 64: Maintenance
This work may only be done at a company related service center within the guarantee period. See www.fluke.com for locations and contact information of Fluke Service Centers worldwide. Calibration As an additional service we offer the regular examination and calibration of your Logger. -
Page 65: Waveform
Power Logger Measurement Theory Waveform The angle given in the waveform function is based on the following formula. arctan Angle between reactive power of first harmonic active power of first harmonic Power Measurements ∑... -
Page 66: Total Harmonic Distortion
1735 Users Manual apparent power power factor distortion power cosine cos Note The distortion power is > zero if the waveform of current is different from the voltage waveform. Total Harmonic Distortion ∑ Total Harmonic Distortion V1 to RMS of the fundamental Vh to RMS of the h-th harmonic... -
Page 67: Technical Specifications
Power Logger Technical Specifications Technical Specifications General Information Display: ¼ VGA Graphic Color transmissive displays 320 x 240 Pixel with additional background lighting and adjustable contrast, text and graphics in color. Quality: Developed, designed and manufactured according to DIN ISO 9001 Memory: 4 MB Flash memory, from this 3.5 MB for measuring data;... -
Page 68: Emc
1735 Users Manual Note: the above terms are defined in European Standards. To calculate the specification at any point in the working temperature range, use the temperature coefficient below. Temperature coefficient: ± 0.1 % of the measured value per K. Intrinsic error: Refers to reference temperature, max. - Page 69 (0.5 % of m. v. + 10 digit) Resolution: 0.1 V A-RMS measurement Fluke Flexi sets and current probes with voltage output are supported. All current probes must correspond to 600 V / CAT III Flexi set I ranges: 15 / 150 / 3000 A RMS (at sine)
-
Page 70: Pf Power Factor
1735 Users Manual Measuring range: see V RMS and A RMS measurement Power errors are calculated by adding the errors of voltage and current. Additional error due to power factor PF: Specified error x (1-IPFI) Maximum Range with Voltage range 830 V delta-connection and 3000 A current range is 2.490 MW Intrinsic error: (0.7 % of m.v. -
Page 71: Frequency Measurement
Power Logger Technical Specifications Frequency Measurement Measuring range: 46 Hz – 54 Hz and 56 Hz – 64 Hz Intrinsic error: (0.2 % of m. v. + 5 digit) Operating error: (0.5 % of m. v.+ 10 digit) Resolution: 0.01 Hz Harmonics Measuring range: 1 to 40... - Page 72 (0.5 % of m. v. + 5 digit) Operating error: (1 % of m. v.+ 10 digit) Resolution: 0.1 ° Note When using Fluke flexi-sets please make sure to position the conductor opposite to the Fluke flexi-set-lock (refer following figure). conductor lock edx039.eps] Figure 12. Flexi-probe Lock...
- Page 73 Appendix A Values Recorded by the Power Logger Recorded Values Measurement Saved Description function parameters Volts/Amps/Hertz Voltages VoltageV1 AN Volts&Amps VL1, VL2, VOLTAGE (AVG) VL3, VoltageV1 AN Volts&Amps AVG, MIN, VOLTAGE (MAX) MAX RMS VoltageV1 AN Volts&Amps values VOLTAGE (MIN) VoltageV2 BN Volts&Amps VOLTAGE (AVG) VoltageV2 BN Volts&Amps...
-
Page 74: Appendix A Values Recorded By The Power Logger
1735 Users Manual Measurement Saved Description function parameters Currents I1, Current I1 AN Volts & Amps I2, I3, AVG, CURRENT (AVG) MIN, MAX Current I1 AN Volts & Amps RMS values CURRENT MAX) Current I1 AN Volts & Amps CURRENT (MIN) Current I2 BN Volts &... - Page 75 Power Logger Recorded Values Measurement Saved Description function parameters (MIN) VoltageV2 BN Harmonic VOLTAGE (AVG) VoltageV2 BN Harmonic VOLTAGE (MAX) VoltageV2 BN Harmonic VOLTAGE (MIN) VoltageV3 CN Harmonic VOLTAGE (AVG) VoltageV3 CN Harmonic VOLTAGE (MAX) VoltageV3 CN Harmonic VOLTAGE (MIN) Currents I1, Current I1 AN Harmonic CURRENT I2, I3, In...
- Page 76 1735 Users Manual Measurement Saved Description function parameters Current IN NG Harmonic CURRENT (AVG) Current IN NG Harmonic CURRENT (MAX) Current IN NG Harmonic CURRENT (MIN) THD I L1, L2, THD I1 AN Harmonic CURRENT (AVG) L3, In, AVG, THD I1 AN Harmonic CURRENT (MAX) MIN, MAX RMS values THD I1 AN Harmonic CURRENT (MIN)
- Page 77 Power Logger Recorded Values Measurement Saved Description function parameters THD V3 CN Harmonic VOLTAGE (MIN) Values of uneven harmonics from the 1 order for V1, V2, V3, I1, I2, I3 ,In, AVG, MIN, MAX RMS values Frequency, Frequency F TOTAL Harmonic AVG, MIN, VOLTAGE (AVG) MAX values...
- Page 78 1735 Users Manual Measurement Saved Description function parameters Current I NG Power CURRENT (MIN) Real powers Real Power P1 AN Power P1, P2, P3, POWER (AVG) AVG, MIN, Real Power P1 AN Power MAX values POWER (MAX) Real Power P1 AN Power POWER (MIN) Real Power P2 BN Power POWER (AVG)
- Page 79 Power Logger Recorded Values Measurement Saved Description function parameters values VoltageV2 BN Power VOLTAGE (MAX) VoltageV2 BN Power VOLTAGE (MIN) VoltageV3 CN Power VOLTAGE (AVG) VoltageV3 CN Power VOLTAGE (MAX) VoltageV3 CN Power VOLTAGE (MIN) Apparent Apparent Power S1 AN Power powers S1, POWER (AVG) S2, S3,...
- Page 80 1735 Users Manual Measurement Saved Description function parameters POWER (AVG) Reactive Power Q2 BN Power POWER (MAX) Reactive Power Q2 BN Power POWER (MIN) Reactive Power Q3 CN Power POWER (AVG) Reactive Power Q3 CN Power POWER (MAX) Reactive Power Q3 CN Power POWER (MIN) Distortion Distortion Power D1 AN Power...
- Page 81 Power Logger Recorded Values Measurement Saved Description function parameters MAX values VOLTAGE (AVG) Frequency F TOTAL Power VOLTAGE (MAX) Frequency F TOTAL Power VOLTAGE (MIN Cos L1,L2, Cos PHI 1 AN Power POWER (AVG) Cos PHI 1 AN Power POWER (MAX) Cos PHI 1 AN Power POWER (MIN) Cos PHI 2 BN Power POWER (AVG) Cos PHI 2 BN Power POWER (MAX)
- Page 82 1735 Users Manual Measurement Saved Description function parameters POWER (MAX) Power Factor PF3 CN Power POWER (MIN) Reactive Reactive Energy EQ1 AN Power energy EQ1, ENERGY (AVG) EQ2, EQ3 Reactive Energy EQ2 BN Power Averages ENERGY (AVG) only Reactive Energy EQ3 CN Power ENERGY (AVG) Real energy Real Energy EP1 AN Power...
- Page 83 Power Logger Recorded Values Measurement Saved Description function parameters SWELL-Phase BN VALUELOG VOLTAGE MAX VOLTS RMS Number of events per phase...
- Page 84 1735 Users Manual...
Need help?
Do you have a question about the 1735 and is the answer not in the manual?
Questions and answers