Table of Contents
Advertisement
Quick Links
ge.com
E
cc
n
RAK348R1 - Receiver
RAK364R1 - Receiver
RAK348T1 - Thermostat
RAK364T1 - Thermostat
ol
a
Ill
Ill
Espafiol
Rata
consultar
una
version
en espafiol de este manual
de instrucciones, visite nuestro
sitio de internet ge.com.
Fran_aise
Pour une version frangaise de
ce manuel d'utilisation, veuillez
visiter notre site web _ radresse
www.electromenagersge.ca
.......................................
5
Batteries ........................................
/4
Buttons .........................................
5
Clock ...........................................
6
..........................
9
................
15-14
...................
2
...10-12
Introduction
Overview
..........................
5
......................................
9
................................
7-8
.....................................
9
...................................
2
Tips ...........................
15
.....................................
16
49-7574
06-07 JR
Advertisement
Table of Contents

Subscribe to Our Youtube Channel
Related Manuals for GE RAK348R1


Summary of Contents for GE RAK348R1
-
Page 1: Table Of Contents
Tips ......Warranty ........Espafiol Rata consultar version en espafiol de este manual de instrucciones, visite nuestro sitio de internet ge.com. Pour une version frangaise de Fran_aise ce manuel d'utilisation, veuillez visiter notre site web _ radresse www.electromenagersge.ca 49-7574 06-07 JR... -
Page 2: Important Safety Information
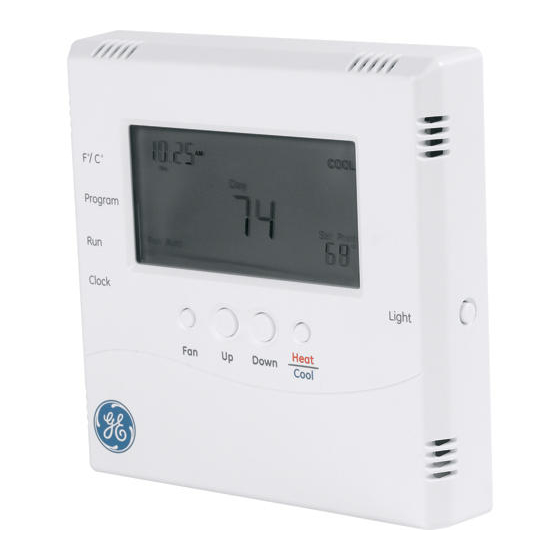
GE IS NOT RESPONSIBLE FOR ANY RADIO OR TV INTERFERENCE CAUSED BY UNAUTHORIZED MODIFICATIONS TO THIS EQUIPMENT. SUCH MODIFICATIONS COULD VOID THE USER'S AUTHORITY TO OPERATE THE EQUIPMENT. THIS EQUIPMENT COMPLIES WITH PART 15 OF THE FCC RULES. OPERATION IS SUBJECT... - Page 3 INTRODUCTION OVERVIEW THERMOSTAT CONTROL - Front littl Includes program period- Time and day of week H°rning' Day' Evening' Night Operat ng mode nd cat on - Toggles display - " 2°_" .._ HEAT,COOL, OFF Fahrenheit/Celsius o_yf I I_ RF connection with a control Puts thermostat into wl !_1 °...
-
Page 4: Batteries
Introduction. This two-part wireless thermostat sustem is designed to provide precision temperature control without the installation headaches and expense of wiring. Powered by four AA batteries, the thermostat will operate for approximately 1 ueaL and can be mounted in an U suitable location that will ensure good temperature control. -
Page 5: Backlight
Buttons. A four-button cluster is located on the front of the thermostat. o©©o Heat Down Cool These buttons are used in adjusting fan operation, changing oo_-_ Modeof the set point temperature up or down and changing operation operating mode of the thermostat. To the right are the nr_O_u display items that are changed... - Page 6 Setting the clock. In all set-up modes, the thermostat will flash the display item you are about to change. The UP and DOWN buttons change settings, the HEAT/COOL button is used to move to the next item. To set the clock, you will use the buttons marked CLOCK, UP, DOWN and HEAT/COOL. Step One Pressthe CLOCKbutton.
-
Page 7: Programming
Thermostat programming. The thermostat provides four program periods: Morning, Day, Evening and Night. A time and temperature can be set for each period. Upon initial power up, the thermostat loads time and temperature program default parameters for weekday and weekend days of the week. - Page 8 Thermostat programming (cont.). Step One Press the PROGRAM button to put the thermostat into the programming mode. The displag will blink all of the dag-of-the-week icons. Pressing the UP or DOWN button will toggle between the weekdag icons and the weekend icons. Ensure the displag is blinking the one gou want to program.
-
Page 9: Exiting Program Node
Navigating. You can quicklg step through to a specific item you want to change bg pressing the HEAT/COOL button until the item gou want to change is flashing. When the item gou want to change is flashing, use the UP or DOWN button to make gour change. Exiting program mode. -
Page 10: Installing Or Removing Receiver
installing or removing receiver. The thermostat and receiver will not operate as a sustem until the U are linked together through the installation process. The linking process binds one or more receivers to a thermostat so that the N will communicate with each other as a control system. - Page 11 Installing or removing receiver (cont.). Internal Buttons pB1-NETWORK A. Pressthe SW4-1NSTALL button Used to uninstall the thermostat inside the thermostat. Pressthe from receiver(s)it has been HEAT/COOLbutton on the front linked to. of the thermostat to select your SW12-RESET choice. Pressthe UP button to set Master Reset - Returns thermostat the receiver number (0-7)and to oil factory defaults.
- Page 12 receiver (cont.). Installing or removing Thermostat Installation Reset If there is difficultg installing a receiver, perform the following: Step One Press the SW4-1NSTALL button inside the thermostat. The "Install" icon will flash. You onlg need to begin the installation session to perform this reset. Step Two Press and hold the PB1-NETWORK button on the inside of the thermostat board for...
- Page 13 Frequently asked questions. "Where should I locate my thermostat?" For best results, the thermostat should be located approximatelg five feet above the floor on an inside wall in an area with good air circulation. A thermostat should not be located where air is stagnating, such as behind doors, in corners or under cabinets.
- Page 14 Frequently asked questions (cont.). "ljust installed the thermostat and the antenna sgm6ol goes on and off. What should I do?" A weak RFsignal between the thermostat and one or more receivers is the cause. The further away the thermostat and receiver are from each other, the weaker the signal. Distance and/or something shielding or blocking the RFsignal is the likely cause.
-
Page 15: Frequently Asked Questions
Troubleshooting tips. Problem Solution No display Hake sure batteries are fresh and installed correctlg. See the "Batteries" section in this manual. System fan does not Verifg that wiring is correct. come on properly Progrom schedule octivotes Check time (AH/PH} set on thermostat (see Progromming}. -
Page 16: Warranty
From the dote of the original purchase What GE Will Not Cover: i;[ Service trips to gour location. i_ Improper installation. If you have an installation problem, contact your installer. You are responsible for providing adequate electrical connections to the product.
Need help?
Do you have a question about the RAK348R1 and is the answer not in the manual?
Questions and answers