Patton electronics COPPERLINK 2160 Series User Manual
Long range ethernet extender
Hide thumbs
Also See for COPPERLINK 2160 Series:
- Getting started manual (107 pages) ,
- Quick start manual (8 pages) ,
- Getting started manual (107 pages)
Table of Contents
Advertisement
Quick Links
Advertisement
Table of Contents

Related Manuals for Patton electronics COPPERLINK 2160 Series


Summary of Contents for Patton electronics COPPERLINK 2160 Series
-
Page 1: User Manual
For Quick Start Installation CopperLink™ Model 2160 Series Long Range Ethernet Extender User Manual Sales Office: +1 (301) 975-1000 Technical Support: +1 (301) 975-1007 E-mail: support@patton.com WWW: www.patton.com Part Number: 07M2160-GS, Rev. D Revised: August 7, 2012... - Page 2 Patton Electronics Company, Inc. 7622 Rickenbacker Drive Gaithersburg, MD 20879 USA Tel: +1 (301) 975-1000 Fax: +1 (301) 869-9293 Support: +1 (301) 975-1007 Web: www.patton.com E-mail: support@patton.com Trademark Statement The term CopperLink is a trademark of Patton Electronics Company. All other trade- marks presented in this document are the property of their respective owners.
-
Page 3: Table Of Contents
Summary Table of Contents General information ............................17 Applications overview............................ 22 Hardware installation............................ 27 Web configuration ............................33 Console and Telnet configuration ......................... 69 Contacting Patton for assistance ......................... 103 Compliance information ..........................106 Specifications .............................. 108 Port pin-outs .............................. 111... -
Page 4: Table Of Contents
Table of Contents Summary Table of Contents ........................... 3 Table of Contents ............................4 List of Figures ..............................9 List of Tables ..............................11 About this guide ............................12 Audience................................12 Structure................................12 Precautions ................................13 Safety when working with electricity .......................14 Preventing Electrostatic Discharge Damage ....................15... - Page 5 Model 2160 Series User Manual Table of Contents Configuring the Model 2160..........................32 Web configuration requirements ........................32 Console configuration requirements .......................32 Telnet configuration requirements ........................32 Web configuration ............................33 Introduction ................................35 Setting Up the WMI .............................35 TCP/IP setup ..............................35 System Login ..............................35 Basic Configuration Options ..........................36...
- Page 6 Model 2160 Series User Manual Table of Contents WFQ Configuration ...........................57 IP DSCP Priority Table ........................58 IP DSCP Configuration Example .......................58 Rate Limit ...............................59 Flow Control ..............................59 Status Options...............................60 LINE Status ..............................60 Management Status ............................60 LAN Status ..............................61 Performance Status ............................61 Administration Options ............................62...
- Page 7 Model 2160 Series User Manual Table of Contents Clear .................................78 ................................78 VLAN ................................79 Mode ................................79 802.1Q VLAN ...........................80 Port-Based VLAN ..........................81 ................................82 Mode ................................82 Queue Schedule ............................82 Queue Weight ............................83 Queue Egress Rate ............................84 Port-Based Priority QoS ..........................84 VLAN Tag Priority QoS ...........................84 IP DSCP Priority QoS ..........................85...
- Page 8 Model 2160 Series User Manual Table of Contents Backup system configuration ........................100 Restore system configuration .........................100 Exit Command..............................102 Contacting Patton for assistance ......................... 103 Introduction ................................104 Contact information............................104 Warranty Service and Returned Merchandise Authorizations (RMAs)..............104 Warranty coverage ............................104 Out-of-warranty service ...........................105 Returns for credit ............................105...
-
Page 9: List Of Figures
List of Figures Model 2160 ................18 Model 2160 front panel LEDs . -
Page 10: Model 2160 Series User Manual
Model 2160 Series User Manual Remote Management Host section ............63 SNMP Administration page . -
Page 11: List Of Tables
List of Tables General conventions ..............16 Front panel LEDs . -
Page 12: About This Guide
About this guide This guide describes the CopperLink™ Model 2160 hardware, installation and basic configuration. Audience This guide is intended for the following users: • Operators • Installers • Maintenance technicians Structure This guide contains the following chapters and appendices: •... -
Page 13: Precautions
Model 2160 Series User Manual About this guide Precautions Notes, cautions, and warnings, which have the following meanings, are used throughout this guide to help you become aware of potential problems. are intended to prevent safety hazards that could result in per- sonal injury. -
Page 14: Safety When Working With Electricity
Model 2160 Series User Manual About this guide Safety when working with electricity The Model 2160 contains no user serviceable parts. The equipment shall be returned to Patton Electronics for repairs, or repaired by qualified service per- sonnel. Opening the Model 2160 case will void the warranty. WARNING Mains Voltage: Do not open the case the when the power cord is attached. -
Page 15: Preventing Electrostatic Discharge Damage
Model 2160 Series User Manual About this guide Preventing Electrostatic Discharge Damage When starting to install interface cards place the interface card on its shielded plastic bag if you lay it on your bench. Electrostatic Discharge (ESD) can damage equipment and impair electrical circuitry. It occurs when electronic printed circuit cards are improperly handled and can result in complete or intermittent failures. -
Page 16: Typographical Conventions Used In This Document
Model 2160 Series User Manual About this guide Typographical conventions used in this document This section describes the typographical conventions and terms used in this guide. General conventions The procedures described in this manual use the following text conventions: Table 1. General conventions Convention Meaning Indicates a cross-reference hyperlink that points to a figure, graphic, table, or sec-... -
Page 17: General Information
Chapter 1 General information Chapter contents Model 2160 overview ............................18 Model 2160 front panel............................19 LED descriptions ............................19 Model 2160 rear panel ............................20 Port descriptions .............................20 Reset button ..............................21 Ground terminal .............................21... -
Page 18: Model 2160 Overview
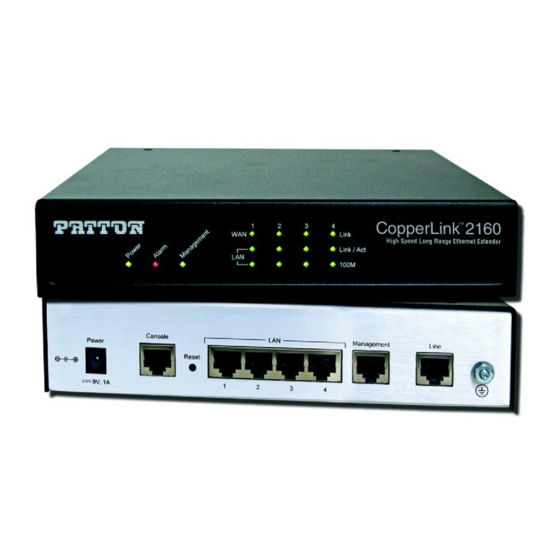
Model 2160 Series User Manual 1 • General information Model 2160 overview The Patton CopperLink™ Model 2160 simplifies and provides cost effective network extension by utilizing pre-existing twisted pair infrastructure enables service providers to offer broadband or data backhaul services to businesses, governments, and various institutions over existing last-mile, copper infrastructure. -
Page 19: Model 2160 Front Panel
Model 2160 Series User Manual 1 • General information Model 2160 front panel LED descriptions The front panel LEDs display the status of the power, system, Ethernet ports, and Line port. Figure 2 shows the front panel LED indicators and table 2 provides a description of the LED indicators’... -
Page 20: Model 2160 Rear Panel
Model 2160 Series User Manual 1 • General information Model 2160 rear panel Port descriptions The CopperLink™ Model 2160 rear panel ports are shown in figure 3 and described in table o l e L i n Power Console Management Line Reset 9V, 1A... -
Page 21: Reset Button
Model 2160 Series User Manual 1 • General information Reset button • To restart the unit with the current startup configuration—Press for less than 1 second and release the Reset button. The Model 2160 will restart with the current startup configuration. •... -
Page 22: Applications Overview
Chapter 2 Applications overview Chapter contents Introduction ................................23 Typical application ..............................23 Distance charts ..............................24 Distance Chart 2160 Series – Auto Mode (TCPAM-32/16) ................24 Distance Chart 2160 Series – Optimal Mode (TCPAM-128) .................25 Distance Chart 2160 Series – TCPAM-128 ....................26... -
Page 23: Introduction
Model 2160 Series User Manual 2 • Applications overview Introduction The Patton CopperLink™ Model 2160 simplifies and provides cost effective network extension by utilizing pre-existing twisted pair infrastructure enables service providers to offer broadband or data backhaul services to businesses, governments, and various institutions over existing last-mile, copper infrastructure. Today, more than ever, operators are finding the business case for leveraging their existing copper networks to be highly attractive from an ROI and initial investment perspective over fiber roll-outs. -
Page 24: Distance Charts
Model 2160 Series User Manual 2 • Applications overview Distance charts Distance Chart 2160 Series – Auto Mode (TCPAM-32/16) Table 4. Distance Chart 2160 Series – Auto Mode Line Rate Distance Line 2160 2161 2162 26 AWG/0.4mm 24 AWG/0.5mm 22 AWG/0.65mm Speed 2-Wire 4-Wire... -
Page 25: Distance Chart 2160 Series - Optimal Mode (Tcpam-128)
Model 2160 Series User Manual 2 • Applications overview Distance Chart 2160 Series – Optimal Mode (TCPAM-128) Table 5. Distance Chart Model 2160 Series – Optimal Mode Line Rate Distance Line 2160 2161 2162 26 AWG/0.4mm 24 AWG/0.5mm 22 AWG/0.65mm Speed 2-Wire 4-Wire... -
Page 26: Distance Chart 2160 Series - Tcpam-128
Model 2160 Series User Manual 2 • Applications overview Distance Chart 2160 Series – TCPAM-128 Table 6. Distance Chart Model 2160 Series – TCPAM-128 Line Rate Distance Line 2160 2161 2162 26 AWG/0.4mm 24 AWG/0.5mm 22 AWG/0.65mm Speed 2-Wire 4-Wire 8-Wire kbps kbps... -
Page 27: Hardware Installation
Chapter 3 Hardware installation Chapter contents Introduction ................................28 Planning the installation............................28 Network diagram ............................29 IP related information .............................29 AC Power Mains .............................29 Location and mounting requirements ......................30 Installing the Model 2160 .............................30 Unpacking the Model 2160 ..........................30 Connecting cables ............................30 Grounding the Model 2160 and connecting power ..................31 Configuring the Model... -
Page 28: Introduction
Model 2160 Series User Manual 3 • Hardware installation Introduction This chapter contains information for planning the installation of the Model 2160 with the following installa- tion procedures: • “Unpacking the Model 2160” on page 30 lists the contents of the shipping box •... -
Page 29: Network Diagram
Model 2160 Series User Manual 3 • Hardware installation Network diagram Draw a network overview diagram that displays all neighboring IP nodes, connected elements and telephony components. Figure 5 shows possible network connections to the Model 2160. Printer Notebook RAID Drive Server Desktop PC Switch... -
Page 30: Location And Mounting Requirements
Model 2160 Series User Manual 3 • Hardware installation Note When setting up your Model 2160 you must consider cable-length limitations and potential electromagnetic interference (EMI) as defined by the applicable local and international regulations. Ensure that your site is properly prepared before beginning installation. Location and mounting requirements The Model 2160 is intended to be placed on a desktop or similar sturdy, flat surface that offers easy access to the cables. -
Page 31: Grounding The Model 2160 And Connecting Power
Model 2160 Series User Manual 3 • Hardware installation Grounding the Model 2160 and connecting power In connecting to the power source, it is important to establish a good grounding connection first, then the power connection. Do the following: 1. Assemble a ground wire using #10 AWG wire with green-colored insulation and two ring terminals. Make the wire long enough to reach one of the following earth ground sources: –... -
Page 32: Configuring The Model 2160
Model 2160 Series User Manual 3 • Hardware installation Configuring the Model 2160 There are three different ways you can configure the Model 2160: the serial console, Telnet, or a web browser. Web configuration requirements Make sure that the PC you use for configuration has an Ethernet adapter and TCP/IP installed. The Model 2160 provides a browser interface that allows you to configure and manage the Ethernet Extender. -
Page 33: Web Configuration
Chapter 4 Web configuration Chapter contents Introduction ................................35 Setting Up the WMI .............................35 TCP/IP setup ..............................35 System Login ..............................35 Basic Configuration Options ..........................36 Operation mode and Management port ......................37 DHCP server ..............................37 ................................39 Review and save basic setup changes .......................40 Advanced Configuration Options..........................41 LINE... - Page 34 Model 2160 Series User Manual 4 • Web configuration IP DSCP Priority Table ........................58 IP DSCP Configuration Example......................58 Rate Limit ...............................59 Flow Control ..............................59 Status Options...............................60 LINE Status ..............................60 Management Status ............................60 LAN Status ..............................61 Performance Status ............................61 Administration Options ............................62 Security Administration...
-
Page 35: Introduction
Model 2160 Series User Manual 4 • Web configuration Introduction The Model 2160 provides a browser interface that allows you to configure and manage the Ethernet Extender. Make sure that the PC you use for configuration has an Ethernet adapter and TCP/IP installed. After you set up the IP address for the 2160, you can access the Ethernet Extender's Web interface applications directly in your browser by entering the IP address. -
Page 36: Basic Configuration Options
Model 2160 Series User Manual 4 • Web configuration Type the default User name root and default Password root and then click OK. For system security, you should change the user name and password after initial onfiguration. Figure 7. System login screen Basic Configuration Options This section contains information for setting up the operation mode and Management port IP, DHCP server, and LAN via the WMI. -
Page 37: Operation Mode And Management Port
Model 2160 Series User Manual 4 • Web configuration Operation mode and Management port To configure the operation mode and Management port in the WMI: 1. From the main menu, click Basic to display the basic installation page. Figure 9. Operation mode and Management port setup page 2. -
Page 38: Basic Dhcp Setup
Model 2160 Series User Manual 4 • Web configuration supervise and distribute IP addresses from a central point and automatically sends a new IP address when a computer is plugged into a different place in the network. The embedded DHCP server assigns network con- figuration information to 253 users (max) accessing the Internet in the same time. -
Page 39: Lan
Model 2160 Series User Manual 4 • Web configuration To configure LAN settings through the WMI: 1. Click on Basic from the main menu. Set up the Operation Mode and Management port, then click Next. Set up the DHCP Server, then click Next to reach the LAN page. Figure 11. -
Page 40: Review And Save Basic Setup Changes
Model 2160 Series User Manual 4 • Web configuration Review and save basic setup changes 1. Once you have entered information on the pages for Operation Mode and Management Port, DHCP Server, and LAN, the Basic Setup Review page will display to confirm your changes. Figure 12. -
Page 41: Advanced Configuration Options
Model 2160 Series User Manual 4 • Web configuration Advanced Configuration Options This section contains information for setting up advanced options for the Model 2160 via the WMI. Advanced setup contains Model 2160 Line, VLAN, QoS and Rate Control parameters. Note The advanced functions are only intended for administrators to set up. -
Page 42: Tcpam Type
Model 2160 Series User Manual 4 • Web configuration TCPAM Type TCPAM (Trellis Coded Pulse Amplitude Modulation) is the standard used for line coding. Select the TCPAM type from the drop-down list. Auto is the default option for TCPAM. You can also manually set the TCPAM type. -
Page 43: Vlan
Model 2160 Series User Manual 4 • Web configuration VLAN Click on VLAN under Advanced on the main menu to reach the VLAN advanced configuration page. Figure 14. VLAN page VLAN (Virtual Local Area Network) allows a physical network to be partitioned into multiple logical net- works. -
Page 44: Vlan Diagram
Model 2160 Series User Manual 4 • Web configuration VID 20 WAN4 WAN5 VID 10 VID 30 WAN3 WAN6 WAN2 WAN7 WAN1 WAN8 Backbone CopperLink Model 2160 CopperLink“2160 Long Range Ethernet Extender Long Range Ethernet Extender LAN2 LAN1 LAN3 LAN4 VID 30 VID 10 VID 20... -
Page 45: 802.1Q Tag-Based Vlan
Model 2160 Series User Manual 4 • Web configuration 802.1Q Tag-Based VLAN Click on VLAN under Advanced on the main menu to reach the VLAN advanced configuration page. Then, select the radio button for 802.1Q Tag-Based VLAN to display the configuration options. Figure 16. -
Page 46: Tag-Based Vlan Overview
Model 2160 Series User Manual 4 • Web configuration Tag-Based VLAN Overview. Figure 17 shows the breakdown of the VLAN tag field. Figure 17. VLAN tag field The Tag Control Information (TCI) section of a VLAN tag includes information on the user Priority level, the Canonical Format Indicator (CFI) and VLAN ID (VID). -
Page 47: Configuring 802.1Q Vlan Tagging
Model 2160 Series User Manual 4 • Web configuration Ports in the same VLAN group share the same frame broadcast domin thus increase network performance through reduced boardcast traffic. You can modify VLAN groups at any time by adding, moving or changing ports without any re-cabling. -
Page 48: Port-Based Vlan
Model 2160 Series User Manual 4 • Web configuration • Untagged VLANs - Untagged (or static) VLANs are typically used to reduce broadcast traffic and to increase security. A group of network users assigned to a VLAN form a broadcast domain that is separate from other VLANs configured on the Model 2160. -
Page 49: Quality Of Service (Qos)
Model 2160 Series User Manual 4 • Web configuration Quality of Service (QoS) Quality of Service (QoS) refers to both a network's ability to deliver data with minimum delay, and the net- working methods used to control the use of bandwidth. Without QoS, all traffic date is equally likely to be dropped when the network is congested. -
Page 50: Port Based Priority
Model 2160 Series User Manual 4 • Web configuration Port Based Priority Click on QoS under Advanced on the main menu to reach the QoS advanced configuration page. Then, select the radio button for Port Based Priority to display the configuration options. Figure 21. -
Page 51: Wrr Example
Model 2160 Series User Manual 4 • Web configuration • Weight Round Robin (WRR): All received packets will be stored into Queue 1, Queue 2, Queue 3, and Queue 4. Assign a weight value for each queue. Then, WRR will re-assemble all packets from the four queues based on the weight assignments. -
Page 52: Wrr Configuration
Model 2160 Series User Manual 4 • Web configuration • Strictly Priority (SP): The SP Queue Type uses queues that are based on priority only. SP transmits the highest priority queue first, then the next highest priority queue, and so on. However, if there is always some content in the highest priority queue, then the other packets in the rest of queues will not be sent until the highest priority queue is empty. -
Page 53: Vlan Tag Priority
Model 2160 Series User Manual 4 • Web configuration VLAN Tag Priority Click on QoS under Advanced on the main menu to reach the QoS advanced configuration page. Then, select the radio button for VLAN Tag Priority to display the configuration options. Figure 29. -
Page 54: Scheduling Configuration
Model 2160 Series User Manual 4 • Web configuration Table 9. VLAN Tag Priority Levels Priority Level Traffic Type 0 (default) Best Effort Background Spare Excellent Effort Controlled Load Video, less than 100 milliseconds latency and jitter Voice, less than 10 milliseconds latency and jitter Network Control Scheduling Configuration. -
Page 55: Vlan Tag Priority Table
Model 2160 Series User Manual 4 • Web configuration VLAN Tag Priority Table. Select a packet with an assigned priority to correspond with each queue. Figure 33. QoS - VLAN Tag Priority Table Configuration Example. As an example, you can set the Model 2160 to use Weighted Round-Robin (WRR) queuing that specifies a relative weight of each queue. -
Page 56: Ip Dscp Priority
Model 2160 Series User Manual 4 • Web configuration Queue 2 Queue 0 Queue 2 Queue 1 Queue 2 Queue 2 Queue 3 Figure 34. Service by WRR IP DSCP Priority Differentiated Services Code Point (DSCP) is the 6-bit field in the header of IP packets, and it is for packet classification purposes. -
Page 57: Scheduling Configuration
Model 2160 Series User Manual 4 • Web configuration Click on QoS under Advanced on the main menu to reach the QoS advanced configuration page. Then, select the radio button for IP DSCP Priority to display the configuration options. Scheduling Configuration. The 2160 provides three combinations of four commonly used techniques: Type 1, Type 2 and Type 3. -
Page 58: Ip Dscp Priority Table
Model 2160 Series User Manual 4 • Web configuration IP DSCP Priority Table. Select the queue for each DSCP level. Each DSCP value (from 0 to 63) is mapped to a Queue value (from 0 to 3) from the drop-down list The number 0 represents the lowest priority and num- ber 3 represents the highest priority and according various queuing strategies to tailor performance to require- ments. -
Page 59: Rate Limit
Model 2160 Series User Manual 4 • Web configuration Rate Limit Click on Rate Limit under Advanced on the main menu to reach the Rate Control configuration page. Figure 40. Rate Limit page Limiting bandwidth to specific users and ports helps control network congestion, ensure high performance, create efficient networks, and prevent a small number of users from monopolizing network bandwidth. -
Page 60: Status Options
Model 2160 Series User Manual 4 • Web configuration Status Options This section contains information for monitoring status options for the Model 2160 via the WMI. The Status menu contains Line, Management, LAN, Performance and Syslog parameters. LINE Status The LINE Status includes information for the run-time device status, mode, Bitrate and Performance infor- mation such as SNR margin, atteunation and CRC error count. -
Page 61: Lan Status
Model 2160 Series User Manual 4 • Web configuration LAN Status The LAN Status page displays information about a LAN port. The system will allow you to select which LAN port to view. Figure 44. LAN Status page Performance Status The Performance Status page displays information about the uptime and errors of the system. -
Page 62: Administration Options
Model 2160 Series User Manual 4 • Web configuration Administration Options This section allows you to configure administration options for Security, Simple Network Management Proto- col (SNMP) and Remote System Log. Security Administration For system security, you should change the default user name and password during initial setup. Otherwise, unauthorized persons can access the Model 2160 and change the parameters. -
Page 63: Remote Management Hosts
Model 2160 Series User Manual 4 • Web configuration Remote Management Hosts The Remote Management Host section of the Security Administration page enables you to set up the legal IP addresses from which authorized persons can configure the Model 2160. This is the most secure way for the network administrator to set up the legal address of configuration. -
Page 64: Community Pool
Model 2160 Series User Manual 4 • Web configuration Click SNMP in the Administration menu to set up the parameters. Figure 49. SNMP Administration page Community Pool An SNMP community is a group of devices and management stations running SNMP. It helps define where information is sent. -
Page 65: Trap Host Pool
Model 2160 Series User Manual 4 • Web configuration After configuring the community pool, click Finish. The browser will prompt the configured parameters and check it before writing into NVRAM. Press Restart to reboot the Model 2160 with the new settings. Click Continue to configure other options. -
Page 66: Utility Options
Model 2160 Series User Manual 4 • Web configuration Utility Options This section allows you to manage utility options for the Model 2160, including system information, the con- figuration tool, upgrade information, log out of the system, and restart the system. System Information To review system information, click System Info in the Utility menu. -
Page 67: Upgrade
Model 2160 Series User Manual 4 • Web configuration Note This option will change all of the settings back to factory default. You will lose all of your current settings. • Restore Configuration: Use this option to recover the backup configuration easily. Click Finish after select- ing Restore Configuration. -
Page 68: Logout
Model 2160 Series User Manual 4 • Web configuration Logout To exit the Model 2160 Web Management Interface securely, click Logout in the Utility menu. You have to log in with your password again after you log out. This is recommended after you finish a management session for security reasons. -
Page 69: Console And Telnet Configuration
Chapter 5 Console and Telnet configuration Chapter contents Introduction ................................71 Log in to the console interface ........................71 Log in using Telnet ............................71 Interface commands ............................71 Window structure ............................72 Main Menu Tree ..............................73 Menu tree for authorized users ........................73 Menu tree for unauthorized users ........................74 Enable Command Menu ............................75... - Page 70 Model 2160 Series User Manual 5 • Console and Telnet configuration Host Name ..............................89 Factory Default ...............................89 Status Command Menu ............................90 LINE Status ..............................90 Interface Status ...............................91 Show Command Menu ............................92 Write Command ..............................93 Reboot Command..............................93 Ping Command ..............................93 Administration Command Menu ..........................95 User Profile ..............................95...
-
Page 71: Introduction
Model 2160 Series User Manual 5 • Console and Telnet configuration Introduction This chapter provides information for configuring the Model 2160 by using the serial console with Telnet. Log in to the console interface The console port is a RJ-48C connector that provides a connection to a PC for monitoring and configuring the Model 2160. -
Page 72: Window Structure
Model 2160 Series User Manual 5 • Console and Telnet configuration The Model 2160 uses a menu-driven interface for serial console and Telnet management. This interface dis- plays all available commands for configuring the Ethernet Extender. The following figure shows an example of the menu-driven interface. In the menu, scroll up/down by pressing the I / K keys. -
Page 73: Main Menu Tree
Model 2160 Series User Manual 5 • Console and Telnet configuration Main Menu Tree The commands available in the main menu tree depend on if you have logged in using a supervisor password (authorized user) or not (unauthorized user). An authorized user can access all of the configuration commands in the subdirectories using the enable command. -
Page 74: Menu Tree For Unauthorized Users
Model 2160 Series User Manual 5 • Console and Telnet configuration Figure 61. Main screen for authorized users Menu tree for unauthorized users Unauthorized users may access the following configuration commands for the Model 2160. Figure 62. Main menu for unauthorized users Figure 63. -
Page 75: Enable Command Menu
Model 2160 Series User Manual 5 • Console and Telnet configuration Enable Command Menu The enable command menu lists commands for setting up the Model 2160. Move the cursor “ >>” to enable and press Enter. Type the supervisor password, which is root. ---------------------------------------------------------------------- Command: enable <CR>... -
Page 76: Setup Command Menu
Model 2160 Series User Manual 5 • Console and Telnet configuration Setup Command Menu The setup command menu lists commands for initially configuring the Model 2160. Move the cursor “ >>” to setup in the main menu and press Enter. When you enter the setup command, the following menu displays: >>... -
Page 77: Mode
Model 2160 Series User Manual 5 • Console and Telnet configuration Mode There are two types of Line mode: • STU-C: Central Office (CO) terminal • STU-R: Customer Premise Equipment (CPE) Link Select the line type for your model. Line type means how many wires you want to use on the CopperLink con- nection. -
Page 78: Line Probe
Model 2160 Series User Manual 5 • Console and Telnet configuration Line Probe For adaptive mode applications, set the Line Probe to Enable. The Model 2160 will adapt the data rate accord- ing to the line status. For all other applications, set the Line Probe to Disable. Clear Use the clear command to reset the CRC error count. -
Page 79: Vlan
Model 2160 Series User Manual 5 • Console and Telnet configuration VLAN Virtual LAN (VLAN) is defined as a group of devices on one or more LANs that are configured so that they can communicate as if they were attached to the same wire, when in fact they are located on a number of differ- ent LAN segments. -
Page 80: Q Vlan
Model 2160 Series User Manual 5 • Console and Telnet configuration 802.1Q VLAN. To modify the VLAN rule, move the cursor to modify and press Enter. ----------------------------------------------------------------------------- Command: setup vlan modify <1~8> <0~4094> <string> Message: Please input the following information. VLAN table entry index <1~8>: 1 VID value (ENTER for default) <1>: 10 VLAN port membership (ENTER for default) <111111>:... -
Page 81: Port-Based Vlan
Model 2160 Series User Manual 5 • Console and Telnet configuration ----------------------------------------------------------------------------- Command: setup vlan link_mode <1~6> <Access|Trunk> Message: Please input the following information. Port index <1~6>: 1 Port link type (TAB Select) <Access>: ----------------------------------------------------------------------------- Table 20 shows the options available within the 802.1Q Tag VLAN command menu: Access The port can receive or send untagged packets. -
Page 82: Qos
Model 2160 Series User Manual 5 • Console and Telnet configuration Quality of Service (QoS) refers to both a network's ability to deliver data with minimum delay, and the net- working methods used to control the use of bandwidth. Without QoS, all traffic date is equally likely to be dropped when the network is congested. -
Page 83: Queue Weight
Model 2160 Series User Manual 5 • Console and Telnet configuration ----------------------------------------------------------------------------- Command: setup qos qSchdl <Type1|Type2|Type3> Message: Please input the following information. Operation type (TAB Select) <Type1>: Type1 ----------------------------------------------------------------------------- The Queue types are Weight Round Robin (WRR), Weighted Fair Queuing (WFQ), Best Effort (BE), and Strictly Priority (SP). -
Page 84: Queue Egress Rate
Model 2160 Series User Manual 5 • Console and Telnet configuration Queue Egress Rate Queues 0-3 can set up the egress rate for WFQ configuration. q0GrssRt Modify queue 0 egress rate q1GrssRt Modify queue 1 egress rate q2GrssRt Modify queue 2 egress rate q3GrssRt Modify queue 3 egress rate The egress rate N value can be set from 0 to 22. -
Page 85: Ip Dscp Priority Qos
Model 2160 Series User Manual 5 • Console and Telnet configuration VLAN Tag Priority uses the tag field information which has been inserted into an Ethernet frame. If a port has an 802.1Q-compliant device attached (such as this Ethernet Extender), these tagged frames can carry VLAN membership information. -
Page 86: List
Model 2160 Series User Manual 5 • Console and Telnet configuration Table 28. IP DSCP Priority QoS Options DSCP DSCP DSCP DSCP Queue Index Queue Index Queue Index Queue Index List Use the list command to view the QoS settings. Rate The rate command menu lists commands for setting the port rate. -
Page 87: Management
Model 2160 Series User Manual 5 • Console and Telnet configuration Management The Management command menu lists commands for configuring the IP address and subnet mask for the Management port. Move the cursor “ >>” to Management in the setup menu and press Enter. The following menu displays: address Management IP address and subnet mask... -
Page 88: Dhcp Server
Model 2160 Series User Manual 5 • Console and Telnet configuration DHCP Server The dhcp command menu lists commands for configuring DHCP settings. Move the cursor “ >>” to dhcp in the setup menu and press Enter. The following menu displays: generic DHCP server generic parameters >>... -
Page 89: Dns Proxy
Model 2160 Series User Manual 5 • Console and Telnet configuration When using the fixed host entry function, you must enter the MAC address and IP address at the same time. You can configure up to 10 maximum fixed host IP addresses. Use the list command to view the DHCP configuration. -
Page 90: Status Command Menu
Model 2160 Series User Manual 5 • Console and Telnet configuration Status Command Menu The status command menu lists commands for viewing the system status of interfaces on the Model 2160. Move the cursor “ >>” to status in the main menu and press Enter. When you enter the status command, the following menu displays: >>... -
Page 91: Interface Status
Model 2160 Series User Manual 5 • Console and Telnet configuration Interface Status To view the status of the Management interface, move the cursor “ >>” to interface in the status menu and press Enter. Figure 65. Interface Status Table 32. Interface Statistics Parameter Description InOctets... -
Page 92: Show Command Menu
Model 2160 Series User Manual 5 • Console and Telnet configuration Show Command Menu The show command menu lists commands for viewing system and configuration information for the Model 2160. Move the cursor “ >>” to show in the main menu and press Enter. When you enter the show command, the following menu displays: >>... -
Page 93: Write Command
Model 2160 Series User Manual 5 • Console and Telnet configuration Write Command The write command saves all new configuration changes to Flash on the Model 2160. You must use the write command and reboot the Ethernet Extender for new configuration changes to tak effect. Move the cursor “ >>”... - Page 94 Model 2160 Series User Manual 5 • Console and Telnet configuration 1~65534: Sets the number of ping request packets from 1 to 65534 -t : Results run continuously until you press the Ctrl key to stop the process • Data Size: Select from 1 to 1999 Ping Command...
-
Page 95: Administration Command Menu
Model 2160 Series User Manual 5 • Console and Telnet configuration Administration Command Menu The admin command menu lists commands for modifying user profiles, Telnet access, Simple Network Man- agement Protocol (SNMP), and supervisor information (username and password). Move the cursor “ >>” to admin in the main menu and press Enter. -
Page 96: Security
Model 2160 Series User Manual 5 • Console and Telnet configuration There are two UI modes for setting up the Model 2160, command and menu mode. The menu mode uses a menu-driven interface. The command mode uses line commands. (Command mode is not covered in this manual). -
Page 97: Snmp
Model 2160 Series User Manual 5 • Console and Telnet configuration ----------------------------------------------------------------------------- Command: admin security ip_pool modify <1~16> <ip> Message: Please input the following information. Client address pool entry number <1~16>: 1 Client IP address (ENTER for default) <0.0.0.0>: ----------------------------------------------------------------------------- You can configure up to sixteen entries for legal address pools. -
Page 98: Trap Host
Model 2160 Series User Manual 5 • Console and Telnet configuration ----------------------------------------------------------------------------- Command: ... 2 edit <Disable|Enable> <string> <Read_Only|Read_Write|Denied> Message: Please input the following information. Validate (TAB Select) <Enable>: Enable Community (ENTER for default) <private>: Access right (TAB Select) <Denied>: ----------------------------------------------------------------------------- You can set up the following options: •... -
Page 99: Supervisor Password And Id
Model 2160 Series User Manual 5 • Console and Telnet configuration You can set up the following options: • Version: Set to Disable, Version 1 or Version 2. • Trap host IP address: Enter the dtrap host IP address. • Community: Enter the community password. -
Page 100: Utility Command Menu
Model 2160 Series User Manual 5 • Console and Telnet configuration Utility Command Menu Model 2160 has three utility tools embedded in the firmware: upgrade, backup and restore. You can update the new firmware via TFTP upgrade tools, backup the configuration via the TFTP backup tool and restore the configuration via the TFTP restore tool. - Page 101 Model 2160 Series User Manual 5 • Console and Telnet configuration ----------------------------------------------------------------------------- Utility Command Menu...
-
Page 102: Exit Command
Model 2160 Series User Manual 5 • Console and Telnet configuration Exit Command To log out of the system without saving your changes, move the cursor “ >>” to exit in the main menu and press Enter. enable Modify command privilege setup Configure system status... -
Page 103: Contacting Patton For Assistance
Chapter 6 Contacting Patton for assistance Chapter contents Introduction ................................104 Contact information............................104 Warranty Service and Returned Merchandise Authorizations (RMAs)..............104 Warranty coverage ............................104 Out-of-warranty service ...........................105 Returns for credit ............................105 Return for credit policy ...........................105 RMA numbers ..............................105 Shipping instructions ..........................105... -
Page 104: Introduction
Model 2160 Series User Manual 6 • Contacting Patton for assistance Introduction This chapter contains the following information: • “Contact information”—describes how to contact Patton technical support for assistance. • “Warranty Service and Returned Merchandise Authorizations (RMAs)”—contains information about the Model 2160 warranty and obtaining a return merchandise authorization (RMA). -
Page 105: Out-Of-Warranty Service
Model 2160 Series User Manual 6 • Contacting Patton for assistance Out-of-warranty service Patton services what we sell, no matter how you acquired it, including malfunctioning products that are no longer under warranty. Our products have a flat fee for repairs. Units damaged by lightning or other catastro- phes may require replacement. -
Page 106: Compliance Information
Appendix A Compliance information Chapter contents Compliance .................................107 EMC compliance: ............................107 Radio and TV interference (FCC Part 15)......................107 CE Declaration of Conformity ..........................107 Authorized European Representative ........................107... -
Page 107: A Compliance Information
Model 2160 Series User Manual A • Compliance information Compliance EMC compliance: • FCC Part 15, Class A • EN55022, Class A • EN55024 Radio and TV interference (FCC Part 15) This equipment generates and uses radio frequency energy, and if not installed and used properly—that is, in strict accordance with the manufacturer's instructions—may cause interference to radio and television recep- tion. -
Page 108: Specifications
Appendix B Specifications Chapter contents Line Connector ..............................109 Line Modulation ..............................109 Ethernet Connector.............................109 Protocols..............................109 VLAN Support..............................109 QoS Support ...............................109 Management Connector............................109 Management Interface............................110 Front Panel Indicators ............................110 Power Supply ..............................110 Environment ...............................110 Dimensions .................................110 Weight ................................110... -
Page 109: Line Connector
Model 2160 Series User Manual B • Specifications Line Connector Shielded RJ-45 Line Modulation TC-PAM 32 TC-PAM 16 TC-PAM 128 Ethernet Connector 4 x 8-position shielded RJ-45 Auto-sensing 10/100Base-TX with half or full-duplex operation LAN Protocols 802.1d Transparent Bridging 2K MAC address learning bridge VLAN Support IEEE 802.1q VLAN Tagging Port Based VLAN, up to 4K VLANs... -
Page 110: Management Interface
Model 2160 Series User Manual B • Specifications Management Interface Web based GUI CLI for local and console access; password protected; SNMP v1/v2 (RFC 1157/1901/1905) agent and MIB (RFC 1213/1493) EFM OAM (IEEE 802.3af) Software upgradeable via web-browser/TFTP Front Panel Indicators Power, Alarm, Diagnostic, WAN Link (x4), Ethernet Link (x4), Ethernet 100M (x4) Power Supply AC: Universal Input (UI)—90–240 VAC (50~60Hz) -
Page 111: Port Pin-Outs
Appendix C Port pin-outs Chapter contents Introduction ................................112 Console port................................112 Ethernet ................................113 Line (CopperLink) ..............................113... -
Page 112: C Port Pin-Outs
Model 2160 Series User Manual C • Port pin-outs Introduction This section provides pin-out information for the ports of the Model 2160. Console port Configuration settings: 9600 bps, 8 bits, no parity, 1 stop bit, no flow control 8–RTS (N/C) 7–CTS (N/C) 6–TD 5–RD... -
Page 113: Ethernet
Model 2160 Series User Manual C • Port pin-outs Ethernet Table 34. RJ45 socket 10/100Base-T Signal Note Pins not listed are not used. Line (CopperLink) Table 35. RJ45 socket CopperLink Signal TRD0+ 2160 TRD0- TRD1+ 2161 TRD1- TRD2+ TRD2- TRD3+ 2162 TRD3- Ethernet...