Jura Impressa F7 Quick Reference Manual
Hide thumbs
Also See for Impressa F7:
- Instructions for use manual (32 pages) ,
- Instructions for use manual (56 pages) ,
- Instructions for use manual (52 pages)
Table of Contents
Advertisement
Quick Links
Quick Reference Guide
This Guide does not replace the Operating Instructions.
For details and cautions you must read all instructions.
Traces of Coffee Grounds in New Machine?
This is normal! Grinder was tested during assembly with beans.
Despite cleaning, traces of ground coffee may be found.
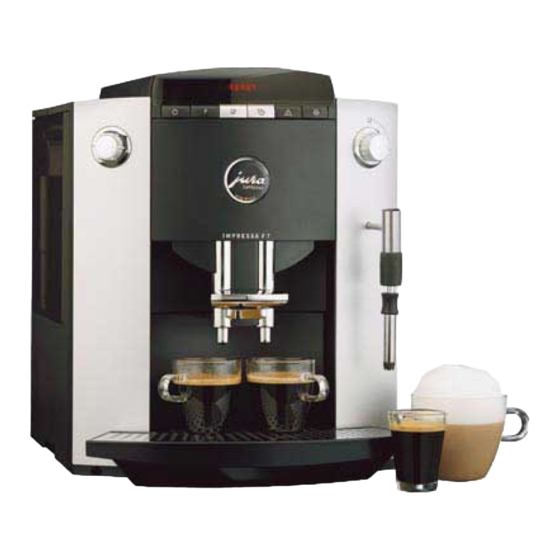
Impressa F7
Control Panel
On/Off P Button 1-Cup 2-Cup
DIAL
Dual Coffee
Dispenser Nozzels
RED TEXT
represents information in the display.
A) First Time Ever Preparation
1. Fill water in tank and beans in bean container.
2. DO NOT install the Water Filter Cartridge now!
3. Push ON/OFF button.
neath the frother and turn the SELECTOR to the water
symbol.
SYSTEM
frother into the cup and stops automatically.
Turn the SELECTOR to the Cup Symbol.
HEATING.
4. Place a cup underneath the coffee spout and push the
RINSE button. READY. Place a large cup underneath the
coffee spout and press the 1-CUP button. The F7 starts
grinding and brews coffee. Discard the first two cups.
READY.
B) Daily Preparation
• Fill fresh water in tank and check bean container.
• Push ON/OFF button: HEATING. RINSE.
• Place a cup under the coffee spouts and press the RINSE
button. READY.
Impressa F7
READY
OPEN
FILLING. Water pumps through the
PRESS
RINSE.
SELECTOR
(enlarged view)
a. Cup
b. Steam / Water
Rinse
SELECTOR
Dual Frother PLUS
TAP. Place a cup under-
a
Steam
Frother
sleeve
(slides up
and down)
CLOSE
SYSTEM
FILLING.
b
TAP.
Advertisement
Table of Contents

Subscribe to Our Youtube Channel
Related Manuals for Jura Impressa F7


Summary of Contents for Jura Impressa F7
- Page 1 Impressa F7 Quick Reference Guide This Guide does not replace the Operating Instructions. For details and cautions you must read all instructions. Traces of Coffee Grounds in New Machine? This is normal! Grinder was tested during assembly with beans. Despite cleaning, traces of ground coffee may be found. SELECTOR Impressa F7 (enlarged view)
- Page 2 C) Factory Settings / Programming Functions Filter: – Unit On: Not Set Hardness: Level 2 Off Aft Hrs: 2 HRS Aroma: ROBUST Cups Made: Temperature: HIGH Language: English Time: Not Set Display: OZ. and AM/PM D) Grinding and Brewing • Push the DIAL. Display shows the cup size, e.g. 4.0 OZ.
- Page 3 Regulating Milk Temperature To increase the milk temperature use the steaming position. H) Cleaning the Frother Should be done immediately after use! Takes approx. 15 sec.! • Place a cup underneath the frother. Turn the SELECTOR for 5 seconds to the cup symbol. Wipe frother clean. J) Programming Push and hold the P button until the display shows FILTER...
- Page 4 PRESS RINSE. Push the RINSE button. CLEANING. After a moment the display shows TABLET. 3. Open the ground coffee lid and drop one tablet into the coffee funnel. Close lid. PRESS RINSE. Push the RINSE button. CLEANING. After a few minutes: EMPTY TRAY.
Need help?
Do you have a question about the Impressa F7 and is the answer not in the manual?
Questions and answers