
Related Manuals for Sharp AY-249E-T


Summary of Contents for Sharp AY-249E-T
- Page 1 AY-A189E-T AY-A249E-T SPLIT TYPE ROOM AIR CONDITIONER SPL∑T KL∑MA OPERATION MANUAL KULLANMA KILAVUZU OUTDOOR UNIT INDOOR UNIT ∑Ç ÜN∑TE DIΩ ÜN∑TE AY-A189E-T AE-A189E AY-A249E-T AE-A249E...
-
Page 3: Table Of Contents
ENGLISH Thank you for purchasing a Sharp air conditioner. Please read this manual carefully before operating the product. CONTENTS • AUXILIARY MODE ......... E-11 • PRECAUTIONS ........... E-1 • TEST RUN MODE ........E-12 • PART NAMES ..........E-2 • ADDITIONAL NOTES ON OPERATION E-13 •... -
Page 4: Part Names
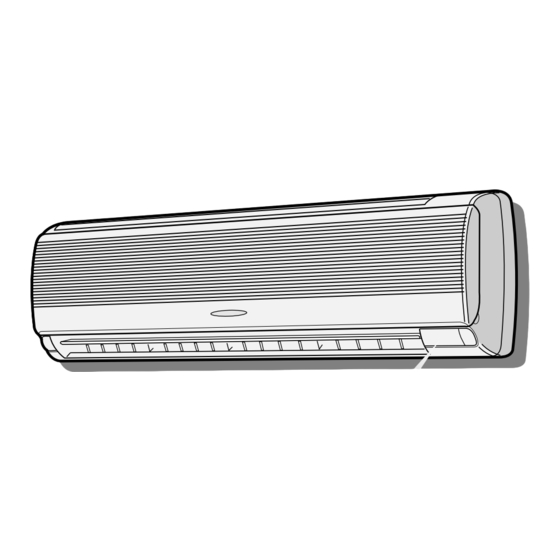
PART NAMES INDOOR UNIT 1 Inlet (Air) 2 Open Panel 3 Operation panel 4 Air Filters 5 Indicator Panel 6 Power Supply Cord (AY-A189E-T only) 7 Vertical Adjustment Louvre 8 Horizontal Adjustment Louvres 9 Outlet (Air) 0 Remote Control Hold the bottom corners of the open panel and gently pull the panel outwards. - Page 5 @@ @@ PP PP @@ @@ PP PP @@ @@ PP PP @@ @@ PP PP @@ @@ PP PP @@ @@ PP PP @@ @@ PP PP @@ @@ PP PP @@ @@ PP PP @@ @@ PP PP @@ @@ PP PP @@ @@...
-
Page 6: Using The Remote Control
USING THE REMOTE CONTROL INSTALLING BATTERIES Use two size-AAA (R03) batteries. Remove the remote control cover. Remote control cover Insert batteries in the compart- ment, making sure the ± and — polarities are correctly aligned. » The display indicates "AM 6:00"... - Page 7 CAUTION » Do not allow the signal receiver window to receive strong direct sunlight, since it can adversely affect its operation. If the signal receiver window is exposed to direct sunlight, close a curtain to block the light. » Using a fluorescent lamp with a quick starter in the same room may interfere with transmission of the signal.
-
Page 8: Basic Operation
@@ @@ PP PP @@ @@ PP PP @@ @@ PP PP @@ @@ PP PP @@ @@ PP PP @@ @@ PP PP @@ @@ PP PP @@ @@ PP PP @@ @@ PP PP @@ @@ PP PP @@ @@ PP PP @@ @@... - Page 9 TIPS ABOUT AUTO MODE In the AUTO mode, the temperature setting and mode are automatically selected according to the room temperature when the unit is turned on. Automatic Operation Room temp. at opera- tion start-up Mode Thermostat Setting Below 21°C HEAT 23°C 21°C-24°C...
-
Page 10: Adjusting The Air Flow Direction
ADJUSTING THE AIR FLOW DIRECTION VERTICAL AIR FLOW The air flow direction is automatically preset in each mode as follows for optimum comfort: COOL and DRY mode Horizontal air flow FAN ONLY and HEAT mode Diagonal air flow HOW TO ADJUST THE AIR FLOW DIRECTION Adjustment range Press the SWING button on the remote control once. -
Page 11: Timer Operation
TIMER OPERATION NOTE: Before setting the timer, make sure the clock is properly set with the current time. TIMER OFF Press the TIMER OFF ( ) button. The TIMER OFF indicator will blink; press the TIME ADVANCE or REVERSE buttons to set the desired time. - Page 12 TIMER OPERATION TIMER ON Press the TIMER ON ( ) button. The TIMER ON indicator will blink. Press the TIME ADVANCE or REVERSE button to set the desired time. (The time can be set in 10-minute incre- ments.) Point the remote control at the signal receiver window on the unit and press the TIMER SET (SET/C) button.
-
Page 13: One-Hour Off Timer
ONE-HOUR OFF TIMER When the ONE-HOUR OFF TIMER is set, the unit will stop operating after one hour. Press the ONE-HOUR OFF TIMER button. » The remote control displays “1 H”. » The unit will stop operating after one hour. To turn off the unit within an hour before the ONE-HOUR OFF TIMER activates, press the ON/OFF button. -
Page 14: Test Run Mode
TEST RUN MODE Use the test run mode only for a test operation. Do not use the test run mode for other than operation testing since the thermostat control is inactive in this mode and the unit remains in continuous operation. Make sure the unit is turned off before conducting a test run. -
Page 15: Additional Notes On Operation
ADDITIONAL NOTES ON OPERATION OPERATING TEMPERATURE RANGE » The built-in protective INDOOR TEMP. OUTDOOR TEMP. device may prevent the 32˚C D.B. 43˚C D.B. unit from operating when upper limit 23˚C W.B. used out of this range. COOLING 21˚C D.B. 21˚C D.B. »... -
Page 16: Maintenance
MAINTENANCE Be sure to disconnect the power cord from the wall outlet or turn off the circuit breaker before performing any maintenance. CLEANING THE FILTERS The air filters should be cleaned every two weeks. TURN OFF THE UNIT REMOVE THE FILTERS 1 Open the front panel. -
Page 17: Before Calling For Service
BEFORE CALLING FOR SERVICE The following conditions do not denote equipment malfunctions UNIT DOES NOT OPERATE SWISHING NOISE The unit will not operate if it is turned on The soft, swishing noise is the sound immediately after it is turned off. The unit of the refrigerant flowing inside the will not operate immediately after the mode unit. -
Page 18: Option Kit
BEFORE CALLING FOR SERVICE IF THE UNIT FAILS TO RECEIVE THE REMOTE CONTROL SIGNAL Check whether the re- Try to send the signal again Check whether the re- mote control batteries with the remote control mote control batteries have become old and pointed properly towards are installed with the weak. -
Page 19: Önlemler
TÜRKÇE Sharp klima satın aldıπınız için teµekkür ederiz. Lütfen, kliman∂z∂ çalıµtırmadan önce bu kılavuzu dikkatle okuyun. ∑Ç∑NDEK∑LER • YARDIMCI MOD ........T-11 • ÖNLEMLER ..........T-1 • TEST MODU ........... T-12 • PARÇALARIN ∑S∑MLER∑ ......T-2 • ∑ΩLET∑MLE ∑LG∑L∑ ∑LAVE NOTLAR ..T-13 •... -
Page 20: Parçalarin ∑S∑Mler
PARÇALARIN ∑S∑MLER∑ ∑Ç ÜN∑TE 1 Hava giriµi 2 Açılır panel 3 ∑µletim paneli 4 Hava filtreleri 5 Gösterge paneli 6 Güç kablosu (Sadece AY-A189E-T) 7 Düµey ayarlı kanatçıklar 8 Yatay ayarlı kanatçıklar 9 Hava çıkıµı 0 Uzaktan kumanda Aç∂k panelin alt köµelerinden tutun ve paneli yavaµça d∂µar∂... - Page 21 @@ @@ PP PP @@ @@ PP PP @@ @@ PP PP @@ @@ PP PP @@ @@ PP PP @@ @@ PP PP @@ @@ PP PP @@ @@ PP PP @@ @@ PP PP @@ @@ PP PP @@ @@ PP PP @@ @@...
-
Page 22: Uzaktan Kumandanin Kullanimi
UZAKTAN KUMANDANIN KULLANIMI P∑LLER∑N TAKILMASI ∑ki adet AAA (R03) ebadında pil kullanın. Uzaktan kumandanın kapaπını Uzaktan kumanda çıkarın. kapaπ∂ Pilleri bölmeye yerleµtirin; artı – kutupların doπru hizada olmasına dikkat edin. • Piller uygun µekilde takıldıπın- da göstergede “AM 6:00” görülür. Kapaπı... - Page 23 UYARI • Sinyal alıcısının güçlü direkt güneµ ıµıπı almasına izin vermeyin, çünkü çalıµmasını olumsuz etkileyebilir. Sinyal alıcı güçlü direkt güneµ ıµıπı alırsa ıµıπı kesmek için perde kullanın. • Aynı odada hızlı çalıµt∂rma özelliπi olan bir floresan lamba kullanılması sinyal gönderimini engelleyebilir.
-
Page 24: Temel ∑Ωlet∑M
@@ @@ PP PP @@ @@ PP PP @@ @@ PP PP @@ @@ PP PP @@ @@ PP PP @@ @@ PP PP @@ @@ PP PP @@ @@ PP PP @@ @@ PP PP @@ @@ PP PP @@ @@ PP PP @@ @@... - Page 25 OTOMAT∑K MODU HAKKINDA B∑LG∑LER OTOMAT∑K modunda sıcaklık ayarı ve modu, ünitenin devreye alındıπı zamanki oda sıcaklıπına göre otomatik olarak seçilir. Otomatik ∑µletim Ünite devreye alındı- πında oda sıcaklıπı Termostat Ayarı 21°C'ın altında ISITMA 23°C 21°C – 24°C NEM ALMA Devreye almada oda sıcaklıπı 24°C –...
-
Page 26: Hava Akiω Yönünün Ayarlanmasi
HAVA AKIΩ YÖNÜNÜN AYARLANMASI DÜΩEY HAVA AKIΩI Optimum rahatlık için hava akıµ yönü her modda otomatik olarak ayarlanır: SO∏UTMA ve NEM ALMA modu Yatay hava akıµı SADECE FAN ve ISITMA modu Çapraz hava akıµı HAVA AKIΩ YÖNÜNÜ AYARLAMA Ayar Aralıπı Uzaktan kumanda üzerindeki SO∏UTMA ve SADECE FAN ve... -
Page 27: Zamanlayici Ayari
ZAMANLAYICI AYARI NOT: Zamanlayıcıyı ayarlamadan önce saatin uygun µekilde ayarlanmasına dikkat edin. ZAMANLAYICIYI KAPATMA ZAMANLAYICI KAPAMA ( ) düπmesine basın. ZAMANLAYICI KAPALI göstergesi yanıp söner; ZAMAN ∑LER∑ veya GER∑ düπmelerine basarak istenen zamanı ayarlayın. (Zaman 10 dakikalık aralıklarla ayarlanabilir.) Uzaktan kumandayı ünite üzerindeki sinyal alıcıya doπru tutun ve ZAMANLAYICI AYAR (SET/C) düπmesine basın. - Page 28 ZAMANLAYICI AYARI ZAMANLAYICIYI AÇMA ZAMANLAYICI AÇMA ( ) düπmesine basın. ZAMANLAYICI AÇIK göstergesi yanıp söner. ZAMAN ∑LER∑ veya GER∑ düπmesine basarak istenen zamanı ayarlayın. (Zaman 10 dakikalık aralıklarla ayarlanabilir.) Uzaktan kumandayı ünite üzerindeki sinyal alıcıya doπru tutun ve ZAMANLAYICI AYAR (SET/C) düπmesine basın.
-
Page 29: B∑R Saat Sonra Kapanma Ayari
B∑R SAAT SONRA KAPANMA AYARI B∑R SAAT SONRA KAPANMA AYARI devreye alındıπında ünite bir saat çalıµıp durur. B∑R SAAT SONRA KAPANMA düπmesine basın. • Uzaktan kumandada “1 H” görülür. • Ünite bir saat çalıµtıktan sonra durur. B∑R SAAT SONRA KAPANMA AYARI devreye girmeden üniteyi bir saat içinde kapatmak için AÇMA/KAPAMA düπmesine basın. -
Page 30: Test Modu
TEST MODU Test modunu sadece test için kullanın. Test modunu iµletim testi haricinde bir amaçla kullanmayın, çünkü bu modda termostat kumandası devrede deπildir ve ünite sürekli iµletimde kalır. Testten önce ünitenin kapalı olmasına dikkat edin. AÇMAK ∑Ç∑N ∑ç ünitenin ön panelini kaldırın ve iµletim paneli üzerindeki TEST düπmesine basın. -
Page 31: Ωlet∑Mle ∑Lg∑L∑ ∑Lave Notlar
∑ΩLET∑MLE ∑LG∑L∑ ∑LAVE NOTLAR ÇALIΩMA SICAKLI∏I ARALI∏I • Entegre koruma tertibatı, ∑Ç SICAKLIK DIS SICAKLIK aralık dıµında 32°C K.T. 43°C K.T. kullanıldıπında ünitenin Üst limit 23°C Y.T. SO∏UTMA çalıµmasını önler. 21°C K.T. 21°C K.T. Alt limit • Nem %80'in üzerinde 15°C Y.T. -
Page 32: Bakim
BAKIM Herhangi bir bakım uygulamadan önce güç kablosunu prizden çekin ve devre kesiciyi kapatın. F∑LTRELER∑N TEM∑ZLENMES∑ Hava filtreleri iki haftada bir temizlenmelidir. ÜN∑TEY∑ KAPATIN F∑LTRELER∑ ÇIKARIN Ön paneli açın. Hava filtrelerini hafifçe yukarı iterek yerinden kurtarın. Hava filtrelerini aµaπı çekerek çıkarın. F∑LTRELER∑... -
Page 33: Serv∑S Ça∏Irmadan Önce
SERV∑S ÇA∏IRMADAN ÖNCE Aµaπıdaki koµullar ekipmanın hatalı çalıµtıπını göstermez TISLAMA ÜN∑TEN∑N ÇALIΩMAMASI Ünite kapatıldıktan hemen sonra açılırsa Yumuµak tıslama sesi, ünitenin içinde çalıµmaz. Ünite mod deπiµtirildikten akan soπutma gazının sesidir. hemen sonra çalıµmaz. Bu, dahili mekanizmaları korumak içindir. Üniteyi çalıµtırmak için 3 dakika bekleyin. SU BUHARI •... -
Page 34: Ops∑Yon K∑T
SERV∑S ÇA∏IRMADAN ÖNCE ÜN∑TE UZAKTAN KUMANDA S∑NYAL∑N∑ ALMAZSA Uzaktan kumandanın Uzaktan kumandayı ünitenin Uzaktan kumandanın pillerinin eski veya zayıf sinyal alıcısına doπru tutarak pillerinin kutuplarının olup olmadıπını kontrol tekrar sinyal göndermeyi uygun yönde olup edin. deneyin. olmadıπını kontrol edin. OPS∑YON K∑T∑ Hava Temizleme Filtre Ünitesi Hava temizleme filtre ünitesinin kullanımı... - Page 36 SHARP CORPORATION OSAKA, JAPAN TINSEA250JBRZ TL 0EO 1 Printed in Thailand...
Need help?
Do you have a question about the AY-249E-T and is the answer not in the manual?
Questions and answers