Table of Contents
Advertisement
Advertisement
Table of Contents

Related Manuals for Craftsman 320.28191


Summary of Contents for Craftsman 320.28191
- Page 1 5=1/2OinoOircuSar Saw Model No. 320°28191 _k CAUTION! Read, understand o Warranty o Safety follow aH Safety Rules and Operating ° Operation gnstructions in this Manual before ° Manntenance using this product. Sears, Roebuck and Coo, Heffman Estates, IL 60&79 www.craftsrnan,com...
-
Page 2: One Year Full Warranty
Sears store or other Craftsman outlet in the United States for free replacement. This warranty does not include parts, such as saw blades,that... -
Page 3: Safety Symbols
The purpose of safety symbols is to attract your attention to possible dangers. safety symbols, and the explanations with them, deserve your careful attention understanding° The symbol warnings DO NOT by themselves eliminate any dan- ger. The instructions and warnings they give are no substitutes for proper accident... - Page 4 Some of these following symbols may be used on this tool. Please study them and learn their meaning, Proper interpretation of these symbols will allow you to operate the tool better and more safely° SYMBOL NAME DESIGNATION / EXPLANATION Volts Vottage Amperes Current...
-
Page 5: Safety Precautions
WARNING: BE SURE to read and understand all instructions in this product manual. Failure to follow all instructions may result in electric shock, fire and/or seri- ous personal injury. WARNING: All repairs should be performed by a qualified service technician at a Sears Service Center... -
Page 6: Work Area Safety
Be sure the laser beam is aimed at a work piece that does not have a reflective surface, such as wood or a rough-coated surface. Reflective sur- faces can reflect the laser light into your eyes, causing flash blindness Do not use on surfaces such as sheet steel that have shiny,... - Page 7 ALWAYS avoid body contact with grounded surfaces, such as pipes, radia- tors, ranges and refrigerators. There is an increased risk of electric shock your body is grounded Do not expose power tools to rain or wet conditions. VVater entering a power tool will increase the risk of electric shock.
- Page 8 Arsenic and chromium from chemically treated lumber. Your risk from these exposures varies, depending upon how often you do this type of work. To reduce your exposure to these chemicals: Work in a well-ventilated area. Work with approved safety equipment, such as those dust masks that are specially designed...
- Page 9 1_ Keep guards in place and in working order, Avoid accidental starting. Be sure the switch is in the "Off" position before plugging the tool into an electrical outlet. Do not carry tools with your finger on the switch. Use clamps or another practical way to secure...
-
Page 10: Specific Safety
SERVICE SAFETY If any part of this saw is missing or should break, bend, or fail in any way; or should any electrical component fail to perform properly: ALWAYS shut off the power switch and remove the plug from the power source, and have the missing, damaged, or failed part replaced BEFORE resuming operation. - Page 11 7o Do not reach underneath the workpiece. The guald cannot protect you from the blade below the workpiece. Always observe that the lower guard is covering the blade before placing the saw down on bench or floor. An unprotected, coasting blade will cause the saw to walk backwards, cutting whatever is in its path.
- Page 12 When restarting a saw in the workpiece, center the saw blade in the kerf and check that saw teeth are not engaged into the material,. If saw is binding, it may walk up or kickback from the workpiece as the saw is restarted. Support large panels to Fig.
- Page 13 Arbor: The shaft on which the cutting tool is mounted. Bevel Cut: A cutting opera- tion made with the blade at any angle other than 90 ° to the plane of the workpiece. Chamfer Cut: A cut removing a wedge from a block of wood so that the end (or portion of the end) is angled other than 90°°...
-
Page 14: Specifications
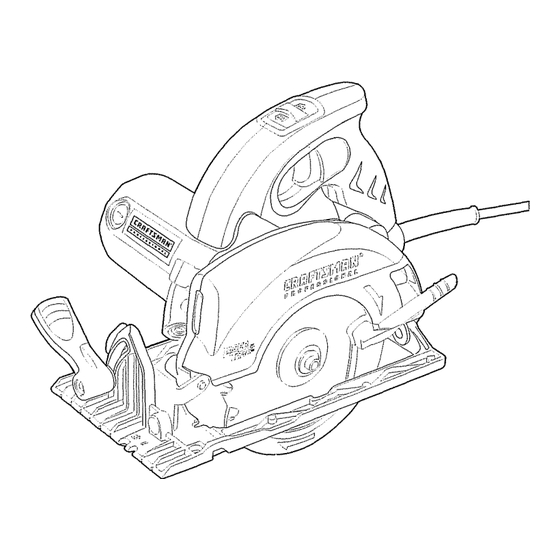
Fig. 3 Laser Switch Spindle Lock Button Upper Blade Guard Worldight Lower Blade Guard lever Edge Guide Lock Knob Blade Bevel-Adjustment Knob Blade Screw Bevel Scale Lower Blade Guard 45 ° Blade Guide Notch Edge Guide 0 ° Blade Guide Notch Handle Trigger Switch... -
Page 15: Unpacking
WARNING: The safe use of this product requires an understanding of the information on the tool and in this product manual, as well as knowledge of the project you are attempting° Before use of this product, familiarize yourself with all operating features and safety rules. -
Page 16: Packing List
Do not discard the packing material until you have carefully inspected and satis- factorily operated the too!. if any parts are damaged or missing, please contact the nearest service center. PACKING LiST 5 1/24n_ Trim Saw, Saw Blade, Edge Guide, Hex Key, Glasses, Carbon Brush and Product Manual SAW BLADES The best of saw blades will not cut efficiently... -
Page 17: Depth Of Cut
STARTING/STOPPIING Fig° 4 SAW (Fig. 4) To start the saw: Depress the Trigger Switch trigger switch. Always allow the blade to reach full speed, then guide the saw into the workpiece. To stop the saw: Release the trigger switch. After you release the trigger switch, allow the blade to come to... - Page 18 USUNG THE LASER TRAC I Fig. 6 LASER GUIDE (Fig. 6) WARNING: !_ASER Laser Switch LIGHT, LASER RADIATION. Avoid Direct Eye Exposure, DO NOT stare into beam. Only turn laser beam on when the saw is on the workpiece, The laser is factory installed and aligned, Class !lla laser.
- Page 19 OPERATING THE SAW tt is important to understand the correct method for operating the sawn Refer to the instructions in this section to learn the correct and incorrect ways for handling the saw. ,_k DANGER: When lifting the saw from the workpiece, the blade is exposed on the underside of the saw until the lower blade guard closes_ Make sure the lower blade guard is closed before setting the saw down.
- Page 20 WARNING: ALWAYS securely clamp and support the workpiece. ALWAYS maintain proper control of the saw. Failure to clamp and support the workpiece and loss of control of saw could result in serious injury° MAKING CROSS CUTS RIP CUTS (Fig. 9) Fig.
-
Page 21: Bevel Cutting
WARNING: Always disconnect the saw from the power source when assem- bling parts, changing blades, and making adjustments, Failure to obey this warning could cause serious personal injury. Disconnect the saw from the power source. Position the edge guide so that the ruler side of the arm is facing up. Slide the arm of the edge guide through the mounting slots at the front of the saw base,... - Page 22 After completing the cut, release the trigger switch and allow the blade to come to a complete stop. After the blade has stopped, remove the saw from the work- piece,, For making 45 ° bevel cuts, Fig. 1 la there is a notch in the saw base to help you line up the...
- Page 23 POCKET CUTTING (Fig, 13) WARNING; Always adjust Fig° t 3 Lower blade guard lever the bevel setting to 0 ° before making a pocket cut. Attempt- ing a pocket cut at any other setting can result in loss of control of the saw, possibly causing serious...
-
Page 24: General Maintenance
,_k WARNING: To ensure safety and reliability, all repairs should be performed by a qualified service technician at a Sears Service Center. _k WARNING: To avoid serious personal injury, always disconnect the saw from the power source when cleaning or performing any maintenance. Power tools that are used to work on fiber-glass boats and sports cars, walt- board, spackling compounds,... - Page 25 CHANGING THE BLADE (Fig. 14) WARNING: A 5-1/2-in° Fig, 14 Depth-of-cut blade is the maximum blade adjustment lever capacity of the sawn Use only 5 1/2-in° blades when replac- ing worn or damaged blades. Never use a blade so thick that it does not allow the outer blade washer to engage with the flats on the spindle.
- Page 26 5_1/2-in. Circular Saw Model No. 320.28191 Always mention the Model Number when ordering parts for this tool,, 3550688000 Flange Bolt 3520069000 Outer Flange 3810376000 Blade 3520070000 Inner Flange 5660024000 Circlips For Shaft , ,,,.._ ......., ,,, ..5620039000 Screw ..
- Page 27 3550231000 Gear ..,,,,,,,,,,, , = ..5700004000 Ball Bearing 5640155000 Bolt 3420519000 Gear Case ,,uu ,,,,, ,..... 3660076000 Spring ,,,,,,,,, ,,,,, ..3402169000 Spindle Lock 5610061000 Thread Forming Screw 5610057000 Thread Forming Screw "_ 57000'13000 Ball Bearing 5650053000 Washer 3402167000 Lock Rod ...
- Page 28 3660071000 Spring Wing Bolt 3400012000 3123087000 Bevel Lever • , ,,,,,,,,, ..,,,,, ,, ..5630197000 ..Square Nut ;65001111701;0 ..5680012000 Rivet --7it i3703686000 Support Plate 3703687000 Depth Bracket 3320421000 Left Handle ASSY 3122922000 Laser Button 4930013000 Receptacle 4930012000 Terminal 2822246000 Transformer...
- Page 29 5-1/2-in. Circular Saw Model No, 320.28191 28191 Manual_Revised 07-0202 Page 29...
- Page 30 Page 30 28191 M anual_Revised 07-0202...
- Page 31 28191 M anual Revised_07_202 Page 31...
- Page 32 Get it fixed, at your home or ours! Your Home For repair - in your home - of all major brand appliances, lawn and garden equipment, or heating and cooling systems, no matter who made it, no matter who sold it ! For the replacement parts, accessories...
Need help?
Do you have a question about the 320.28191 and is the answer not in the manual?
Questions and answers