Table of Contents
Advertisement
Quick Links
Advertisement
Table of Contents

Related Manuals for Stanton M.207


Summary of Contents for Stanton M.207
- Page 1 M.207 2-Channel Scratch Mixer with Effects User Manual...
-
Page 2: Important Safety Instructions
Important Safety Instructions 1. Read Instructions – All the safety and operating instructions should be read before this product is operated. 2. Retain Instructions – The safety and operating instructions should be retained for future reference. 3. Heed Warnings – All warnings on the appliance and in the operating instructions should be adhered to. 4. -
Page 3: Table Of Contents
4.5. The Sampler ................................. 18 4.5.1. Manual Sampling ............................... 18 4.5.2. BPM Synchronized Sampling ..........................19 4.5.3. Playing Back a Sample ............................20 4.5.4. Erasing a Sample ............................... 20 5. Troubleshooting ................................. 21 Registration Card ................................22 Stanton Warranty ................................23 Specifications ................................... 24... -
Page 4: Introduction
Introduction Introduction Welcome to the M.207! Thank you for purchasing the M.207. Before starting, please check that you have received the following items: • M.207 unit • Power Cable • User Manual • Warranty Card Now that you have checked that everything was included in the box, let’s talk about this exciting unit. Overview The M.207 is a revolutionary 2-channel scratch mixer that allows you to control FX parameters and automation by interacting with the FXGlide™... -
Page 5: Connecting The M.207
Connecting the M.207 Connecting the M.207 Before starting to connect the M.207, please read the Important Safety Instructions page and the following guidelines: Study this setup diagram (Figure 2.1). Make sure all faders are at "zero,” the Master knob is turned all the way counterclockwise, and all devices are Off. -
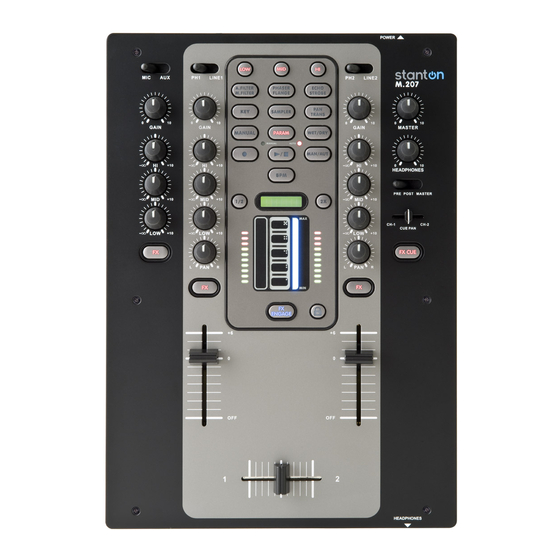
Page 6: Description
M.207 Description M.207 Description Top Panel (Figure 3.1) Figure 3.1... - Page 7 M.207 Description 1. Mic/Aux Input Selector: Selects the Microphone (MIC) or Auxiliary (AUX) input. You would use the AUX input for connecting a 3rd audio source, like a CD Player, sampler, or another mixer (session input). 2. Mic/Aux gain (gAIN): Adjusts the volume of the MIC or AUX input. 3.
- Page 8 M.207 Description 21. FX Parameter (PARAM): This button controls the parameter setting for the currently selected effect. 22. Wet/Dry: This button controls either the balance between the FX processor and the dry signal that is sent to the master output, or it controls the balance between the frequency selectable effects and the unfiltered frequencies (Frequency Wet/Dry).
- Page 9 M.207 Description (Front Panel) M.207 Description - Front Panel (Figure 3.2) Figure 3.2 Note Considering that Channels 1 (PH1/LN1) & 2 (PH2/LN2) contain the same controls and functionality; we will only describe them once and duplicate the numbering: 1. Fader Start (FDR START): Switches the FADER START ON/OFF. This feature is used to trigger playback on a connected CD Player when the fader is used.
-
Page 10: Rear Panel
10. ground connector: To eliminate electrical hum, connect the ground cable from your standard turntable ground post to the M.207 ground terminal. Some turntables (like the Stanton STR8.150) do not require grounding wire. 11. Microphone Input (Mic): Connect a standard unbalanced (1/4") microphone. -
Page 11: Front Panel
Fader start enables the Crossfader on the M.207 mixer to start and stop playback on a CD player. To use this function you need a CD player (like Stanton’s C.324) with the Fader Start feature and its related cable. You can use this feature to trigger playback on a deck that might be just out of physical reach or to do a fader based beat juggle between 2 decks. -
Page 12: Effects
M.207 Effects M.207 Effects In this section of the manual, we will show you how to use the main M.207 effects – from the Auto Filter to the Transform effect. Let’s get ready to tweak! 4.2.1 The FXglide™ Area This is the main control for the effects in the M.207 and it is separated into 3 components – the Slider Strip (A), the Button Strip (B), and the LED Strip (C). -
Page 13: Effects
Effects Effects There can be 2 effects per button. One effect is located at the top and the other at the bottom of the button. For example, A.Filter/M.Filter, Phaser/Flanger, etc. Pressing the button once triggers the top effect (the button lights up solid). (Figure 4.3) Figure 4.3 Pressing and holding the button engages the bottom effect (the button will blink to indicate that the lower effect is engaged). -
Page 14: Automatic And Manual Filter
Automatic and Manual Filter 4.3.1 Automatic and Manual Filter (A.FILTER/M.FILTER) A.Filter (Figure 4.7) Auto Filter is a sweeping filter that moves based on the BPM. The FXGlide™ Button Strip gives you 5 different sweep lengths, from 16 beats (16/1) to 1 beat (1/1). Pressing WET/DRY will give you control over the ratio of effect audio to “normal”... -
Page 15: Phaser/Flanger
Phaser/Flanger 4.3.2 Phaser/Flanger (PHASER/FLANgE) Phaser (Figure 4.9) The Phaser is a sweeping notch filter that moves in time with the BPM. You are able to select the Sweep lengths (from 16 beats to 1 beat) via the FXGlide™ buttons. The PARAM button adds resonance to the filter, and the WET/DRY button controls the amount of effect mix. -
Page 16: Pan/Transform
Pan/Transform 4.3.4 Pan/Transform (PAN/TRANS) Pan (Figure 4.13) The Pan effect sweeps the audio left and right to the beat of the music. The sweep interval is determined by the value selected on the FXGlide™ Button Strip, ranging from 16 beats to 1 beat in length. The PARAM value controls the shape of the sweep. -
Page 17: Frequency Filters
Frequency Filters 4.3.6 Frequency Filters The M.207 has 3 frequency filters at the top of the effect area. (Figure 4.16) They can act as effects themselves, offering “reverse EQ kill” functionality, or they can be used to limit the frequency ranges being sent to an effect. Let’s go over each case separately. -
Page 18: Filtering The Effect Sends
Filtering the Effects Sends 4.3.6.2 Filtering the Effect Sends These buttons are also able to filter the frequencies being sent to a selected effect. For example, this could be used to add shimmer to the high end by running it through the flange or to send just the midrange to the echo effect to accentuate a vocal. Several cool effects can be achieved by using the frequency filters along with effects. -
Page 19: Fxglide™ Slider Automation
FXglide™ Slider Automation FXglide™ Slider Automation Many of the effects on the M.207 are beat synchronized. In most cases, the effect is modulated using a smooth sine wave. However, you are able to manually input a modulation pattern of your own. Automation time can either be BPM based, or manually done. -
Page 20: Bpm Synchronized Automation Recording
BPM Synchronized Automation Recording 4.4.2 BPM Synchronized Automation Recording Before to make a BPM synchronized automation make sure the M.207 is in Auto Recording. Press the MAN/AUT button Figure 4.22 (1) until the red LED above the PLAY/STOP button lights. If it is already red, you can skip this step. Press the RECORD button (2). -
Page 21: The Sampler
The Sampler The Sampler In addition to the Effects section, the M.207 also comes with a built-in 5-bank sampler. Samples can be recorded manually, or lengths can be determined according to the active BPM and the selected beat division. Sample playback can be either one shot or looping, and samples stay in memory until either the M.207 is turned OFF or they are erased by the user. -
Page 22: Bpm Synchronized Sampling
BPM Synchronized Sampling 4.5.2 BPM Synchronized Sampling Press the SAMPLER button Figure 4.27 (1). This puts you into SAMPLER mode and allows you to play back any samples you already have stored in the sample slots. Set the Record mode to AUTO by pressing the MAN/AUT button (2). The red AUTO LED will light up to let you know you are in the right mode. -
Page 23: Playing Back A Sample
Playing Back a Sample 4.5.3 Playing Back a Sample To play a sample, touch one of the areas in the FXGlide™ Button Strip. (Figure 4.29) Figure 4.29 When a sample is playing, the PLAY/STOP button will blink Figure 4.30 (1). There are 2 modes for sample playback –... -
Page 24: Troubleshooting
Troubleshooting Troubleshooting Problem / Symptom Possible Cause / Solution No Sound. Is the power ON? Based on your connections, check that you have properly set the Input Selector Switch. Make sure that the Input Gain, Channel Fader, and Master output are turned up. Make sure the channels are properly assigned to the Crossfader. -
Page 25: Registration Card
Return Authorization Number (RA#) PRIOR to shipping your product to us. Warranty Service outside the United States: To initiate a warranty repair, please contact the authorized Stanton dealer from whom you purchased your product, and follow the dealer’s return policy. -
Page 26: Stanton Warranty
Stanton dealer's return policy. Stanton assumes no risk and shall be subject to no liability for damages or loss resulting from the specific use or application made of the merchandise. Stanton's liability for any claim, whether based on breach of contract, negligence, infringement of any rights of any party, or product liability, and relating to the merchandise shall not exceed the price received by Stanton from your purchase of such merchandise. -
Page 27: Specifications
Specifications Specifications 1. POWER: AC 100 – 240 V, 50/60 Hz, 16 W 2. DIMENSIONS (H x W x D) 108.2 mm x 250 mm x 352.6 mm 10.82 cm x 25 cm x 35.26 cm 3. WEIgHT: 9.25 lbs / 4.2 kg 4. - Page 28 M.207, STR8.150, and FXGlide are trademarks or registered trademarks of the Stanton Group. All other trademarks are property of their respective owners, who are in no way affiliated with Stanton DJ or SC System products. All information included in the User Manual is subject to change without notice.
Need help?
Do you have a question about the M.207 and is the answer not in the manual?
Questions and answers