Table of Contents
Advertisement
Available languages
Available languages
owner's
manual
MODEL
NO.
113.176120
Serial
Number
Model number
is found in
the rear on the UL label.
Serial number will be
found on the inside (back
side) of the latch.
You should record both
model and serial
numbers
in a safe place
for future use.
WARNING"
FOR YOUR
SAFETY,
READ ALL
INSTRUCTIONS
CAREFULLY
SAVE THIS
MANUAL
FOR FUTURE
REFERENCE
J
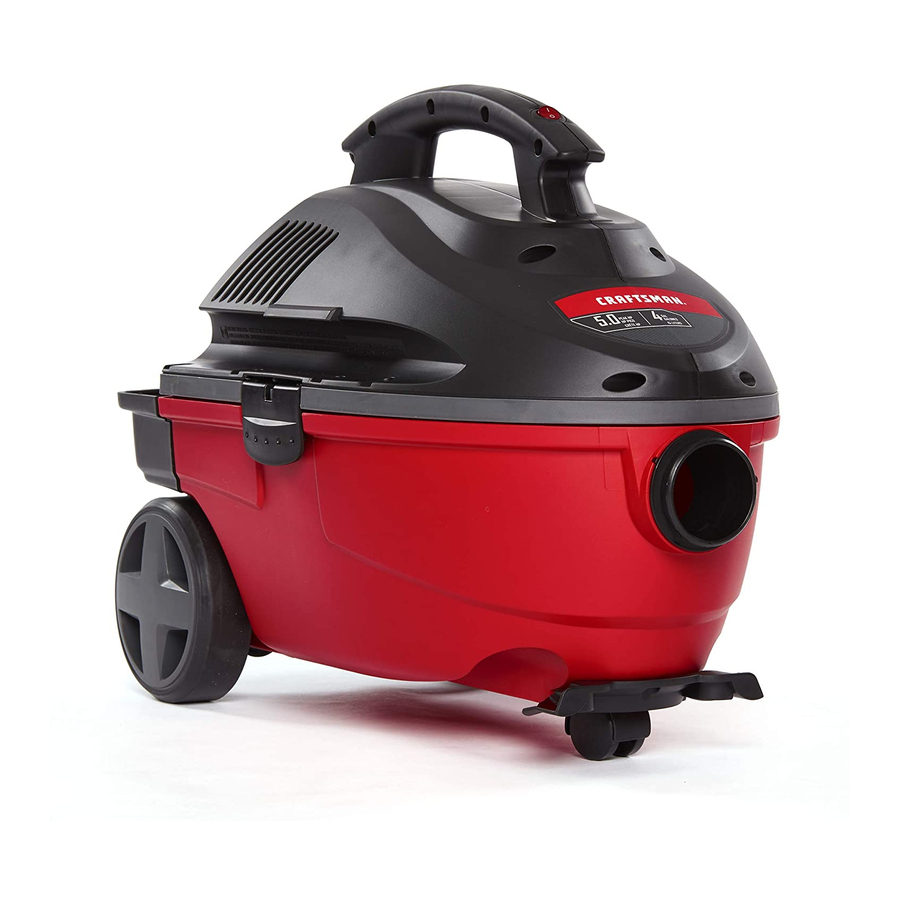
CRRFlrsM8 N°
4 GALLON
PORTABLE
WET/DRY
VAC
• safety
• assembly
• operation
• maintenance
• repair parts
• EspaRol-
pagina 13
Sears Brands Management Corporation,
Hoffman Estates, IL 60179 U.S.A.
Part No. SP6772
Printed in China
Advertisement
Chapters
Table of Contents

Related Manuals for Craftsman 113.176120


Summary of Contents for Craftsman 113.176120
- Page 1 owner's manual MODEL 113.176120 Serial Number Model number is found in the rear on the UL label. CRRFlrsM8 N° Serial number will be found on the inside (back side) of the latch. You should record both model and serial numbers in a safe place for future use.
-
Page 2: Warranty
Warranty CRAFTSMAN ONE YEAR FULL WARRANTY FOR ONE YEAR from the date of purchase, this product is warranted against any defects in material or workmanship. Defective product will be replaced free of charge. For warranty coverage details to obtain free replacement, visit the web site: www.craftsman.com... - Page 3 • Donotusewitha torn filter orwithout • Keep hair, l oose clothing, fingers, and thefilter installed except when allparts ofbody away from openings vacuuming liquids a sdescribed inthis andmoving p arts. manual. Dry debris ingested bythe • Toreduce t herisk offalls, u seextra impeller may damage themotor orbe carewhen cleaning onstairs.
-
Page 4: Table Of Contents
Introduction Read this owner's manual to familiarize This Portable Wet/Dry Vac is intended for household use. It may be used for yourself with the product features and to vacuuming wet or dry media. understand the specific usage of your new Wet/Dry Vac. Table of Contents Section Page... -
Page 5: Tool Caddy Assembly
Assembly (continued) Tool Caddy Assembly Head Locate the tool caddy and the bag Screw (4) assembly in the carton. The tool caddy is designed to fit on the back of the 4-Gallon drum and MUST BE assembled to the Vac BEFORE fastening the wheels. 1. -
Page 6: Insert Hose
Assembly (continued) 1. Line up front (label and switch side) of Handle the power head with the Vac port On/Off Cord located on the front of the drum. NOTE: Power head must be aligned with Power drum for proper attachment. Head 2. -
Page 7: Operation
Operation WARNING: To reduce the risk of fire, explosion, or damage to Vac: Do not leave Vac running while unattended - you may fail to notice important signs indicating abnormal operation such as loss of suction, debris/liquid exiting exhaust, or abnormal motor noises. -
Page 8: Vacuuming Dry Materials
Operation (continued) Vacuuming Dry Materials Emptying the Drum 1. The filter must always be in correct position to reduce the risk of leaks and injury from accidental starting, unplug possible damage to Vac. WARNING: To reduce the risk of power cord before emptying the drum. 2. -
Page 9: Maintenance
Maintenance Filter 4. Gently push on the filter plate to seat the rubber ring of the filter inside the _, WARNING: To reduce the risk of circular channel of the filter plate. injury from accidental starting, unplug 5. Place the filter nut onto the threaded power cord before changing or screws and tighten it down. -
Page 10: Cleaning A Dry Filter
Maintenance (continued) NOTE: If filter cage needs to be Cleaning A Dry Filter removed, or replaced, use a flat blade Some removal of dry debris can be screwdriver and insert the blade near one accomplished without removing the filter of the tabs between the filter cage and from the Vac. -
Page 11: Cleaning And Disinfecting The Wet/Dry Vac
Maintenance (continued) Storage Cleaning and Disinfecting Wet/Dry Before storing your Vac, the drum should be emptied and cleaned. The cord should To keep your Wet/Dry Vac looking its be wrapped around the handle, as shown best, clean the outside with a cloth and the hose should be stored as dampened with warm water and mild described in this manual. -
Page 12: Repair Parts
Repair Parts 4 Gallon Portable Wet/Dry Vac - Model Number 113.176120 Always order by Part Number - Not by Key Number WARNING SERVICING OF DOUBLE-INSULATED WET/DRY In a double-insulated Wet/Dry Vac, two systems of insulation are provided instead of grounding. No grounding means is provided on a double-insulated appliance, should a means for grounding be added. - Page 13 manual del usuari0 NO. DE MODELO 113.176120 N_mero de serie El n_mero de modelo se encuentra en la parte trasera, en la etiqueta de UL. El n_mero de serie se CRRFr MRN° encontrar_,en el interior (lado trasero) del pestillo. Usted debe anotar los n_meros tanto de modelo como de serie en un lugar seguro para uso futuro.
-
Page 14: Garantia
El productodefectuososer_ reemplazadogratuitamente. Para conocer los detalles de coberturade la garantia con el fin de obtener un reemplazo gratis, visite el sitioWeb: www.craftsman.com Estagarantia no cubrelos filtros, la manguera ni los aditamentos,queson piezasperecederasque se puedendesgastarpor causadel usonormal dentrodel periodode garantia. - Page 15 • Apague la aspiradora antes de desenchufarla. da_os a la aspiradora, utilice t_nicamente • Para reducir el riesgo de lesiones debidas a un accesorios recomendados por Craftsman. arranque accidental, desenchufe el cordon de • Parareducirel riesgo de lesionesen los ojos, use energia antes de cambiar o limpiar el filtro.
-
Page 16: Introducci6N
Introducci6n Estaaspiradora para mojado/seco port_.til e st,. Leaeste manualdel operadorparafamiliarizarse diseSada para usodom6stico.Se puedeutilizar con lascaracteristicas delproducto y paraentender para recogermaterialesmojadoso secos. la utilizaci6nespecificade su nuevaaspiradorapara mojado/seco. Indice Articulo P;_gina Articulo P;_gina Garantia ....... Recogida de materialessecos ... Instruccionesde seguridadimportantes ... 14-15 Recogida de liquidos .... -
Page 17: Ensamblaje De La Basede Soporteparaherramientas
Ensamblaje (continuaci6n) Ensamblajede la basede soportepara herramientas Phillips (4) Localice la base de soporte para herramientas y el ensamblaje de la bolsa en la caja de cart6n. La base de soporte para herramientas est,. dise_ada para encajar en la parte trasera del tambor de 4 galones y DEBE SER ensamblada en la aspiradora ANTES de instalar las ruedas. -
Page 18: Introduzcala Manguera
Ensamblaje (continuaci6n) 1. Alineelapartedelantera(el lado de laetiquetay Cord6n de el interruptor)del cabezal d el motorcon el Interruptor orificio de aspiraci6nubicadoen la parte de encendido delanteradeltambor. NOTA: E l cabezal d el motorse debealinearcon el Cabezal del motor tamborpara instalarlocorrectamente. 2. Coloque el cabezal d el motor sobrela parte superiordeltambor. -
Page 19: Funcionamiento
Funcionamiento ADVERTENCIA: P ara reducir el riesgo de incendio,explosiono dafiosa la aspiradora: • No deje la aspiradora en marcha mientras est_ desatendida. Usted podria no notar se_ales importantes que indiquen un funcionamiento anormal, tal como p_rdida de succiOn, residuos o liquido que salen por el escape o ruidos anormales del motor. -
Page 20: Recogida De Materialessecos
Funcionamiento (continuaci6n) Vaciadodel tambor Recogidade materiales secos con la aspiradora J_. ADVERTENCIA: Parareducirel riesgode 1. El filtro debeestarsiempreen la posici6n lesiones debidasa unarranqueaccidental, correctapara reducirel riesgodefugasy desenchufe el cord6n deenergiaantesde posiblesda_osa laaspiradora. vaciarel tambor. 2. Cuandoutilicela aspiradora para recogerpolvo muy fino, ser_. n ecesario queustedvacieel 1. -
Page 21: Mantenimiento
Mantenimiento Filtro 4. Empuje suavemente sobre la placa del filtro para asentar el anillo de goma del filtro dentro _, ADVERTENCIA: Parareducirel riesgode del canal circular de la placa del filtro. lesionespor causade un arranqueaccidental, 5. Coloque la tuerca del filtro en el esp_.rrago desenchufeel cord6nde energfaantesde roscado y apri6tela hacia abajo. -
Page 22: Limpiezade Un Filtro Seco
Mantenimiento(continuaci6n) NOTA: S i es necesario retirar o reemplazar l ajaula Limpieza de un filtro seco del filtro, utiliceun destorniiiadorde hoja pianae SepuedeIograrun pocode remoci6nde residuos insertela hoja cercade unade laslengiJetas entre secossin quitar elfiltro de laaspiradora. D 6una lajauia delfiitro y el anillocentraldel cabezal d el palmada con la manosobrela partesuperiordel motor. -
Page 23: Limpiezay Desinfecci6N De Laaspiradora Paramojado/Seco
Mantenimiento(continuaci6n) Almacenamiento Limpieza y desinfecci6nde la aspiradora para mojado/seco Antesdealmacenarlaaspiradora,se debevaciary Para mantenerel mejor aspectoposible de la limpiarel tambor para polvo.El cord6nse debe aspiradorapara mojado/seco,limpie su exterior enrollaralrededordel asatal y comose muestraen con un paso humedecidocon aguatempladay la ilustraci6n,y la manguerase debealmacenarde la maneradescritaen este manual.Los accesorios un jab6nsuave. -
Page 24: Piezasderepuesto
Piezasderepuesto Aspiradorapara mojado/secoport;itilde 4 galones, n_merode modelo113.176120 Pida siempre por n_mero de pieza, no por n_mero de clave ADVERTENCIA SERVICIODEAJUSTESY REPARACIONES DE UNAASPIRADORA CONAISLAMIENTODOBLE En una aspiradora con aislamiento done se proporcionan dos sistemas de aislamiento en vez de conexi6n a tierra. - Page 25 Notes...
- Page 26 Notes...
- Page 27 Notes...
- Page 28 Your Home For troubleshooting, product manuals and expert advice: managemylife www.managemylife.com For repair - in your home - of all major brand appliances, lawn and garden equipment, or heating and cooling systems, no matter who made it, no matter who sold it! For the replacement parts, accessories and owner's manuals that you need to do-it-yourself.
Need help?
Do you have a question about the 113.176120 and is the answer not in the manual?
Questions and answers
Need to replace filter, plate and nut for model 113.176120
You can find replacement parts for the Craftsman model 113.176120, including the filter, plate, and nut, as follows:
- Filter: CRAFTSMAN 38741 Purple Stripe Filter – $17.60
- Filter Plate: CRAFTSMAN 831010 Plate Filter – $8.37
- Filter Nut: CRAFTSMAN 38650 Filter Nut – $3.90
These parts are available for purchase.
This answer is automatically generated
Need to replace filter, plate and nut for this model