Table of Contents
Advertisement
Advertisement
Table of Contents

Subscribe to Our Youtube Channel
Related Manuals for Fluke 1502A


Summary of Contents for Fluke 1502A
- Page 1 Hart Scientific 1502A Thermometer Readout User’s Guide Rev. 722101 ENG...
- Page 2 Limited Warranty & Limitation of Liability Each product from Fluke Corporation, Hart Scientific Division ("Hart") is warranted to be free from de- fects in material and workmanship under normal use and service. The warranty period is three years for the Thermometer Readout. The warranty period begins on the date of the shipment. Parts, product re- pairs, and services are warranted for 90 days.
-
Page 3: Table Of Contents
Table of Contents 1 Before You Start ......1 Symbols Used ......1 Safety Information . - Page 4 7 Digital Communications Interface ....23 Serial Interface ......23 7.1.1 Setting the Baud Rate .
- Page 5 Figures Figure 1 Connecting a four-wire probe ..... . 12 Figure 2 1502A Front Panel ......13 Figure 3 1502A Back Panel .
- Page 6 Tables Table1 International Electrical Symbols ..... 1 Table 2 Matching Certificate Values to 1502A ITS-90 Coefficients ..18 Table 3 Setting Coefficients Rtpw, a8, b8, a4, and b4 .
-
Page 7: Before You Start
1 Before You Start Symbols Used Before You Start Symbols Used Table 1 lists the symbols that may be used on the instrument or in this manual Table1 International Electrical Symbols and the meaning of each symbol. Symbol Description AC (Alternating Current) AC-DC Battery Complies with European Union Directives... -
Page 8: Safety Information
1502A Thermometer Readout User’s Guide Symbol Description Canadian Standards Association OVERVOLTAGE (Installation) CATEGORY II, Pollution Degree 2 per IEC1010-1 re- fers to the level of Impulse Withstand Voltage protection provided. Equipment of OVERVOLTAGE CATEGORY II is energy-consuming equipment to be supplied from the fixed installation. -
Page 9: Cautions
1 Before You Start Safety Information Before initial use, or after transport, or after storage in humid or semi-humid environments, or anytime the instrument has not been energized for more than 10 days, the instrument needs to be energized for a "dry-out" period of 2 hours before it can be assumed to meet all of the safety requirements of the IEC 1010-1. -
Page 10: Authorized Service Centers
Keep the probe wires clean and away from fluids. Authorized Service Centers Please contact one of the following authorized Service Centers to coordinate service on your Hart product: Fluke Corporation, Hart Scientific Division 799 E. Utah Valley Drive American Fork, UT 84003-9775 Phone: +1.801.763.1600 Telefax: +1.801.763.1010... - Page 11 1 Before You Start Authorized Service Centers Fluke South East Asia Pte Ltd. Fluke ASEAN Regional Office Service Center 60 Alexandra Terrace #03-16 The Comtech (Lobby D) 118502 SINGAPORE Phone: +65 6799-5588 Telefax: +65 6799-5588 E-mail: antng@singa.fluke.com When contacting these Service Centers for support, please have the following...
-
Page 12: Introduction
2 Introduction Introduction The 1502A is a low-cost high-accuracy digital thermometer readout designed to be used with 25 and 100 RTDs and SPRTs. Its unique combination of fea- tures makes it suitable for a wide variety of applications from laboratory mea- surement to industrial processes. -
Page 13: Specifications And Environmental Conditions
3 Specifications and Environmental Conditions Specifications Specifications and Environmental Conditions Specifications Resistance Range 0 to 400 , auto-ranging Resistance Accuracy, one year 0 to 20 : 0.0005 20 to 400 : 0.0025% (25 ppm) of reading Resistance Accuracy, short 0 to 30 : 0.0005 term 1, 2 30 to 400 : 0.0015% (15 ppm) of reading... -
Page 14: Environmental Conditions
1502A Thermometer Readout User’s Guide 2.2 lb. (1.0 kg) Weight OVERVOLTAGE (Installation) CATEGORY II, Pollution Degree 2 per Safety IEC 1010-1 Accuracy specifications apply within the recommended operating temperature range. Accuracy limits are increased by a factor of the temperature coefficient outside this range. Short-term accuracy includes nonlinearity and noise uncertainties. -
Page 15: Quick Start
4 Quick Start Unpacking Quick Start This section briefly explains the basics of setting up and operating your 1502A thermometer readout. Unpacking Unpack the thermometer carefully and inspect it for any damage that may have occurred during shipment. If there is shipping damage, notify the carrier immediately. -
Page 16: Figure 1 Connecting A Four-Wire Probe
1502A Thermometer Readout User’s Guide to pins 4 and 5. (Pins 1 and 5 source current and pins 2 and 4 sense the poten- tial.) If a shield wire is present it should be connected to pin 3. Probe Connector Shield RTD Sensor Figure 1 Connecting a four-wire probe... -
Page 17: Parts And Controls
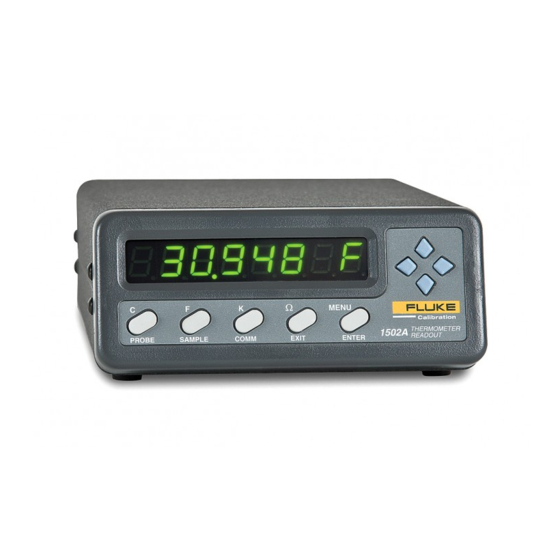
5 Parts and Controls Front Panel Buttons Parts and Controls Front Panel Buttons See Figure 2. The front panel buttons are used to select units of measurement, access operat- ing parameters, and alter operating parameters. The function of each button is as follows: C/Probe—This button selects units of degrees Celsius. -
Page 18: Rear Panel
115 VAC grounded socket. (230 VAC optional) IEEE-488 Port (optional) - The GPIB connector is for interfacing the ther- mometer to a computer or terminal with IEEE-488 communications. IEEE-488 FLUKE CORPORATION HART SCIENTIFIC DIVISION www.hartscientific.com POWER... -
Page 19: General Operation
6 General Operation Selecting Units General Operation This section explains basic operation of the 1502A Thermometer. Selecting Units Temperature can be displayed in degrees Celsius (indicated with “C”), degrees Fahrenheit (indicated with “F”), or Kelvin (indicated with “A” for absolute). The resistance of the sensor can also be displayed (indicated with “o”... -
Page 20: Figure 4 Parameter Menu Structure
1502A Thermometer Readout User’s Guide Menu Probe Sample Comm (Cal) Set probe type Set filter Set clock Enter password Pr= t90 FI= 4 11.23.30 PA= 0000 Set coefficients Set current Set time stamp Set menu lockout Cur= 1.0 ts= OFF LO=CaL Set power saver Set baud rate... -
Page 21: Selecting The Probe Characterization
6 General Operation Selecting the Probe Characterization when all the digits are correct. If the password is entered correctly the first pa- rameter in the menu will appear. Selecting the Probe Characterization Before the 1502A can measure temperature accurately it must know how to cal- culate temperature from the resistance of the sensor. -
Page 22: Its-90 Prt And Coefficients
1502A Thermometer Readout User’s Guide digit will flash. Use the U and D buttons to change a digit. Once the sign and digits are correct, press Enter to accept the number. If you decide to cancel any changes you have made, you may do so by pressing the /Exit button. This will immediately skip to the next coefficient. -
Page 23: Table 3 Setting Coefficients Rtpw, A8, B8, A4, And B4
6 General Operation Selecting the Probe Characterization Example 1: A PRT was calibrated to ITS-90 and its calibration certificate states values for coefficients Rtpw, a4, b4, a8, and b8. Set the 1502A parameters with values from the certificate as follows. Table 3 Setting Coefficients Rtpw, a8, b8, a4, and b4 1502A Coefficient Certificate Value... -
Page 24: Callendar-Van Dusen (Rtd) Conversion
1502A Thermometer Readout User’s Guide Example 3: A PRT was calibrated to ITS-90 and its calibration certificate states values for coefficients R(273.16K), a6, b6, c6, and d. Set the 1502A parameters with val- ues from the certificate as follows: Table 5 Setting Coefficients R(273.16), a6, b6, c6, and d 1502A Coefficient Certificate Value R0.01... -
Page 25: Ipts-68 Conversion
6 General Operation Selecting the Probe Characterization 6.4.5 IPTS-68 Conversion The IPTS-68 characterization converts resistance to temperature according to the International Practical Temperature Scale of 1968. The applicable coeffi- cients are R (“r0”), (“ALPHA”), (“dELtA”), a (“A4”), and c (“C4”). You can also select the temperature scale (“SCALE”) as IPTS-68 (“68”) or ITS-90 (“90”). -
Page 26: Filtering
1502A Thermometer Readout User’s Guide Compare this temperature with the temperatures listed on the probe calibration report to verify that the coefficients you entered are correct. Filtering While measuring temperature, the readings may appear to vary. This may be due to actual variations in temperature or electrical noise internal to the 1502A. The filter helps to smooth variations in the measurements and improve resolu- tion. -
Page 27: Digital Communications Interface
7 Digital Communications Interface Serial Interface Digital Communications Interface Remote communications allows an external device, such as a computer, to com- municate with the 1502A to obtain measurement data and control its operation. Communication is accomplished with various commands issued to the 1502A through the RS-232 port or optional IEEE-488 port. -
Page 28: Automatic Transmission Of Measurements
1502A Thermometer Readout User’s Guide 7.1.2 Automatic Transmission of Measurements The 1502A can be programmed to automatically send measurements to a re- mote printer or terminal. The transmission interval is set using the “SA PEr” sample period parameter. This is set in the Comm menu after the baud rate pa- rameter. -
Page 29: Duplex Mode And Linefeed
7 Digital Communications Interface GPIB Interface to the time stamp parameter. The display will briefly show “ti Sta” then the time stamp state which is either ON or OFF. Use the U and D buttons to change the state and press Enter. ON enables transmission of the time stamp and OFF disables it. -
Page 30: Setting The Address
1502A Thermometer Readout User’s Guide 7.2.1 Setting the Address The IEEE-488 bus requires that each device has a unique address. The default address of the 1502A is 22 but can be changed if necessary. The IEEE-488 ad- dress of the 1502A is set within the Comm menu after the serial linefeed pa- rameter. -
Page 31: Table 6 Command List
7 Digital Communications Interface Remote Commands Table 6 Command List Command Description Measurement Commands read measurement (includes label, unit, and time) F[ETCH?] read measurement value (SCPI compatible) SA[=[[[hh:]mm:]ss] read [or set] serial sample period U=C|F|K|O select units ST[=ON/OF] read [or set] the time stamp CL[=hh:mm:ss] read [or set] the system clock Probe Characterization Commands... -
Page 32: Reading Temperature
1502A Thermometer Readout User’s Guide Command List Continued Command Description Calibration Commands *PA=<password> disable password lockout of calibration commands *LO=[=CA|AL] read [or set] menu lockout *C0[=<value>] read [or set] the 0 calibration parameter *C1[=<value>] read [or set] the 100 calibration parameter *C4[=<value>] read [or set] the 400 calibration parameter *SN[=<value>]... -
Page 33: Automatically Transmitting Measurements
7 Digital Communications Interface Remote Commands 7.3.1.2 Automatically Transmitting Measurements By setting the sample period, the 1502A can be programmed to automatically transmit measurements from the RS-232 port at specified intervals. The sample period can be set remotely using the commands: SA=[[hh:]mm:]ss<EOS>... -
Page 34: Selecting The Characterization
1502A Thermometer Readout User’s Guide 7.3.2.1 Selecting the Characterization The following commands can be used to select the probe characterization and coefficients: P=90<EOS> selects the ITS-90 characterization P=68<EOS> selects the IPTS-68 characterization P=R<EOS> or P=S<EOS> selects the standard Callendar-Van Dusen characterization R0=<value><EOS>... -
Page 35: Setting The Filter
7 Digital Communications Interface Remote Commands 7.3.3.1 Setting the Filter The filter helps to reduce variations in the measurements. The filter can be set remotely using the command: FI=<value><EOS> sets the filter time constant FI=0<EOS> disables the filter The value is the filter time constant in seconds. It must be between 0 and 60 in- clusive. -
Page 36: Calibration Commands
1502A Thermometer Readout User’s Guide LF=OF<EOS> disables linefeed 7.3.5 Calibration Commands The following commands are used in calibrating the instrument. 7.3.5.1 Entering the Password In order to set the calibration parameters the password must be issued first. The following command enables access to the calibration parameters: *PA=2051<EOS>... -
Page 37: Reading A List Of Commands
7 Digital Communications Interface Remote Commands ver.mmmmm,v.vv The m’s represent digits of the model number. The v’s represent the digits of the firmware version number. As an example, if the version number was 1.10 the response would be “ver.1502A,1.10". The following IEEE-488.2 and SCPI compatible command can be used to read the manufacturer, model number, serial number, and firmware version number. -
Page 38: Calibration Procedure
8 Calibration Procedure Accessing the Calibration Parameters Calibration Procedure The 1502A uses a three-point calibration scheme with a quadratic polynomial correction function to maintain the accuracy of its resistance measurement. The three calibration points are at 0 , 100 , and 400 . Three calibration pa- rameters determine the correction function: CAL0, CAL100, and CAL400. - Page 39 1502A Thermometer Readout User’s Guide power. The *C0=<value><EOS>, *C1=<value> <EOS>, and *C4=<value><EOS> commands can be used to set the values of the CAL0, CAL100, and CAL400 parameters respectively. Calibration Procedure Calibration requires four-wire 100 and 400 resistors of 6.25 ppm uncer- tainty and a 0 resistor (or short).
-
Page 40: Maintenance
9 Maintenance Maintenance The calibration instrument has been designed with the utmost care. Ease of operation and simplicity of maintenance have been a central theme in the product development. Therefore, with proper care the instrument should require very little maintenance. Avoid operating the instrument in an oily, wet, dirty, or dusty environments. -
Page 41: Troubleshooting
10 Troubleshooting Troubleshooting In case you run into difficulty while operating the 1502A, this section provides some suggestions that may help you solve the problem. Below are several situa- tions that may arise followed by possible causes of the problem and suggested actions you might take. -
Page 42: Ce Comments
CE Comments 10.1.1 EMC Directive Fluke Corporation, Hart Scientific Division’s equipment has been tested to meet the European Electromagnetic Compatibility Directive (EMC Directive, 89/336/EEC). The Declaration of Conformity for your instrument lists the spe- cific standards to which the unit was tested. -
Page 43: Immunity Testing
10 Troubleshooting CE Comments 10.1.1.1 Immunity Testing The instrument was tested to the requirements for industrial locations. This al- lows the instrument to be used in all types of locations from the laboratory to the factory floor. Criterion C was used for Electrostatic Discharge (ESD, IEC 61000-4-2) and Electric Fast Transit (EFT, Burst, IEC 61000-4-4).
Need help?
Do you have a question about the 1502A and is the answer not in the manual?
Questions and answers