Table of Contents
Advertisement
Advertisement
Table of Contents
Troubleshooting

Related Manuals for Konica Minolta ScanDIVA


Summary of Contents for Konica Minolta ScanDIVA
- Page 1 ScanDIVA User’s Guide...
- Page 2 International ENERGY STAR® Compliance Statement The purpose of the International ENERGY STAR® Program is to promote the development and popularization of energy-efficient office equipment.
-
Page 3: Safety Information
SAFETY INFORMATION This section contains detailed instructions on the operation and maintenance of this machine. To achieve optimum utility of this device, all operators should carefully read and follow the instructions in this manual. Please keep this manual in a handy place near the machine. Make sure you observe all of the precautions listed in this manual. - Page 4 SAFETY INFORMATION WARNING ● Do not modify this product, as a fire, electrical shock, or breakdown could result. If the product employs a laser, the laser beam source could cause blindness. ● Do not attempt to remove the covers and panels which have been fixed to the product. Some products have a high-voltage part or a laser beam source inside that could cause an electrical shock or blindness.
- Page 5 SAFETY INFORMATION WARNING ● Do not place a flower vase or other container that contains water, or metal clips or other small metallic objects on this product. Spilled water or metallic objects dropped inside the product could result in a fire, electrical shock, or breakdown. Should a piece of metal, water, or any other similar foreign matter get inside the product, immediately turn OFF the Power Switch, unplug the power cord from the power outlet, and then call your authorized service representative.
- Page 6 SAFETY INFORMATION CAUTION ● Do not place any objects around the power plug as the power plug may be difficult to pull out when an emergency occurs. ● The socket-outlet shall be installed near the machine and shall be easily accessible as the power plug may be difficult to pull out when an emergency occurs.
- Page 7 INFORMATIONS DE SÉCURITÉ Cette section contient des instructions détaillées sur l'utilisation et l'entretien de cette machine. Pour obtenir un rendement optimal de cette machine, il est imperative que toutes les personnes l'utilisant lisent attentivement et observent scrupuleusement les consignes de ce manuel. Veuillez conserver ce manuel en lieu sûr, à...
- Page 8 INFORMATIONS DE SÉCURITÉ WARNING Ne modifiez pas ce produit, car cela risquerait de causer un incendie, une électrocution ou une panne de l'appareil. Si ce produit comporte un laser, sachez que l'exposition au rayon laser pose un risque pour les yeux. N'essayez jamais de démonter les couvercles et panneaux montés sur le produit.
- Page 9 INFORMATIONS DE SÉCURITÉ WARNING Ne posez jamais de vase ou tout autre récipient contenant de l’eau, ainsi que de petits objets métalliques tels que des trombones sur l’appareil. Si le récipient venait à être renversé ou des objets métalliques venaient à tomber dans l’appareil, cela risquerait de provoquer un incendie, une électrocution ou une panne de l’appareil.
- Page 10 INFORMATIONS DE SÉCURITÉ CAUTION Ne posez aucun objet à proximité de la prise de courant alimentant le cordon car cela risquerait de gêner l’accès au cordon et son retrait en cas d’urgence. Veillez à ce que la prise de courant alimentant l’appareil se trouve à proximité de ce dernier et soit facile d’accès afin de permettre un retrait rapide du cordon d’alimentation en cas d’urgence.
- Page 11 Please follow the instructions given in this manual when handling the system and do not touch any part of the system the manual does not cover. NEVER attempt to disassemble or remodel the system. The contents of this manual are subject to change without notice. No part of this manual may be quoted, reproduced, or translated into any other language.
- Page 12 Introduction Thank you for choosing our Book Scanner (herein after referred to as “the Scanner”). This operator’s manual includes precautions for installation/operation of the Scanner, a system outline, an explanation of the Driver software, operation procedures for the Scanner, troubleshooting tips, maintenance, and product specifications.
- Page 13 Interference-Causing Equipment Standard (ICES-003 ISSUE 4) For Canada Users) This Class A digital apparatus complies with Canadian ICES-003. Cet appareil numérique de la classe A est conforme à la norme NMB-003 du Canada. UL/UL Marking This equipment has been tested and found to comply with UL60950-1. CE Marking (Declaration of Conformity) (For European Users) This product complies with the following EU directives: 2006/95/EC and 2004/108/EC directives.
- Page 14 Copyright Books, magazines, journals and other materials may be copyrighted. Unauthorized scanning into a computer and subsequent printing or other use of such copyrighted materials may be contrary to the provisions of the United States Copyright laws, title 17 of the United States Code. You are encouraged to obtain permission to scan, copy or otherwise use copyrighted to obtain a license from an organization such as the Copyright...
-
Page 15: Trademark Acknowledgments
Copyright Books, magazines, journals and other materials may be subject to copyright. The copying, scanning or altering of such materials may, unless authorized by the copyright owner, infringe Copyright Law. In some countries, there are various types of copying which will not be treated as copyright infringement such as research or private study, for criticism or review, for reporting current events and various acts in relation to education, libraries and public administration. - Page 16 An overview of the features, system configuration, functions and part names of the Scanner. Chapter 3 ScanDIVA TWAIN Driver Describes installation, start-up procedures and explanation of the image acquisition screen for the ScanDIVA TWAIN Driver. Chapter 4 Operation Describes operation precautions and procedures, and settings for each function. Chapter 5 Troubleshooting Describes error and warning messages that appear on the Personal Computer, and procedures for eliminating these problems.
-
Page 17: Table Of Contents
Black Shading ................3-16 White Shading ................3-17 White Balance................3-19 Tone Curve ................3-20 2.10 Image Registration..............3-26 Deletion of ScanDIVA TWAIN Driver ........... 3-27 Driver start-up ................3-30 Book Scanner Screen ..............3-31 Basic Screen................3-31 Preview Screen................. 3-35 Detail Screen ................ - Page 18 Precautions for Operation .............4-2 Main Unit ..................4-2 Glass Plate Unit (Option)............. 4-3 Turning the Scanner ON/OFF ............4-4 Turning ON the Power Switch ............. 4-4 Turning OFF the Power Switch ........... 4-4 Power Saving Features ............... 4-5 Using the Operation Panel ............4-6 Making scanning condition settings..........
-
Page 19: Chapter 1 Precautions For Installation & Operation
Chapter 1 Precautions for Installation & Operation... -
Page 20: Precautions For Installation
ScanDIVA User’s Guide 1 Precautions for Installation Installation Environment Install the Scanner in a location, which meets the following requirements to ensure safe operation and utmost performance. A well-ventilated place An area which is free from ammonia or other organic gases. -
Page 21: Grounding
Chapter 1 Precautions for Installation & Operation Grounding Be sure to connect the Ground Wire for the Power Cable to any of the following places to prevent electrical shocks due to electrical leakage: Ground Terminal of the outlet Ground terminal that complies with local electrical standards NOTE : NEVER connect the Ground Cable to a Gas Pipe, the Ground Wire for a Telephone Line, or a Water Pipe. -
Page 22: Precautions For Installation And Operation
ScanDIVA User’s Guide 2 Precautions for Installation and Operation Operating Environment The following environment is required for consistent performance of the Scanner: Temperature: 50 to 95°F (10 to 35°C) with temperature variation not exceeding 18°F (10°C) per hour Humidity: 15 to 85%RH with humidity variation not exceeding 20% per hour... -
Page 23: Notes In The Operation
Chapter 1 Precautions for Installation & Operation Notes in the operation Hereafter, please refer to "6 setup tips", "8 scanning tips", and "Others" to obtain a steady scanning image. 6 setup tips 1. Please clean the glass side before starting operations. ... - Page 24 ScanDIVA User’s Guide Others 1. The following settings are recommended for the PC monitor: Connection: Digital (DVI-D or HDMI) Color temperature setting: sRGB or 6500K 2. When the glass plate is used, the following settings are recommended because the original can be kept flat by the glass plate.
-
Page 25: Precautions When Operating The Personal Computer
Chapter 1 Precautions for Installation & Operation Precautions when operating the Personal Computer Refer to the operation manual provided for the Personal Computer. Moving the Scanner When moving the Scanner, observe the following: The Scanner body weighs 50 kg (110 lbs ). When carrying the Scanner, hold the places shown in the figure below. - Page 26 ScanDIVA User’s Guide...
-
Page 27: Chapter 2 Overview
Chapter 2 Overview... -
Page 28: Features
ScanDIVA User’s Guide 1 Features The Scanner is designed to scan books set face up on the book table. This makes setting the book very easy and reduces concerns that the book may be creased or damaged. In addition, warped text lines and text compression are corrected, ensuring clearer images. -
Page 29: Part Identification And Functions
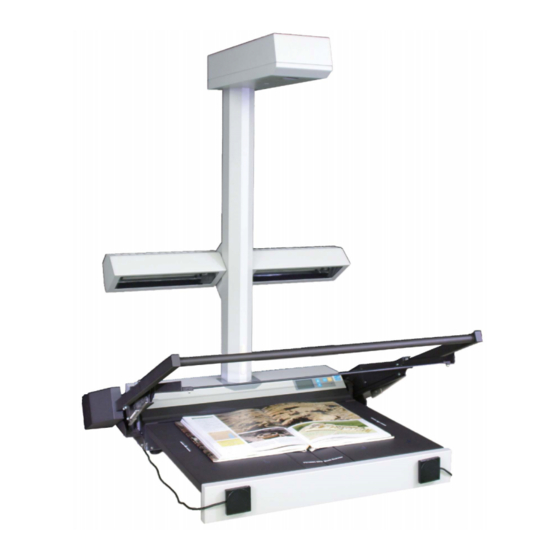
Chapter 2 Overview 2 Part Identification and Functions 1. Head Unit: The CCD sensor is housed in this unit. This sensor scans the original. 2. Lamp Unit: Illuminates the original evenly for accurate scanning. 3. Operation Panel: Displays the operation status of the Scanner, and is used to set scanning conditions. -
Page 30: Power Cord
ScanDIVA User’s Guide 9. Power Cord: Connects the Scanner to the Power Outlet. 10. USB Cable: Connects the Scanner to the Personal Computer. 11. Manual Switch (Option): Press this switch instead of the “SCAN” button on the “Book Scanner” screen to start scanning. -
Page 31: Chapter 3 Scandiva Twain Driver
Chapter 3 ScanDIVA TWAIN Driver... -
Page 32: Scandiva Twain Driver Setup
ScanDIVA User’s Guide 1 ScanDIVA TWAIN Driver Setup The ScanDIVA TWAIN Driver hereinafter referred to as “the Driver” must be installed on the Personal Computer connected to the Scanner to read images from it via TWAIN scanning. This chapter describes the system requirements of the Personal Computer and the installation procedure of the Driver. -
Page 33: Installation Procedure
Chapter 3 ScanDIVA TWAIN Driver Installation Procedure The following procedure shows the driver installation for Windows 7. Administrative rights are needed for the driver installation. Note: Screens may differ slightly depending on the Windows version. Check that the Power Switches of the Scanner and the Personal Computer are turned OFF. - Page 34 ScanDIVA User’s Guide When the installation screen appears, click “ScanDIVA Ver.*.*.*.*” to begin driver installation. Completes the installation of the TWAIN Driver first when the NOTE ! Application is installed, and, next, click "ImageDIVA Touch Ver.*.*. *. *". Please refer to User's Guide of ImageDIVA Touch for the ...
- Page 35 Chapter 3 ScanDIVA TWAIN Driver When the “Welcome to the InstallShield Wizard for Book Scanner ScanDIVA” screen appears, click the “Next” button. When the License Agreement” screen appears, confirm the following messages and click the “Yes” button. Click the “Install” button.
- Page 36 ScanDIVA User’s Guide When the “InstallShield Wizard Complete” screen appears, click the “Finish” button and remove the CD-ROM from the Personal Computer. Turn the Power Switch of the Scanner ON. “Installing device driver software” appears. The installation of the Driver is completed.
-
Page 37: Setup Of The Scanner
Chapter 3 ScanDIVA TWAIN Driver 2 Setup of the Scanner Before using the Scanner, perform the setup procedure described in this chapter. This procedure is not necessary every time the Scanner is used, however, it should be performed at least in the following cases: - when the machine is installed;... -
Page 38: Disabling User Account Control
ScanDIVA User’s Guide Disabling User Account Control If the User Account Control is enabled when operating under the Windows Vista or Windows 7 environments, be sure to disable the User Account Control setting before starting the setup procedure. After the procedure is completed, be sure to return the setting to enable. - Page 39 Chapter 3 ScanDIVA TWAIN Driver Click “Change User Account Control settings”. After turning UAC off, a text box will appear to ask your permission if you want to continue with the turning OFF of UAC, click “Continue”. Uncheck “Use User Account Control (UAC) to help protect your computer”...
-
Page 40: Aging - 10Min
In such a case, repeat the “Aging – 10min” procedure at least twice. Launch the application and the ScanDIVA TWAIN Driver. Check “Adjustment” on the screen of the ScanDIVA TWAIN Driver. Select “2. Aging - 10min” on the pull-down list under “Detail & Adjustment”, and then click “Run”. - Page 41 Chapter 3 ScanDIVA TWAIN Driver The window indicating that adjustment is underway will appear. When the window disappears, the adjustment is completed. Proceed to the next adjustment, “2.4 CCD Gain”. 3-11...
-
Page 42: Ccd Gain
ScanDIVA User’s Guide CCD Gain This adjustment is to match the sensitivity of the CCD to the luminance of the installation location. Assemble the Adjustment Plate and place it on the cradle. NOTE ! For the procedure to assemble the Adjustment Plate, refer to “2.1 Assembling the Adjustment Plate”... - Page 43 Chapter 3 ScanDIVA TWAIN Driver Place the “Setup Adjustment Sheet” on the Adjustment Plate as shown below. NOTE ! Adjust the top of the Adjustment Sheet along with the Adjustment Plate. Be sure to adjust the center of Setup Adjustment Sheet at the center of cradle.
- Page 44 ScanDIVA User’s Guide Select “3 CCD Gain” on the pull-down list under “Detail & Adjustment”, and then click “Run”. Click “OK” on the confirmation screen to confirm the test chart. The window indicating that adjustment is underway will appear. When the window disappears, the adjustment is completed.
-
Page 45: Exposure Time
Chapter 3 ScanDIVA TWAIN Driver Exposure Time This Adjustment is to match the Exposure Level to the luminance of the installation location. Place the “Setup Adjustment Sheet” on the Adjustment Plate. NOTE ! Refer to “2.4 CCD Gain” above to place the “Setup Adjustment Sheet”. -
Page 46: Black Shading
ScanDIVA User’s Guide Black Shading This adjustment is to read the fundamental data to calibrate the black shading level. Remove the “Setup Adjustment Sheet” and the Adjustment Plate that were on the cradle in the previous adjustment. Select “5. Black Shading” on the pull-down list under “Detail & Adjustment”, and then click “Run”. -
Page 47: White Shading
Chapter 3 ScanDIVA TWAIN Driver White Shading This adjustment is to read the fundamental data to calibrate the white shading level. Place the Adjustment Plate on the cradle. NOTE ! For the procedure to assemble the adjustment plate, refer to “2.1 Assembling the adjustment plate”... - Page 48 ScanDIVA User’s Guide Place the “White Paper” on the Adjustment Plate as shown below with the white surface facing the front. Adjust the edge of the paper to the inside of the outer cover If the Glass Plate Unit has been attached, close the Glass Plate Unit, and place the “White Paper”...
-
Page 49: White Balance
Chapter 3 ScanDIVA TWAIN Driver White Balance This procedure is to adjust the color balance. Remove the “White Paper” and then place the “Setup Adjustment Sheet” on the Adjustment Plate. NOTE ! Refer to “2.4 CCD Gain” above to place the “Setup Adjustment Sheet”. -
Page 50: Tone Curve
ScanDIVA User’s Guide Tone Curve This procedure is to adjust the brightness of image by setting an appropriate value. “A”, “M”, “19” in the Gray Scale are settable within these parameters. This procedure is required only when the machine is installed or the optional glass plate is attached. - Page 51 Chapter 3 ScanDIVA TWAIN Driver Place the Test Chart on the adjustment plate and the Gray Scale accordingly. Adjust the top of the Test Chart along with the Adjustment Plate. Be sure to adjust the center of the cradle to the center of the Test Chart.
- Page 52 ScanDIVA User’s Guide Select “Sheet Original Mode” on the pull-down list under “Profile” and then change the settings as below. Size: B4L 3-22...
- Page 53 Chapter 3 ScanDIVA TWAIN Driver Click “Preview” to read the image. Crick and drag with the mouse on the image of the Gray Scale at position “A” to select the area. 3-23...
- Page 54 ScanDIVA User’s Guide The histogram and the average of the R, G, B values of the selected area is displayed. Adjust the tone curve so that the value of the “G” will be within the following range. Gray Scale Acceptable Range Position A: 242 ±...
- Page 55 Chapter 3 ScanDIVA TWAIN Driver The “ToneCurve” screen appears. Change the value and click the “OK” button. Read the image from “Preview” and check to see if the histogram value is within the acceptable range. If it is outside the acceptable range, adjust the tone curve again.
-
Page 56: Image Registration
ScanDIVA User’s Guide 2.10 Image Registration This procedure is to adjust the scanning standard position for sheet originals. This procedure is required only at the installation of the machine. Place the Test Chart on the cradle. Align the Test Chart against the original stopper, and align the left edge of the chart to the center of the cradle. -
Page 57: Deletion Of Scandiva Twain Driver
When the Driver installed on the Personal Computer is no longer necessary, use the following procedure to delete it. Confirm that the Personal Computer is connected with the ScanDIVA. Turn ON the Power Switch of the ScanDIVA. Turn ON the Power Switch of the Personal Computer. - Page 58 When the following window appears, click “No” in order to not restart the computer. Turn OFF the Power Switch of ScanDIVA. From “Start” menu, choose “Control panel”. Click “uninstall a program”. Select “Book Scanner ScanDIVA” and then click the “Uninstall” button. Click “Yes”. 3-28...
- Page 59 Chapter 3 ScanDIVA TWAIN Driver When the Uninstall Complete screen appears, click the “Finish” button. Restart the Personal Computer. 3-29...
-
Page 60: Driver Start-Up
The Driver can be started from any TWAIN compatible application. Following procedure is described for the Driver start-up. Select the “Book Scanner ScanDIVA" in “Select TWAIN Source" view. When “Acquire" is executed, the basic screen is displayed as follows: 3-30... -
Page 61: Book Scanner Screen
Chapter 3 ScanDIVA TWAIN Driver 5 Book Scanner Screen Images can be loaded and function settings made from the Personal Computer using the “Book Scanner” screen. This section describes the settings available in the “Book Scanner” screen. Basic Screen 1. Mode: From the pull-down list, select the scan mode corresponding to the type of original. - Page 62 ScanDIVA User’s Guide 3. Size: Select the original size to be scanned from the pull-down list. 4. Resolution: Select the resolution of the image to be output from the pull-down list. There are six selections: 600, 400, 360, 300, 240 and 200 (dpi).
- Page 63 Chapter 3 ScanDIVA TWAIN Driver 6. Edit: 5. Center Erase Select automatic or manual center erase. When “Auto” is selected, the shadow along the binding of the book is automatically detected and erased. When the “Auto” option is not selected, the area corresponding to the center of the book table is erased, regardless of the condition of the original.
- Page 64 ScanDIVA User’s Guide 8. Detail & Displays the detail menu, and executes the adjustment when “Run” is Adjustment: clicked. The Scanner must be adjusted for setup and when the installation location is changed. See “2 Setup of the Scanner” in chapter 3 for additional information about Scanner adjustment.
-
Page 65: Preview Screen
Chapter 3 ScanDIVA TWAIN Driver Preview Screen 24-bit Color 8-bit Gray 1-bit B/W 3-35... - Page 66 ScanDIVA User’s Guide 1. Output Setting: Sets the Cropping Area by mouse operation. Size of Cropping Area The size of Cropping frame is displayed. Fit on Left Page When “Split” is selected, Cropping Area on a right page is fit to the left page.
-
Page 67: Detail Screen
Chapter 3 ScanDIVA TWAIN Driver Detail Screen 1. White Balance: Selects Auto or Manual in White Balance correction. Auto: Whenever the image is read, the white balance is calculated and corrected. The correction might not operate correctly, depending on the condition of the original. - Page 68 ScanDIVA User’s Guide 4. Black and White: This option is only active when the Image Type is set to “1bit BK/W”. Remove the check mark under Diffusion Dither to convert the image to binary data. 5. Color Profile Setting: Sets the Color Profile.
-
Page 69: Chapter 4 Operation
Chapter 4 Operation... -
Page 70: Precautions For Operation
ScanDIVA User’s Guide 1 Precautions for Operation Main Unit The following sections require special attention when operating the Scanner. Do not place any object on the head unit. Be careful not to knock your head against the head unit. Do not place any... -
Page 71: Glass Plate Unit (Option)
Chapter 4 Operation Glass Plate Unit (Option) Handle Holding the handle, lower the glass in the direction of the arrow so that the glass is pressing down on the document. Keep your hands off the book table while lowering the glass. Use care to prevent your fingers, fingernails, etc., from being pinched by the glass as it is... -
Page 72: Turning The Scanner On/Off
ScanDIVA User’s Guide 2 Turning the Scanner ON/OFF Turning ON the Power Switch Check that the Scanner is firmly connected to the Personal Computer with the USB cable, and press the Power Switch of the Scanner ON (“I” position). NOTE ! Turn the Power Switch of the Scanner ON before the Personal Computer is powered ON. -
Page 73: Power Saving Features
Chapter 4 Operation Power Saving Features For U.S.A. Users After the Scanner has been idle for a certain period of time, the Operation Panel display and the Fluorescent Lamps are turned “OFF” and the Panel LED lamp flickers green, indicating that the Scanner is in Sleep Mode. To return to active condition, click any button on the driver operation screen or depress any key on the Operation Panel. -
Page 74: Using The Operation Panel
ScanDIVA User’s Guide 3 Using the Operation Panel The Operation Panel can be used to set scanning conditions. Scanning conditions can be set from the Operation Panel when the “READY” screen is displayed. The Operation Panel cannot be used if the following message is NOTE ! ... - Page 75 Chapter 4 Operation PAGE Available settings: “SPREAD”, “SINGLE”, “SPLIT” SIZE The document size settings that are available vary depending on the “PAGE” setting. The available settings are listed below. When “PAGE” is set to “SPREAD”: A2 L, B3 L, A3 P/L, B4 P/L, A4 P/L, B5 P/L, A5 P/L, 18 ×...
- Page 76 ScanDIVA User’s Guide BOOK CORRECT Select “ON” or “OFF”. FRAME MASKING Select “ON” or “OFF”. CENTER ERASE Select “ON” or “OFF”. Panel Reset Selecting “RESET” in the “Panel Reset” screen resets the scanning condition settings to their default settings. The default scanning condition settings are shown below.
-
Page 77: Placing The Original
Chapter 4 Operation 4 Placing the original For a book original Place the original face up on the book table, aligning the top edge of the book against the stopper, and the spine of the book with the center mark. Center mark For a sheet original Place the original face up on the book table, aligning the top edge of the book... - Page 78 ScanDIVA User’s Guide For a 3D object Place the 3D object face up on the book table. Optimum exposure can be obtained by placing the 3D object on a piece of white paper. 4-10...
- Page 79 Chapter 4 Operation How to place the original on the book table Do not place the original askew. Do not place the book with its top edge beyond the stopper. Be careful to avoid the condition shown in the figure below if pressing the original from the bottom.
- Page 80 ScanDIVA User’s Guide Adjust the height of the book table so that the right and left pages will be horizontal. (Press down the higher side of the original.) When the inclination of the page at the center of the book exceeds NOTE ! ...
-
Page 81: Scanning Procedures
Chapter 4 Operation 5 Scanning procedures Place the original face up on the book table. REFERENCE For placing the original, refer to Chapter 4, “4 Placing the original”. Place the original so that it will not go beyond the stopper. NOTE ! ... - Page 82 ScanDIVA User’s Guide Using the “Page”, “Size”, or “Mode” keys. Page Spread: Entire area (both pages) is scanned as one sheet. Single: Only one page (right or left) is scanned. Split: Both pages are scanned separately, one page at a time.
- Page 83 Chapter 4 Operation When the “Scan” button on the menu screen is pressed, the LED lamp turns red and scanning is started. If enabled, the buzzer sounds when the Manual Switch (option) is NOTE ! pressed, and scanning is begun. The buzzer can be disabled in the Maintenance Mode by an ...
-
Page 84: Book Correction
ScanDIVA User’s Guide 6 Book Correction Book Correction When thick originals like books are scanned this function is effective. The following function is activated automatically in book correction. Functions automatically activated Curved text line correction This function corrects the position of the text on the curved surface near the center of the book (area between pages) of a thick open book, ensuring that an undistorted image is made. -
Page 85: Note On Originals
Chapter 4 Operation 7 Note on originals Names of book terminology Back/Spine Tassel Cover Foot Head Binding crease The Scanner is designed for exclusive use in scanning images from a book or file. Note, however, that it may not make reliable images from any of the following types of originals. -
Page 86: Originals With A Tag Attached Or Bookmark Placed
ScanDIVA User’s Guide Originals with a tag attached or bookmark placed The Scanner may not work correctly when a tag is attached or a bookmark is placed within 30 mm (1.2 inches) of the top and bottom edges as shown in the figure. -
Page 87: Bound With Special Binding
Chapter 4 Operation Bound with special binding When the binding section of the book has a special design and the surface of the original is more than 50 mm (2 inch) above the book table as shown in the figure, press the center of the book table so that the binding section is lowered to the extent that the Auto Focus function is effective. -
Page 88: Using The Optional Glass Plate Unit
ScanDIVA User’s Guide 8 Using the optional Glass Plate Unit CAUTION Do not use the Glass Plate Unit when scanning three-dimensional objects. Using the Glass Plate Unit with three-dimensional objects can damage them. Also, do not place anything on top of the glass, or subject the glass to shock or impact. Doing so could damage the glass. -
Page 89: Chapter 5 Troubleshooting
Chapter 5 Troubleshooting... -
Page 90: Problems With The Scanner
ScanDIVA User’s Guide 1 Problems with the Scanner When any error occurs in the Scanner, an error message appears on the screen of the Personal Computer and on the Operation Panel screen, the LED lamp flashes red and scanning stops. In this case, turn the Power Switch OFF and then back ON. -
Page 91: Troubleshooting
Chapter 5 Troubleshooting 2 Troubleshooting Errors shown on the Personal Computer screen Error message Action “Scanning was cancelled because the original was not 1. Please re-position the original and start scanning detected correctly” again. 2. If the error still appears, please execute the setup adjustment. -
Page 92: Errors Shown On The Operation Panel
ScanDIVA User’s Guide Errors shown on the Operation Panel Error message Action The Scanner itself may be broken. Please contact your authorized service representative. -
Page 93: Trouble When Scanning An Image
Scanner and the Personal Computer. Application software of your computer does not find • Refer to Chapter 5 “2 Troubleshooting” the Book Scanner ScanDIVA The image cannot be scanned properly. 1. Is the original placed on the proper position? •... - Page 94 ScanDIVA User’s Guide...
- Page 95 Chapter 6 Maintenance...
-
Page 96: Chapter 6 Maintenance
ScanDIVA User’s Guide 1 Maintenance The following daily checks and cleaning are required to ensure the best possible performance and proper operation of the Scanner. Daily checks Any of the following conditions could damage the Scanner or other electrical equipment. -
Page 97: Chapter 7 Product Specifications
Chapter 7 Product Specifications... -
Page 98: Major Specifications
ScanDIVA User’s Guide 1 Major Specifications Type Desktop Color Book Scanner for face-up original Document Type Book Original, Sheet Original, 3D Object Maximum Original Size: 18 inches × 24 inches L, Document Size A2 L: 420 mm × 594 mm... - Page 99 Chapter 7 Product Specifications At the installation of the main unit or the addition of the optional Glass Plate: Adjust the Aging, CCD Gain, Exposure Time, Black Shading, White Shading, White Balance, Tone Curve and Registration by this rotation. Set Up Adjustment At the luminance change of the original surface: Adjust the Aging, CCD Gain, Exposure Time, Black Shading, White Shading and White Balance by this rotation.
-
Page 100: Appendix
ScanDIVA User’s Guide 2 Appendix Assembling the Adjustment Plate Requirement parts ① × 6pcs ② × 6pcs Assembling procedure ① ① ② Inset the cut-in part of ① into that of ② Caution Assemble them on the flat place such as desktop. -
Page 101: Placing The Adjustment Plate
Chapter 7 Product Specifications Placing the Adjustment Plate Correctly placed Adjustment Plate Position standard Portrait : Front cover Landscape : Center of the platen... - Page 102 1. Your company name, address, telephone number, department name, floor number, machine location, etc. 2. Model name, serial number, condition or system(s) indication(s) on the display. Etc. For your reference purpose. Serial No. Model Name ScanDIVA Installation Data Authorized Dealer’s Name TEL. No. Address...
- Page 104 Printed in Japan The information contained in this manual is subject to change without notice to incorporate improvements made on the product or products the manual covers. Manufactured For Konica Minolta by Kyokko Seiko 100 Williams Drive Ramsey, NJ 07446 2012.8 7177-7002-01...
Need help?
Do you have a question about the ScanDIVA and is the answer not in the manual?
Questions and answers