Fujitsu AWYZ14LBC Operating Manual
Ceiling wall type heat & cool model
Hide thumbs
Also See for AWYZ14LBC:
- Service instruction (26 pages) ,
- Service manual (19 pages) ,
- Installation manual (2 pages)
Table of Contents
Advertisement
05M104_9314961014-02_cover
1
OPERATING MANUAL
BEDIENUNGSANLEITUNG
MANUAL DE FUNCIONAMIENTO
MANUALE DI ISTRUZIONI
ΕΓ ΕΙΡΙ∆Ι
MANUAL DE INSTRUÇÕES
РУКОВОДСТВО ПО ЭКСПЛУАТАЦИИ
ROOM AIR CONDITIONER
CEILING WALL TYPE
HEAT & COOL MODEL
(REVERSE CYCLE)
KEEP THIS OPERATION MANUAL
FOR FUTURE REFERENCE
2005.12.12, 9:36 AM
MODE D'EMPLOI
ΛΕΙΤ ΥΡΓΙΑΣ
P/N9314961014-03
Advertisement
Table of Contents

Related Manuals for Fujitsu AWYZ14LBC


Summary of Contents for Fujitsu AWYZ14LBC
- Page 1 OPERATING MANUAL BEDIENUNGSANLEITUNG MODE D’EMPLOI MANUAL DE FUNCIONAMIENTO MANUALE DI ISTRUZIONI ΕΓ ΕΙΡΙ∆Ι ΛΕΙΤ ΥΡΓΙΑΣ MANUAL DE INSTRUÇÕES РУКОВОДСТВО ПО ЭКСПЛУАТАЦИИ ROOM AIR CONDITIONER CEILING WALL TYPE HEAT & COOL MODEL (REVERSE CYCLE) KEEP THIS OPERATION MANUAL FOR FUTURE REFERENCE P/N9314961014-03 05M104_9314961014-02_cover 2005.12.12, 9:36 AM...
-
Page 2: Table Of Contents
CONTENTS Fig. 1 Fig. 2 SAFETY PRECAUTIONS ........En-1 HI-POWER OPERATION ......... En-12 FEATURES AND FUNCTIONS ......En-2 COIL DRY OPERATION ........En-13 NAME OF PARTS ..........En-3 AUTOMATIC FILTER CLEANING PREPARATION ..........En-4 FUNCTION ............En-14 OPERATION ............En-6 PERFOMING MAINTENANCE...... -
Page 3: Features And Functions
FEATURES AND FUNCTIONS INVERTER SWING OPERATION At the start of operation, a large power is used to bring the The airflow-direction louvers move (swing) automatically. room quickly to the desired temperature. Afterwards, the In addition, up, down, left, and right airflow directions can unit automatically switches to a low power setting for eco- be selected using the Remote Controller. -
Page 4: Name Of Parts
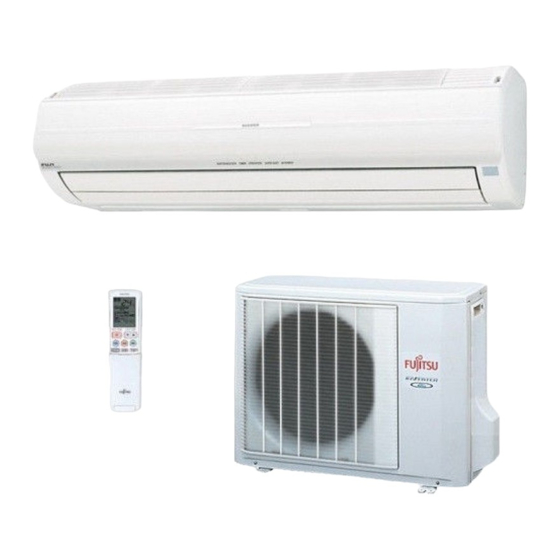
NAME OF PARTS Fig. 1 Indoor Unit Fig. 5 Remote Controller Intake Grilles Signal Transmitter UV Lamp (4 position) Remote Controller Display (Fig. 6) Indicator (Fig. 2) COIL DRY Display MAINTENANCE SIGN Indicator Lamp (red) Operating Mode Display TIMER Indicator Lamp (green) FAN CONTROL Display OPERATION Indicator Lamp (red) ECONOMY Operation... -
Page 5: Preparation
PREPARATION How to open and close the Remote Controller's cover. Take hold of both sides Open gently (do not be of the cover, and insert too rough). the cover into its place until you hear a click. Prompts to change Remote Controller's batteries G Remote Controller periodically starts and stops. - Page 6 CAUTION! Turn on the Power G Take care to prevent infants from Connect the Power Supply Plug (Fig. 1 H) to an electrical outlet; accidentally swallowing batteries. G When not using the Remote Controller in the case of a direct line connection, turn on the circuit breaker. for an extended period, remove the batteries to avoid possible leakage and Load Batteries (LR03 ×...
-
Page 7: Operation
OPERATION To Select Mode Operation Press the necessary Operation button. Cooling Operation: Press the COOL button (Fig.5 Heating Operation: Press the HEAT button (Fig.5 Dry Operation : Press the DRY button (Fig.5 Auto Operation : Press the AUTO button (Fig.5 Fan Operation : Press the FAN button (Fig.5 The Indoor Unit's OPERATION Indicator Lamp (red) (Fig.2 ) will light. - Page 8 To Stop Operation Press the START/STOP button (Fig.5 The OPERATION Indicator Lamp (red) (Fig. 2 ) will go out. About AUTO CHANGEOVER Operation G When AUTO CHANGEOVER operation first selected, the fan will oper- AUTO: ate at very low speed for about one minute, during which time the unit detects the room conditions and selects the proper operating mode.
-
Page 9: Adjusting The Direction Of Air Circulation
ADJUSTING THE DIRECTION OF AIR CIRCULATION G Adjust the up, down, left, and right air directions with the AIR DIRECTION buttons on the Remote Controller. G Use the AIR DIRECTION buttons after the Indoor Unit has started operating and the airflow-direction louvers have stopped moving. -
Page 10: Swing Operation
SWING OPERATION Begin air conditioner operation before performing this procedure. To select SWING Operation Open the Remote Controller lid to perform swing operation settings. Press the SWING button (Fig. 5 The SWING Display (Fig. 6 ) will light. Each time the SWING button is pressed, the swing operation will change in the following order. -
Page 11: Timer Operation
TIMER OPERATION Before using the timer function,be sure that the Remote Controller is set to the correct current time (See page 5). To Use the OFF TIMER or ON TIMER To Cancel the Timer Open the Remote Controller lid to perform the timer function settings. Press the CANCEL button. - Page 12 SLEEP TIMER OPERATION Unlike other timer functions, the SLEEP timer is used to set the length of time until air conditioner operate is stopped. To Use the SLEEP timer To Cancel the Timer: While the air conditioner is operating or stopped, press the Press the CANCEL (TIMER) button.
-
Page 13: Hi-Power Operation
ECONOMY OPERATION Begin Air Conditioner operation before performing this procedure. Open the Remote Controller lid. To Use the ECONOMY Operation Press the ECONOMY button (Fig.5 "ECO" appears on the Remote Controller display. Economy operation begins. To Stop the ECONOMY Operation Press the ECONOMY button (Fig.5 ) again. -
Page 14: To Start Coil Dry Operation
COIL DRY OPERATION G After allowing the interior of the indoor unit time to dry, run the UV filter clean, to limit mold and bacteria on the interior of the unit and on the air filter. This function shows clear results after cooling or dehumidifying. G For COLID DRY Operation, press the COIL DRY button. - Page 15 AUTO FILTER MAINTENANCE FUNCTION G This is a convenient function that automatically removes dust from the air filters after a set amount of time of air conditioner operation. G The auto filter maintenance function can also be started using the Remote Controller. Auto Filter Maintenance CAUTION! Do not touch the air filters during the auto...
-
Page 16: Auto Filter Maintenance Function
About the Auto Filter Maintenance function G Depending on how dirty the air filters are, all of the dust may not be removed from the air filters during the auto filter maintenance. In this case, perform auto filter maintenance again. G If dust remains on the air filters after auto filter maintenance has been per- formed a number of times, perform dust box maintenance (see page 16) G Depending on the condition of the dust on the air filters, such as if the dust is... -
Page 17: Dust Box Maintenance
PERFORMING MAINTENANCE G Frequent maintenance will extend the life of the air conditioner and improve the cooling and heating performance. G Before maintenance, stop air conditioner operation using the Remote Controller and unplug the power supply cord from the electrical outlet. CAUTION! Before cleaning the air conditioner, be sure to turn it off When cleaning the air conditioner, do not stand on any... - Page 18 2. Remove the dust collected in the dust boxes and clean the dust boxes. G After washing with water, make sure the dust boxes are 1. Open the dust boxes. completely dry before installation. The brushes are espe- Hold the latch (light blue) on both sides of the interior cially difficult to dry so wipe them with a towel, etc.
- Page 19 3. Install the dust box onto the main unit, press the "MAINTENANCE / MANUAL AUTO" button, and then insert the air filter. 1. Install the dust box onto the main unit. Make sure that the dust box's 2 yellow latches are open.
- Page 20 PERFORMING MAINTENANCE (CONTINUED) 3. Install the dust box onto the main unit, press the "MAINTENANCE / MANUAL AUTO" button, and then insert the air filter. (Continued) If the filter is not in the correct position, it may not Following the same procedure, insert the other side's automatically lock into its place.
- Page 21 PERFORMING MAINTENANCE (CONTINUED) Intake Grille Maintenance G Perform dust box maintenance at the same time. CAUTION! Intake grille Be sure to install the intake grilles securely. G If the intake grilles are not installed securely, they may fall and cause personal injury. 1.
- Page 22 MANUAL AUTO OPERATION Use the MANUAL AUTO operation in the event the Remote Controller is lost or otherwise unavailable. REMOTE CONTROLLER UNAVAILABLE (MANUAL AUTO OPERATION) If the Remote Controller is lost or the batteries are dead, the air conditioner can be operated provisionally from the indoor unit. 1.
- Page 23 TROUBLESHOOTING In the event of a malfunction (burning smell, etc.), immediately stop operation, disconnect the WARNING! Power Supply Plug, and consult authorized service personnel. Merely turning off the unit’s power switch will not completely disconnect the unit from the power source.
-
Page 24: Troubleshooting
TROUBLESHOOTING Symptom Items to check See Page G Is the Power Supply Plug disconnected its outlet? CHECK ONCE Doesn’t operate at all: MORE G Has there been a power failure? — G Has a fuse blown out, or a circuit breaker been tripped? G Is the timer operating? 10 - 11 G Is the Air Filter dirty? - Page 25 OPERATING TIPS Temperature and Humidity Range Dry Mode Heating Mode Cooling Mode Outdoor temperature About –10 to 43 °C About –10 to 43 °C About –15 to 24 °C Indoor temperature About 18 to 32 °C About 30 °C or less About 18 to 32 °C G If the air conditioner is used under higher temperature conditioner than those listed, the built-in protection circuit may operate to prevent internal circuit damage.
Need help?
Do you have a question about the AWYZ14LBC and is the answer not in the manual?
Questions and answers