Table of Contents
Advertisement
Advertisement
Table of Contents

Related Manuals for AEG COMPETENCE E2190-1


Summary of Contents for AEG COMPETENCE E2190-1
- Page 1 COMPETENCE E2190-1 Built-In Electric Oven User information...
-
Page 2: Dear Customer
Dear Customer, Please read these operating instructions carefully. Above all, please observe the “safety” section on the first few pages. Please retain these operating instructions for later reference. Pass them on to any subsequent owners of the appliance. The following symbols are used in the text: Safety Instructions Warning: Information concerning your personal safety. -
Page 3: Table Of Contents
Switching the Oven On and Off ........ - Page 4 Oven Interior Dimensions ........
-
Page 5: Operating Instructions
• Warning: Risk of burns! The interior of the oven becomes hot dur- ing use. • Using ingredients containing alcohol in the oven may create an alco- hol-air mixture that is easily ignited. -
Page 6: Disposal
To Avoid Damaging Your Appliance • Do not line your oven with aluminium foil and do not place a baking tray or dish on the oven floor, otherwise the oven enamel will be damaged by the resulting build up of heat. -
Page 7: Description Of The Appliance
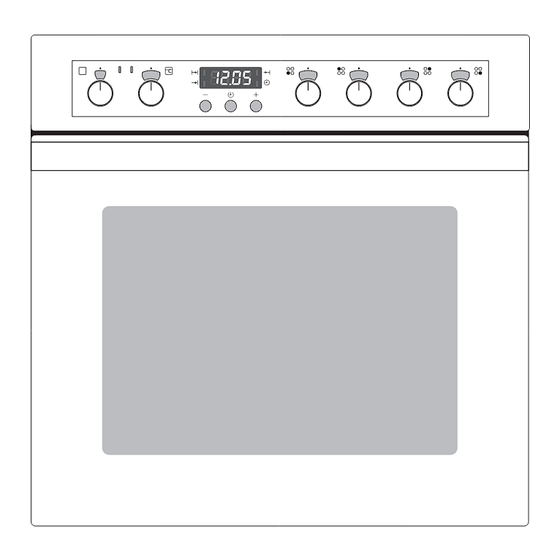
Description of the Appliance General Overview Control panel Door handle Full glass door... -
Page 8: Control Panel
Control Panel Oven Power Indicator Temperature Pilot Light Temperature selector Oven Functions Oven Features Shelf positions Clock function buttons Hob Cooking Zone Control Knobs Top heat and heating elements Oven shelf runners, removable Oven lighting Oven lighting Fan heating element... -
Page 9: Oven Accessories
Oven Accessories Combination shelf For dishes, cake tins, items for roasting and grilling. Baking tray For cakes and biscuits. Fat tray For roasting or for collecting fat Grill pan with handle Support for the grill tray as a col- lecting vessel for fat... -
Page 10: Before Using For The First Time
Before using for the first time Setting the Time The oven will only function if the time is set. The set time function indicator will flash after the appliance has been connected to the mains or following a power failure. -
Page 11: Initial Cleaning
Initial Cleaning Before using the oven for the first time you should clean it thoroughly. Caution: Do not use any caustic, abrasive cleaners! The surface could be damaged. To clean any metal front panels use commercially available cleaning agents. 1. Turn the oven function switch to oven lighting 2. -
Page 12: Using The Hob
Using the Hob Also refer to the operating instructions for your built-in hob. It con- tains important information on ovenware, operation, cleaning and care. Heat settings • You may select the heat settings within the range of settings 1-9. • Intermediate positions may be selected between settings 2 and 7. 1 = lowest heat setting 9 = highest heat setting Switch the cooking zone off approx. -
Page 13: Cooking With The Zones
Cooking with the Zones 1. For heating up/browning, select a high heat setting. 2. As soon as steam starts to form or the oil is hot, turn back to the heat setting necessary for further cooking. 3. To stop cooking, turn back to the zero position. -
Page 14: Operating The Oven
2. Turn the “temperature selection” control knob to the required tempera- ture. The yellow oven power indicator will remain on while the oven is in use. The red temperature pilot light comes on while the oven is heating up. 3. To switch off the oven turn the “oven functions” control knob and the “temperature selection”... -
Page 15: Oven Functions
Oven Functions The oven has the following functions: Oven lighting With this function you can illuminate the oven interior e.g. for clean- ing. The heating element is not in use. Fan cooking For baking on up to three levels at the same time. -
Page 16: Inserting The Shelf And Universal Baking Tray
Anti-tip device All slide-in units have a small bulge on the left and right. This bulge is an anti-tip device and must always point to the rear of the oven. Tray or universal baking tray: The anti-tip device must point to- wards the rear of the oven. -
Page 17: Attaching/Removing The Grill Pan Handle
Attaching/Removing the Grill Pan Handle The handle is particularly useful for removing the grill pan and tray more easily from the hot oven. Attaching the handle Insert the handle at an angle from above into the recess in the side of... -
Page 18: Clock Functions
To set a countdown. A signal sounds after the time has elapsed. This function does not affect the operation of the oven. Cook time To set how long the oven is to be in use. End time To set when the oven is to switch off again. -
Page 19: Switching Off The Time Display
• The required oven function and temperature may be selected before or after setting the clock functions cook time • When the cooking time has expired turn the oven function switch and the temperature selection switch back to the off position. - Page 20 Countdown 1. Press selection button ly until the countdown function indicator flashes. 2. Using the quired countdown (Max. 2 hours and 30 minutes.) After approx. 5 seconds the display will show the remaining time. The countdown function indicator is illuminated. When the time has expired the function indicator will flash and an acoustic signal will sound for...
- Page 21 When the time has expired the function indicator will flash, an acoustic signal will sound for 2 minutes and the oven will switch off. 3. Switch off the acoustic signal and the programme by pressing any but- ton.
- Page 22 When the time has elapsed the function indicator will flash, an acoustic signal will sound for 2 minutes and the oven will switch off. 3. Switch off the acoustic signal and the programme by pressing any but- ton.
- Page 23 In this case 13:05. And will switch off again when the set time has ended. In this case 14:05. combined can be used together if the oven is to function set function set and end time...
- Page 24 Changing Time The time can only be changed if neither of the automatic functions (cook time or end time 1. Press selection button ly until the time function indicator flashes. 2. Using buttons rent time. After approx. 5 seconds the func- tion indicator will stop flashing and the clock will show the set time.
-
Page 25: Usage, Tables And Tips
Usage, Tables and Tips Boiling The information given in the following tables is for guidance. The switch setting required for cooking depends on the quality of the pans and the type and quantity of food. Settings for cooking on the zones Heat setting Heating up browning... -
Page 26: Baking
Baking Use the fan cooking oven function for baking. Cake Tins • Light tins are suitable for fan cooking Shelf Positions • You can bake on up to 3 levels simultaneously using fan cooking 1 Baking Sheet: Shelf Position 3... - Page 27 Variations in the amount of browning will even themselves out during baking. Switch off the oven 10-15 minutes before the end of the cooking time to make use of the residual heat. Unless otherwise stated the information in the tables applies to a cold oven.
-
Page 28: Baking Table
Buns / cup cakes Scones Meringues Sausage rolls Pizza Bread Wholemeal bread White bread 1) Pre-Heat oven. Select the lower temperature to start with, then select the higher one only if required. Cakes, position Fan Cooking Time Shelf Temperature hr. : min. - Page 29 Shortcrust biscuits Small piped biscuits Sponge fingers Meringues Macaroons Small pastries made with yeast dough Small pastries made with puff pastry Bread rolls 1) Pre-Heat oven. Fan Cooking 2 Levels 3 Levels 1/3/5 1/3/5 Time Hours: Tempera- Mins. ture ºC...
-
Page 30: Tips For Baking
Tips for Baking Baking result The cake is under- cooked at the bottom The cake collapses (is sticky and soft in the middle) Cake is too dry Cake is unevenly browned Cooking time too long Possible cause Wrong shelf position Cooking temperature too high Cooking time too short Too much liquid in mixture... -
Page 31: Table: Desserts
Soufflé - sweet/savoury 1)Pre-heat oven. The figures printed in bold indicate the best oven function and temperature to use in each case. Select the lower temperature to start with, then select the higher one only if required. Fan Cooking U Shelf Temp. -
Page 32: Roasting
1-2 knuckles, 1-2 chicken pieces, small poultry, sirloin, fillet, game). • Tip: If you use dishes for roasting (particularly for small amounts), the oven will not get so dirty! Shelf Positions • Please see the following table for the shelf positions to use. - Page 33 The cooking times are only for guidance. • We recommend roasting meat and fish in the oven from a weight of 1 kg. • The cooking time required is dependent on the type and quality of the meat.
-
Page 34: Table: Meat, Roasting, Casseroles
1) Pre-Heat oven. 2)For rotitherm roasting and joints of 5 lb & over eliminate the additonal time. The figures printed bold indicate the best oven function and temperature to use in each case. Select the lower temperature to start with, then select the higher one only if re- quired. -
Page 35: Table: Roasting, Casseroles, Au Gratin
Table: Roasting, casseroles, au gratin Poultry, Quantity Game, Fish, approx. Vegetables Casseroles, miscellaneous Casseroles 1 kg/2 lbs Lancashire 1 kg/2 lbs Hot Pot Moussaka 1 kg/2 lbs 675 g/ Meat Loaf 1.5 lbs Poultry / Game Chicken 1 kg/2 lbs Chicken 1.5 kg/3 lbs 1.5-2 kg/... - Page 36 1) Place food in suitable containers and position wire shelf as per chart. The figures printed bold indicate the best oven function and temperature to use in each case. Select the lower temperature to start with, then select the higher one only if re- quired.
- Page 37 • For larger amounts use the wire shelf and the meat tin together for grilling. Warning: The grill pan handle must be removed whilst grilling! Al- ways use oven gloves when removing or attaching the grill pan handle. Shelf Positions • For grilling flatter foods, always use the 2nd shelf position from the top.
-
Page 38: Grilling Table
Grilling Table Food Bacon rashers Beefburgers Chicken joints Chops: Lamb pork Fish: whole trout/hering fillet plaice/cod Kebabs Kidneys: Lamb/pig Liver: Lamb/pig Sausages Steaks: rare Steaks: medium Steaks: well done Shelf Level Grilling Time from down minutes each side 6-10 10-15 7-10 10-15 8-12... -
Page 39: Defrosting
Defrosting To defrost food, use the oven’s defrosting function temperature. Defrosting dishes • Put the food on a plate and put the plate on the tray. • Use only parchment paper or film to cover the food. Do not use plates or dishes as they significantly increase the defrosting time. -
Page 40: Cleaning And Care
1. Switch on the oven lighting when cleaning. 2. Every time you use the oven, wipe it out afterwards with water and washing-up liquid, then dry. Do not use any abrasive items. 3. Remove stubborn marks with special oven cleaners. -
Page 41: Shelf Support Rails
Shelf Support Rails The shelf support rails on the left and right hand sides of the oven can be removed for cleaning the side walls. Removing the shelf support rails First pull the front of the rail away from the oven wall (1) and then un- hook at the back (2). -
Page 42: Oven Lighting
Warning: Risk of electric shock! Prior to changing the oven light bulb: – Switch off the oven! – Disconnect from the electricity supply. Place a cloth on the oven floor to protect the oven light and glass cov- Changing the oven light bulb/ cleaning the glass cover 1. -
Page 43: Oven Roof
1. Move the heating element back up towards the oven roof. 2. Pull the heating element forwards against the spring pressure and guide it over the oven support lug. 3. Settle it onto the support. 4. Insert shelf support rail. Important: The heating element... -
Page 44: Oven Door
Oven Door The oven door of your appliance may be removed for cleaning. Removing the oven door 1. Open the oven door completely. 2. Completely fold back the brass- coloured clamping lever on both door hinges. 3. Grip the oven door with both hands... -
Page 45: Oven Door Glass
Oven Door Glass The oven door is fitted with three glass panels mounted one behind the other. The inner panels may be removed for cleaning. Warning: The following steps must be performed only with the oven door removed. If the glass is removed while the oven door is attached, the lighter weight may cause it to spring up and cause injury. - Page 46 2. Lower the glass panel. Lay the panel against the spring on the lower door edge in front of the retaining section on the handle side and slide it under the retaining section. The glass panel must be firmly in position! Re-hang the oven door...
-
Page 47: What To Do If
Advice on cookers with metal fronts: Because of the cold surface at the front of the cooker, opening the oven door during (or just after) baking or roasting may cause the glass to steam up. Possible cause The relevant cooking zone is not switched on. -
Page 48: Technical Data
Technical Data Oven Interior Dimensions Height x Width x Depth Capacity (usable capacity) Regulations, Standards, Directives This appliance meets the following standards: • EN 60 335-1 and EN 60 335-2-6 relating to the safety of electrical appliances for household use and similar purposes and •... -
Page 49: Installation Instructions
Installation Instructions Important: The new appliance may only be installed and connected by a qualified electrician / competent person. Please observe this instruction, otherwise the warranty will not cover any damage that may occur. Safety Instructions for the Installer • A device must be provided in the electrical installation which allows the appliance to be disconnected from the mains at all poles with a contact opening width of at least 3 mm. -
Page 50: Electrical Connection
Connection Cooker Control Circuit It is necessary that you install a double pole switch between the oven and the electricity supply (mains), with a minimum gap of 3mm between the switch contacts and of a type suitable for the required load in compliance with the current regulations. - Page 55 Removal...
-
Page 56: Warranty Conditions
Warranty conditions Great Britain Standard guarantee conditions We, AEG, undertake that if within 12 months of the date of the purchase this AEG appliance or any part thereof is proved to be defective by reason only of faulty workmanship or materials, we will, at our discretion repair or replace the same FREE OF CHARGE for labour, materials or carriage on condition that: •... -
Page 58: Index
..... 11 Oven Ceiling ..... . . 43 Oven light bulb. -
Page 59: Service And Spare Parts
Service and Spare Parts If you wish to purchase spare parts or require an engineer, contact your local AEG Service Force Centre by telephoning: 08705 929 929 Your telephone call will be automatically routed to the Service Force Centre covering your post code area. For the address of your local Service Force Centre and further informa- tion about Service Force, please visit the website at www.serviceforce.co.uk... - Page 60 From the Electrolux Group. The world´s No.1 choice. The Electrolux Group is the world´s largest producer of powered appliances for kitchen, cleaning and outdoor use. More than 55 million Electrolux Group products (such as refrigerators, cookers, washing machines, vacuum cleaners, chain saws and lawn mowers) are sold each year to a value of approx. USD 14 billion in more than 150 countries around the world.
Need help?
Do you have a question about the COMPETENCE E2190-1 and is the answer not in the manual?
Questions and answers