Table of Contents
Advertisement
Advertisement
Table of Contents

Related Manuals for AEG COMPETENCE B1180-1


Summary of Contents for AEG COMPETENCE B1180-1
- Page 1 COMPETENCE B1180-1 The Versatile Built-In Oven User Instructions...
-
Page 2: Dear Customer
Dear customer Please read these operating instructions carefully. Pay particular attention to the section “Safety Instructions” on the first few pages. Please retain these operating instructions for later refer- ence. Pass them on to possible new owners of the appliance. The following symbols are used in the text: Safety Instructions Warning: Information concerning your personal safety. -
Page 3: Table Of Contents
CONTENTS Operating Instructions Safety ............Disposal . - Page 4 Contents Cleaning and Care ..........36 Exterior of the Appliance .
-
Page 5: Operating Instructions
Operating Instructions Safety Electrical Safety • The appliance may only be connected by a registered specialist. • In the event of any faults or damage to the appliance: remove fuses or switch off. • It is not permissible to clean the appliance with a steam or high pressure cleaner for safety reasons! •... - Page 6 Operating Instructions To Avoid Damaging Your Appliance • Do not line your oven with aluminium foil and do not place a baking tray or dish on the oven floor, otherwise the oven enamel will be damaged by the resulting build up of heat. •...
-
Page 7: Disposal
Disposal Disposing of the packaging material All materials used can be fully recycled. Plastics are marked as follows: • >PE< for polyethylene, as used for the outer wrapping and the bags inside. • >PS< for polystyrene foam, e.g., as used for the padding materials. They are completely free of CFCs. -
Page 8: Description Of The Appliance
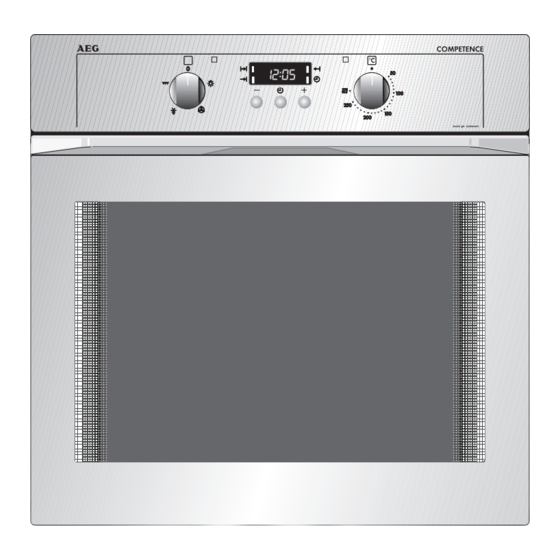
Operating Instructions Description of the Appliance General Overview Control Panel... -
Page 9: Oven Features
Operating Instructions Oven Features Relates only to appliances with a metal front: Steam from the oven is fed out between the upper door edge and the control panel. -
Page 10: Oven Accessories
Operating Instructions Oven Accessories Combination shelf For dishes, cake tins, roasting and grilling trays. Grill pan with handle Support for the grill tray as a col- lecting vessel for fat. Grill tray Insert for the grill pan for grilling smaller amounts of grilled food. -
Page 11: Before Using For The First Time
Before Using for the First Time Setting the Time The oven will only operate when the time has been set. 1. The time function indicator D will flash after the appliance has been connected to the mains or following a power failure. 2. -
Page 12: Initial Cleaning
Operating Instructions Initial Cleaning Before using the oven for the first time you should clean it thoroughly. Caution: Do not use any caustic, abrasive cleaners! The surface could be damaged. To clean metal fronts use commercially available cleaning agents. 1. Turn the oven function switch to oven lighting L. 2. -
Page 13: Operating The Oven
Operating the Oven Switching the Oven On and Off 1. Turn the “oven functions” switch to the required function. 2. Turn the “temperature selection” switch to the required temperature. The yellow oven power indicator is illuminated while the oven is in use. The red temperature pilot light comes on while the oven is heating up. -
Page 14: Oven Functions
Operating Instructions Oven Functions The oven has the following functions: Oven lighting With this function you can illuminate the oven interior e.g. for clean- ing. The heating element is not in use. U Fan cooking For baking on up to three levels at the same time. The rear wall heating element is used and in addition the fan is switched on. -
Page 15: Inserting The Shelf And Universal Baking Tray
Inserting the Shelf and Universal Baking Tray Anti-tip device All slide-in units have a small bulge on the left and right. This bulge is an anti-tip device and must always point to the rear of the oven. Tray or universal baking tray: The anti-tip device must point to- wards the rear of the oven. -
Page 16: Attaching/Removing The Grill Pan Handle
Operating Instructions Attaching/Removing the Grill Pan Handle The handle is particularly useful for removing the grill pan and tray more easily from the hot oven. Attaching the handle Insert the handle at an angle from above into the recess in the side of the grill pan (1) lift it gently and then lower it (2) until you hear it click into place. -
Page 17: Working With The Electronic Clock
Operating Instructions Working with the Electronic Clock The electronic clock has the following functions: Countdown ] To set a countdown. A signal sounds after the time has elapsed. This function does not affect the functioning of the oven. Cook time < To set how long the oven is to be in use. -
Page 18: Switching Off The Time Display
Operating Instructions General information • Once a function has been selected the corresponding function indi- cator will flash for approx. 5 seconds. During this time the required times can be set using the + or - button. • After the required time has been set the function indicator will flash again for approx. - Page 19 Countdown ] 1. Press selection button Y repeatedly until the countdown function indicator ] flashes. 2. Using the + or - button set the required countdown ]. (Max. 2 hours and 30 minutes.) After approx. 5 seconds the display will show the remaining time. The countdown function indicator ] is illuminated.
- Page 20 Operating Instructions Cook time < 1. Press selection button Y repeatedly until the cook time function indicator < flashes. 2. Using buttons + or - set the re- quired cooking time. After approx. 5 seconds the display will revert to the time. The cook time function indicator <...
- Page 21 End time > 1. Press selection button Y repeatedly until the end time func- tion indicator > flashes. 2. Using buttons + or - set the time at which you want the oven to switch off. After approx. 5 seconds the display will revert to the time.
- Page 22 Operating Instructions Cook time < and End time > combined Cook time < and end time > can be used together if the oven is to switch on and off automatically at a later time. 1. Using the cook time < function set the time required for the dish to cook.
- Page 23 Changing TIME The time can only be changed if neither of the automatic functions (cook time < or end time >) have been set. 1. Press selection button Y repeatedly until the TIME function indicator flashes. 2. Using buttons + or - set the cur- rent time.
-
Page 24: Usage, Tables And Tips
Operating Instructions Usage, Tables and Tips Baking Use the fan cooking Cake tins • Light tins are suitable for fan cooking Shelf positions • You can bake on up to 3 levels simultaneously using fan cooking 1 Baking sheet: Shelf position 3 2 Baking sheets: Shelf positions 1 and 4 oven function for baking. - Page 25 General information • Please note that the shelf positions are counted from bottom to top. • Always place cakes in cake tins in the middle of the shelf. Notes on the baking tables In the tables you will find information on temperatures, cooking times and shelf positions for a selection of recipes.
-
Page 26: Baking Tables
Operating Instructions Baking Tables Biscuits, Bread, Pies Using cake tins Cakes in Pound Cake tins Sandcakes/Cakes in loaf tins Madeira cake Dundee cake Large Christmas cake (10“) Victoria Sandwich Pastry cases Bakewell tart Swiss roll Flans & quiches Using baking sheets Short bread Biscuits Macaroons... -
Page 27: Tips On Baking
Cakes, Biscuits, Bread, Pies Bread Wholemeal bread White bread 1) Pre-heat oven. Select the lower temperature to start with, then select the higher one only if re- quired. Tips on Baking This is how to tell if your cake is cooked through The cake collapses (is sticky, not properly cooked through, water marks) -
Page 28: Table: Desserts
Operating Instructions Table: Desserts Desserts Apple pie Rice pudding Fruit crumble Pineapple upside down cake Pavlova Baked custard Baked apples Bread and butter pudding Apple charlotte Soufflé - sweet/savoury 1)Pre-heat oven. The figures printed in bold indicate the best oven function and temperature to use in each case. -
Page 29: Roasting
Roasting For roasting, use the fan cooking U oven function. Roasting Dishes • Any heat-resistant dish is suitable for roasting. • If the dish has plastic handles, ensure that the handles are heat-re- sistant. • Large roasts can be roasted directly on the meat tin or on the shelf with the meat tin underneath (e.g. -
Page 30: Table: Meat, Roasting, Casseroles
Operating Instructions Table: Meat, roasting, casseroles Meat Pork Shoulder; leg; rolled; boned spare rib; loin of pork Beef Inexpensive cuts Prime cuts -rare -medium -well done Yorkshire pudding - small - large Lamb Veal 1)Pre-Heat oven. 2)For joints of 5 lb & over eliminate the additonal time. The figures printed bold indicate the best oven function and temperature to use in each case. -
Page 31: Table: Roasting, Casseroles, Au Gratin
Table: Roasting, casseroles, au gratin Poultry, Game, Fish, Quantity ap- Vegetables Casseroles, miscel- laneous Casseroles 1 kg/2 lbs Lancashire 1 kg/2 lbs Hot Pot Moussaka 1 kg/2 lbs 675 g/ Meat Loaf 1.5 lbs Poultry/ Game Chicken 1 kg/2 lbs Chicken 1.5 kg/3 lbs 1.5-2 kg/3.5-4... - Page 32 Operating Instructions Poultry, Game, Fish, Vegetables Fish (baked, steamed) Whole fish Fish pies, bakes Vegetables Stuffed pepper/au- bergines Au gratin dishes Quantity ap- Fan Cooking U prox. Shelf posi- tion from down 1-1.5 kg/ 2-3 750 g-1 kg/ 3 or 2 1.5-2 lbs Time Temperature...
-
Page 33: Grilling
Grilling Use the grill oven function with a temperature of 275 °C for grilling. Important: Always pre-heat the empty oven for 5 minutes using the grill function Ovenware for grilling • For small amounts use the grill pan and the grill pan grid together for grilling. -
Page 34: Grilling Table
Operating Instructions Grilling Table Bacon rashers Beef burgers Chicken joints Chops: Fish: Kebabs Kidneys: Liver: Sausages Steaks: Shelf Level Food from down Lamb Pork Whole trout Hering Fillet plaice/cod Lamb/pig Lamb/pig rare medium well Grilling Time minutes each side 6-10 10-15 7-10 10-15... -
Page 35: Defrosting
Defrosting To defrost food, use the oven's defrosting function Defrosting dishes • Put the food on a plate and put the plate on the tray. • Use only parchment paper or film to cover the food. Do not use plates or dishes as they significantly increase the defrosting time. Shelf levels •... -
Page 36: Cleaning And Care
Operating Instructions Cleaning and Care Warning: For safety reasons cleaning the appliance with a steam jet cleaner or high-pressure water cleaner is not permissible! Exterior of the Appliance Wipe the front of the appliance with a soft cloth dipped in warm soapy water. -
Page 37: Shelf Support Rails
Shelf Support Rails The shelf support rails on the left and right hand sides of the oven can be removed for cleaning the side walls. Removing the shelf support rails First pull the front of the rail away from the oven wall (1) and then un- hitch at the back (2). -
Page 38: Oven Lighting
Operating Instructions Oven Lighting Warning: There is a danger of electric shock! Prior to changing the oven light bulb: – Switch off the oven! – Remove the fuses in the fuse box or switch off the circuit breaker. Place a cloth on the oven floor to protect the oven light and glass cover. -
Page 39: Cleaning The Oven Ceiling
Cleaning the Oven Ceiling The upper heating element can be folded down to make it easier to clean the oven ceiling. Folding down the heating ele- ment Warning: Only fold down the heat- ing element when the oven is switched off and there is no risk of being burnt! 1. -
Page 40: Oven Door
Operating Instructions Oven Door The oven door of your appliance may be removed for cleaning. Removing the oven door 1. Open the oven door completely. 2. Completely fold back the brass- coloured clamping lever on both door hinges. 3. Grip the oven door with both hands on the sides and close it to about 3/4 going past the point of resist- ance. -
Page 41: Oven Door Glass
Oven Door Glass The oven door is fitted with three glass panels mounted one behind the other. The inner panels may be removed for cleaning. Warning: Carry out the following steps only when the oven door is un- hinged! When left on its hinges, the door could rise rapidly due to the lighter weight when the glass is removed and could cause injury. - Page 42 Operating Instructions Inserting the middle door glass 1. Insert the middle glass panel at an angle from above into the section of the door in which the handle is located. 2. Lower the middle glass panel and slide it under the lower bracket to- wards the lower door edge as far as it will go.
-
Page 43: What To Do If
What to do if ... Symptom The oven does not heat The oven lighting does not come on. If you cannot rectify the fault with the help of the information given above please contact your local Service force Centre. Warning: Repairs to the appliance must be carried out by qualified service engineers! Improper repairs can give rise to significant hazards for the user. -
Page 44: Technical Data
Operating Instructions Technical Data Oven Interior Dimensions Height x Width x Depth Capacity (usable capacity) Regulations, Standards, Directives This appliance meets the following standards: • EN 60 335-1 and EN 60 335-2-6 relating to the safety of electric appliances for household use and similar purposes and •... -
Page 45: Installation Instructions
Installation Instructions Important: Any electrical installation work must be carried out by a qualified electrician/competent person. The oven must be installed according to the instructions supplied. Safety Instructions for the Installer • Protection against access to live parts must be guranteed by the in- stallation. - Page 46 Installation Instructions This oven can be installed either in-column as shown or under a counter...
- Page 47 Installation Instructions...
- Page 48 Installation Instructions...
- Page 49 Installation Instructions...
- Page 50 Installation Instructions...
-
Page 51: Warranty Conditions
Warranty conditions Great Britain Guarantee Conditions AEG offer the following guarantee to the first purchaser of this appliance. 1. The guarantee is valid for 12 months commencing when the appliance is handed over to the first retail purchaser, which must be verified by purchase invoice or similar docu- mentation. -
Page 52: Customer Service Centres
Customer Service Centres Customer Service Centres Great Britain For general enquiries or information regarding AEG appliances contact: Customer Services Department AEG Domestic Appliances 55-77 High Street Slough Berkshire SL1 1DZ Tel.: 08705 350 350... -
Page 54: Index
Index INDEX Accessories ......15 Cleaning accessories ......36 initial cleaning . -
Page 55: Service And Spare Parts
Service and Spare parts Service and Spare parts In the event of your appliance requiring service, or if you wish to pur- chase spare parts, please contact Service Force by telephoning: 08705 929 929 Your telephone call will be automatically routed to the Service Force Centre covering your post code area. - Page 56 From the Electrolux Group. The world´s No.1 choice. The Electrolux Group is the world´s largest producer of powered appliances for kitchen, cleaning and outdoor use. More than 55 million Electrolux Group products (such as refrigerators, cookers, washing machines, vacuum cleaners, chain saws and lawn mowers) are sold each year to a value of approx. USD 14 billion in more than 150 countries around the world.
Need help?
Do you have a question about the COMPETENCE B1180-1 and is the answer not in the manual?
Questions and answers