Table of Contents
Advertisement
Quick Links
Advertisement
Table of Contents

Related Manuals for AT&T Plug&Share 6800B4X


Summary of Contents for AT&T Plug&Share 6800B4X
-
Page 1: Wireless Router
Plug&Share ™ Wireless Router 22 Mbps Turbo 802.11b 6800B4X User Manual Copyright © 2004 Advanced American Telephones. All Rights Reserved. AT&T and the Globe Design are trademarks of AT&T Corp., licensed to Advanced American Telephones. All marks are trademarks of their respective corporations. -
Page 2: Table Of Contents
Table of Contents Table of Contents GETTING STARTED ..............4 About your new wireless network router ......4 Package contents............5 System requirements ............5 Router controls, connections and indicator lights ..6 Router installation ............7 THE SETUP WIZARD ..............8 Internet connection type..........8 Dynamic IP address screen ..........9 PPPoE screen ..............9 Static IP address screen ..........10 Wireless LAN connection screen ........10... - Page 3 Table of Contents STATUS SCREENS ..............38 Device information ............38 Logs ................39 Traffic statistics..............40 Wireless client computers ..........41 SHORTCUTS ................42 Parental control ............42 Gaming applications ............43 Personal web site............44 Personal FTP site ............45 Internet telephony ............46 FIRMWARE UPGRADES ............47 CONFIGURING THE WIRELESS NETWORK......48 Change network settings ..........48 File &...
-
Page 4: Getting Started
Getting Started About Your New Wireless Router Your new AT&T Plug&Share Wireless Router gives you the freedom to share files, programs, storage ™ devices, scanners, printers and even broadband Internet access among all the computers in your network — without the inconvenience and expense of a tangle of network cabling. Designed for fast, easy setup and use, your new router transfers data at up to 22 Mbps (megabits per second). -
Page 5: Package Contents
Getting Started Package Contents Please check to make sure your package contains the following items: Plug&Share Power adapter RJ45 Ethernet cable ™ Wireless Router Use ONLY the supplied Connects the router to the adapter. Do not attempt host computer, which is the to use any other power computer you are using to adapter. -
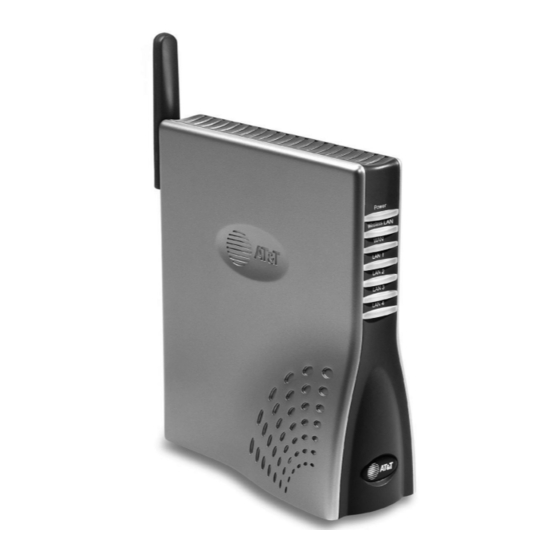
Page 6: Router Controls, Connections And Indicator Lights
Getting Started Router Controls, Connections and Indicator Lights BACK FRONT Power A steady light indicates that the LAN Ports 1- 4 router is properly connected to RJ45 jacks for cable con- the power supply. nections to a local area network. After installation Wireless LAN and setup, you will not A steady light indicates that the... -
Page 7: Router Installation
Getting Started Step 1: Make sure that you have Internet access Before you begin, launch your web browser to make sure you can connect to the Internet. If you can connect to web sites as usual, proceed to Step 2, below. If you cannot connect to the Internet, check your modem connections, or consult the User Manual provided by your broadband/Internet service supplier. -
Page 8: The Setup Wizard
Setup Wizard Basic > Advanced > Admin > Status > Shortcuts > Help Wizard Wireless ISP Connection DHCP Step 3: Run the Setup Wizard To configure your router for use, launch your web browser, then follow the steps below. NOTE: The screens you will see are stored in the router; they are not web site pages. During setup, ignore alerts that prompt you to re-connect to the Internet. -
Page 9: Dynamic Ip Address Screen
Setup Wizard Basic > Advanced > Admin > Status > Shortcuts > Help Wizard Wireless ISP Connection DHCP Set Dynamic IP Address The following screen appears if you select Dynamic IP Address as your Internet connection type. Host Name: If your ISP requires that you enter a host name, enter it here. -
Page 10: Static Ip Address Screen
Setup Wizard Basic > Advanced > Admin > Status > Shortcuts > Help Wizard Wireless ISP Connection DHCP Set Wireless LAN Connection This screen displays the default settings for your wireless network. SSID (Service Set Identifier): This feature pro- vides protection against unauthorized access to your network. -
Page 11: Wep Encryption
Setup Wizard Basic > Advanced > Admin > Status > Shortcuts > Help Wizard Wireless ISP Connection DHCP Security Wizard: Set Admin Password An Admin Password is not required, but is recommended to prevent unauthorized tampering with the router’s settings if others have access to your network. Only those who know the password will be allowed to change settings (see page 34 for important information on password use). -
Page 12: Security Setup Completed
Setup Wizard Basic > Advanced > Admin > Status > Shortcuts > Help Wizard Wireless ISP Connection DHCP Security setup completed Your setup is complete. For additional security protection, turn to the Wireless Settings section (page 15). Click Back to change any settings Click Save Settings to end the setup session now. -
Page 13: System Settings
Basic System Settings Basic > Advanced > Admin > Status > Shortcuts > Help System settings To change your network settings, launch your web browser, type http://ATT.Router in the address field, then press Enter. If the router page does not appear, type http://192.168.0.1 then press Enter. Click tabs in the blue menu bar at the top of the page to choose the type of settings you want to review or change. -
Page 14: Basic Settings
Basic System Settings Basic > Advanced > Admin > Status > Shortcuts > Help Wizard Wireless ISP Connection DHCP Setup Wizard Click Run Wizard for a simple, step-by-step configuration of your router settings. (It is usually not neces- sary to do this after initial setup is complete.) AT&T Plug&Share 22 Mbps Turbo Wireless Router 6800B4X ™... -
Page 15: Basic Wireless Settings
Basic System Settings Basic > Advanced > Admin > Status > Shortcuts > Help Wizard Wireless ISP Connection DHCP Wireless settings Options on this page allow you to control security features that can protect your privacy. Remember that all devices connected to the wireless network must share the same security settings. •... - Page 16 Basic System Settings Basic > Advanced > Admin > Status > Shortcuts > Help Wizard Wireless ISP Connection DHCP • WEP: (Default Off) For a higher level of privacy you can choose to scramble the data being transferred over your network by setting Wired Equivalent Privacy (WEP) Encryption to On. Click on the box to enable WEP Encryption.
-
Page 17: Basic Isp Connection
Basic System Settings Basic > Advanced > Admin > Status > Shortcuts > Help Wizard Wireless ISP Connection DHCP ISP Connection Type At this screen you must choose an Internet connection type compatible with your Internet Service Provider (ISP). If you are unsure which to choose, contact your ISP. When you make a selection, the screen will change to show options available for that connection type (see next page). - Page 18 Basic System Settings Basic > Advanced > Admin > Status > Shortcuts > Help Wizard Wireless ISP Connection DHCP ISP Connection Type: Dynamic IP Address This setting is usually required for use with DSL modems. Choose this setting if you have to log on to the Internet when you turn on your computer (IP addresses are assigned by your ISP).
- Page 19 Basic System Settings Basic > Advanced > Admin > Status > Shortcuts > Help Wizard Wireless ISP Connection DHCP ISP Connection Type: PPPoE PPPoE stands for “Point to Point Protocol over Ethernet,” often used by DSL service providers. Select Dynamic PPPoE to obtain an IP address automatically for your PPPoE connection (the option most often used).
- Page 20 Basic System Settings Basic > Advanced > Admin > Status > Shortcuts > Help Wizard Wireless ISP Connection DHCP ISP Connection Type: Static IP Address This connection type is rarely required. Contact your ISP before choosing this option. • To set a static IP address: Contact your Internet Service Provider and obtain the IP address, subnet mask, gateway address, and DNS (domain name server) numbers required, and enter them in the fields on this screen.
-
Page 21: Basic Dhcp Settings
Basic System Settings Basic > Advanced > Admin > Status > Shortcuts > Help Wizard Wireless ISP Connection DHCP DHCP Server When any device on your network is turned on, it must be assigned an IP address to communicate with other devices. -
Page 22: Advanced Settings
Advanced System Settings Basic > Advanced > Admin > Status > Shortcuts > Help Virtual Server Multi-Mode Applications Filters Firewall Routing Performance Virtual Server If you want to use a network computer as a virtual server (to host web sites or FTP sites, for example) you can configure the router to direct incoming traffic to your server. -
Page 23: Special Applications
Advanced System Settings Basic > Advanced > Admin > Status > Shortcuts > Help Virtual Server Multi-mode Applications Filters Firewall Routing Performance Multiple Connection Applications This option allows compatibility with applications that require multiple connections (video conferencing, Internet telephony, gaming, etc.). You can set up as many profiles as you like for applications that require multiple connections. -
Page 24: Filters
Advanced System Settings Basic > Advanced > Admin > Status > Shortcuts > Help Virtual Server Multi-Mode Applications Filters Firewall Routing Performance Filters Filters allow you to control Internet access from networked computers. Options allow you to restrict access to specific web sites, restrict access to all web sites except those you designate, or restrict access to other computers on your local area network (LAN). -
Page 25: Mac Filters
Advanced System Settings Basic > Advanced > Admin > Status > Shortcuts > Help Virtual Server Multi-Mode Applications Filters Firewall Routing Performance MAC Filters A MAC address is a unique serial number for each hardware adapter. This filter allows you to block Internet and LAN access from network computers by specifying the computer’s MAC address (you can find this address by displaying the DHCP screen;... -
Page 26: Url Blocking
Advanced System Settings Basic > Advanced > Admin > Status > Shortcuts > Help Virtual Server Multi-Mode Applications Filters Firewall Routing Performance URL Blocking Use URL Blocking to prohibit access to groups of web sites by using key words. A URL (Uniform Resource Locator) is the Internet address of a web site (usually beginning with “http://”). -
Page 27: Domain Blocking
Advanced System Settings Basic > Advanced > Admin > Status > Shortcuts > Help Virtual Server Multi-Mode Applications Filters Firewall Routing Performance Domain Blocking Use Domain Blocking to prohibit access to specific web sites. This option allows you to enter the full name of each web site to be blocked. -
Page 28: Firewall Rules
Advanced System Settings Basic > Advanced > Admin > Status > Shortcuts > Help Virtual Server Multi-Mode Applications Filters Firewall Routing Performance Firewall Rules This feature can provide additional security protection by helping to prohibit unauthorized access to your network. •... - Page 29 Advanced System Settings Basic > Advanced > Admin > Status > Shortcuts > Help Virtual Server Multi-Mode Applications Filters Firewall Routing Performance DMZ (Demilitarized Zone) is a feature that allows specified network computers unrestricted Internet access. Computers designated as DMZ are not affected by other security measures (firewall protection, parental controls, etc.).
-
Page 30: Routing
Advanced System Settings Basic > Advanced > Admin > Status > Shortcuts > Help Virtual Server Multi-Mode Applications Filters Firewall Routing Performance Routing Options on this page should be changed only if necessary to manage very complex setups, such as a network that is subdivided into several sub-networks. -
Page 31: Dynamic Routing
Advanced System Settings Basic > Advanced > Admin > Status > Shortcuts > Help Virtual Server Multi-Mode Applications Filters Firewall Routing Performance Dynamic Routing Select this option to control how the router automatically builds routing information. Consult your network administrator before doing so. NOTE: Consult your Internet Service Provider (ISP) or network administrator before changing these settings. -
Page 32: Routing Table
Advanced System Settings Basic > Advanced > Admin > Status > Shortcuts > Help Virtual Server Multi-Mode Applications Filters Firewall Routing Performance Routing Table This screen displays existing routes to various subnetworks. • Network Address: Displays the network IP address of the connected subnetwork. •... -
Page 33: Wireless Network Performance
Advanced System Settings Basic > Advanced > Admin > Status > Shortcuts > Help Virtual Server Multi-Mode Applications Filters Firewall Routing Performance Wireless Performance If excessive data errors occur repeatedly, you may be able to correct the problem by adjusting the settings on this screen. -
Page 34: Administrator Settings
Administrator System Settings Basic > Advanced > Admin > Status > Shortcuts > Help Passwords Settings Backup Other Passwords Passwords are not required, but you may want to use them to prevent unauthorized tampering with sys- tem settings if others have access to your network. You can designate an Administrator (who can change all router settings, including the passwords) and Users (who can view settings, but cannot change them). -
Page 35: Router Information
Administrator System Settings Basic > Advanced > Admin > Status > Shortcuts > Help Passwords Settings Backup Other Router Info • Local Time: Click Set Time to set the date and time manually, or set the router to obtain time auto- matically by connecting to a Network Time Protocol server (NTP). -
Page 36: Backup Settings
Administrator System Settings Basic > Advanced > Admin > Status > Shortcuts > Help Passwords Settings Backup Other Backup Router System Settings At this screen you can back up all system settings by saving them in a file on your local hard drive, or restore saved settings if the router becomes unstable and needs to be reset. -
Page 37: Other Options
Administrator System Settings Basic > Advanced > Admin > Status > Shortcuts > Help Passwords Settings Backup Other Other Options • Ping Test: To check whether a computer is connected to the Internet or to your LAN, enter its host name or IP address, then click Ping (“Packet Internet Groper”). -
Page 38: Status Screens
Status Screens Basic > Advanced > Admin > Status > Shortcuts > Help Router Info Activity Traffic WLAN Router Information This screen displays the current status of the router (see descriptions below). • Router Information: Displays the router’s current firmware version. (See page 47 to download a more recent version if one is available.) •... -
Page 39: Logs
Status Screens Basic > Advanced > Admin > Status > Shortcuts > Help Router Info Activity Traffic WLAN Activity This screen displays a record of the most recent 200 network events. After 200 events are recorded, new entries will overwrite older ones. Each time the router is reset or turned off, all entries are deleted. The Activity Settings option allows you to keep a permanent record of these events (see below). -
Page 40: Traffic Statistics
Status Screens Basic > Advanced > Admin > Status > Shortcuts > Help Router Info Activity Traffic WLAN Traffic Statistics This screen displays a summary of traffic handled by your wireless network (volume of data sent and received by your Local Area Network and Wide Area Network). •... -
Page 41: Wireless Client Computers
Status Screens Basic > Advanced > Admin > Status > Shortcuts > Help Router Info Activity Traffic WLAN Wireless This screen displays a list of all client computers currently connected to your wireless router. AT&T Plug&Share 22 Mbps Turbo Wireless Router 6800B4X ™... -
Page 42: Shortcuts
Shortcuts Basic > Advanced > Admin > Status > Shortcuts > Help Parental Control Gaming Personal Web Site Personal FTP Site Internet Telephony Parental Control This option allows you to restrict Internet access from networked computers. You can completely deny access to the Internet for a specific computer, or you can restrict access to a list of approved web sites (for example, you might enter "childs_school.com"... -
Page 43: Gaming Applications
Shortcuts Basic > Advanced > Admin > Status > Shortcuts > Help Parental Control Gaming Personal Web Site Personal FTP Site Internet Telephony Gaming At this screen you can create profiles for Internet games that require multiple connections. These profiles are sometimes necessary to allow interactive gaming, by preventing other settings (such as Network Address Translation) from inhibiting the multiple connections. -
Page 44: Personal Web Site
Shortcuts Basic > Advanced > Admin > Status > Shortcuts > Help Parental Control Gaming Personal Web Site Personal FTP Site Internet Telephony Personal Web Site This option allows you designate a network computer as a virtual server to host your personal web site. You can create a profile for each site, so that site visitors will be directed to the server hosting that site. -
Page 45: Personal Ftp Site
Shortcuts Basic > Advanced > Admin > Status > Shortcuts > Help Parental Control Gaming Personal Web Site Personal FTP Site Internet Telephony Personal FTP Site This option allows you to designate a network computer as a virtual server to host your personal FTP site. You can create a profile for each site, so that site visitors will be directed to the server hosting that site. -
Page 46: Internet Telephony
Shortcuts Basic > Advanced > Admin > Status > Shortcuts > Help Parental Control Gaming Personal Web Site Personal FTP Site Internet Telephony Internet Telephony (VoIP) At this screen you can create profiles for Internet telephone services that require multiple connections. These profiles are sometimes necessary to allow Internet telephone use, by preventing other settings (such as Network Address Translation) from inhibiting the multiple connections. -
Page 47: Firmware Upgrades
Upgrades Basic > Advanced > Admin > Status > Shortcuts > Help Firmware Upgrade At this screen you can check to see if a new firmware version is available, and install it. (Firmware controls your router’s operation, and newer versions may give you more options or increase performance.) Before downloading and installing new firmware, you should connect your computer to the router with an Ethernet cable (see page 7). -
Page 48: Configuring The Wireless Network
Configuring the Wireless Network Change Network Settings After your wireless network is installed you can view or change settings at any time. Launch your Internet browser and enter http://ATT.Router in the URL (web address) field. If the router page does not appear, enter http://192.168.0.1 Choose the types of settings you want to view or change. -
Page 49: File & Print Sharing For Windows ® Xp
Configuring the Wireless Network — Windows ® Windows • Windows 2000 • Windows Me/98 SE ® ® ® Configure Windows XP for Network Sharing ® Caution Before making any changes to your networking settings, please review this section carefully. Failure to follow these instructions precisely may result in the inability to log into your network or computer. - Page 50 Configuring the Wireless Network — Windows ® Windows • Windows 2000 • Windows Me/98 SE ® ® ® Step 4 Click Wireless Network Connection. Step 5 Click the Properties button. Step 6 Make sure File and Printer Sharing for Microsoft Networks appears in this list, and check it if it is unchecked.
- Page 51 Configuring the Wireless Network — Windows ® Windows • Windows 2000 • Windows Me/98 SE ® ® ® Step 7 Highlight the My Computer icon on your desktop, then click the right mouse button. Scroll down to click on Properties. Step 8 Click the Change button.
- Page 52 Configuring the Wireless Network — Windows ® Windows • Windows 2000 • Windows Me/98 SE ® ® ® Step 10 When configuration is complete, you must re- start Windows ® When Windows restarts you will be prompted ® to enter a user name and password. Be sure to record these in a safe place.
- Page 53 Configuring the Wireless Network — Windows ® Windows • Windows 2000 • Windows Me/98 SE ® ® ® Configure Windows XP for Printer Sharing ® Step 1 Click Start > Printers and Faxes. Step 2 Place the cursor on the printer you want to share, then click the right mouse button.
- Page 54 Configuring the Wireless Network — Windows ® Windows • Windows 2000 • Windows Me/98 SE ® ® ® Configure Windows XP for File Sharing ® Step 1 Double-click the My Computer icon on your desktop. Step 2 Place the cursor on the disk drive you want to share (usually Drive C:), then click the right mouse button and scroll down to select Sharing and Security.
- Page 55 Configuring the Wireless Network — Windows ® Windows • Windows 2000 • Windows Me/98 SE ® ® ® To Share Network Files in Windows ® Step 1 Double-click the My Network Places icon on your desktop. Step 2 Double-click View Workgroup Computers to see a list of all computers connected to your network.
-
Page 56: File & Print Sharing For Windows ® 2000
Configuring the Wireless Network — Windows 2000 ® Windows XP • Windows 2000 • Windows Me/98 SE ® ® ® Configure Windows 2000 for Network Sharing ® Caution Before making any changes to your networking settings, please review this section carefully. Failure to follow these instructions precisely may result in the inability to log into your network or computer. - Page 57 Configuring the Wireless Network — Windows 2000 ® Windows XP • Windows 2000 • Windows Me/98 SE ® ® ® Step 5 Click Start > Settings > Control Panel. Step 6 Double-click System. Step 7 Click the Properties button. Step 8 Enter a unique name to identify your computer.
- Page 58 Configuring the Wireless Network — Windows 2000 ® Windows XP • Windows 2000 • Windows Me/98 SE ® ® ® Step 9 When configuration is complete, you must re-start Windows ® When Windows restarts you will be prompted ® to enter a user name and password. Be sure to record these in a safe place.
- Page 59 Configuring the Wireless Network — Windows 2000 ® Windows XP • Windows 2000 • Windows Me/98 SE ® ® ® Configure Windows 2000 for Printer Sharing ® Step 1 Click Start > Settings > Printers. Step 2 Place the cursor on the printer you want to share, then click the right mouse button.
- Page 60 Configuring the Wireless Network — Windows 2000 ® Windows XP • Windows 2000 • Windows Me/98 SE ® ® ® Configure Windows 2000 for File Sharing ® Step 1 Double-click the My Computer icon on your desktop. Step 2 Place the cursor on the disk drive you want to share (usually Local Drive C:), then click the right mouse button and scroll down to select Sharing.
- Page 61 Configuring the Wireless Network — Windows 2000 ® Windows XP • Windows 2000 • Windows Me/98 SE ® ® ® To Share Network Files in Windows 2000 ® Step 1 Double-click the My Network Places icon on your desktop. Step 2 Double-click Computers Near Me to see a list of all computers connected to your workgroup.
-
Page 62: File & Print Sharing For Windows Me And 98 Se
Configuring the Wireless Network — Windows 98 SE/Windows ® ® Windows XP • Windows 2000 • Windows Me/98 SE ® ® ® Configure Windows 98/Me for Network Sharing ® Caution Before making any changes to your networking settings, please review this section carefully. Failure to follow these instructions precisely may result in the inability to log into your network or computer. - Page 63 Configuring the Wireless Network — Windows 98 SE/Windows ® ® Windows XP • Windows 2000 • Windows Me/98 SE ® ® ® Step 5 Click the Access Control tab at the top of this screen, then click on the Share- Level access control button.
- Page 64 Configuring the Wireless Network — Windows 98 SE/Windows ® ® Windows XP • Windows 2000 • Windows Me/98 SE ® ® ® Step 9 To verify that configuration is complete, double- click the Network Neighborhood icon on your desktop. In the next window displayed you should see the names of all network computers.
- Page 65 Configuring the Wireless Network — Windows 98 SE/Windows ® ® Windows XP • Windows 2000 • Windows Me/98 SE ® ® ® Configure Windows 98/Me for Printer Sharing ® Step 1 Click Start > Settings > Printers. Step 2 Place the cursor on the printer you want to share, then click the right mouse button and scroll down to select Sharing.
- Page 66 Configuring the Wireless Network — Windows 98 SE/Windows ® ® Windows XP • Windows 2000 • Windows Me/98 SE ® ® ® Configure Windows 98/Me for File Sharing ® Step 1 Double-click the My Computer icon on your desktop. Step 2 Place the cursor on the disk drive you want to share (usually Drive C:), then click the right mouse button and scroll down to select Sharing.
- Page 67 Configuring the Wireless Network — Windows 98 SE/Windows ® ® Windows XP • Windows 2000 • Windows Me/98 SE ® ® ® To Share Network Files in Windows 98/Me ® Step 1 Double-click the Network Neighborhood icon on your desktop. Step 2 Double-click any icon to see a list of all shared folders on that computer.
-
Page 68: Troubleshooting
Troubleshooting Troubleshooting If your router does not work properly, try the following suggestions before seeking repair assistance. Problem Solution No lights on the router • Make sure that both ends of the AC adapter are firmly plugged in. • Make sure the router is plugged into a working electrical outlet not controlled by a wall switch. - Page 69 Troubleshooting Problem Solution Other wireless devices • Check the Wireless icon (4 stacked bars) in the System Tray cannot connect to the router at the bottom right corner of your screen. If there is an “X” over the icon, see “No Access to Router” on previous page. If the icon is white, try the following steps: •...
- Page 70 Troubleshooting Corrective procedures (continued from previous page) Set Windows This procedure allows your computer to automatically detect IP ® automatically detect IP settings settings, which may allow you to connect to the Internet. Consult your network administrator If your computer is new, it may not have an IP address, which before attempting this change.
-
Page 71: Glossary
Glossary Glossary Access Point Access points are the contact points (wireless routers and transmitters) in a wireless LAN that are connected to an Ethernet hub or server. Users can roam within the range of access points and their wireless device connections are passed from one access point to the next. Administrator The network administrator is the person who manages the LAN. - Page 72 Glossary Firewall Firewalls are methods used to keep networks secure from intruders and unauthorized access. Firewalls use filters to prevent unwanted data from being transmitted to and/or from a local network. Firewalls are typically used to prevent outsiders from accessing your private data resources and for controlling what outside (WAN) resources your users can access.
- Page 73 Glossary resources among the devices on the LAN. MAC Address A MAC address is a unique serial number for hardware adapters, giving the adapter a unique identification. Metric A number that indicates how long a packet takes to get to its destination. MTU (Maximum Transmission/Transfer Unit) is the largest packet size that can be sent over a network.
- Page 74 Glossary RTS (Request To Send) is a signal sent from the transmitting station to the receiving station requesting permission to transmit data. Server Servers are typically powerful and fast computers that store programs and data. The programs and data are shared by client computers (workstations) on the network. SMTP SMTP (Simple Mail Transfer Protocol) is the standard Internet e-mail protocol.
- Page 75 Glossary Virtual Servers Virtual servers are client servers (such as web servers) that share resources with other virtual servers (i.e., it is not a dedicated server). VoIP (Voice Over Internet Protocol) is a method used to deliver voice information over the Internet. VoIP services allow telephone calls using your PC or LAN.
-
Page 76: Technical Specifications
Technical Specifications Technical Specifications Standards Modulation Technology • IEEE 802.11 • DSSS: Direct Sequence Spread Spectrum • IEEE 802.11b • IEEE 802.3u Modulation Techniques • IEEE 802.3 • Barker (1Mbps/0db) • Barker (2Mbps/3db) VPN Pass Through/Multi-Sessions • CCK (5.5Mbps/5.5db) • PPTP •... - Page 77 For customer service, please call 1-877-800-5400 or visit www.plugandshare.att.com Copyright © 2004 Advanced American Telephones. All Rights Reserved. AT&T and the Globe Design are trademarks of AT&T Corp., licensed to Advanced American Telephones. All marks are trademarks of their respective corporations. Issue 1.10 AT&T 02/20/04...
Need help?
Do you have a question about the Plug&Share 6800B4X and is the answer not in the manual?
Questions and answers