TRENDnet TEW-652BRU User Manual
300mbps wireless n home router with usb port
Hide thumbs
Also See for TEW-652BRU:
- Quick installation manual (6 pages) ,
- Datasheet (3 pages) ,
- User manual (70 pages)
Table of Contents
Advertisement
Quick Links
Advertisement
Table of Contents

Related Manuals for TRENDnet TEW-652BRU


Summary of Contents for TRENDnet TEW-652BRU
- Page 1 Cover Page TRENDnet User’s Guide...
-
Page 2: Table Of Contents
Protocol/IP filters ....................23 Upgrade your router firmware ..................42 Firewall rules ......................24 Restart your router ...................... 43 Advanced Router Setup ..............26 Check connectivity using the router management page ..........43 © Copyright 2012 TRENDnet. All Rights Reserved. - Page 3 Connect to a Printer ....................57 Connect to a Scanner ....................58 Connect to a Storage Device ................... 58 Router Management Page Structure ..........59 Technical Specifications..............60 Troubleshooting ................61 Appendix ..................62 © Copyright 2012 TRENDnet. All Rights Reserved.
-
Page 4: Product Overview
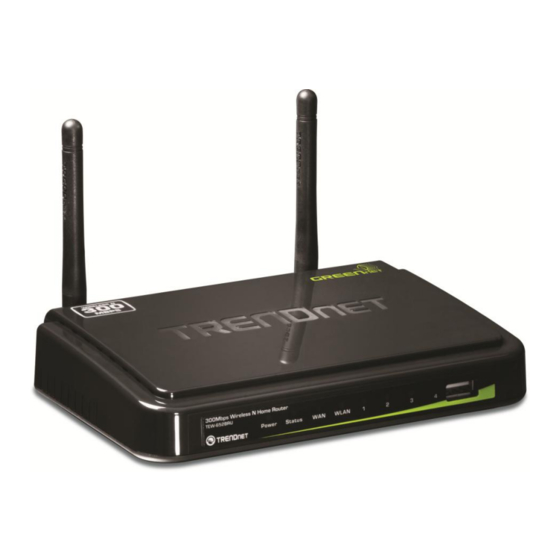
TRENDnet User’s Guide Features Product Overview The 300Mbps Wireless N Home Router with USB Port (model TEW-652BRU) delivers high performance wireless n speed, coverage, and security. Share data across your network by connecting USB flash drives, hard drives, or printers directly to the USB share port on the front of the router. -
Page 5: Product Hardware Features
On/Off Power Switch – Push your router On/Off push button power switch to turn your router “On” (Inner position) or “Off” (Outer position). Antennas – The antennas broadcasts wireless signals to allow your wireless clients and wireless network devices to connect to your router. © Copyright 2012 TRENDnet. All Rights Reserved. - Page 6 USB Port 2.0 Port – The USB 2.0 port allows you to connect USB printers and storage devices to your network and share access to these devices to computers on your network through the use of the included USB software utility. © Copyright 2012 TRENDnet. All Rights Reserved.
-
Page 7: Application Diagram
WPS. The button LED is blinking blue when WPS is activated. of the router, allowing any wired or wireless computer connected to the this network centralized access to the printer through the use of the included software utility. © Copyright 2012 TRENDnet. All Rights Reserved. -
Page 8: Basic Router Setup
A modem and Internet service to your home, provided by your ISP (modem typically supplied by your ISP) A router to connect your computers and devices and also connects to the modem. © Copyright 2012 TRENDnet. All Rights Reserved. -
Page 9: Router Installation
User Name: _________ Password: ________________ 4. PPPoE with a fixed IP address Verify Password: ________________ User Name: _________ IP Address: ____. _____._____._____ (e.g. 215.24.24.129) Password: ________________ Verify Password: ________________ IP Address: ____. _____._____._____ (e.g. 215.24.24.129) © Copyright 2012 TRENDnet. All Rights Reserved. - Page 10 8. Verify that the following front panel LED indicators on your router (Power is solid green, Status is blinking green, WAN and WLAN (Wireless) are solid green, and the LAN port for which your computer is connected is sold green. © Copyright 2012 TRENDnet. All Rights Reserved.
-
Page 11: Setup Wizard
Password” to confirm. This will change the password required to log into your router. Click Next. Note: Once you change the login password, it will be required every time you log into your router. © Copyright 2012 TRENDnet. All Rights Reserved. - Page 12 Note: If you are an advanced user, you can make LAN IP address interface and DHCP IP address range changes here. 8. Wireless LAN: Select Enable for Wireless LAN. Note: Selecting Disable will disable the wireless functionality of the router and will not allow wireless clients to connect. © Copyright 2012 TRENDnet. All Rights Reserved.
- Page 13 2. Once wireless security is enabled on your router, each wireless device connecting to your router must be configured with the same wireless security type and key. 10. Click Restart and wait for your router to reboot. © Copyright 2012 TRENDnet. All Rights Reserved.
-
Page 14: Connect Additional Wired Devices To Your Network
Please ensure that your computer or device network settings (also called TCP/IP settings) are configured to obtain IP address settings automatically (also called dynamic IP address or DHCP) and to Obtain DNS Server address settings automatically. © Copyright 2012 TRENDnet. All Rights Reserved. -
Page 15: Wireless Networking And Security
WPA2: Currently the most secure method of wireless security and required for 802.11n performance. Note: Check the specifications of your wireless network adapters and wireless appliances to verify the highest level of encryption supported. © Copyright 2012 TRENDnet. All Rights Reserved. -
Page 16: Secure Your Wireless Network
Key 1-4 – Choose a key index 1,2,3, or 4 and enter the key. Note: The Key Index # must also match when configuring wireless devices to connect to your wireless network. © Copyright 2012 TRENDnet. All Rights Reserved. - Page 17 Note: It is recommended to use port 1812. Confirmed Passphrase – Re-enter the passphrase. Shared Secret – Enter the shared secret used to authorize your router Note: 8-63 alphanumeric characters (a,b,C,?,*, /,1,2, etc.) with your RADIUS server. © Copyright 2012 TRENDnet. All Rights Reserved.
-
Page 18: Connect Wireless Devices To Your Router
3 seconds and release it. A blue LED on your router WPS button will flash indicating that the WPS setup process has been activated on your router. (See “Product Hardware Features” on page For connecting additional WPS supported devices, repeat this process for each additional device. © Copyright 2012 TRENDnet. All Rights Reserved. - Page 19 4. You will receive a message counting down indicating the WPS process is activated on WPS. your router. 5. You will receive a success message indicate that the wireless device successfully connected using WPS. © Copyright 2012 TRENDnet. All Rights Reserved.
-
Page 20: Basic Wireless Settings
802.11b. SSID – The name of your wireless network. Identifies your wireless network when connecting with wireless devices. Enter the wireless network name. © Copyright 2012 TRENDnet. All Rights Reserved. - Page 21 20MHz channel or 40MHz (two 20MHz channels). When 40MHz is active, this mode is capable of providing higher performance only if the wireless devices support the 40MHz channel width and if there is no adjacent wireless interference. © Copyright 2012 TRENDnet. All Rights Reserved.
-
Page 22: Steps To Improve Wireless Connectivity
2.4GHz frequency can potentially drop the wireless signal. 7. Although the phone may not be in use, the base can still transmit wireless signal. Move the phone’s base station as far away as possible from your wireless devices. © Copyright 2012 TRENDnet. All Rights Reserved. -
Page 23: Advanced Wireless Settings
CTS (Clear to Send) frame. The RTS/CTS function is used to prevent wireless data traffic collisions. The RTS Threshold defines the smallest data packet size allowed to initiate the RTS/CTS function. Default Value: 2346 (range: 256-2346) © Copyright 2012 TRENDnet. All Rights Reserved. -
Page 24: Access Control Filters
MAC addresses of devices in your network then to determine which MAC Update – Modifies an existing MAC address entry. addresses you do not want to allow access. Cancel – Discard changes to an existing MAC address entry. © Copyright 2012 TRENDnet. All Rights Reserved. -
Page 25: Domain/Url Filters
You may want to allow or block computers or devices on your network access to specific websites (e.g. www.trendnet.com, etc.), also called domains or URLs (Uniform Resource Only Deny computers/devices with MAC addresses listed below to access the Locators). You may also enter a keyword (e.g instead of complete URL to generally allow... -
Page 26: Protocol/Ip Filters
26). 4. Next to Domains List, enter the website/URL/domain (e.g.www.trendnet.com) or keyword (e.g. trendnet) to allow or block access and click Add to add this to the domains 2. Click on Access, click on Filter, and click on Protocol/IP Filters. -
Page 27: Firewall Rules
When selected, the entry will be highlighted. Delete – Removes an existing protocol/IP filter. Update – Modifies an existing protocol/IP filter. Cancel – Discard changes to an existing protocol/IP filter. © Copyright 2012 TRENDnet. All Rights Reserved. - Page 28 * to choose all protocol types. Below, enter the port selected, the entry will be highlighted. number or range of port numbers to apply the firewall rule. (e.g. 80-80 or 20-21). For all ports, use the port range 1 - 65534. © Copyright 2012 TRENDnet. All Rights Reserved.
-
Page 29: Access Your Router Management Page
Default Password: admin Note: If you change the router login password, you will need to access the router management page using the User Name “admin” and the new password instead of the default password “admin”. © Copyright 2012 TRENDnet. All Rights Reserved. -
Page 30: Set Your Router Date And Time
3. In the Connection Type drop-down list, click the type of Internet connection provided Note: NTP servers are used for computers and other network devices to synchronize by your ISP (Internet Service Provider). time across network. 4. Complete the fields required by your ISP. © Copyright 2012 TRENDnet. All Rights Reserved. -
Page 31: Clone A Mac Address
If you want to use the MAC address from the previous device (computer or old router that directly connected to the modem, you should first determine the MAC address of the device or computer and manually enter it into your router using the clone MAC address feature. © Copyright 2012 TRENDnet. All Rights Reserved. -
Page 32: Change Your Router Ip Address
Note: The DHCP address range will change automatically to your new router IP address settings so you do not have to change the DHCP address range manually to match your new router IP address settings. © Copyright 2012 TRENDnet. All Rights Reserved. -
Page 33: Set Up Dhcp Reservation
DHCP IP address range (Start IP & End IP). MAC Address – Enter the MAC (Media Access Control) address of the computer or network device to assign to the reservation. (e.g. 00:11:22:AA:BB:CC) © Copyright 2012 TRENDnet. All Rights Reserved. -
Page 34: Enable/Disable Upnp On Your Router
(e.g. instant messenger, online gaming applications, etc.) UPnP is enabled on your router by 2. Click on Management, and click on Remote Management. © Copyright 2012 TRENDnet. All Rights Reserved. -
Page 35: Allow/Deny Multicast Streaming
3. Next to Multicast Stream, click Enabled or Disabled to turn the feature on or off on your router. Note: It is recommended to leave this setting enabled. 4. To save changes, click Apply. © Copyright 2012 TRENDnet. All Rights Reserved. -
Page 36: Allow Remote Access To Your Router Management Page
5. Next to DMZ Host IP, enter the IP address you assigned to the computer or network device to expose to the Internet. 6. To save changes, click Apply. 4. To save changes, click Apply. © Copyright 2012 TRENDnet. All Rights Reserved. -
Page 37: Virtual Server
An example would be forwarding a port to an network/IP camera (typically on TRENDnet IP cameras use HTTP TCP port 80 for remote access web requests) on your network for to allow remote access to it. -
Page 38: Special Applications
UPnP (Universal Plug and Play) to automatically configure your router to allow access for applications. See “Enable/disable UPnP on your router” on page Note: Please refer to the device documentation to determine if your device supports UPnP first, before configuring this feature. © Copyright 2012 TRENDnet. All Rights Reserved. - Page 39 Update – Modifies an existing special application. Name – Enter a name for the special application. Cancel – Discard changes to an existing special application. Trigger – Port or port range requested by the device. © Copyright 2012 TRENDnet. All Rights Reserved.
-
Page 40: Change Your Router Ip Address
1. Log into your router management page (see “Access your router management page” page 26). 2. Click on Main, and click on LAN & DHCP Server. 3. Enter the router IP address settings. © Copyright 2012 TRENDnet. All Rights Reserved. - Page 41 Metric – Enter the metric or priority of the route. The metric range is 1-15, the lowest number 1 being the highest priority. (e.g. 1 ) Add – Saves the static route. © Copyright 2012 TRENDnet. All Rights Reserved.
-
Page 42: Enable Dynamic Routing On Your Router
RIP 1 - Sends out routing information to other routers using the RIP version 1 protocol. RIP 2 – Sends out routing information to other routers using the RIP version 2 protocol. © Copyright 2012 TRENDnet. All Rights Reserved. -
Page 43: Router Maintenance & Monitoring
1. Log into your router management page (see “Access your router management page” page 26). 2. Click on Tools and click on Settings. 3. Under Restore factory default settings, and next to Restore, click Restore. If prompted, click Yes or OK. © Copyright 2012 TRENDnet. All Rights Reserved. -
Page 44: Backup And Restore Your Router Configuration Settings
(Default Filename: cfg.bin) To restore your router configuration: 1. Log into your router management page (see “Access your router management page” page 26). 2. Click on Tools and click on Settings. © Copyright 2012 TRENDnet. All Rights Reserved. -
Page 45: Upgrade Your Router Firmware
TRENDnet may periodically release firmware upgrades that may add features or fix 2. Click on Status and click on Device Information to check your router’s current problems associated with your TRENDnet router model and version. To check if there is firmware version at the top of the page. -
Page 46: Restart Your Router
Disconnect the power adapter from the power port of your router for 10 seconds, then, plug the power adapter back into the power of your router. 3. Enter in the IP address (e.g. 192.168.10.101) or host name (e.g. www.trendnet.com) Wait for your router Status light to begin flashing. -
Page 47: Check The Router System Information
DHCP Client (or Dynamic IP address) Internet connection type, you will router. provide the option to Release and Renew your IP address settings. Other Internet connection types such as PPPoE will and the mode set will provide the option to Connect and Disconnect. © Copyright 2012 TRENDnet. All Rights Reserved. -
Page 48: View Your Router Log
> Log Refresh - The Page: 1/1 will display the current page. Your router log can be used to obtain activity information on the functionality of your router or for troubleshooting purposes. © Copyright 2012 TRENDnet. All Rights Reserved. -
Page 49: Configure Your Router Log
Send router logs to an external log server purposes when checking your e-mail. 1. Log into your router management page (see “Access your router management page” page 26). To Email Address – Enter your e-mail address. © Copyright 2012 TRENDnet. All Rights Reserved. -
Page 50: View Your Router Packet Statistics
2. Click on Status and click on Wireless. 3. The table displays the amount time each wireless device has been connected and the MAC address of each wireless device. 4. To save changes, click Apply. © Copyright 2012 TRENDnet. All Rights Reserved. -
Page 51: Capture Packets Using The Router Management Page
You can enter up to three receivers. (e.g. 192.168.10.250) Start – Starts the packet capture. Stop - Stops the packet capture Download – Download the packet capture file. (.pcap file) 4. To save changes, click Apply. © Copyright 2012 TRENDnet. All Rights Reserved. -
Page 52: Usb Storage And Printer Sharing
Mac OS X (10.6) 1.06GHz or above 1GB RAM or above Mac OS X (10.5) 867MHz or above 512MB RAM or above Mac OS X (10.4) 333MHz or above 256MB RAM or above © Copyright 2012 TRENDnet. All Rights Reserved. - Page 53 6. At the prompt, you can choose another destination folder to install the program or to install in the default location, click Next. 5. At the Customer Information window, enter your information and click Next. 7. Click Install to start the software installation. © Copyright 2012 TRENDnet. All Rights Reserved.
- Page 54 8. Wait for the installation status to complete. MAC OS X 1. Insert the included CD-ROM into your computer’s CD-ROM drive. 2. Open the CD contents and locate the “TRENDnet USB Control Center Utility Installer” (.dmg) file. Double-click the file. 9. At the completion window, click Finish.
-
Page 55: Using The Utility
MAC OS X – Launching the Utility Upon completing the software installation, a desktop shortcut is automatically created. Double-click the icon to start the utility. Closing the utility will exit the application. © Copyright 2012 TRENDnet. All Rights Reserved. - Page 56 MAC OS X – Utility Main Window Menu Items (Windows Only) About (Windows Only) System - Clicking Exit will close the utility and exit the application. About – Displays the software/driver version and support contact information. © Copyright 2012 TRENDnet. All Rights Reserved.
- Page 57 To verify if you are connected to the USB device, a message will appear next to the USB device displaying a message that the USB device is “Manually connected by <your computer name>”. Windows OS MAC OS X © Copyright 2012 TRENDnet. All Rights Reserved.
- Page 58 USB device. Reject – Clicking this option will disregard the request and your computer will not be able to connect to the USB © Copyright 2012 TRENDnet. All Rights Reserved.
- Page 59 Reject – Clicking this option will disregard the request. If the remote computer rejects the request, the local computer will display the message The remote computer will receive the request message below. below. Click OK to close the message. © Copyright 2012 TRENDnet. All Rights Reserved.
-
Page 60: Connect To A Printer
When a USB printer is connected and selected in the main window, clicking this option allows you to enable/disable the auto connect feature to a selected printer in the Auto- Connect printer list. When your computer attempts to print, the Auto-Connect feature © Copyright 2012 TRENDnet. All Rights Reserved. -
Page 61: Connect To A Scanner
Windows OS MAC OS X 4. After you have finished printing, click Disconnect, to make the scanner available to other computers on your network that use the scanner. Windows OS MAC OS X © Copyright 2012 TRENDnet. All Rights Reserved. -
Page 62: Router Management Page Structure
Status SNMP Device Information Remote Management Capture Packets Log Setting Email Log Routing Syslog Log Type Static Statistic Dynamic Wireless Routing Table © Copyright 2012 TRENDnet. All Rights Reserved. -
Page 63: Technical Specifications
Dimension (L x W x H) 158 x 109 x 34mm (6.2 x 4.3 x 1.3in) building materials and other conditions. Weight 215g (7.6oz) Operation: 0~ 40C (32F~ 104F); Storage: -10~ Temperature 70C (14F~158 F) © Copyright 2012 TRENDnet. All Rights Reserved. -
Page 64: Troubleshooting
5. Please see “Steps to improve wireless connectivity” on page 19 if you continue to have wireless connectivity problems. Note: If you are experiencing difficulties, please contact your computer or operating system manufacturer for assistance. © Copyright 2012 TRENDnet. All Rights Reserved. -
Page 65: Appendix
2. In the Network Preference window, next to "Show:", select Network Status. You'll see Ethernet and select the TCP/IP tab. your network status and your IP address settings displayed. In MAC OS 10.5/10.6, in the left column, select Ethernet. e. Configure TCP/IP to use DHCP. © Copyright 2012 TRENDnet. All Rights Reserved. - Page 66 3. You may be prompted to enter a security key in order to connect to the network. 4. Enter in the security key corresponding to the wireless network, and click Connect. © Copyright 2012 TRENDnet. All Rights Reserved.
- Page 67 The firmware setting is not accessible by the end user. © Copyright 2012 TRENDnet. All Rights Reserved.
- Page 68 1999/5/EK būtiskajām prasībām un citiem ar to saistītajiem noteikumiem. Lietuvių Šiuo TRENDnet deklaruoja, kad šis TEW-652BRU atitinka esminius Česky TRENDnet tímto prohlašuje, že tento TEW-652BRU je ve shodě se [Lithuanian] reikalavimus ir kitas 1999/5/EB Direktyvos nuostatas. [Czech] základními požadavky a dalšími příslušnými ustanoveními...
- Page 69 Download section limited to, duty, tax, and other fees. and look for the desired TRENDnet product to access to the GPL Code or LGPL Code. These codes are distributed WITHOUT WARRANTY and are subject to the copyrights of WARRANTIES EXCLUSIVE: IF THE TRENDNET PRODUCT DOES NOT OPERATE AS the developers.
Need help?
Do you have a question about the TEW-652BRU and is the answer not in the manual?
Questions and answers