
Related Manuals for Bissell Powergroom Pet Compact


Summary of Contents for Bissell Powergroom Pet Compact
- Page 1 U S E R ’ S G U I D E 13H8 SERIES Product Registration Safety Instructions Product View Assembly Operations Maintenance and Care 8-12 Troubleshooting Consumer Services Replacement Parts Warranty...
- Page 2 Everything we know about floor care went into the design and construction of this complete, high-tech home cleaning system. Your PowerGroom Pet Compact vacuum is well made, and we back it with a limited two year warranty. We also stand behind it with a knowledge- able, dedicated Consumer Services department, so, should you ever have a problem, you’ll receive fast, considerate assistance.
-
Page 3: Important Safety Instructions
MPORTANT SAFETY INSTRUCTIONS When using an electrical appliance, basic Do not pick up flammable materials (lighter fluid, ■ precautions should be observed, including gasoline, kerosene, etc.) or use in the presence of the following: explosive liquids or vapors. Do not pick up toxic material (chlorine bleach, ■... -
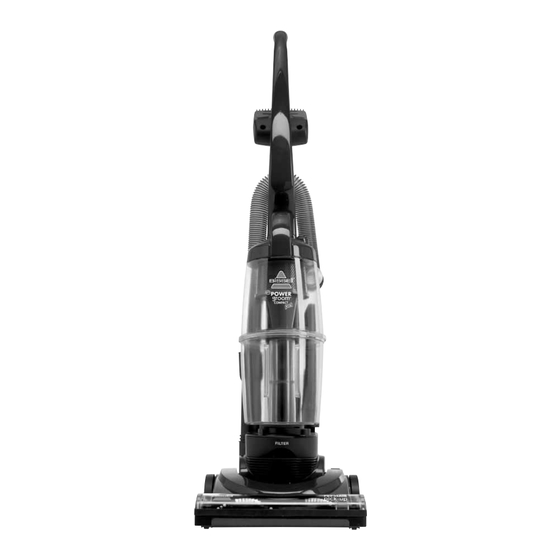
Page 4: Product View
roduct view Handle Contour Tool Power Switch Carry Handle Upper Tank Cyclone Cord Hook Easy Empty Dirt Container HEPA Media Filter & Foam Lock ‘n Seal Motor Filter ® Lever Hose Holder Quick Release Foot Window Cord Wrap Stretch Hose Power Cord Crevice Tool Pet Hair Lifter... -
Page 5: Attach Handle To Vacuum
ssembly The only tool you’ll need to assemble your vacuum cleaner is a Phillips screwdriver. Attach handle to vacuum Locate the vacuum handle and remove the screw packet taped to the handle. Stand the vacuum upright and from the rear of the unit, slide the base of the handle firmly into the grooves at the top of the vacuum body. Ensure the handle fits firmly to the vacuum body. If there are any gaps, continue to push firmly until the handle is secure. Insert the provided screw into the existing hole, attaching the handle to the body of the vacuum. Tighten securely with a screwdriver. Attach vacuum hose and tools Slide the end of the hose into the hose wand base. Snap the hose into the hose clip. Note: The vacuum will not operate effec- tively unless the hose wand is firmly attached. -
Page 6: Operation
peration CAUTION: Before using your vacuum, make sure that the dirt con- Power Switch tainer is in locked position and that all filters (inner circular, The power switch is located on the left side outer circular, pre-motor and of the vacuum. Push the rocker switch post-motor) are in place. -
Page 7: Dusting Brush
peration Special on board tools NOTICE: Your vacuum is not only a powerful carpet and While vacuuming, certain carpets rug cleaner, it’s also a versatile above floor vacu- and low humidity conditions may um cleaner when you select one of the generate small static discharges. -
Page 8: Emptying Dirt Container
aintenance and care Maximize your cleaning performance To maximize your cleaning performance WARNING: and extend the life of your vacuum, it is very important that you empty your dirt container To reduce the risk of and check and clean your filters frequently. electric shock, turn Perform the following maintenance steps power switch OFF and... -
Page 9: Maintenance And Care
aintenance and care Cleaning the foam motor and HEPA media filter Empty the dirt container as soon as the dirt reaches the “full” line on the side of the container. WARNING: Unplug the vacuum from electrical outlet. Do not operate cleaner The foam motor filter protects the motor with damp or wet from dirt particles. It is located in the slide filters or without all out tray underneath the dirt container. If the... - Page 10 aintenance and care Check rotating floor brush and drive belt WARNING: You should check your vacuum cleaner’s rotating floor brush and drive belt regularly To reduce the risk of injury for wear or damage. You should also clean from moving parts, turn the brush and brush ends of strings, hair off vacuum cleaner and disconnect Power Plug...
-
Page 11: Replace Drive Belt
Discard the old drive belt. Place new drive belt over motor pulley and loop other end over rotating floor brush in the space between the bristles. NOTE: It is important that you use only genuine BISSELL replacement belts. Generic belts may not meet the exact specifications required to keep your vacuum operating at its peak performance. The use of unbranded belts could lead to early failure of the vacuum and could void your warranty. -
Page 12: Clearing Clogs
aintenance and care Clearing Clogs CAUTION: Low suction or poor pickup may be due to To reduce the risk of injury a clog in the vacuum cleaner. If you notice from moving parts, turn off a change in the sound of the motor, check vacuum cleaner and dis- for clogs. -
Page 13: Troubleshooting
Thank you for selecting a BISSELL product. Please do not return this product to the store. For any questions or concerns, BISSELL is happy to be of service. Contact us directly at 1-800-237-7691. w w w . b i s s e l l . c o m... - Page 14 Grand Rapids MI 49501 ATTN: Consumer Services Or visit the BISSELL website - www.bissell.com When contacting BISSELL, have model number of cleaner available. Please record your Model Number: ___________________ Please record your Purchase Date: ___________________ NOTE: Please keep your original sales receipt. It provides proof of purchase date in the event of a warranty claim.
- Page 15 - BISSELL vacuum These items are available for purchase as accessories for your BISSELL PowerGroom Pet Compact: To purchase call 1-800-237-7691 or visit www.bissell.com. Item Part No. Part Name 203-2166 Dirt Container 203-2165 Hose 203-2171 Foam Motor Filter...
- Page 16 Subject to the *EXCEPTIONS AND EXCLUSIONS identified below, upon receipt of the product BISSELL Homecare, Inc. will repair or replace (with new or remanufactured components or products), at BISSELL’s option, free of charge from the date of purchase by the original purchaser, for two years any defective or malfunctioning part.
Need help?
Do you have a question about the Powergroom Pet Compact and is the answer not in the manual?
Questions and answers