
Subscribe to Our Youtube Channel
Related Manuals for Bissell powergroom rewind


Summary of Contents for Bissell powergroom rewind
- Page 1 ™ USER'S GUIDE 1428, 5957 & 6355 SERIES Thank You Safety Instructions Product View Assembly Operations Maintenance and care 8-11 Troubleshooting Replacement Parts Accessories Warranty Consumer Care...
- Page 2 Your BISSELL vacuum is well made, and we back it with a limited one year warranty. We also stand behind it with a knowledgeable, dedicated Consumer Care department, so, should you ever have a problem, you’ll receive fast, considerate assistance.
-
Page 3: Important Safety Instructions
■ in the plug. (Spares may be obtained from all parts of body away from openings your BISSELL supplier). If for any reason the and moving parts. plug is cut off, it must be disposed of, as Turn off all controls before plugging ■... -
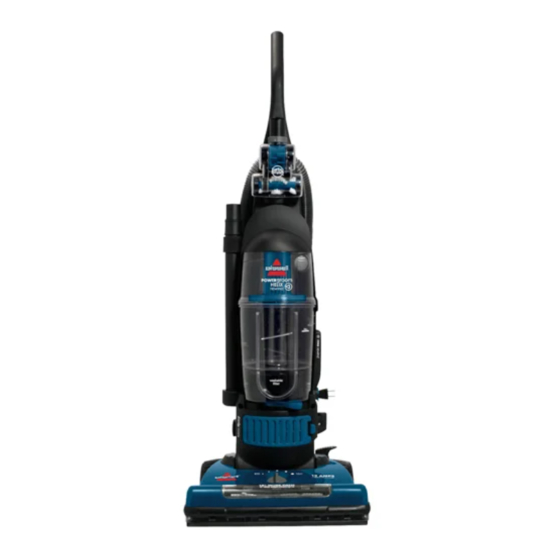
Page 4: Product View
roduct view Handle Stretch Hose TurboBrush ™ Tool (Select Models Only) Hose Clip Crevice Tool Carrying Extension Handle Wand Combination Dusting Brush/ Upholstery Tool Easy Empty ™ Dirt Container Power Switch Automatic Filter Cup Cord Rewind Washable Hose Lock ’n Filter Wand Seal... -
Page 5: Attach Vacuum Hose And Tools
ssembly you need: phillips head screwdriver. attach handle to vacuum 1. Locate the vacuum handle and remove the screw packet taped to the base of the handle. 2. Stand the vacuum upright and slide the base of the handle firmly into the grooves at the top of the vacuum body. -
Page 6: Power Switch
perations caution: automatic cord Rewind Cord may retract quickly. Gently pull out power cord and stop when yellow line is visible. Do not pull power cord beyond the red line. Plug cord into electrical outlet. To retract, press the button on top of the cord rewind. -
Page 7: Tools
perations tools notice: Attach desired tool to hose for above floor The floor brush will continue cleaning surfaces or hard to reach areas. to rotate while you use your vacuum for above floor clean- 1. Remove Hose: with vacuum in upright ing. -
Page 8: Empty Dirt Container
perations empty dirt container Empty when dirt reaches the “Full” line Full Line on the container. 1. Turn power OFF. Unplug power cord from electrical outlet. Unlock Lock Position 2. Slide Lock ‘n Seal lever to Position “Unlock” position. 3. Grasp dirt cup handle portion and pull straight out to remove from vacuum and empty. -
Page 9: Cleaning The Pre-Motor Filter
aintenance and care cleaning the inner & outer circular filter continued 4. Separate the outer foam filter and inner pleated circular filter. Wash each individually by hand in warm water. Mild detergent may be used if desired. Rinse well; let filters completely air dry before replacing in filter cup. -
Page 10: Checking Rotating Floor Brush/Drive Belt
aintenance and care WaRning: checking rotating floor brush and drive belt To reduce the risk of injury from moving parts, turn the power check your vacuum’s rotating floor switch OFF and disconnect plug brush and drive belt regularly for from electrical outlet. wear or damage. -
Page 11: Clearing A Clog
aintenance and care clearing a clog low suction or poor pickup may be due to a clog in the vacuum. if you notice a change in the sound of the vacuum motor, check for clogs. Suction 1. Turn power OFF. Unplug vacuum cord inlet from electrical outlet. -
Page 12: Troubleshooting
Power cord not plugged in 1. Check electrical plug Blown fuse/tripped breaker 2. Check/replace fuse or reset breaker Damaged cord 3. Refer to a BISSELL authorized service center for repair or replacement Vacuum cleaner won't pick up possible causes Remedies Incorrect height adjustment 1. -
Page 13: Replacement Parts
eplacement parts Item Part No. Part Name 32074 Style 9, 10, 12, 14 Drive Belt 203-8049 Hose Assembly 203-1283 Brush Dowel 203-7913 Inner Circular Pre-Motor Pleated Filter 203-8161 Outer Circular Pre-Motor Filter 203-8037 Style 12 HEPA Media Filter* 203-1215 Pre-Motor Filter Appearance may vary * The filter media, not the vacuum as a whole, complies with IEST-RP-CC001.5... - Page 14 ccessories Item Part No. Part Name 203-1429 TurboBrush Tool 203-7936 Pet TurboBrush Tool (select models) 203-1056 Crevice Tool 203-1059 Combination Dusting/Upholstery Brush 203-1068 Extension Wand *Not all parts are included with every model 1a/1b Colors may vary w w w . b i s s e l l . c o m...
-
Page 15: Limited One-Year Warranty
If you need additional instruction regarding this warranty or have questions regarding what it may cover, please contact BISSELL Consumer Care by telephone, or regular post as described below, or contact your local in country distributor. - Page 16 Call BISSELL Consumer Care at the numbers below and we will give you the location of a BISSELL Authorized Service Center in your area. If you have questions about your warranty or need replacement parts please contact the numbers below.
Need help?
Do you have a question about the powergroom rewind and is the answer not in the manual?
Questions and answers