Table of Contents
Advertisement
Quick Links
Advertisement
Table of Contents

Related Manuals for Edimax EK-08RO


Summary of Contents for Edimax EK-08RO
- Page 1 STACKABLE 8 / 16 PORT OSD KVM SWITCH EK-08RO / EK-16RO User’s Manual...
-
Page 2: Table Of Contents
TABLE OF CONTENTS INTRODUCTION……………….……………………………………..1 FEATURES…………...……………………………………………….1 PACKAGE CONTENTS……………...…………..……………………2 TECHNICAL SPECIFICATIONS………..…………………………….3 SYSTEM REQUIREMENT…………………………………………..4 CABLE DIAGRAMS………………………………………………….5 PRODUCT DETAILS…………………………………………………5 HARDWARE INSTALLATION………………………………………6 USAGE…………………………………………………………………8 DAISY CHAIN CONNECTION DIAGRAM…………………………11 HOT PLUG……………………………………………………………12 ON SCREEN DISPLAY OPERATION……………………………12 TROUBLESHOOTING………………………..…………………….14 ACCESSORIES……………………………………………………...16 CERTIFICATES……………………………………………………..16... -
Page 3: Introduction
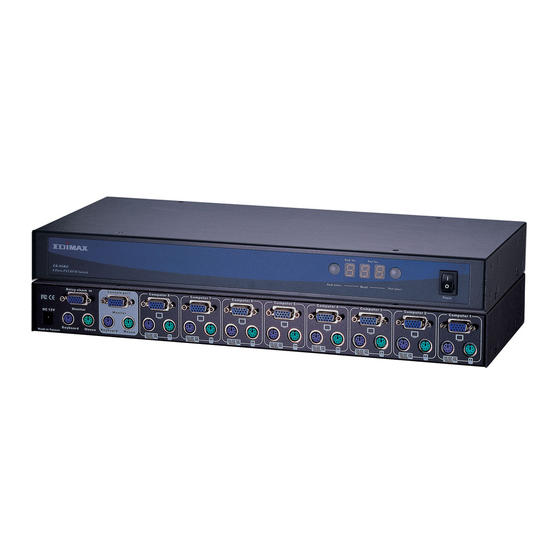
Introduction Thank you for purchasing KVM switch. KVM switch can save your MONEY, TIME, SPACE, EQUIPMENT and POWER. Controlling multiple PCs from One Keyboard, Mouse and VGA Monitor. KVM switch is loaded with features such as 19” Rack Mount Size, Daisy Chain up to eight units, On Screen Display Menu, Password security, Searching PC server name, Hot key Control, Front Panel Push Button and Auto Scan Control. -
Page 4: Package Contents
Package Contents 8 port KVM Switch 8 port KVM Switch User’s manual AC to DC Power Adapter Stack Kit Daisy Chain Cable 16 port KVM Switch 16 port KVM Switch User’s manual AC to DC Power Adapter Stack Kit Daisy Chain Cable... -
Page 5: Technical Specifications
-20 ~ 60℃ Storage Temperature Humidity 0~80%, Non-Condensing Size 19” Rack Mount / 1RU Weight (kg) Dimension (cm) 8 port KVM Switch 2.2kg 41(L) X 16.5(W) X 4.4(H) 16 port KVM Switch 19” Rack Mount/ 2RU 3.5kg 41(L) X 22.5(W) X 8.9(H) -
Page 6: System Requirement
PS/2 Cable: Mini Din 6 pin Male to Male VGA Cable: HDB15 pin Male to Male 8 port KVM Switch 16 port KVM Switch AT to PS/2 keyboard adapter: (Optional) Din 5 pin Male to Mini Din 6 pin Female... -
Page 7: Hardware Installation
Hardware Installation Before installation, please make sure all of peripherals and computers have been turned off. This example of installation is based on 8 port KVM Switch and 16 port KVM Switch have the same installation procedures Step 1 Find a convenient place to put your KVM Switch. Its 19” rack mount form factor makes it ideal stackable on 19”... - Page 8 DB-9 serial port on the computer, and the other end to the PC1 DB-9 serial mouse port on the back of the KVM Switch. If you need Serial DB-9 to PS2 Mini Din 6 pin adapter, please contact your supplier.
-
Page 9: Usage
Step 10 Attach the power supply to the KVM unit and plug the other end into an electrical receptacle. Now you will see the LED for Port 1 light up, and you will hear a beep. Switch on your monitor. - Page 10 KVM Switch. If you add a new KVM Switch as a slave bank, please use reset button of master KVM Switch to automatic assign a new ID to it. You can view this new slave bank go through OSD menu.
-
Page 11: Daisy Chain Connection Diagram
KVM switch. B. Use one end of 3-in-one Cable Kit to connect the daisy chain port of bank 1 and the other end for the console port (white color block) of bank 2 KVM switch. OSD default value (Note: Not including password) -
Page 12: Hot Plug
PC directly) is powered on. Before you go hot plug function, please switch to this pass through port to next port and then switch back to the pass through port. c. You may unplug the mouse or the keyboard from the console port and plug it back in at any time. -
Page 13: Hot Plug
/ : SELECT PORT To use up arrow key “ PgDn/PgUp: BANK SELECT After you have selected the PC port already, you can press the ENTER Key to switch the fter you have selected the PC port alr PC port you want immediately PC port you want immediately To use “... -
Page 14: Enter Password
NEW PASSWORD COMPLETE ESC : QUIT d. The “ CONSOLE ON/OFF “ means to manage the console of KVM switch. If you select “ CONSOLE ON “, it means that any user can use the console. If you select “ CONSOLE OFF “(factory default OFF state), it means that any user will not be allowed to use the console unless you enter the password. - Page 15 CONSOLE will be set up ON state back to OFF state. hen you finish the set up of PC name and get out of OSD setting mode, you will find the PC name showed at the up-left corner of monitor. Now, you can use ESC key to clear the message right away if you don’t need it.
-
Page 16: Troubleshooting
Avoiding switching ports during shutting down the PC process. When you switch one PC port to another PC port, the best scan time setting need to be set to 5 sec. or more. Normally, the VGA monitor change one resolution mode to another will take one or two seconds. -
Page 17: Accessories
Daisy Chain port Extender (Mini Din 6 Female to Mini Din 6 Female) MAX. 100 feet PS2 to Serial adapter (Mini Din 6 Female to DB9 Female) 3-in-one 6 feet VGA and PS2 cable for pc port to KVM Switch USB-PS2 adaptor for multi-platform PC / iMAC / SUN...
Need help?
Do you have a question about the EK-08RO and is the answer not in the manual?
Questions and answers