Table of Contents
Advertisement
Advertisement
Table of Contents

Related Manuals for EdgeStar IP210SS


Summary of Contents for EdgeStar IP210SS
-
Page 2: Table Of Contents
IMPORTANT SAFETY INSTRUCTIONS…………………………………………………1 PREPARING YOUR ICE MAKER FOR USE IMPORTANT SAFETY TIPS.……………………………………………………………….2 GETTING TO KNOW YOUR UNIT OPERATING PROCEDURES & MAINTENANCE UNPACKING YOUR ICE MAKER ..………….…………………………………………...4 CONNECTING YOUR ICE MAKER……………….……….……………………………..4 CLEANING AND MAINTAINING YOUR ICE MAKER….……………………………….4 USING YOUR ICE MAKER……………….……..………………………………………...5 TROUBLESHOOTING..……………………….……………………………………………6 TECHNICAL SPECIFICATIONS & CIRCUIT DIAGRAM…..……………..….………..8 WARRANTY…………………………..……….………………………………………….…9 … … … … … … … … … … … … … … … … … … … … … … … … …... - Page 3 Your safety and the safety of others are very important. Your safety and the safety of others are very important. We have provided many important safety messages in this manual and on your appliance. We have provided many important safety messages in this manual and on your appliance. Always read and obey all safety messages. Always read and obey all safety messages. This is the safety alert symbol: This is the safety alert symbol: All safety messages will follow the safety alert symbol and the word “DANGER” or All safety messages will follow the safety alert symbol and the word “DANGER” or “WARNING”. “WARNING”. These words mean: These words mean: You can be killed or seriously injured if you don’t immediately ...
-
Page 4: Important Safety Tips
IMPORTANT SAFETY TIPS When using electrical appliances, basic safety precautions should be followed to reduce the risk of fire, electric shock, and/or injury to persons or property. Read all instructions before using any appliance. Do not operate this or any other appliance with a damaged cord. Connect to properly polarized outlets only. No other appliance should be plugged into the same outlet. Be sure that the plug is fully inserted into the receptacle. Do not run cord over carpeting or other heat insulators. Do not cover the cord. Keep cord away from traffic areas, and do not submerge in water. We do not recommend the use of an extension cord, as it may overheat and become a fire risk. If you must use an extension cord, use a cord of No.14 AWG minimum size and ... -
Page 5: Getting To Know Your Unit
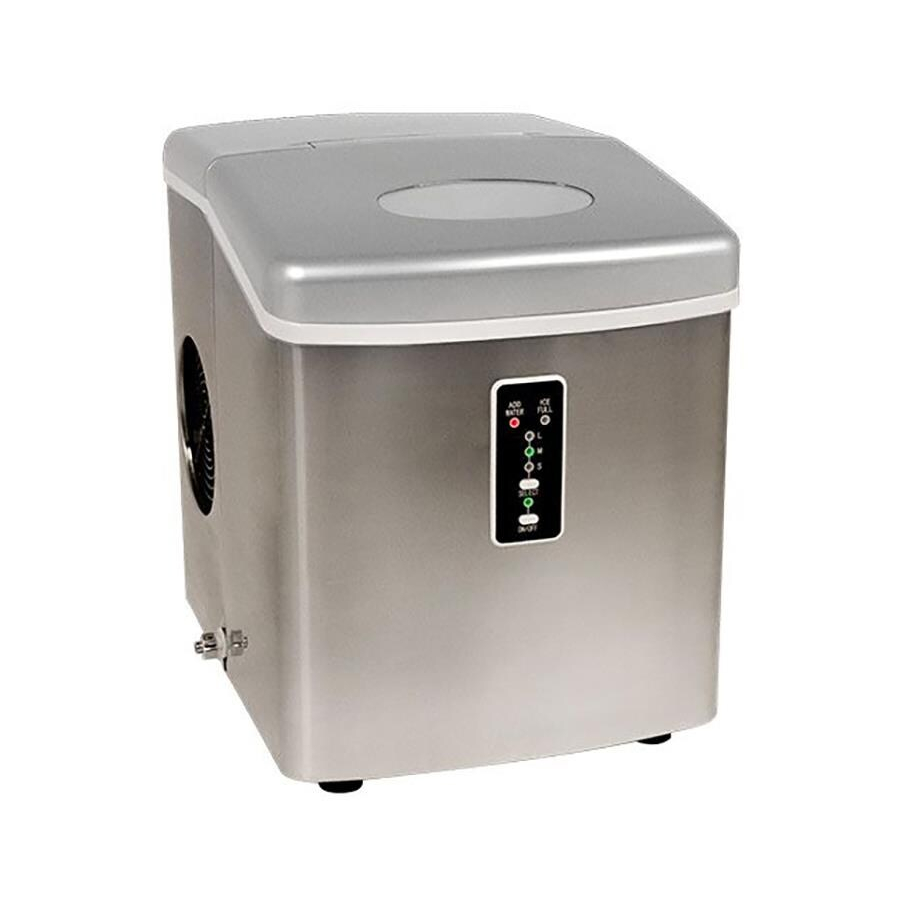
1. Cover: Features a transparent window for interior visibility. 2. Ice shovel. 3. Control Panel: Easy to use, with touch controls. A. Icefull light. B. Ice size indicators: Small, Medium, and Large. C. Ice size selector button. D. Add water light: when lit, add water. E. Power indicator. F. Power button. 4. Foot 5. Water drain cap: For draining water from water reservoir. 6. Air vent. Note: Ice scoop not shown. 6 5 4 D E F A B C 1 2 3 ... -
Page 6: Unpacking Your Ice Maker
UNPACKING YOUR ICE MAKER 1. Remove the exterior and interior packaging. Check that ice basket and ice scoop is 1. Remove the exterior and interior packaging. Check that ice basket and ice scoop is included. If any parts are missing, please contact customer service. included. If any parts are missing, please contact customer service. 2. Clean the interior with lukewarm water and a soft cloth. Take out the ice basket and clean 2. Clean the interior with lukewarm water and a soft cloth. Take out the ice basket and clean it . it . 3. Find a location for your ice maker that is protected from direct sunlight and other sources 3. ... -
Page 7: Using Your Ice Maker
1. Select the size of the ice cube by pressing the “Select” button. If the room temperature is lower than 60°F, it is best to select the small or medium ice size, otherwise the ice cubes might stick together. 2. Open the cover, remove the ice basket and pour water into tank. Keep water level below the level mark. 3. Press “Power” on the control panel to begin the ice making cycle. 4. The ice making cycle lasts 6 to 15 minutes, depending on the size of the ice cubes selected. 5. While the ice maker is on, verify the water level periodically. If the water level is too low, the ice maker will stop automatically, and the “Water” indicator will turn on. Press the “Power” button, fill the unit with water, and press “Power” again. Allow the refrigerant inside the compressor at least 3 minutes to settle before restarting. 6. The ice maker automatically stops working when the ice basket is full. 7. Change the water in the water reservoir every 24 hours to ensure a reasonable hygiene level. ... -
Page 8: Troubleshooting
Unit goes through the ice making process, but no ice is produced, or ice cubes are very small. Compressor makes a knocking noise When the unit tries to dump the ice, the ice case and shovel jam. Solution Check to make sure the power cord is plugged in Check the control panel for any lights or if there is any movement with any components of the unit such as the ice case or water pump. If there is no light or no movement, contact EdgeStar support. When the ice maker is plugged in, the power light may blink until you push the power button to turn on the unit. If you push the power button, but the unit does not respond, then the probable cause is a faulty control panel, and needs to be replaced. Contact EdgeStar support. Contact EdgeStar support. Contact EdgeStar support. Check to see if the ice maker is being used in proper ambient temperature. If unit is run in a ... - Page 9 If the ambient temperature in the room is normal, the compressor may be faulty. Contact EdgeStar support If there is a steady drip coming from the machine, the drain plug may be loose or a hose may have been damaged. If the drain plug is securely attached, contact EdgeStar support If the machine is leaking when water is poured into the lower water reservoir, a hose may have become dislodged. Contact EdgeStar support. Contact EdgeStar support ...
-
Page 11: What Is Not Covered
DESCRIPTION OF WARRANTY SERVICE All defective product components covered by this warranty will be repaired or replaced, at EdgeStar’s option, free of charge on a mailin basis to EdgeStar’s authorized repair facility during the first 90 days from the date of original purchase. All defective product components covered by this warranty will be repaired or replaced, at ... -
Page 12: Obtaining Warranty Service
Contact EdgeStar for troubleshooting assistance and warranty service authorization at 18663195473. Please have your order receipt available to confirm the date of purchase. Once an EdgeStar authorized representative has confirmed that your product is eligible for warranty service, the product must be returned to an EdgeStar authorized repair facility. The purchaser is solely responsible for prepaying all shipping related costs to and from the ...
Need help?
Do you have a question about the IP210SS and is the answer not in the manual?
Questions and answers