Table of Contents
Advertisement
Quick Links
Use and Care Guide
®
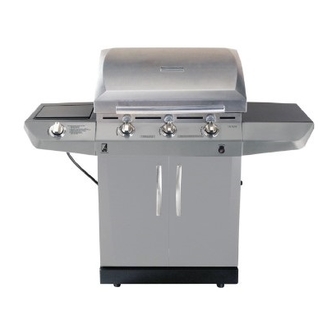
LiquidPropane Gas Grill with infraredCooking System
Sears Model No. 4t5.t6657900
This Grill is for Outdoor Use Only
•
Read and follow all Safety, Assembly,
and Use and Care instructions in this
Guide before assembling and cooking
with this grill.
•
Failure to follow all instructions in this
Use and Care Guide may lead to fire or
explosion, which could result in property
damage, personal injury or death.
•
Safety
•
Parts
•
Use and Care
•
Assembly
Assembly Questions?
Call t-800-241-7548
Tools
needed for assembly:
Adjustable wrench (not provided)
Screwdriver (not provided)
7/16" Combination wrench (not provided)
SAVE THESEINSTRUCTIONS!
Sears, Roebuck
and Co., Hoffman
Estates,
IL 60179
U.S.A.
©2008Sears, RoebuckandCo., All Rights Reserved
Printedin China
Model464261709
80019155,02-23-09
Advertisement
Table of Contents

Related Manuals for Kenmore 16657 - 3 Burner Grill


Summary of Contents for Kenmore 16657 - 3 Burner Grill
- Page 1 Use and Care Guide ® LiquidPropane Gas Grill with infraredCooking System Sears Model No. 4t5.t6657900 This Grill is for Outdoor Use Only • Safety • Parts • Use and Care • Read and follow all Safety, Assembly, • Assembly and Use and Care instructions in this Guide before assembling and cooking Assembly Questions? with this grill.
- Page 2 CALIFORNIA PROPOSiTiON 65 if you smell gas: 1. Combustion by-products produced when using 1. Shut off gas to the appliance. this product contain chemicals known to the State of 2. Extinguish any open flame. California to cause cancer, birth defects, and other 3.
- Page 3 Protection Agreements Congratulations on making a smart purchase. Your new Kenmore® product is designed and manufactured for years of All warranty coverage is void if this grill is ever used for dependable operation. But like all products, it may require repair commercial or rental purposes.
- Page 4 LP Tank • The LP Tank used with your grill must meet the following requirements: • Use LP Tanks only with these required measurements: 12" (30.5cm) (diameter) x 18" (45.7 cm) (tall) with 20 lb. (9 kg.) capacity maximum. • NEVER store a spare LP cylinder under or near the •...
- Page 5 LP Tank Exchange Connecting Regulator To The LP Tank • Many retailers that sell grills offer you the option of replacing 1. LP tank must be properly secured onto grill. (Refer to your empty LP tank through an exchange service. Use only assembly section.) those reputable exchange companies that inspect, precision fill, 2.
- Page 6 Leak Testing Valves, Hose and Regulator 1. Turn all grill control knobs to OFF. 2. Be sure regulator is tightly connected to LP tank. 3. Completely open LP tank valve by turning OPD hand wheel counterclockwise. If you hear a rushing sound, turn gas off immediately.
- Page 7 Safety Tips A Before opening LP cylinder valve, check the coupling nut for tightness. A When grill is not in use, turn off all control knobs and LP cylinder valve. For Safe Use of Your Grill and to Avoid Serious ,A, Never move grill while in operation or still hot.
- Page 8 Sideburner Match Lighting 1. Turn OFF all burner control valves. 2. Open the sideburner lid. Turn controls and gas source or tank OFF when not Turn on gas at LP cylinder. in use. 3. Place lit match near burner. CAUTIo. 4.
- Page 9 General Grill Cleaning CAUTION •Do not mistake brown or black accumulation of grease and smoke for paint. Interiors of gas grills are not painted at the factory (and should never be painted). Apply a strong solution of detergent and water or use a grill cleaner with scrub brush SPIDER ALERT! on insides of grill lid and bottom.
- Page 10 Food Safety Cleaning the Burner Assembly Food safety is a very important part of enjoying the outdoor Follow these instructions to clean and/or replace parts of burner cooking experience. To keep food safe from harmful bacteria, assembly or if you have trouble igniting grill. follow these four basic steps: Turn gas off at control knobs and LP cylinder, Clean: Wash hands, utensils, and surfaces with hot soapy water...
- Page 11 80000268 CASTER, LOCKING GRATE, F/SB 80006640 80004093 CASTER_ FIXED FRONT BRACE 80007568 BOTTOM SHELF 80007452 HEAT SHIELD, F/TANK 80007503 TANK SCREW, F/BOTTOM LEFT RAIL, F/GREASE TRAY 80007501 80006484 SHELF RIGHT RAIL, F/GREASE TRAY 80007502 CART LEFT SIDE PANEL 80007454 LEFT DOOR, NO HANDLE 80017687 GROMMET, F/REGULATOR DOOR HANDLE...
- Page 12 I© (9----- 12,464261709...
- Page 13 Attach the two locking casters at the rear of the bottom shelf and the two fixed casters at the front and tighten with the caster wrench provided. Fixed caster Lockingcaster--______ Bottom Attach side panels to bottom shelf using three l/4-20xl/2"Screw 1/4-20x1/2"screw 1/4-20x1/2"...
- Page 14 Place lower back panel between side panels at rear of bottom shelf. Secure lower back panel to side panels using four 1/4-20x1/2" screws, 7ram lock washers, and 7ram flat washers. Lowerbackpanel 1/4-20×1/2"screw 7ramlock washer l/4-20xl/2"Screw 7ramflat washer Qty.4 7mm lock washer Qty.4 7mm flat washer Qty.4...
- Page 15 On backof grill, placeupperbackpanel betweensidepanelsand abovefowerback panel Secureupper backpanelin lowerholes, usingone t/4-20x114 " screw,7ramIockwasher,and7ram fiat washeron eachside Do not fully tighten screws until side shelf installation is complete in later steps, © 7mm Lock washer 7mm fiatwasher Qty.2 Qtyo2 114-20x1½" screw Qty.2 Upper backpanel...
- Page 16 Insert flange on left sideburner shelf into side shelf brackets on side of firebox. Attach left sideburner shelf using three 1/4-20x3/4" screws, 7ram lock washers, 7ram flat washers, 1/4" nuts, shown A. Attach rear of shelf using one l/4-20xllA '' screw, 7ram lock washer, and 7ram flat washer in lower hole, shown D. Attach front of shelf and fascia using one #8x3/8"...
- Page 17 First, removethe two screws and lock washersfactory attachedto the sideburner valvebracket,.Position sideburner valve bracketbeneathsidebumershelffasciaso that valvestemcomesthrough largercenterhole infascia Alignthe holes on valve bracketwithleft and rightholeson fascia Secureusinglockwashersand screwsthatwereremovedfrom bracket Next,placesideburner b ezelovervalve stemon front sideof fascia Alignsmall holeson bezelwith upperand lowerholeson l ascia,p aNngsure°OFF °...
- Page 18 Insertsideburnerburnerinto left shelfThe stud on bottomof burnerfits into rearsmall holein sideburnerdrip pan on shelf,shownA, Secureburnerto sidebumer drip panwith one Wingnut, shownB Makesureburnertubeengages sidebumer valve,shownC Sidebumerburner Wing nut Wing nut Sidebumer drip pan Undersidebumershelf,attachsidebumerignitorwireto electrode,shown A Placesidebumergrateontosideburnershelf, aligninggratelegswith holesin shelf,shownB, Sidebumer IgnitorWire 18°...
- Page 19 Insert front brace under control panel and between cart side panels. Make sure door hinge pins are on the top side and facing the front. Secure using two l/4-20xllA '' screws, 7ram lock washers, and 7ram flat washers on each side. 7ram Lockwasher 7ram flat washer Qty.4...
- Page 20 Insert hinge pin on bottom of doors into hole in bottom shelf. Press upper hinge pin in front brace, align hinge hole on top of door, and release hinge pin into door. i!i!,i_i,i!iiiiiiii doo_ Hingepin on bottom of door Release the cap and nut from electronic ignition module. Attach electronic ignition module and heat shield to the cart right side panel with the nut and cap, shown A.
- Page 21 Install heat diffusers by sliding one end of each heat diffuser into slots at front of firebox and resting opposite end on pins in back of firebox. Heat diffuser Place cooking grates onto the firebox as shown. Insert the two wire ends at rear of warming rack into holes in back of firebox.
- Page 22 On back of grill, slide grease tray into opening in upper back panel. cAuTioN Failure to install grease tray will cause hot grease to drip from bottom of grill with risk of fire or property damage. Greasetray Unscrew electronic ignition cap on cart right side panel. Insert AA battery into ignitor, negative (=) end first. ' Replace the cap.
- Page 23 LP CYLINDER IS SOLD SEPARATELY. Fill and leak check the cylinder before attaching to grill and regulator (see Use & Care section). Once cylinder has been filled and leak checked, place cylinder into hole in bottom shelf. Make sure cylinder valve is facing front of grill.
- Page 24 EMERGENCIES; if a gas leak cannot be stopped, or a fire occurs due to gas leakage, call the fire department. Gasleakingfrom •Damagedhose. •Turnoff gas at LP cylinderor at sourceon naturalgassystems.If cracked/cut/burned anythingis burned,replacevalve/hose/regulator. If burned, hose. discontinueuseof productuntila plumberhas investigated cause and corrections are made.
- Page 25 Troubleshooting (continued) ELECTRONIC IGNITION: Burner(s)will not light usingignitor. •No spark,no ignitionnoise. • SeeSectionI of ElectronicIgnitionSystemon the nextpage. (See ElectronicIgnition Troubleshooting a lso) •No spark,some ignitionnoise. • SeeSectionII of ElectronicIgnitionSystemon the next page. •Sparks,but not at electrodeor at full • SeeSectionIII of ElectronicIgnitionSystemon the next page. strength.
- Page 26 Troubleshooting - Electronic Ignition SECTION I Nosparksappearat ,Battery not installed •Checkbatteryorientation. •Installbattery(makesurethat "+" and"-" anyelectrodeswhen properly. connectorsare orientedcorrectly, w ith "+"end up controlknobturnedto and "-" enddown.) _" ; no noisecan be heardfrom spark •Deadbattery. •Has batterybeen used •Replacebatterywith newAA-sizealkalinebattery. module. previously? •Checkto insurethreadsare •Ignitionbuttoncap...
- Page 27 464261709 •27...
- Page 28 Your Home ...... !!!!!!!!!!!!!!!!!!!!!_ iiiiiiiiiiiiiiiiiiiiii' For expert troubleshooting and home solutions advice: iiiiiiiiiiiiiiiiiiiiii !!!!!!!!!!!!!!!!!!!!! !!!!!!!!!!!!!!!!!!!!! iiiiiiiiii alnag® ... iiiiiiiiiiiiiiiiiiiii iiiiiiiiiiiiiiiiiiiii ...... iiiiiiiiii ,,**mooo om,oomo.com iiiiiiiiiiiiiiiiiiiii: iiiiiiiiiii iiiiiiiiiiiiiiiiiiiiii For repair- in your home - of all major brand appliances, iiiiiiiiiiiiiiiiiiii iiiiiiiiiii iiiiiiiiiii lawn and garden equipment, or heating and cooling systems, iiiiiiiiiiiiiiiiiiiiii...
Need help?
Do you have a question about the 16657 - 3 Burner Grill and is the answer not in the manual?
Questions and answers