
Related Manuals for Uniden ATLANTIS 200


Summary of Contents for Uniden ATLANTIS 200
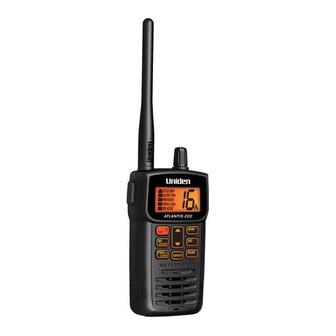
- Page 1 Atlantis 200 TWO-WAY VHF MARINE RADIO RADIO VHF MARITIME OWNER’S MANUAL GUIDE D’UTILISATION...
- Page 2 Making a Distress Call For future reference, write your boat’s name & call sign here: Speak slowly - clearly - calmly. 1. Make sure your radio is on. 16/9-TRI 2. Press the button to switch to Channel 16 (156.8 16/9-TRI MHz). (If the display does not show 16, press the button again until it does.) Push To Talk 3. Press the button and say: “MAYDAY -- MAYDAY -- MAYDAY.” 4. Say “THIS IS {name of your boat (three times) and call sign/ boat registration number (once)}.”...
- Page 3 Faire un appel de détresse Pour toute référence ultérieure, transcrivez ci-dessous le nom et l’indicatif d’appel de votre bateau: Parlez lentement – clairement – calmement. Vérifiez si votre radio est en marche. 16/9-TRI 2. Appuyez sur la touche du microphone afin de commuter au canal 16 (156,8 MHz). (Si le canal 16 n’apparaît pas à 16/9-TRI l’affichage, appuyez de nouveau sur la touche jusqu’à ce qu’il soit affiché.) Push To Talk 3. Appuyez sur le bouton de microphone...
-
Page 4: Table Of Contents
Table of Contents Introduction ..............2 Features..................2 Included in Your Package ......... 3 Controls and Indicators ..........4 LCD.Display................5 Getting Started ............6 Attaching.the.Antenna..............6 Set.Battery.Type.................6 Install.Batteries................6 Charging.Ni-MH.Batteries............7 Battery.Level.Display..............7 Attach.and.Remove.Belt.Clip............8 Operation ..............9 Turn.On.and.Set.Squelch............9 Selecting.a.Channel..............10 Change.Channel.Mode.............10 Transmitting.and.Receiving. - Page 5 Maintenance.&.Troubleshooting..........15 Common.Questions..............16 Specifications................16 Marine Channels ............18 United.States.Channels............18 Canada.Channels..............19 International.Channels..............22 Weather.Channels..............24 RBRC.Information..............24 Maritime.Radio.Services.Operation..........24 Basic.Radio.Guidelines.............25 FCC/Industry.Canada.Information..........25 FCC.RF.Exposure.Information..........26 RF.Exposure.Information............26 Body-worn.Operation..............27 Three.Year.Limited.Warranty............27...
-
Page 6: Introduction
Introduction The Atlantis 200 is a waterproof, portable two-way VHF transceiver. It is compact, lightweight, rugged and fits easily in your hand. This marine radio will give you consistent, outstanding performance in virtually all conditions and situations. Your radio has many important and valuable features. To ensure that you get the most from these features, please read this operating guide carefully before using the unit. -
Page 7: Included In Your Package
Optional DC Adapter AC Adapter Rechargeable Batteries (BWZG189100) (BADG1194001) (BBTG0873001) Owners Manual (Not Shown) If any of these items are missing or damaged, contact Uniden Customer Service (see back cover for contact information). For information on available accessories, visit NOTE www.uniden.com. -
Page 8: Controls And Indicators
Controls and Indicators 1. Speaker 10. On/Off/Vol Knob 2. PWR h/l - loCk Key 11. Lanyard Hole 3. WX - alERT Key 12. Battery Case Cover 4. 16/9 - TRI Key 13. Battery Case Cover Screw 14. MEM Key 5. LCD Display 6. -
Page 9: Lcd.display
LCD Display D E FG H Battery Level Indicator Icons Memory (MEM) Indicator Transmit (TX) Indicator United States (US) Channel Indicator (1 W) Power Indicator International (INT) Channel Indicator HIGH (3.5 W) Power Indicator Canada (CAN) Channel Indicator Channel Number Display Triple Watch (TRIPLE) Indicator Weather (WX) Mode Indicator Weather Alert (WX ALERT) Indicator... -
Page 10: Getting Started
Getting Started Attaching the Antenna 1. Place antenna over antenna stub. 2. Thread antenna clockwise until fully seated against mounting base. Hand tighten only. Be sure the antenna is firmly seated. NOTE Set Battery Type Your radio comes set to Ni-MH and with 6 Ni-MH batteries installed. •... -
Page 11: Charging.ni-Mh.batteries
Charging Ni-MH Batteries Your radio is powered by 6 AAA rechargeable Ni-MH (included) or 6 AAA non-rechargeable alkaline batteries (not included). Before operating your radio, charge the Ni-MH batteries for 14 hours without interruption using the multifunction jack (Ext. Speaker/Mic/CHARGE) on top of the radio located under the rubber protective cap. -
Page 12: Attach.and.remove.belt.clip
Battery Icon Battery Level Icon Level LEVEL 5 LEVEL 4 HIGH HIGH 100% Full Battery Approx.70% Capacity LEVEL 3 LEVEL 2 HIGH HIGH Battery Battery Approx.50% Approx.20% Capacity Capacity LEVEL 1 LEVEL 0 HIGH HIGH Low Battery Nearly Empty (10% or Less) (Flashing) •... -
Page 13: Operation
Operation Turn On and Set Squelch Your radio automatically tunes to channel 16 — the United States Coast Guard frequency for distress, safety, and calling. HIGH 1. Turn knob clockwise until you hear a beep. 2. Continue until you hear a hissing sound. sQuElCh 3. -
Page 14: Selecting.a.channel
S2 - medium squelch S3 - maximum (tight) squelch 1. Press sQuElCh . S displays and the current squelch level flashes. 2. Press sQuElCh while the squelch level displays in order to change the squelch level to the next level. 3. -
Page 15: One-Touch.channel.16/9
One-touch Channel 16/9 Press 16/9 Press 16/9 again Monitoring HIGH HIGH HIGH CH 20, press again to to monitor the 16/9 to monitor original channel CH 9. monitor CH 16. (CH 20). Triple Watch Triple Watch mode monitors channels 16 and 9 for a signal while you listen to the currently-selected channel. -
Page 16: Emergency/Weather.alert
Emergency/Weather Alert Emergency/Weather Alert allows your radio to function as a severe weather warning radio and will also alert you to any local or national emergencies. If the NOAA issues a warning while this feature is turned On, the radio sounds an alert tone. You will then hear the emergency/ weather broadcast. -
Page 17: Programming.a.channel.into.memory
1. To listen to International marine channels, press the uIC button. INT appears on the display. To listen to HIGH Canadian marine channels, press the uIC button again. CAN appears on the display. 2. The radio will keep the last mode HIGH setting that was selected when turned back on. -
Page 18: Transmit
• Scanning starts from the lowest to highest channel and stops when it finds an active channel. It remains on that channel until the transmission ends, then resumes scanning after a 2 second delay period. • When in the scan mode, the unit automatically activates NOTE the Triple Watch feature. -
Page 19: Enable.or.disable.key.beep
If the antenna has been damaged, do not transmit except in an emergency situation. Transmitting with a defective antenna may cause further radio damage. x You are responsible for continued FCC technical compliance of your radio. x You should arrange for periodic performance checks with your Uniden dealer. E-15... -
Page 20: Common.questions
Common Questions Problem Things to Try The radio won’t turn on. Charge the radio. • Make sure the Battery Switch is in the Ni-MH position (refer to page 6). • Make sure you installed Ni-MH The radio does not batteries. charge. - Page 21 Microphone Built-in Electret type Display Liquid Crystal Display Speaker 16Ω, 0.2 W (Rated) AAA rechargeable Ni-MH batteries 1.2V , 900 mAh x 6 (7.2 V) Power Source AAA alkaline batteries (optional) 1.5V x 6 (9 V) 4.5 (H) x 2.5 (W) x 1.22 (D) inch Size (without antenna) 116 (H) x 63 (W) x 31 (D) mm Weight...
-
Page 22: Marine Channels
Marine Channels United States Channels United States Marine Channels Ch RX Freq TX Freq Status Name 1A. 156.050 156.050 Simplex Vessel.traffic.system/commercial 5A. 156.250 156.250 Simplex Vessel.traffic.system/commercial 156.300 156.300 Simplex Inter-ship.safety 7A. 156.350 156.350 Simplex Commercial 156.400 156.400 Simplex Commercial 156.450 156.450 Simplex Non.commercial 10 156.500 156.500... -
Page 23: Canada.channels
United States Marine Channels Ch RX Freq TX Freq Status Name 67 156.375 156.375 Simplex,.1W Bridge.To.Bridge 68 156.425 156.425 Simplex Non.Commercial 69 156.475 156.475 Simplex Non.Commercial 70 156.525 .Inhibit Receive.only Digital.Selective.Calling 71 156.575 156.575 Simplex Non.Commercial 72 156.625 156.625 Simplex Non.Commercial.(Ship-Ship) 73 156.675 156.675 Simplex... - Page 24 Canadian Marine Channels Ch RX Freq TX Freq Status Name 5A 156.250 156.250 Simplex Vessel Traffic System 156.300 156.300 Simplex Inter-Ship Safety 7A 156.350 156.350 Simplex Commercial 156.400 156.400 Simplex Commercial 156.450 156.450 Simplex Boater Calling Channel 156.500 156.500 Simplex Commercial 156.550 156.550 Simplex Vessel Traffic System...
- Page 25 Canadian Marine Channels Ch RX Freq TX Freq Status Name 66A 156.325 156.325 Simplex,.1W Port.Operation 156.375 156.375 Simplex Bridge.To.Bridge 156.425 156.425 Simplex Non.Commercial 156.475 156.475 Simplex Non.Commercial 156.525 Inhibit Receive.only Digital.Selective.Calling 156.575 156.575 Simplex Non.Commercial 156.625 156.625 Simplex Non.Commercial 156.675 156.675 Simplex Port.Operation 156.725 156.725...
-
Page 26: International.channels
International Channels International Marine Channels Ch RX Freq TX Freq Status Name 1 160.650 156.050 Duplex Marine.operator 2 160.700 156.100 Duplex Marine.operator 3 160.750 156.150 Duplex Marine.operator 4 160.800 156.200 Duplex Marine.operator 5 160.850 156.250 Duplex Marine.operator 6 156.300 156.300 Simplex Inter-ship.safety 7 160.950 156.350... - Page 27 International Marine Channels Ch RX Freq TX Freq Status Name 62 160.725 156.125 Duplex Marine.operator 63 160.775 156.175 Duplex Marine.operator 64 160.825 156.225 Duplex Marine.operator 65 160.875 156.275 Duplex Marine.operator 66 160.925 156.325 Duplex Marine.operator 67 156.375 156.375 Simplex Bridge.to.bridge 68 156.425 156.425 Simplex Non.commercial...
-
Page 28: Weather.channels
Regulations and Safety Warnings WARNING! Read this information before using the radio. RBRC Information As part of our commitment to protect the environment and conserve natural resources, Uniden voluntarily ® participates in an RBRC industry program to collect and recycle used Ni-MH batteries within the US. -
Page 29: Basic.radio.guidelines
Guard, use in Canada, and use in international waters. Operation on these frequencies without proper authorization is strictly forbidden. See page 18 through page 24 for tables of the available channels and their uses. If you are still not certain which channels to use, see the FCC maritime radio page at the FCC website (http://wireless.fcc.gov/marine/) or contact the FCC Call Center at 1-888-CALL-FCC. -
Page 30: Fcc.rf.exposure.information
Unauthorized changes or modifications to this equipment may void compliance with the FCC Rules. Any change or modification must be approved in writing by Uniden. Changes or modifications not approved by Uniden could void the user’s authority to operate the equipment. FCC RF Exposure Information... -
Page 31: Body-Worn.operation
Three Year Limited Warranty WARRANTOR: UNIDEN AMERICA CORP. (“Uniden”) ELEMENTS OF WARRANTY: Uniden warrants, for three years, to the original retail owner, this Uniden Product to be free from defects in materials and craftsmanship with only the limitations or exclusions set out below. - Page 32 Uniden, or (F) installed or programmed by anyone other than as detailed by the Operating Guide for this product. STATEMENT OF REMEDY: In the event that the product does not...
Need help?
Do you have a question about the ATLANTIS 200 and is the answer not in the manual?
Questions and answers