Table of Contents
Advertisement
Quick Links
Copyright
All mobile products by GIGA-BYTE COMMUNICATIONS INC. mentioned in this document, including the
device, accessories, software, text, music, and pictures, are owned by, or authorized by original manufacturers
to GIGA-BYTE COMMUNICATIONS INC. Reproduction, transfer, distribution, or storage of part or all of the
contents in this document in any form without the prior written permission of GIGA-BYTE COMMUNICATIONS
INC. is prohibited.
GIGA-BYTE Group, GIGA-BYTE COMMUNICATIONS INC.
MS802│0-1
Advertisement
Table of Contents

Related Manuals for Gigabyte GSmart MS802


Summary of Contents for Gigabyte GSmart MS802
- Page 1 Copyright All mobile products by GIGA-BYTE COMMUNICATIONS INC. mentioned in this document, including the device, accessories, software, text, music, and pictures, are owned by, or authorized by original manufacturers to GIGA-BYTE COMMUNICATIONS INC. Reproduction, transfer, distribution, or storage of part or all of the contents in this document in any form without the prior written permission of GIGA-BYTE COMMUNICATIONS INC.
-
Page 2: Safety Information
Safety Information This chapter contains important information on safe and efficient operation. Please read this information before using the device. Exposure to Radio Frequency (RF) Energy The device contains a transmitter and a receiver. When it is ON, it receives and transmits RF energy. Please use the device appropriately. -
Page 3: Regulatory Agency Identifications
Regulatory Agency Identifications For regulatory identification purposes, your product is assigned a model number of MS802. To ensure continued reliable and safe operation of your device, use only the accessories listed below with your MS802. The Battery Pack has been assigned a model number of GPS-H01. Note: This product is intended for use with a certified Class 2 or Class 3 Limited Power Source, rated 5 Volts DC, maximum 1 Amp power supply unit. - Page 4 • ETSI EN 300 328 Electromagnetic compatibility and Radio spectrum Matters (ERM); Wideband Transmission systems; data transmission equipment operating in the 2.4 GHz ISM band and using spread spectrum modulation techniques. Safety precautions for RF exposure • Use only original manufacturer-approved accessories, or accessories that do not contain any metal. •...
- Page 5 antenna area when the phone is IN USE optimizes the antenna performance and the battery life. Telecommunications & Internet Association (TIA) safety information Pacemakers The Health Industry Manufacturers Association recommends that a minimum separation of six inches be maintained between a handheld wireless phone and a pacemaker to avoid potential interference with the pacemaker.
- Page 6 household waste disposal service, shop from where you purchased the equipment, or manufacturer of the equipment. RoHS Compliance This product is in compliance with Directive 2002/95/EC of the European Parliament and of the Council of 27 January 2003, on the restriction of the use of certain hazardous substances in electrical and electronic equipment (RoHS) and its amendments.
-
Page 7: General Information
General Information This chapter contains important information on safe and efficient operation. Please read this information before using the device. Ignorance of the following notices may lead to violations of the law. • Before using the device, please make sure you have fully charged the battery. •... -
Page 8: Table Of Contents
Table of Contents Copyright………………………………………………………….………………………………………………..……0-1 Safety Information………………………………………………...………….…………………………………………0-2 Regulatory Agency Identifications………………………………..………….……………….……………………….0-3 General Information…………………………………………….…..…………….………………………………….…0-7 Chapter 1 Before Using Your Device………………………………………………...………………………….…1-1 1.1 Getting to Know Your Device .…………………………………………………………………………………….1-1 1.2 Features..……..……………………………………………...……………………………………………………1-3 1.3 Insert the Battery & SIM card……………………………….……………………………………………………..1-3 1.4 SIM..………………………..………………………………………………………………………………………..1-3 1.5 Battery …….………………………………………………….………………………………….………………….1-3 1.6 Lock/Unlock.…...……………….…………………………………………………………………………………..1-4 1.7 Power ………………….……………………………………………………………………………………………1-5 Chapter 2 Getting Started.……………………………………………………………………….…………………. - Page 9 3.11 Black List…...……………………………………………………………………………………………………3-4 3.12 Video Telephony..….…………………………………………………………………………………………...3-4 Chapter 4 Settings…………...……………....................4-1 4.1 Personal Settings.…………........................4-1 4.2 System Settings............................4-3 Chapter 5 Synchronization…………………….……………................5-1 5.1 About ActiveSync..........................5-1 5.2 Install and Use ActiveSync.........................5-1 5.3 Synchronize via Bluetooth..........................5-2 Chapter 6 Getting Connected…........................6-1 6.1 Internet Access............................6-1 6.2 GPRS Connection Settings........................6-1 6.3 Activating GPRS Connection........................6-1 6.4 GPRS Wizard.............................6-2 6.5 Connecting with Your Personal Computer ....................6-2...
- Page 10 Chapter 9 Applications…………..…......................9-1 9.1 Calendar..............................9-1 9.2 Contacts ..............................9-1 9.3 Tasks .................................9-2 9.4 Notes …..............................9-3 9.5 Word Mobile ...............................9-3 9.6 Excel Mobile...............................9-4 9.7 PowerPoint Mobile .............................9-4 9.8 OneNote Mobile............................9-4 9.9 Windows Media Player …...........................9-5 9.10 Internet Explore …............................9-5 9.11 Calculator ..............................9-6 9.12 Games ..............................9-6 9.13 STK (SIM Tool Kit) ...........................9-6 9.14 Zip …………………..........................9-6...
-
Page 11: Chapter 1 Before Using Your Device
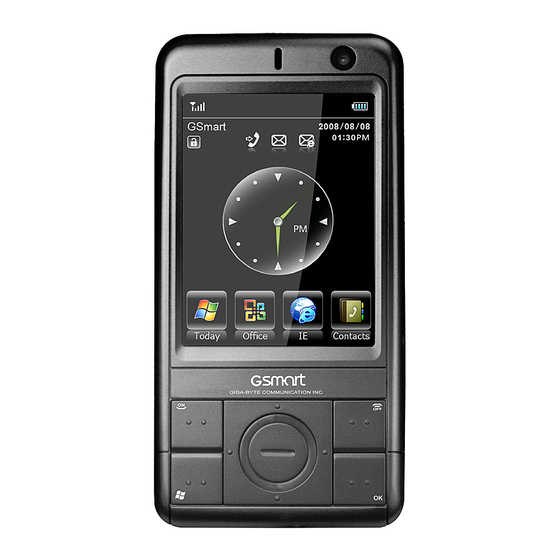
1. Before Using Your Device 1.1 Getting to Know Your Device Today screen from any screen. This section introduces you to the hardware of the Press the Windows Windows Flag device and its function keys. key to open Start menu options. - Page 12 key for a few seconds slot Micro SD card here. to power on/off your Plug in headset, and device. then you can listen to Use USB connector to the FM radio, music 16 Headset Plug synchronize data with via the headset or use 11 Mini USB slot your desktop PC, to the device's...
-
Page 13: Features
cover back onto the device in that order. 1.2 Features 5. Push the battery cover back, and then you will MS802 is not only having mobile phone features, it hear “click”. also integrates Personal Digital Assistant (PDA) 1.4 SIM capability. The following section provides more information about the device features: Before using your MS802, you must contact a ˙Touch screen: 2.8”... -
Page 14: Lock/Unlock
Charging the battery Please make sure that the battery is installed and fully charged when using your MS802 for the first time. You may charge the battery in the following ways: 1. Universal AC Adapter: Plug your AC adapter into a suitable main power socket, and plug the connector to the charging slot of your MS802. -
Page 15: Power
Power off While the power is on, press, and hold Power key on the top of the device for about 5 seconds to turn it off. To reduce the power consumption of your device, you may change the backlight duration and brightness level. - Page 16 Sleep Mode 1. Sleep Mode is a power saving mode designed to reserve battery power. After idling for a period of time, the device automatically enters Sleep Mode. You may also manually enter Sleep mode by pressing power On/Off key shortly. The backlight of the screen will turn off and the device will go into Sleep mode.
-
Page 17: Chapter 2 Getting Started
2. Getting Started and commands to create or edit a file. 2.1 Display Information 5. Pop-up menu The main screen displays the following information: It allows you to access an item quickly. Tap the selected item to perform an action. To cancel this pop-up menu, tap other areas of this screen. - Page 18 From Today screen > Start > Programs Your device contains the following programs: Icon Programs Description Audio Mixer, Camera, Photo Editor, Pictures & Videos, Multimedia Recorder, JAVA, FM Radio, Streaming Player Calculator, Pocket Remote, Restore to Tools Default, Zip, Spb Backup, Programs Magnifier You will see many application icons under your...
- Page 19 Quickly guide with voice. Getting you to instruct Settings Started the common MS802 contains Personal, System, and Connections use functions. setting items. You can purchase, and Tap Start > Settings > Personal tab download Marketplace applications from the Internet for your device.
- Page 20 Feedback Improvement Program. Phone Settings for phone functions. Encrypt data in your Micro Encryption Shutdown SD card. Settings for shutdown screen. Animation Managed Examine the installed Sounds& Settings for alarm sound and Programs programs Notifications notification. Memory status and running Memory Settings for screen appearance programs.
- Page 21 Tap Start > Settings > Connections tab Display Wi-Fi status and IP Wi-Fi Utility info. Wireless Turn on/off Wi-Fi, Bluetooth, Manager Phone, GPRS. Status & Icon area This area shows icons of basic system status or alerts. You can tap the icons to get the definitions or go to the settings.
-
Page 22: Screen Orientation
change the default screen display by following the No signal. steps below: Roaming. 1. Tap Start > Settings > System tab > Screen > General tab. GPS signal is trying to 2. On General ta b screen, select your desired connect, and is orientation, Portrait, Landscape (right-handed ), or... -
Page 23: Setting The Time & Date
2.3 Setting the Time & Date not accurately respond to your stylus taps, or you have performed a system reset, you need to align When using MS802 for the first time, you are your screen again. required to set your time zone, time, and date. You 1. -
Page 24: Drawing On The Screen
of the screen, and tap the put Selector arrow field on your Letter Recognizer screen. This device will display the letters/numbers that you icon to select Block Recognizer. had just input in Letter Recognizer fields. Write ters and numbers in a correspo nding field, the system will display the letters/number Tap the delete key... -
Page 25: Recording A Message
either create a standalone recording, or include a recording in a written note. If you want to include the recording in a note, open the note first. In the Messaging program, you can also add a recording to an E-mail message. Creating a recording 1. -
Page 26: Editing My Info
4. Select a password type in Password type field. 5. Input your password in Password field and reconfirm the password in Confirm field. 6. Tap OK, a pop-up window will appear to confirm, “Do you want to save password settings changes?”... - Page 27 languages in alphabetic order are: Afrikaans, Albanian, Arabic (Saudi Arabia), Azeri (Cyrillic), Azeri (Latin), Basque, Belarusian, Bulgarian, Catalan, Chinese (Hong Kong S.A.R.), Chinese (Macau S.A.R.), Chinese (People’s Republic Of China), Chinese (Singapore), Chinese (Taiwan), Croatian, Czech, Danish, Dutch (Belgium), Dutch (Netherlands), English (Australia), English (Belize), English (Canada), English (Caribbean), English (Ireland), English (Jamaica), English (New Zealand),...
-
Page 28: Chapter 3 Phone Functions
3. Phone Functions 3.1 Phone Dialer Screen and Key When a call is connected, the screen displays the Introduction following: 1. The calling status Press Talk/Send key to enter phone functions. 2. The name and number of the contact you are Please insert a SIM card before using these calling functions. -
Page 29: Receiving/Ignoring A Call
number using the keypad on the screen. To make an international call 2. To delete an error input, use key on 1. Tap, and hold 0 key until + sign appear. + your screen. replaces the international prefix of the country that you are calling from. -
Page 30: Making A Call From Contacts
3.8 Creating a New Contact 4. When you select Off, icon on screen will On Contacts screen, tap New on the lower-left corner change t o icon. of the screen. After you enter into “Select a Contact 3.7 Making a Call from Contacts Type”, you can select Outlook Contact or SIM Contact. -
Page 31: Setting Ringtone And Password
lower-left corner of the screen. folder in your device. The ring tone files will be 2. Tap Menu on the lower-right corner of the screen. added as the options. 3. Select a desired function to perform. You may 3. You can set keypad tone for dialing. change call history display method by selecting 4. - Page 32 When the video call is connected successfully, the 3G Video Telephony Application appears as: To make a video call 1. On Phone Dialer Screen, type the required phone number. 2. Tap the Video Call button to make a video call. As the call progresses, the 3G Video Telephony Application automatically proceeds to Dialing screen.
- Page 33 This window displays Operator information. : The screen only shows the Remote Window. Call Status Call Failed This window displays the current call status. If the placed call failed, the 3G Video Telephony Elapsed Time Application displays a dialog that prompts you to indicate whether a voice call should be dialed or This window displays the elapsed time of the current whether the video call should be retried with the...
- Page 34 1. Tap Contacts of Today screen to open Outlook 2. To make a video call, tap Video Call in Menu. Contacts page. 2. Do one of the following to display a menu. Tap menu or tap and hold the required contact record.
-
Page 35: Chapter 4 Settings
4. Settings 4.1 Personal Settings tapping the arrow You may set your personalized settings by Lock preference. You may set a personal password to lock your device. Buttons A strong password must have at least 7 characters You may assign programs to a hardware button. that are a combination of uppercase and lower case You may set certain keys as the activation keys for letters, numerals, and punctuation. - Page 36 Owner information Keypad Set layout, items, color, and background of Today You can use this function to change the key tone. display. If you select Long tones, the key tone will be 1. Tap Start > Settings > Personal tab > Owner continuous, when you input a phone number.
-
Page 37: System Settings
2. On Appearance tab, select the desired theme. To Note: All services in Services tab are use your own background, check “Use this provided by operators. Please contact picture as the background”, and then tap Browse your operator for more services. to locate the desired file. - Page 38 Backlight You can check one of three modes of CPU profile: Configure the backlight settings, and adjusts the 1. Power saving mode. brightness level to save power. 2. Standard mode 3. Performance mode Using the backlight on battery power substantially reduces the battery life.
- Page 39 Tap Start > Settings > System tab > Memory. Screen ˙Main tab displays the amount of memory. This tab Setting screen orientation, screen alignment, and shows storage’s and program’s memory. You can text size. examine the total, in-use, and free memory. ˙Storage Card tab displays how much memory is ˙On General tab, you can adjust the screen’s available on the storage card that is inserted into...
- Page 40 pronunciations of applications’ names. Then you can go to “Voice Commander” in Programs to start what you record. Tap Start > Programs > Voice Commander. ˙On Music tab: If you have MP3 files in the device or Micro SD card, you may record voice tags for these MP3 files.
-
Page 41: Chapter 5 Synchronization
5. Synchronization 5.1 About ActiveSync 1. ActiveSync Installation: Use the enclosed CD to install Microsoft You may use Microsoft ActiveSync to synchronize ActiveSync in your personal computer. This data in this device with personal computer. device already has the built-in ActiveSync. ˙You can update Outlook data in this device and in 2. -
Page 42: Synchronize Via Bluetooth
5.3 Synchronize via Bluetooth You can synchronize data via Bluetooth. Select Start > Programs > ActiveSync > Menu, and then select “Connect via Bluetooth” and tap ”Synchronize” in this device to process synchronization. Note: If you want to synchronize your phone and your PC via Bluetooth, your PC needs to have a Bluetooth receiver, a host adapter, or a built-in Bluetooth. -
Page 43: Chapter 6 Getting Connected
6. Getting Connected When you use GPRS and Internet connection, you will not be able to answer a call. If you want to make a call, your device will disconnect to the Internet automatically and reconnect to the Internet at the end of conversation. -
Page 44: Gprs Wizard
Bluetooth, please make sure the device you would like to make connections with is also equipped with Bluetooth. Bluetooth Connection Settings When Bluetooth is activated, tap the icon on Today screen, and you will see icon in the pop-up window. 6.4 GPRS Wizard When you are connected to GPRS network, you may surf on the Internet or send and receive email. - Page 45 3. If you want this device to be detected by other 6. Select the device to be connected, and then Bluetooth devices, please check “Make this select “Next“. The screen will prompt for device visible to other devices”. (Without password. After inputting password on password checking this item, other Bluetooth devices are input screen, select “Next“.
-
Page 46: Internet Sharing
Registering New Serial Port: 1. Select “New Incoming Port” to enter setup screen. 2. Select a port to be set. 3. Select “Finish”. 6.7 Internet Sharing You can set the device as a wireless modem. Internet Sharing allows your PC/Notebook be connected to a wireless network. -
Page 47: Usb
6.9 USB You may use the device as a mass storage device or a Micro SD card reader. 1. On the device, select Start > Settings > Connections tab > USB 2. Tap “SD-Card Reader”, and then tap “Change”. 3. Connect the device to the computer with a USB cable. -
Page 48: Chapter 7 Messaging
7. Messaging 7.1 SMS\MMS & E-mail Messaging includes text messages (SMS), multimedia messages (MMS), and E-mail. Before receiving and sending your email, please make sure this device has connected to a network. When you are connected to a network, you may go to “Messaging”... - Page 49 5. Tap the Input Panel icon on the lower center of the screen to activate or disable the Input Panel, and then edit this SMS or MMS. When read a SMS\MMS, you can: Select Start > Messaging > SMS\MMS, and then select the SMS\MMS to read and reply.
-
Page 50: Synchronously Process E-Mail
Compose, and send a MMS: “Inbox” synchronization, please see the online Help 1. Tap Start > Messaging > SMS\MMS > Menu > of ActiveSync in your computer. New > MMS to write a new MMS. Inbox synchronization process rules: 2. Tap “To”, “Cc”, or “Bcc” fields to input receivers’ 1. -
Page 51: Using E-Mail
1. E-mail address, account name, password, and 2. Tap “Received” on the upper-right corner of the domain name. screen to choose email arrangement. 2. POP3 or IMAP4. 3. Tap and hold on the email to open the pop-up 3. SMTP. menu. -
Page 52: Using Push E-Mail
up your device to synchronize via an over-the-air connection with Exchange Server. To use push e-mail, please turn on Wi-Fi or data connection to connect to the Exchange Server. Enabling Push E-mail on your PC: 1. Connect your device to the PC with a USB cable. 2. -
Page 53: Messenger
following the same steps as sending e-mail to a contact saved on your device. Note: To be able to use push e-mail, you need to have an exchange server. Microsoft Exchange Server also supports useful functions such as remote device wipe. To find out more on the benefit and usage of Microsoft Exchange server, please visit Microsoft’s website,... - Page 54 MS802│ 7-7...
-
Page 55: Chapter 8 Multimedia
8. Multimedia 8.1 Camera You may use camera function in this device to capture important moments. 1. Select Start > Programs > Multimedia > Camera or press, and hold Camera Key to launch camera. 2. Focus on the wanted object to shoot. Make a half press, and hold Camera Key to execute auto focus, and then make a full press to take a picture. -
Page 56: Video Mode
8.2 Video Mode Video Settings: 1. Mode: You may select different recording modes The device camera can also be used as a video to fit the recording environment. recorder to record memorable moments of your life. 2. Effect: You may apply many different photo effects. -
Page 57: Recorder
2. After turning on GPS, it will start to search the current GPS coordination, and the GPS button will display as 3. When GPS has successfully connected to satellite signals, the GPS button will become GPS ON . Under this mode, the photos you take will carry the current coordinates of where you are at EXIF. -
Page 58: Pictures & Videos
8.7 Audio Mixer 8.5 Pictures & Videos Audio Mixer enables you to configure bass, treble, You may use “Pictures & Videos” function to manage and 3D effects while you listen to the music. Use your photos or videos. In Pictures & Videos > Menu Media Player to play your audio files, and then >... - Page 59 MS802│ 8-5...
-
Page 60: Chapter 9 Applications
9. Applications 9.1 Calendar If you select Remind me in “Reminder” field, then the device will remind you by an alert sound according to Appointments and Meetings: the settings in Start > Settings > Personal tab > You may use “Calendar” to arrange appointments, Sounds &... -
Page 61: Tasks
company will show on the right hand side of Phone Book: company name. “Contacts” helps you manage your phone book. ˙To search for a contact, select Start > 1. Tap “Enter a name…” field to input part of name Programs > Search. Enter the name of the contact or desired or phone number to search for that in “Search for”... -
Page 62: Notes
6. To appoint a task as certain category, tap 9.5 Word Mobile “Categories” field to select a category from the options list. You may use Word Mobile in this device with 7. To add notes, select Notes tab and input desired Microsoft Word in your computer to copy and move content. -
Page 63: Excel Mobile
9.7 PowerPoint Mobile Note: When you are synchronizing or copying files from the device to PC, Word You may use PowerPoint Mobile in this device with Mobile files will be transformed into Word Microsoft PowerPoint in your computer to easily copy files. -
Page 64: Windows Media Player
9.9 Windows Media Player Your Windows Media Player allows you to play sound and video files in this device, select Start > Programs > Windows Media to activate Windows Media Player. 1. Tap to view in full screen. : Display the wanted website, from which find the wanted music and image to play. -
Page 65: Calculator
3. Input website address in the blank text field. displayed in programs will be enlarged. 3. Check “Menu Magnifier”, and then select OK to ˙Select the icon next to the blank field to go to save. When you check this option, the font the link. -
Page 66: Sd Add-Ons
need. your landmark). The next page allows you to add ˙Set a password. When you unzip the file, the the name of the landmark and descriptions. Then system will ask you to input the password. to save the landmark. 4. Select “Start” to compress the file. 5. -
Page 67: Sim Manager
2. Select the desired item, or select all SIM contacts Note: When the device has a bad signal by tapping Menu > Select All. reception of GPS or GSM, a warning 3. Tap Menu > Save to Device Contacts. window will pop up. To copy Device contacts to the SIM card: 1. - Page 68 them, and tapping on the Options button. Tap “Next” to continue. 3. On the next screen, you should provide the backup file name, and location. If you select the Custom location, you will be able to select any folder on your device. Tap “Next” to proceed. 4.
-
Page 69: Search
reboot caused by backup in unattended mode. Note: Before you upgrade the system of your e. Backup only on AC power: If you select this device, you can tap “Full Backup” to backup the option, the backup copy will be created only if files you want to save. -
Page 70: Marketplace
The 2D barcode is below. 9.27 Marketplace You can purchase software in Marketplace via the Internet. Then you can download, and install the software. Tap Start > Programs > Marketplace. To provide a quality user experience, your device will need to send information to Spb Catalog for GSmart. This may include your name, phone number, device ID, operating system version, device make &... -
Page 71: Chapter 10 Managing Your Mobile
10. Managing Your Mobile 10.1 Memory Management The saved data in ROM will not be lost suddenly. As long as there is sufficient space in this device, you Select Start > Settings > System tab > Memory may install suitable programs. Main Tab: Adding programs through ActiveSync: Display current memory status of this device. - Page 72 Adding programs through the Internet: Via the Internet, you may download software which is suitable for this device. Before you install the program, please make sure the device processor is suitable for the software. 1. Select Start > Settings > System tab > About > Version tab to check information in this device.
-
Page 73: Chapter 11 Specifications
11. Specifications Item Specification System Information Operating System Windows Mobile 6.1 Professional Processor Marvell PXA 270 520 MHz Memory ROM 256 MB, RAM 128MB Size Dimensions (mm) 117 x 59.8 x 14.8 mm Weight (in grams) 130 g (Including battery) Battery Battery Capacity Lithium Polymer 1300 mAh... -
Page 74: Digital Camera
WLAN 802.11b/g Wireless Technology: OFDM and DSSS Operating frequency: 2.412 - 2.462GHz WLAN WLAN 802.11b Output power:12dbm (Typical) WLAN 802.11g Output power:10dbm (Typical) GPRS GPRS Class 12 WAP 2.0 Modem dial-up Mini USB 2.0 Image Format JPEG, GIF, PNG, BNP, WBMP Max Size (per) Depends on available RAM Audio... -
Page 75: External Memory
Type JPEG Pixels 3.0 mega pixels Front Camera 0.3 mega pixels VGA Auto Focus (Rear Camera) Macro Mode Video Recording Message Windows Live Messenger E-mail External Memory Type Micro SD Card Max Size Maximum to 4GB Operating Temperature -10℃~45℃ Temperature Note: Specifications may vary in some regions. -
Page 76: Chapter 12 Faq
12. FAQ Why can’t I turn on the device? Why does the device launch wrong programs or ignore my command, when I press a device key? Please make sure that the device has sufficient power, and that the battery is secured in the device. Select Start >... - Page 77 Can I synchronize information with PC and How do I set a sound alert for incoming text Exchange Server at the same time? messages in my device? No. You can only synchronize information either with 1. Tap Start > Settings > Personal tab > Sounds & PC or with Exchange Server at one time.
Need help?
Do you have a question about the GSmart MS802 and is the answer not in the manual?
Questions and answers