Table of Contents
Advertisement
Quick Links
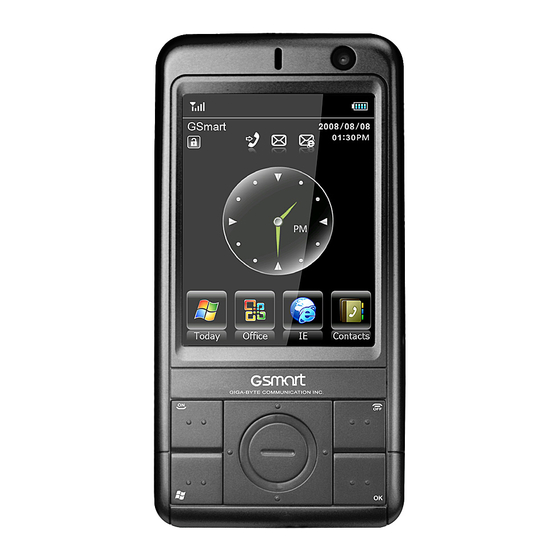
Getting to Know Your Device
No.
Item
1
Touch Screen
2
Talk/Send Key
3
End Key
Windows Flag
4
Key
Function
Display screen. Use
stylus to select items on
the screen.
You can make or
answer a call by
pressing Talk/Send key,
or go to Phone Dialer
screen.
Press this key to end a
call or to return to
Today screen from any
screen.
Press the Windows
key to open Start menu
5
GPS Key
6
Navigation Key
7
LED Indicator1
8
LED Indicator2
Front Camera
9
Lens
10 Power On/Off
11 Mini USB slot
MS802│ 01
options.
Long press this key to
execute GPS function
or application. OK as
default.
Press up, down, left
and right directions to
navigate. Tap the
center key to execute
the selected function or
application.
The LED indicator
indicates the status of
your device by showing
different colors.
Green: Mobile network
is detected.
Red: Charging
activated.
The LED indicator
indicates the status of
your device by showing
different colors.
Blue: Bluetooth is
activated.
Orange: Wi-Fi is
activated.
Purple: Notification,
GPS signal is detected.
Use when making
Video calls.
Press and hold Power
key for a few seconds
to power on/off your
device.
Use USB connector to
synchronize data with
your desktop PC, to
transmit data or to
charge the battery.
Advertisement
Table of Contents

Related Manuals for Gigabyte GSmart MS802


Summary of Contents for Gigabyte GSmart MS802
-
Page 1: Getting To Know Your Device
Getting to Know Your Device options. Long press this key to execute GPS function GPS Key or application. OK as default. Press up, down, left and right directions to navigate. Tap the Navigation Key center key to execute the selected function or application. -
Page 2: Insert The Battery & Sim Card
music/voice through the built-in speaker. The CMOS camera on the back of the device 19 Camera Lens supports 3-mega-pixel photo and high-quality video. Push and slide out the cover to replace 20 Battery Cover battery and unlock SIM card hatch. Use something shaped like a needle 12 Reset Hole... -
Page 3: Today Screen
corner of the device. Settings > Personal tab > Today 3. Insert the SIM card with the metal contacts 4. Command area facing down into the carrier. Depending on different mode, this area contains 4. Return the battery back to the battery slot, different features such as menu options, input battery cover back onto the device in that order. -
Page 4: Install And Charge Battery
Data call. You have one or more new voice mail(s). You have missed calls. You have one or more Voice call in active. instant message(s). 3G network is System volume. connected. GPRS is in range. Phone volume. Volume GPRS is connected. Ringer is on. -
Page 5: Power Off
Power On Press Power On / Off key on the top of the device to turn on the device. Power Off Press and hold Power On / Off Key on the top of the device for about 5 seconds while the power is Open Battery Cover About 1. -
Page 6: Specifications
saved to memory card automatically. Band:2.4 - 2.4835GHz Output power:0dbm Specifications (Typical) WLAN 802.11b/g Item Specification Wireless Technology: OFDM System Information and DSSS Operating frequency: 2.412 - Operating Windows Mobile 6.1 WLAN 2.462GHz System Professional WLAN 802.11b Output Processor Marvell PXA 270 520 MHz power:12dbm (Typical) WLAN 802.11g Output Memory... - Page 7 Ringtone Type MP3, WMA, AMR Polyphone 48 polyphonic mid file Digital Camera Type JPEG Pixels 3.0 mega pixels Front 0.3 mega pixels VGA Camera Auto Focus (Rear Camera) Macro Mode Video Recording Message Windows Live Messenger E-mail External Memory Type Micro SD Card If this document is modified, please download the Max Size...
Need help?
Do you have a question about the GSmart MS802 and is the answer not in the manual?
Questions and answers