Table of Contents
Advertisement
Quick Links
Advertisement
Table of Contents

Related Manuals for Gigabyte GSmart MS800


Summary of Contents for Gigabyte GSmart MS800
- Page 1 MS800...
-
Page 2: Copyright
GIGA-BYTE Communications. Reproduction, transfer, distribution, or storage of part or all of the contents in this document in any form without the prior written permission of GIGABYTE Communications Inc. is prohibited. -
Page 3: Safety Information
Safety Information This chapter contains important information on safe and efficient operation. Please read this information before using the device. Exposure to Radio Frequency (RF) Energy The device contains a transmitter and a receiver. When it is ON, it receives and transmits RF energy. Please use the device appropriately. -
Page 4: Regulatory Agency Identifications
Regulatory Agency Identifications For regulatory identification purposes, your product is assigned a model number of MS800. To ensure continued reliable and safe operation of your device, use only the accessories listed below with your MS800. The Battery Pack has been assigned a model number of GPS-H01. Note: This product is intended for use with a certified Class 2 or Class 3 Limited Power Source, rated 5 Volts DC, maximum 1 Amp power supply unit. - Page 5 systems and 5 GHz high performance RLAN equipment. • ETSI EN 300 328 Electromagnetic compatibility and Radio spectrum Matters (ERM); Wideband Transmission systems; data transmission equipment operating in the 2.4 GHz ISM band and using spread spectrum modulation techniques. Safety precautions for RF exposure •...
- Page 6 antenna area when the phone is IN USE optimizes the antenna performance and the battery life. Telecommunications & Internet Association (TIA) safety information Pacemakers The Health Industry Manufacturers Association recommends that a minimum separation of six inches be maintained between a handheld wireless phone and a pacemaker to avoid potential interference with the pacemaker.
- Page 7 household waste disposal service, shop from where you purchased the equipment, or manufacturer of the equipment. RoHS Compliance This product is in compliance with Directive 2002/95/EC of the European Parliament and of the Council of 27 January 2003, on the restriction of the use of certain hazardous substances in electrical and electronic equipment (RoHS) and its amendments.
-
Page 8: General Information
General Information This chapter contains important information on safe and efficient operation. Please read this information before using the device. Ignorance of the following notices may lead to violations of the law. • Before using the device, please make sure you have fully charged the battery. •... -
Page 9: Table Of Contents
Table of Contents C o p yr i g h t … …… …… … … … … …… … … … … … … … … … … …… … … … … …… … … … … … . . … … … …1 S af et y Inf o rmat i on…... - Page 10 3.10 Setting Ringtone and Password ………………………………………………………………………...………3-4 3.11 Block List ………………………………………………………………………………………………….………3-4 3.12 Video Telephony ………………………………………………………………………………………….……...3-5 Chapter 4 Settings …………...........................4-1 4.1 Personal Settings …………........................4-1 4.2 System Settings ............................4-3 Chapter 5 Synchronization ……………………....................5-1 5.1 Install and Use ActiveSync ........................5-1 5.2 Synchronize via Bluetooth ........................5-2 Chapter 6 Getting Connected …........................6-1 6.1 Internet Access............................6-1 6.2 GPRS Connection Settings........................6-1...
- Page 11 Chapter 9 Applications …………..…......................9-1 9.1 Calendar..............................9-1 9.2 Contacts ..............................9-1 9.3 Tasks .................................9-2 9.4 Notes …..............................9-3 9.5 Word Mobile ...............................9-3 9.6 Excel Mobile...............................9-4 9.7 PowerPoint Mobile .............................9-4 9.8 Windows Media Player …...........................9-4 9.9 Internet Explore …............................9-5 9.10 Calculator ..............................9-6 9.11 Games ..............................9-6 9.12 STK (SIM Tool Kit) ...........................9-6 9.13 Zip …………………..........................9-6 9.14 GPS Tracking …………………………………………………………….……………………….………………9-6...
-
Page 12: Chapter 1 Before Using Your Device
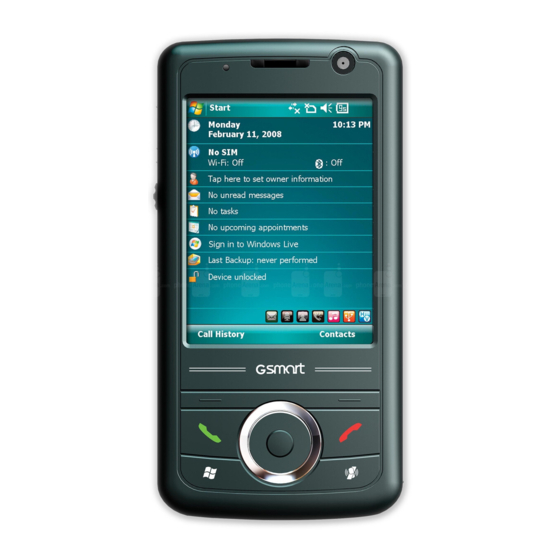
1 Before Using Your Device 1.1 Familiarizing yourself with Press to execute the function Left Function MS800 displayed on the bottom left of the screen. This section introduces you to the hardware of the Press to execute the function device and its function keys. Right Function displayed on the bottom right of the screen. - Page 13 Green: Mobile network is detected. Purple: Notification, GPS signal is detected. Press and hold Power key for 11 Power On/Off a few seconds to power on/off your device. Use USB connector to synchronize data with your 12 Mini USB slot desktop PC, transmit data or charge the battery.
-
Page 14: Features
● Microsoft Windows Mobile 6: Windows Live, Windows Live Messenger, Pocket Outlook, Pocket Explorer, and Office tools (Word, Excel, and PowerPoint). Also features Encryption, Internet Sharing, Windows Update, Pictures & Videos, Calculator, Games, ActiveSync, and File Explorer. ●Other programs: GPS Tracking, FM Radio, Zip, Java, Streaming Player, SIM Manager, etc. -
Page 15: Sim
Note: If the device or the SIM card is lost or stolen, you should contact your network operator immediately in order to prevent unauthorized use. 1.5 Battery 4. Insert the battery back to the battery slot. Your MS800 comes with a removable and rechargeable Lithium Polymer battery. -
Page 16: Lock/Unlock
1.6 Lock/Unlock 1. Lock the device: On Today screen, tap Device unlocked to lock the device. The device will not respond to touches on screen nor react to any input on the keypad when it is locked. You may also enable the device lock automatically after the screen backlight is turned off. - Page 17 Sleep Mode 1. Sleep Mode is a power saving mode designed to reserve battery power. After idling for a period of time, the device automatically enters Sleep Mode. You may also manually enter Sleep mode by pressing power On/Off key shortly. The backlight of the screen will turn off and the device will go into Sleep mode.
-
Page 18: Chapter 2 Getting Started
2 Getting Started 3. Today screen 2.1 Display Information On Today screen, this area contains shortcuts to certain programs and important information of today. The main screen displays the following information: To change Today screen settings, tap Start > Settings > Personal tab > Today 4. - Page 19 2 The most recent 5 programs you have used. JAVA, Streaming 3 Tap on Programs to enter the Programs menu. Player 4 Tap on Settings to enter the Settings menu. Calculator, 5 Tap on Help to see detail information about Easy-Touch Menu, different features.
- Page 20 Settings region, number, Regional Program Description currency, time, and date. Settings You may assign programs to hard Remove programs from your Remove Buttons keys. Programs device. You can set your preferred input Screen orientation, screen Input Screen method. alignment, and text size. You may set a personal password for Encrypts data in your micro SD Lock...
-
Page 21: Screen Orientation
Receive broadcast channel Bluetooth is activated. Cell Broadcast information and news from your Setting Wi-Fi is activated; a Wi-Fi service provider. network is in range; Wi-Fi Select Operating Your own operating system set up. network is connected. Band SMS Service Receiving and sending text Strong signal. -
Page 22: Setting Time& Date
programs on your device, while Landscape may be optimal for viewing longer text files. You can also change the default screen display by following the steps below: 1. Tap Start > Settings > System tab > Screen > General tab. 2. -
Page 23: Using The Stylus
identified from your handwriting. 2.4 Using the stylus 3. Do not write letters/numbers continually to prevent recognition error. Use the stylus to touch or write on your screen. 4. Do not write letters outside of the input fields. Using stylus can avoid damaging your screen. There are 2 ways to use your stylus: Keyboard ●... -
Page 24: Drawing On The Screen
can write a sentence or more than one sentence. Pause and let Transcriber change the written characters to typed characters. 1. On your screen keyboard, tap the arrow icon next to keyboard icon for more input methods. On the pop-up list, tap Transcriber. 2. -
Page 25: Editing My Info
include a recording in Notes tab. In Notes, you can either create a standalone recording, or include a recording in a written note. If you want to include the recording in a note, open the note first. In the Messaging program, you can also add a recording to an E-mail message. -
Page 26: Memory Expansion
unused for. The device supports multi-language automatically. If 3. Select an appropriate time. the documents don’t show correctly, tap “Start” > 4. Select a password type in Password type field. Settings > System > Region and select the region 5. Input your password in Password field and and the language you want. -
Page 27: Chapter 3 Phone Functions
3 Phone Functions 3.1 Phone Dialer screen and key Introduction Press Talk/Send key to enter phone functions. Please insert a SIM card before using these functions. Phone Dialer screen From Phone Dialer screen, you can access Contacts, Speed Dial, Call History, and more options under Menu. -
Page 28: Making A Call
4. Press Key to end the call. Speed Dial You can set ten phone numbers in your speed dial list. 1. After entering phone function, press Menu > Speed Dial to enter your Speed Dial List. 2. On your Speed Dial List screen, you can select a contact on your list to see the contact’s detailed information. -
Page 29: Emergency Calls
To make an international call phone. You can only adjust it during a call. 1. Tap and hold 0 key until + sign appear. + replaces 3. When you select Vibrate, icon will change to the international prefix of the country that you are calling from. -
Page 30: Creating A New Contact
3.9 Call history 3.8 Creating a new contact Call History contains all outgoing calls, incoming On Contacts screen, tap New on the bottom left of calls, and missed calls. You may choose to display the screen. A blank record will appear. all or only display highlighted items. -
Page 31: Setting Ringtone And Password
Select Start > Programs > Phone Manager > Block List 1. Check “Block all unknown calls” or tap “Menu” and select “Add Block List” to add a number you would like to block. 2. Select “OK” to save the settings. Alternatively, tap “Contacts”... - Page 32 To make a video call 1. On Phone Dialer Screen, type the required phone number. 2. Tap the Video Call button to make a video call. As the call progresses, the 3G Video Telephony Application automatically proceeds to Dialing screen. Status information appears below the phone number.
- Page 33 : Unblock video data for the remote. Mute Video Tap this button to mute/un-mute local audio data transmit to the others. The button indicates the state: : Mute audio data for the remote. : Un-mute audio data for the remote. Switch cameras Tap this button to switch between the front and rear camera.
- Page 34 Call History The Call History feature of the 3G Video Telephony Application is used to remember previous calls. This feature allows you to easily redial the number of a call you made earlier. In the Call History page, you can distinguish audio calls from video calls by their icons.
-
Page 35: Chapter 4 Settings
4 Settings 4.1 Personal settings Lock You may set a personal password to lock your device. You may set your personalized settings by A strong password must have at least 7 characters preference. that are a combination of uppercase and lower case letters, numerals, and punctuation. - Page 36 1. Tap Start > Settings > Personal tab > Owner sound from Ring tone list. Information. 2. To download ring tones, you can make a 2. On Identification tab, enter your personal connection to the Internet and then download ring information.
-
Page 37: System Settings
on the Today screen. you are on the phone. Voice Mail Set up voice mail and SMS service To change the theme of your Today screen: and Text center. 1. Tap Start > Settings > Personal tab > Today. Messages 2. - Page 38 Backlight Configure the backlight settings and adjusts the It is Customer Experience Improvement Program brightness level to save power. designed by Microsoft®. The purpose is to identifying trends and usage patterns to improve the software. Using the backlight on battery power substantially You can check Send Feedback to participate or Don't reduces battery life.
- Page 39 program by selecting it in the list and then tapping Regional settings Stop, or just tap Stop All to stop all the running Setting for region, number, currency, time, and date programs. format. Power This feature allows you to customize the unit and Battery status and settings.
-
Page 40: Chapter 5 Synchronization
5 Synchronization You may use Microsoft ActiveSync to synchronize 5.1 Install and Use ActiveSync data in this device with personal computer. • You can synchronously update Outlook data in Note: Before installing ActiveSync, do not this device and in your personal computer. connect your device to the computer. -
Page 41: Synchronize Via Bluetooth
5.2 Synchronize Via Bluetooth Instead of using a USB cable, you may also synchronize data via Bluetooth. Select Start > Programs > ActiveSync > Menu, then select “Connect via Bluetooth” and tap ”Synchronize” in this device to process synchronization. For descriptions regarding synchronization through Bluetooth device, please refer to “Synchronizing Your Information >... -
Page 42: Internet Access
6 Getting Connections When using GPRS and Internet connection, you will not be able to answer a call. If you want to make a call, your device will automatically disconnect to the Internet and reconnect to the Internet at the end of conversation. -
Page 43: Gprs Wizard
6.4 GPRS Wizard turn the phone function on. The icon will appear on Today screen when GPRS is activated. When you are connected to GPRS network, you may 1. Tap Start > Internet Explorer. surf on the Internet or send and receive email. GPRS 2. - Page 44 3. If you want this device to be detected by other Bluetooth devices, please check “Make this Bluetooth is a short distance wireless communication device discoverable to other devices”. (Without technology. Before using Bluetooth function, please checking this item, other Bluetooth devices are finish connection setup first.
-
Page 45: Internet Sharing
Registering New Serial Port: 1. Select “New Incoming Port” to enter setup screen. 2. Select a port to be set. 3. Select “Finish”. 6.7 Internet Sharing You can set the device as a wireless modem. Internet Sharing allows your PC/Notebook be connected to a wireless network. -
Page 46: Wi-Fi
Note: Reboot is required when you change the IP address in Start > Settings > Connections tab > Wi-Fi > Network Adaptors tab > Edit > IP Address. 6.9 USB You may use the device as a mass storage device or a Micro SD card reader. -
Page 47: Chapter 7 Messaging
7 Messaging 7.1 Email & Message Before receiving and sending your email or message, please make sure that this device has connected to a network. When you are connected to a network, you may go to “Messaging” to receive and send your email or message. -
Page 48: Directly Connect To Email Server
ActiveSync beforehand. For more information on appointed methods, and send out unsent email in “Inbox” synchronization, please see the online Help Outbox. of ActiveSync in your computer. You may choose to read just the mail within the last Inbox synchronization process rules: few days, mail subjects only, or complete mail. - Page 49 2. See “6.1 Internet Access” to connect this device 1. Tap “Inbox” on the top left corner of the screen for to a network and start receiving and sending a folder name. email and messages. 2. Tap “Date” on the top right corner of the screen for mail arrangement.
-
Page 50: How To Use Push Email
When reading mail, you can: 1. Tap on a contact in “To, CC, BCC” fields to save this contact as a new contact. 2. Tap “Reply” to compose a reply email. 3. Select the icon on the bottom center of the screen to activate or disable screen keypad. -
Page 51: Messenger
2. Input the IP address of your server in “Server Address”. 3. Input your network login name, password, and domain name, and then tap “NEXT”. 4. In ActiveSync on your device, select Menu > Schedule 5. Set the Peak times to “As items arrive” and the Off-peak times sync time to “As items arrive”. - Page 52 Windows Live Messenger: 1. Select Start > Programs > Messenger 2. Tap on the arrows to choose your sign in status and then tap “Sign in”. 3. Enter your MSN or Hotmail email address and password. 4. Select “Sign In”. Compose Hotmail: 1.
-
Page 53: Chapter 8 Multimedia
8 Multimedia 8.1 Camera You may use camera function in this device to capture important moments. 1. Select Start > Programs > Multimedia > Camera or press and hold Camera Key to launch camera. 2. Focus on the object you want to shoot and press halfway and hold Camera Key to execute auto focus and then press deeply to take a picture. -
Page 54: Video Mode
18. Time Stamp: Shows photo taking time on a camera mode. photo. Pictures & Videos: view your video here. 19. Confirm Frame: You can choose to continue shooting, send MMS, not to save it, or go to Video Settings: to open the menu for video Pictures &... -
Page 55: Taking A Geotagged Photo
8 .3 Taking A GeoTagged Photo ou can take GeoTagged photos (photos that carry the coordinates of where you were when you took them) and easily share them with friends through online albums like flickr. 1. After turning on the ca mera, tap the GPS button on the bottom left of the preview screen to enable/disable the GPS coordinates photograph... -
Page 56: Pictures & Videos
Note: If there is incoming call during recording, 8.6 JAVA answering the call will automatically terminate recording. If you want to continue recording This device supports JAVA, providing you the after ending a call, you need to reactivate freedom of using JAVA applications and games. recording function. - Page 57 MS800...
-
Page 58: Chapter 9 Applications
9 Applications 9.1 Calendar If you select Remind me in “Reminder” field, then the device will remind you by an alert sound according to Appointments and Meetings: the settings in Start > Settings > Personal Tab > You may use “Calendar” to arrange appointments, Sound and Notifications. -
Page 59: Tasks
addresses, home addresses, and any other display contacts, by which your contacts list will information that relates to a contact, such as a only display contacts in this category. birthday or an anniversary date. You can also add a ․If you want to view the contacts by companies, picture or assign a ring tone to a contact. -
Page 60: Notes
3. Select “Starts” and “Due” field to set first and last day of task. Add Notes: 4. You may select “Occurs” to select whether this 1. Tap Start > Programs > Notes. In the note list, task has periodicity. select “New”. 5. -
Page 61: Excel Mobile
desired file names to open pop-up menu. The saved Excel Mobile file in this device could be opened by selecting from “Excel After opening a Word Mobile file, you may tap “View” Mobile” list screen. To delete, copy or send a file, tap to set Toolbar, Wrap to Window, and Zoom. -
Page 62: Windows Media Player
9.8 Windows Media Player Your Windows Media Player allows you to play sound and video files in this device, select Start > Windows Media to activate Windows Media Player. 1. Tap the icon to view in full screen. 2. Display website, from which find the music and image you want to play. -
Page 63: Calculator
or WI-FI. Enlarge the font and start reading text on your device 2. Select Start > Internet Explorer with ease. Magnifier enlarges the display font like a 3. Input website address in the blank text field. magnifying glass. ․Select the icon next to the blank field to go to 1. -
Page 64: Zip
format, such as Google Earth, to display the routes. 9.13 ZIP 1. Tap Start > Programs > GPS Application > GPS Tracking. After entering GPS Tracking, the device will activate GPS and search for the You can save storage space and increase efficiency coordinates. -
Page 65: Sim Manager
9.16 SIM Manager To change contact information on your SIM card, tap Start > Programs > Phone Manager > SIM Manager, then tap a SIM contact and edit it. To copy SIM contacts to your device: 1. Tap Start > Programs > Phone Manager > SIM Manager. -
Page 66: Chapter 10 Managing Your Mobile
10 Managing Your Mobile 10.1 Memory Management Select Start > Messaging > Menu > Tools > Options > Storage tab. If you have inserted a memory card, Select Start > Settings > System Tab > Memory check “Save Attachment to Memory Card” and E-mail attachments will automatically be saved to Main Tab: memory card. - Page 67 Adding programs to “Start” menu: ․If this file contains installation program, the Select Start > Settings > Personal Tab > Menus. installation wizard will automatically activate. 1. Check the programs to be displayed on “Start” Please follow the instructions on screen. Once the menu.
-
Page 68: Chapter 11 Specifications
11 Specifications Item Specification System Information Operating System Windows Mobile 6 Professional Processor Marvell PXA 270 520 MHz Memory 256 MB ROM, 64MB RAM Size Dimensions (mm) 116*59*14.95 mm Weight (in grams) 130 g (Including Battery) Battery Battery Capacity Li-Ion 1300 mAh Standby time Up to 150 hours Talk time... - Page 69 Connectivity Bluetooth Bluetooth 2.0 Modulation: GFSK WLAN WLAN 802.11b/g Wireless Technology: OFDM and DSSS GPRS GPRS Class 12 WAP 2.0 Modem dial-up Mini USB 1.1 Image Format JPEG, GIF, PNG, BNP, WBMP Max Size (per) Depends on available RAM Audio Format WMA, MP3, MID, AMR, WAV,AAC Max Size...
-
Page 70: Digital Camera
Ringtone Type MP3, WMA, AMR Polyphone 192 polyphonic mid file Digital Camera Type JPEG Pixels 2.0 mega pixels Front Camera 0.3 mega pixels VGA Resolution QVGA, QQCGA Auto Focus Macro Mode Video Recording Message Windows Live Messenger E-Mail External Memory Type Micro SD Card Max Size... -
Page 71: Operating Temperature
Operating Temperature -10℃~45℃ Temperature Note: Specifications may vary in some regions. 11-4 MS800... -
Page 72: Chapter 12 Faq
12 FAQ Why can’t I turn on the device? the device to adjust volume. Please make sure that the device has sufficient power, and that the battery is secured in the device. Why would the screen darken automatically? Plug the device to an outlet using the travel charger. This is a power saving mechanism. - Page 73 My device can’t form a successful connection PC or with Exchange Server at one time. with ActiveSync. Please make sure you have installed ActiveSync 4.5 or later version on your computer. You can find ActiveSync in the installation CD, or you can download the latest version from Microsoft’s website.
Need help?
Do you have a question about the GSmart MS800 and is the answer not in the manual?
Questions and answers