Singer Intelligent Pro ESP36T1 Instruction Manual
- Instruction manual (97 pages)
Advertisement
- 1 Product Information
- 2 Using the Intelligent Pro Steam Press
- 3 Troubleshooting & Warranty
- 4 IMPORTANT SAFETY INSTRUCTIONS
- 5 Documents / Resources
Please read all instructions before use.
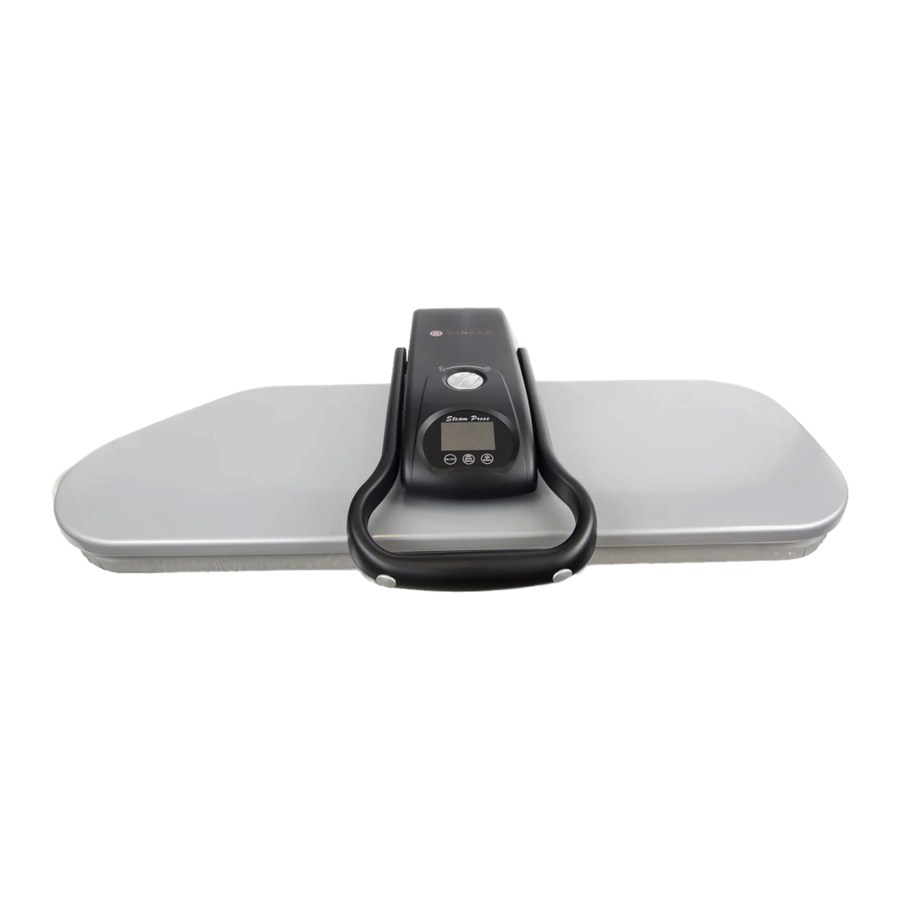
Product Information
The following features and accessories are included with your steam press. Carefully inspect packaging material as some parts are shipped inside Styrofoam packaging. To obtain possible missing parts, refer to Consumer Support section of this manual.

FEATURES AND ACCESSORIES
- Handle
- Locking Knob
- Pressing Plate
- Ironing Board
- Water Tank
- Steam Burst Buttons
- On/Off Button
- Temperature Control Button
- Steam Selector Button
- Power Indicator Light
- Steam Ready Indicator Light
- Pressing Indicator Light
- Temperature Digits
- Power Cord Indicator Light
- Storage Compartment
- Spray Bottle
- Pressing Cushion
- Measuring Cup
FEATURES & ACCESSORIES DESCRIPTIONS
- Handle – raises and lowers the Pressing Plate. Also used to carry the unit.
- Locking Knob – locks the Pressing Plate and Ironing Board together.
- Pressing Plate – large temperature-controlled surface that heats and presses fabric.
- Ironing Board – padded surface onto which fabric is placed for pressing.
- Water Tank – holds the water needed to produce steam.
- Steam Burst Buttons – located on either side of the Handle and produces a burst of steam when pressed.
- On/Off Button – activates and deactivates the unit.
- Temperature Control – used to select a desired temperature by cycling through the list of choices above the buttons. Adjust the Temperature Control until the Indicator Light beneath your preferred material becomes illuminated.
- Steam Selector Button – selects Auto Steam "
![]() " or Man Steam "
" or Man Steam "![]() ".
". - Power Indicator Light – illuminates when On/Off Switch is in "On" (|) position.
- Steam Ready Indicator Light – illuminates when unit is ready to produce steam for use.
- Pressing Indicator Light – illuminates while unit is heating to selected temperature. When light goes off, Steam Press is ready for use.
- Temperature Digits – indicates Pressing Plate surface temperature.
- Power Cord Indicator Light – illuminates when power is "On".
- Storage Compartment – provides a convenient place to store needlecraft items such as needles, thread and scissors.
- Spray Bottle – used to moisten fabric before pressing stubborn wrinkles and heavier fabrics.
- Pressing Cushion – fabric covered pad used for pressing gathered or contoured areas such as sleeves, darts, collars or yokes.
- Measuring Cup – used to assist in easily filling the Water Tank (best with distilled water).
 " or Man Steam "
 ".
".Using the Intelligent Pro Steam Press
ABOUT AUTO SHUT-OFF
The Auto Shut-Off feature includes both an Auto Shut-Off and an Auto Wake-Up. These multifunction safety features deactivate electrical power to the heater when Pressing Plate has been left closed on the Ironing Board for more than 10 seconds. Heater deactivation is signaled by a beeping sound. Heater Functionality is restored when Pressing Plate is raised back up. Power to heater will also be cut if the Pressing Plate is in raised position without use for approximately 15 minutes (once again signaled by a beeping sound) Heating ability of the unit can only be restored in this situation by pressing the ON/OFF Switch.

Auto Shut-Off does not mean power to the unit is totally cut off. Power is always on, and the Power Indicator Light will remain illuminated until On/Off Switch is set to "Off" (O) position. Unplug power cord.
FEATURES OF INTELLIGENT PRO STEAM PRESS
Your Steam Press provides clean, professional results every time!
- Pressing surface is twenty-four (24) times larger than most hand-held irons
- Can reduce ironing time up to 50%
- Multiple dry and steam settings, burst setting to remove stubborn wrinkles
- Variable temperature control
- Automatic Shut Off safety feature while open or closed with audible alert
- Power Indicator Light
- Protects delicate fabrics like silk
DO NOT PLUG IN UNIT UNTIL YOU HAVE FILLED THE WATER TANK. DO NOT ATTEMPT TO PULL WATER TANK OUT COMPLETELY. FOR HOUSEHOLD USE ONLY.
FILLING WATER TANK
- Place Intelligent Pro Steam Press on a flat, level surface.
- Turn Locking Knob to "Unlock" position to unlock Pressing Plate.
- Lift up Pressing Plate using Handle. It will automatically stay in lifted position.
- Pull Water Tank out. Note that Water Tank cannot be completely removed from unit; do not attempt to force it free.
- Remove Water Tank Cap to expose Water Tank refill hole.
- Using Measuring Cup (included), fill Water Tank up to the MAX (300ml - 10.144 oz) line with distilled water.
![]()
- Replace Water Tank Cap and push Water Tank back in main unit.

OPERATION
- With Pressing Plate raised, plug power cord into electrical outlet, and touch On/Off Button to "On" (|) position.
- Identify type of fabric to be pressed, then press Temperature Control Button until you reach the setting that matches that fabric. It is best to start with the most delicate fabric first. Higher heat will damage Nylon and Silks.

- Lay fabric flat on Ironing Board.
![]()
- Intelligent Pro Steam Press is ready when Pressing Indicator Light illuminates. If pressing wool, cotton or linen you may choose to spray with a burst of steam using Steam Burst Buttons. This function is available once Steam Burst Ready Indicator Light illuminates. See "Steam" section before applying steam.
- To press, lower Pressing Plate gently onto fabric and Ironing Board. Hold there for 8-10 seconds, then lift Pressing Plate. Repeat until you have achieved desired crease and smoothness.
![]()


 NOTE: The unit will automatically turn off the Pressing Plate after 10 seconds in the closed position. A beep will emit until the unit is opened. Once the unit is opened, it will return to normal operation.
- Once pressing tasks are complete, immediately turn On/Off Switch to "Off" (O) position and unplug power cord from electrical outlet.
STEAM OPTIONS
MANUAL (MAN) STEAM
Do not activate Steam Burst Buttons with unit completely closed, as this may damage unit. Best results are obtained if Pressing Plate is held open approximately 3 in. (75 mm.) above Ironing Board before pressing Steam Burst Buttons. For safety reasons, do not hold Pressing Plate open more than 3 in. (75 mm.) when using Steam Burst Buttons. Only use burst of steam for 1 second for best results. If Pressing Plate is left on fabric for more than 10 seconds, it could damage fabric.
- Hold Pressing Plate approximately 3 in. (.75 mm.) above Ironing Board.
![]()
- Press Steam Burst Buttons to release a burst of steam onto fabric for 1 second.
- Lower Pressing Plate onto fabric for 8-10 seconds, then raise once again.

NOTE: If Pressing Plate is left on fabric for more than 10 seconds, it could damage fabric.
- Repeat steps 1-3 above until fabric is smooth and wrinkle-free.
AUTO STEAM
- Hold Pressing Plate approximately 3" above Ironing Board.
- Press Steam Selector Button until Auto Steam "
![]() " illuminates. This activates Auto Steam and automatically releases a burst of steam to fabric.
" illuminates. This activates Auto Steam and automatically releases a burst of steam to fabric.
![]()
- Lower Pressing Plate onto fabric, then raise once again.
- Repeat steps 1-3 until fabric is smooth and wrinkle-free.

PRESSING AND STEAMING TIPS
PRESSING PANTS
- Place Pressing Cushion under waistband and press. Continue repositioning waistband until completely pressed.
![]()
- To press inseam, place Pressing Cushion under area to be pressed.
![]()
- Place pleated area on Ironing Board. Carefully fold pleats and press.
![]()


PRESSING SHIRTS AND BLOUSES
- Place shoulder yoke on Ironing Board first and press.
- Place sleeves on Ironing Board with the fold parallel to long seam, and press.
![]()
- Place cuffs on end of Ironing Board, and press.
![]()
- Place bottom of shirt behind Ironing Board by pressing the side with pocket. Pull shirt towards you as you press each section.
![]()
![information]() NOTE: Embroidery should be placed face down on Ironing Board to reduce wear and prevent damage to delicate areas.
NOTE: Embroidery should be placed face down on Ironing Board to reduce wear and prevent damage to delicate areas. - Finish by pressing collar of shirt.
![]()


OTHER TECHNIQUES
- Placing Pressing Cushion between fabric and Pressing Plate may help with delicate fabrics.
- If you have older types of buttons or zippers, you may need to take special care to avoid melting. In order to do so, place garment face-down and cover with Pressing Cushion before pressing.
- Spray Bottle may be used to spray fabric lightly. This will help to remove stubborn wrinkles.
- Place damp cloth over fabric before pressing. This will help with stubborn wrinkles or heavy gauge fabrics.
- To press large pieces of fabric, place entire piece behind Ironing Board. Pull fabric toward you over Ironing Board and lower Pressing Plate. Press fabric in sections until completed.
- Place embroidery face down on Ironing Board to reduce wear and prevent damage to delicate areas.
USING PRESSING CUSHION
- For garments constructed with details such as darts, curved seams, and shoulder pads, a Pressing Cushion may be used.
- Use Pressing Cushion in areas where no creases are desired or to shape a tailored garment.
- Place area to be pressed on the Ironing Board.
![]()
- Place Pressing Cushion under dart, seam, etc.
- Making sure the area to be pressed is raised, lower Pressing Plate until it meets the raised area.
- Do not force Pressing Plate to its lowest position. This may cause damage to the unit.

CLEANING STEAM PRESS
- Fill Water Tank with distilled or demineralized water.
- Place Pressing Cushion in the middle of Ironing Board.
![]()
- Place a clean towel over Pressing Cushion and Ironing Board.
- Set Temperature Control to the highest setting (LINEN).
- When Steam Ready Indicator Light illuminates, lower Pressing Plate onto Pressing Cushion.
- Press Steam Burst Button six times.
- Allow Pressing Plate to cool.
- Clean Pressing Plate with damp cloth. Do not use abrasive materials, as this may damage Pressing Plate.
- Ironing Board Cover is removable for cleaning. Hand wash only with mild detergent.

STORAGE
- Once pressing is complete, immediately turn On/Off Button "Off" and unplug power cord from electrical outlet.
- Allow unit to cool completely (at least 30 minutes).
- Lower Pressing Plate down and turn Locking Knob to "Lock" position.
- Wrap up power cord.
- Store all accessories safely away, preferably near Intelligent Pro Steam Press.
- Store Intelligent Pro Steam Press in a cool, dry place.
- For long term storage, empty water from Water Tank.
Troubleshooting & Warranty
| PROBLEM | POSSIBLE CAUSE | SOLUTION |
| Unit fails to heat up and steam. Power Indicator Light does not illuminate. | Unit is not plugged in. | Plug into electrical outlet. |
| Household Circuit Breaker/Ground Fault Interrupter has tripped or blown a fuse. | Reset Circuit Breaker/Ground Fault Interrupter, or replace fuse. If you need assistance, contact a licensed electrician. | |
| Unit fails to heat up and steam. Power Indicator Light does illuminate. | Auto Shut-Off has engaged. | Refer to Auto Shut-Off section of this manual for proper procedure. |
| Water Tank is empty. | Refill Water Tank using procedures found in this manual. | |
| Unit is damaged or malfunctioning. | Immediately cease usage and contact our Consumer Support Department. | |
| Steam Burst output is weak or intermittent. | Pressing Plate needs to be cleaned. | Refer to Cleaning section of this manual for proper procedure. |
LIMITED WARRANTY
SAVE THIS DOCUMENT AND KEEP IT IN A SAFE PLACE!
The Intelligent Pro Steam Press is warranted to be free from defects in material and workmanship.
The warranty for the Intelligent Pro Steam Press's wiring and electronic parts is for a period of one (1) year from the date of purchase.
The warranty for all other parts of the Intelligent Pro Steam Press is for a period of ninety (90) days from the date of purchase.
Service under the Warranty may be obtained by returning the Intelligent Pro Steam Press with:
- This original warranty document; and
- Proof of purchase (such as the purchase receipt) to:
SVP Sewing Brands LLC
ATTN: Service Department
1714 Heil Quaker Boulevard LaVergne, TN 37068
If you have any questions regarding these warranties, please contact:
SVP Sewing Brands LLC
1-800-4-SINGER (1-800-474-6437)
E-mail: talktoUS@singer.com
ATTN: Consumer Affairs
1714 Heil Quaker Boulevard LaVergne, TN 37068
Or, visit the Consumer Support Area of our website at: www.Singer.com
Technical Specifications*
Adapter Input: 120V~,60Hz / 220-240V~, 50-60Hz
Power: 1800 watts / 2200-2618 watts
*Please refer to product for actual rating, depending on region.
IMPORTANT SAFETY INSTRUCTIONS
PLEASE READ THIS MANUAL CAREFULLY BEFORE USING AND KEEP IT FOR FUTURE REFERENCE.
When using electrical appliances, especially when children are present, basic safety precautions should always be taken, including the following: READ ALL INSTRUCTIONS BEFORE USING - KEEP AWAY FROM WATER

Any appliance is electrically live even when the switch is off.
To reduce the risk of death by electric shock:
- Always unplug Steam Press immediately after using.
- Do not place or store appliance where it can fall or be pulled into a tub or sink.
- Do not place or drop in water or other liquid.
- If appliance falls in water, unplug it immediately. Do not reach into water.

To reduce the risk of burns, electrocution, fire, or injury to persons:
- This appliance should never be left unattended when plugged in.
- Close supervision is necessary when this appliance is used by or near children or the physically challenged. Unsupervised use could result in fire or personal injury.
- Use this appliance only for its intended use as described in this manual. Do not use attachments not recommended by the manufacturer.
- This appliance can be used by children aged from 8 years and above and persons with reduced physical, sensory or mental capabilities or lack of experience and knowledge if they have been given supervision or instruction concerning use of the appliance in a safe way and understand the hazards involved. Children shall not play with the appliance. Cleaning and user maintenance shall not be made by children without supervision.
- If the supply cord is damaged, it must be replaced by the manufacturer, its service agent or a similarly qualified person in order to avoid a hazard.
- Never operate this appliance if it has a damaged cord or plug, if it is not working properly, if it has been dropped or damaged, or it has been dropped in water. Do not attempt to repair the appliance. Incorrect reassembly or repair could cause a risk of fire, electric shock, or injury to persons when the appliance is used. Return appliance to an authorized service center for examination.
- Keep cord away from heated surfaces. Do not allow cord to contact heated surfaces. Do not pull or twist cord. Let appliance cool completely before putting away.
- This appliance has a polarized plug (one blade is wider than the other). As a safety feature, this plug will fit in a polarized outlet only one way. If the plug does not fit fully in the outlet, reverse the plug. If it still does not fit, contact a qualified electrician. Do not attempt to defeat this safety feature.
- Never drop or insert any object into any opening.
- Do not use outdoors or operate where aerosol(spray)products are being used or where oxygen is being administered.
- Do not use an extension cord to operate appliance.
- Surfaces of this appliance may be hot when in use. Do not let eyes or bare skin touch heated surfaces.
- Always turn the On/Off Switch to "Off" before plugging in or unplugging unit.
- Always let appliance cool for at least thirty minutes before storing.
- Do not move appliance without unplugging it.
- Unplug this appliance before filling with water. Do not overfill.
- While emitting steam, this appliance may cause burns if held too close to the skin, scalp or eyes, or if it is used incorrectly. To reduce risk of contact with hot water as it escapes through steam vents, test appliance before each use by holding and testing it away from body.
- Do not operate steamer without properly filling the Water Tank.
- Never yank cord to disconnect from outlet. Instead, grasp plug and pull to disconnect.
- USE CAUTION - burns could occur from touching hot metal parts, or proximity to hot water or steam. Do not turn unit upside down - there may be hot water in Tank.
- To reduce likelihood of circuit overload, do not operate another high wattage appliance on the same circuit.
- Use distilled or demineralized water in Steam Press.
- Do not let cord hang over the edge of counter.
- Always put appliance on a secure, level surface, such as a table or counter, when using.
- This Steam Press is for household use only.
- Do not allow cord to touch hot surfaces. Let appliance cool completely before putting away. Loop cord loosely around appliance when storing.
- This appliance must be grounded. Do not alter the plug or attempt to defeat this feature.
- Before plugging in Steam Press, be sure electrical information on the label agrees with your power supply.
- Disconnect Steam Press when not in use and when the Ironing Board Cover is being replaced.
SAVE THESE INSTRUCTIONS!
FOR HOUSEHOLD USE ONLY
Documents / Resources
References
Download manual
Here you can download full pdf version of manual, it may contain additional safety instructions, warranty information, FCC rules, etc.
Advertisement


Need help?
Do you have a question about the Intelligent Pro ESP36T1 and is the answer not in the manual?
Questions and answers