Table of Contents
Advertisement
Quick Links
Advertisement
Table of Contents

Related Manuals for HIKVISION DS-K2621 Series


Summary of Contents for HIKVISION DS-K2621 Series
- Page 1 DS-K262X Series Access Controller User Manual...
-
Page 2: Regulatory Information
DS-K262X Series Access Controller User Manual Regulatory Information FCC Information Please take attention that changes or modification not expressly approved by the party responsible for compliance could void the user’s authority to operate the equipment. FCC compliance: This equipment has been tested and found to comply with the limits for a Class B digital device, pursuant to part 15 of the FCC Rules. - Page 3 DS-K262X Series Access Controller User Manual under the EMC Directive 2014/30/EU, RE Directive 2014/53/EU,the RoHS Directive 2011/65/EU 2012/19/EU (WEEE directive): Products marked with this symbol cannot be disposed of as unsorted municipal waste in the European Union. For proper recycling, return this product to your local supplier upon the purchase of equivalent new equipment, or dispose of it at designated collection points.
- Page 4 DS-K262X Series Access Controller User Manual Cet équipement doit être installé et utilisé à une distance minimale de 20 cm entre le radiateur et votre corps.
-
Page 5: Safety Instruction
DS-K262X Series Access Controller User Manual Safety Instruction These instructions are intended to ensure that user can use the product correctly to avoid danger or property loss. The precaution measure is divided into Dangers and Cautions: Dangers: Neglecting any of the warnings may cause serious injury or death. Cautions: Neglecting any of the cautions may cause injury or equipment damage. -
Page 6: Available Model
DS-K262X Series Access Controller User Manual Available Model Product Name Model Access Controller DS-K2621 Series Access Controller DS-K2622 Series Access Controller DS-K2624 Series Access Controller... -
Page 7: Table Of Contents
DS-K262X Series Access Controller User Manual Contents Chapter 1 Appearance ........................ 1 1.1 Device Appearance and Interface ..................1 1.2 Indicator Description ......................1 Chapter 2 Terminal Wiring ......................3 2.1 4-Door Controller Wiring Description ..................3 2.2 Wiegand Card Reader Wiring ....................4 2.3 RS-485 Card Reader Wiring .................... - Page 8 DS-K262X Series Access Controller User Manual 7.6 Quick Operation via Web Browser ..................20 7.6.1 Set Security Question ....................20 7.6.2 Select Language ......................21 7.6.3 Time Settings ....................... 21 7.7 Operation Process ........................ 21 7.8 Add Person ........................... 22 7.9 Device Management ......................
- Page 9 DS-K262X Series Access Controller User Manual 7.11.8 Alarm Input Settings ....................57 7.11.9 Access Configuration ....................57 7.12 Maintenance and Security ....................59 7.12.1 Upgrade and Maintenance ..................59 7.12.2 View Exception Diagnosis ..................61 7.12.3 Device Debugging ..................... 61 7.12.4 Log Query ........................
-
Page 10: Chapter 1 Appearance
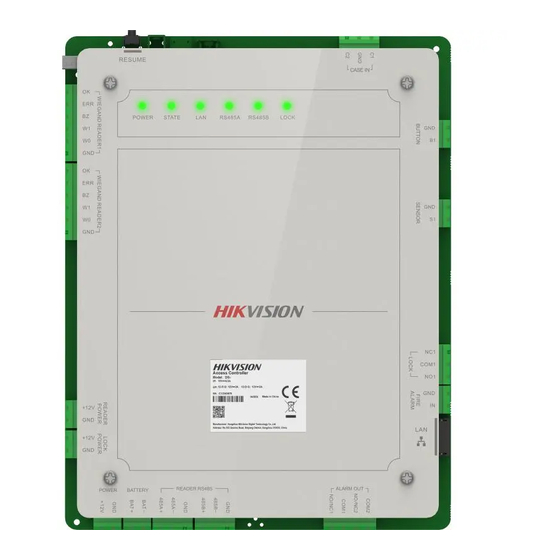
DS-K262X Series Access Controller User Manual Chapter 1 Appearance 1.1 Device Appearance and Interface Open the case by the key. Figure 1-1 Device Component and Interface 1.2 Indicator Description Introduction of the indicator of 1-Door, 2-Door, and 4-Door controller. - Page 11 DS-K262X Series Access Controller User Manual Device Name Indicator Details 1-Door controller 6 indicators: 1 Power indicator, 1 Operating Status indicator, 1 Network indicator, 2 RS-485 indicators, 1 Door Contact indicator 2-Door controller 7 indicators: 1 Power indicator, 1 Operating Status indicator, 1 Network indicator, 2 RS-485 indicators, 2 Door Contact indicators 4-Door controller...
-
Page 12: Chapter 2 Terminal Wiring
DS-K262X Series Access Controller User Manual Chapter 2 Terminal Wiring Terminal Wiring Description of the Access Controller. 2.1 4-Door Controller Wiring Description Remove the 4 screws on the controller and remove the decoration sheet. Here taking 4-door controller as an example. Figure 2-1 Unscrew the Control Box... -
Page 13: Wiegand Card Reader Wiring
DS-K262X Series Access Controller User Manual Figure 2-2 Wiring Diagram of the Access Controller Note The recommended specification for the accumulator (optional) is 12 V, 7 Ah. ● The working temperature of the accumulator is 0 °C to 40 °C. ●... -
Page 14: Rs-485 Card Reader Wiring
DS-K262X Series Access Controller User Manual Figure 2-3 Wiegand Card Reader Wiring Diagram Note You must connect the OK/ERR/BZ, if using access controller to control the LED and buzzer of the Wiegand card reader. 2.3 RS-485 Card Reader Wiring You can view the RS-485 card reader wiring diagram. Figure 2-4 RS-485 Card Reader Wiring Diagram Note If the card reader is installed too far away from the access controller, you can use an external... -
Page 15: Door Lock Wiring
DS-K262X Series Access Controller User Manual 2.4 Door Lock Wiring You can view the door lock wiring diagram. Figure 2-5 Wiring Diagram of Door Lock 2.5 Alarm Wiring You can view the alarm wiring diagram. Figure 2-6 Alarm Wiring 2.6 Exit Button Wiring You can view the exit button wiring diagram... -
Page 16: Door Contact Wiring
DS-K262X Series Access Controller User Manual Figure 2-7 Exit Button Wiring 2.7 Door Contact Wiring You can view the door contact wiring diagram. Figure 2-8 Door Contact Wiring... -
Page 17: 1-Door/ 2-Door Board
DS-K262X Series Access Controller User Manual 2.8 1-Door/ 2-Door Board Figure 2-9 1-Door Board... - Page 18 DS-K262X Series Access Controller User Manual Figure 2-10 2-Door Board...
-
Page 19: Chapter 3 Installation
DS-K262X Series Access Controller User Manual Chapter 3 Installation The case of the access controller can be screwed to the wall。 Steps Note The device can be installed indoors. ● The wall holding the case should be able to support wight three times of the device steadily with ●... - Page 20 DS-K262X Series Access Controller User Manual Figure 3-2 Hang Access Controller 3. Close the case door and complete the installation.
- Page 21 DS-K262X Series Access Controller User Manual Figure 3-3 Installation completed...
-
Page 22: Chapter 4 Device Debugging
DS-K262X Series Access Controller User Manual Chapter 4 Device Debugging Device Initialization Hold the initialization button for 5 s to initialize. Figure 4-1 Device Initialization Fire Relay Remain Open/Close Selection Note This operation requires disassembling the upper shell of the device, which is recommended to set by a professional. - Page 23 DS-K262X Series Access Controller User Manual Figure 4-2 Fire Relay Remain Open/Close Selection Alarm Output Jump Cap Selection (Taking 4-Door as an Example) This operation requires disassembling the upper shell of the device, which is recommended to set by a professional. Figure 4-3 Alarm Output Jump Cap Selection (Taking 4-Door as an Example)
-
Page 24: Chapter 5 Typical Application
DS-K262X Series Access Controller User Manual Chapter 5 Typical Application Typical application of access controller, door lock and platform. Figure 5-1 Typical Application Example... -
Page 25: Chapter 6 Activation
● insensitive), 4 or more continuously increasing or decreasing digits, or 4 or more consecutively repeated characters. Password cannot contain words such as hik, hkws, and hikvision (case insensitive). ● 3. Click Activate. 4. Edit the device IP address. You can edit the IP address via the SADP tool, the device, and the... -
Page 26: Activate Via Sadp
Get the SADP software from the supplied disk or the official website http:// ● www.hikvision.com/en/ , and install the SADP according to the prompts. The device and the PC that runs the SADP tool should be within the same subnet. - Page 27 DS-K262X Series Access Controller User Manual Status of the device becomes Active after successful activation. 5. Modify IP address of the device. 1) Select the device. 2) Change the device IP address to the same subnet as your computer by either modifying the IP address manually or checking Enable DHCP.
-
Page 28: Chapter 7 Operation Via Web Browser
Answer the security questions. E-mail Verification 1. Export the QR code and send it to pw_recovery@hikvision.com as attachment. 2. You will receive a verification code within 5 minutes in your reserved email. 3. Enter the verification code into the verification code field to verify your identification. -
Page 29: Help
Answer the security questions. E-mail Verification 1. Export the QR code and send it to pw_recovery@hikvision.com as attachment. 2. You will receive a verification code within 5 minutes in your reserved email. 3. Enter the verification code into the verification code field to verify your identification. -
Page 30: Select Language
DS-K262X Series Access Controller User Manual 7.6.2 Select Language You can select a language for the device system. Click in the top right of the web page to enter the wizard page. Click Next on the change password page. You can select a language for the device system from the drop-down list. -
Page 31: Add Person
DS-K262X Series Access Controller User Manual Figure 7-1 Configuration Process 7.8 Add Person Add the person's information, including the basic information, certificate, authentication and settings. Add Basic Information Click Person Management → Add to enter the Add Person page. Add the person's basic information, including the employee ID, the person's name, organization, gender, and person type. -
Page 32: Add Fingerprint
DS-K262X Series Access Controller User Manual Click Add Card, enter the Card No. and select the Property, and click OK to add the card. Click Add to save the settings. Click Save and Continue to save the settings and continue to add next person. Add Fingerprint Note Only devices supporting the fingerprint function can add the fingerprint. -
Page 33: Permission Management
DS-K262X Series Access Controller User Manual Permission Management Before you start: You have already add the device. For details, see Device Management . ● You have already complete access point management. For details, see . ● You have already complete the access permission management. For details, see Permission ●... -
Page 34: Device Management
DS-K262X Series Access Controller User Manual 7.9 Device Management 7.9.1 Search Not Added Device The system can automatically search for not added modules that have been connected to the access controller. Click Device Management → Search Not Added Device . The searched not added modules will be displayed in the list of the page. -
Page 35: Access Control Management
DS-K262X Series Access Controller User Manual 5. Click OK. 6. Optional: Other Operations Icon Description You can edit the IO module. You can delete the IO module. You can restart the IO module. You can restore the IO module to the factory settings. You can upgrade the IO module. -
Page 36: Search Event
DS-K262X Series Access Controller User Manual Basic Information You can view the model, serial No. and firmware version. Device Capacity You can view the person, card, fingerprint, and event capacity. 7.10.2 Search Event Click Access Control → Event Search to enter the Search page. Enter the search conditions, including the event type, the employee ID, the name, the card No., the start time, and the end time, and click Search. - Page 37 DS-K262X Series Access Controller User Manual Figure 7-2 Add Access Schedule Template 2. Set basic information. Name Set basic information. Copy from The user can select an existing template. After selected, the chosen one will be duplicate to your current template. The user can make adjustments based on this template. 3.
- Page 38 DS-K262X Series Access Controller User Manual 1) Click Select Holiday. 2) Select existing holiday schedule or click Add. Enter Holiday Name, Date and Access Time Period. Note A maximum of 8 period is allowed per day. 3) Click OK. 4) The user can then check the allowed access time period during the holiday. 6.
-
Page 39: Access Control Application
DS-K262X Series Access Controller User Manual Figure 7-3 Access Control Management 2. Enter Access Permission Name. 3. Select Access Schedule Template. Click View Licenses on the right side to check the access time period of different templates. 4. Click +Add. Select access point. Click Save. 5. - Page 40 DS-K262X Series Access Controller User Manual Figure 7-4 Open Door with First Person 2. Click +Add.Select access point. 3. Set parameters for Open Door with First Person. Rule of Opening Door Free Access After First Person The mode is applicable for the passing of groups of persons, such as visitors entering the scenic spots.
- Page 41 DS-K262X Series Access Controller User Manual Interval of Consecutive Authentication The permitted length of interval of consecutive authentication for a same person. Repeated authentication for the same person during the interval is not valid. First Person Authentication Time Set Rules Takes Effect at and Authentication Period. 4.
- Page 42 DS-K262X Series Access Controller User Manual Figure 7-5 Multi-Factor Authentication Settings 2. Click Group Management to configure group. 1) Click + on the left, then enter group name. 2) Click +Add and select persons you want to add to this group. Click OK. 3) Click OK.
- Page 43 DS-K262X Series Access Controller User Manual Persons can open the door only after they complete authentications following rules on the card reader. Local Authentication + Remotely Opening Door Persons should authenticate on the device first and the authentication will be confirmed remotely on client.
- Page 44 DS-K262X Series Access Controller User Manual Figure 7-6 Multi-Door Interlocking Settings 2. Enter Name. 3. Click +Add, select access point to form a multi-door interlocking group. 4. It is recommended to delete unnecessary access point in the area. - Select access points not needed. Click Delete to delete in batches. - Click to delete single access point.
- Page 45 DS-K262X Series Access Controller User Manual Figure 7-7 Anti-Passback Settings 2. Add Anti-Passback Route. 1) Enter name of Anti-Passback Parameter. Click Next. 2) Card reader Order. Click Add. Select a card reader needed. 3) Click to add the next card reader. 4) Repeat sub step 3 to add more card readers.
- Page 46 DS-K262X Series Access Controller User Manual Set time of Forgive Anti-Passback Regularly. The system will forgive anti-passback. Then person need to follow the anti-passback route to start from the the First Card Reader. Delay Forgiving Anti-Passback Set time of Delay Forgive Anti-Passback. The system will start timing and forgive anti- passback once reach the set delayed time.
- Page 47 DS-K262X Series Access Controller User Manual Figure 7-8 Remain Open or Closed 2. Click +Add. 3. Add Access Point. 1) Click +Add. 2) Select access point in the pop-up on the right. Click OK. 3) Click to delete single access point or select multiple access points and then click Delete to delete in batches.
-
Page 48: Door Parameter Configuration
DS-K262X Series Access Controller User Manual 5. Click Save. 7.10.5 Door Parameter Configuration Configure parameters for unlocking doors. Select Door No. Select a door to configure relative parameters. Click Access Control → Parameter Settings → Door Parameters to enter the settings page. Select Door No.. - Page 49 DS-K262X Series Access Controller User Manual Set Door Open Timeout Alarm via PC Web If the door is not closed after reaching the lock action time, the access control point will sound an alarm. Click Access Control → Parameter Settings → Door Parameters to enter the settings page. Set Door Open Timeout Alarm.
- Page 50 DS-K262X Series Access Controller User Manual Click Save. Set Extended Open Duration via PC Web The door contact can be enabled with appropriate delay after person with extended access needs swipes her/his card. Click Access Control → Parameter Settings → Door Parameters to enter the settings page. Set Extended Open Duration.
-
Page 51: Card Reader Parameter Configuration
DS-K262X Series Access Controller User Manual Set Dismiss Code via PC Web The administrator or specified person can enter the dismiss code to dismiss the alarm. Click Access Control → Parameter Settings → Door Parameters. Create a Dismiss Code. When an alarm is triggered, you can enter the dismiss code to dismiss the alarm. - Page 52 DS-K262X Series Access Controller User Manual Figure 7-9 Authentication Parameter Configuration...
- Page 53 DS-K262X Series Access Controller User Manual Card Reader Parameter Configuration Terminal Select the No. of the card reader and configure the authentication parameter of it. After saving, the user can choose other No. for configuration. Note The No. here will be used as the dial address of RS-485. Select No. based on the dial address of the card reader.
-
Page 54: Set Facial Recognition Parameters
DS-K262X Series Access Controller User Manual Tampering Detection The card reader will report lid opened alarm if the card reader is removed. Disable this feature to stop the alarm report. QR Code Enable this feature allows authentication via scanning the QR code. Bluetooth Parameter Configuration Enable Bluetooth Start using bluetooth function. -
Page 55: Card Settings
DS-K262X Series Access Controller User Manual Fingerprint Security Level Fingerprint security level configuration. The higher the security level, the lower the False Acceptance Rate; the higher the False Rejection Rate. Note Only device with fingerprint module supports the fingerprint functions. 7.10.8 Card Settings Enable/Disable NFC Protection via PC Web After enabling, the device can read NFC card. -
Page 56: Event And Detection
DS-K262X Series Access Controller User Manual Note If the peripheral card reader which can read EM card is connected, after enabling this function, you can also swipe EM card via this card reader. Set DESFire Card You can enable DESFire card and DESFire card read content. Click Parameter Settings →... -
Page 57: Privacy Settings
DS-K262X Series Access Controller User Manual Note If choose Card Reader Event, then you need to choose card reader. - If choose choose Linkage Type as Card linkage. You need to fill in Card No. and choose Card Reader. - If choose choose Linkage Type as Link Employee ID. You need to fill in Link Employee ID and choose Card Reader. - Page 58 DS-K262X Series Access Controller User Manual All events will be deleted on the specified time chosen. Overwrite The earliest 5% events will be deleted when the system detects the stored events has been over 95% of the full space. Set Event Storage Type via PC Web Browser You can configure the event storage type.
-
Page 59: System Configuration
DS-K262X Series Access Controller User Manual 7.11 System Configuration 7.11.1 View Device Information View the device name, language, model, serial No., version, RS-485, alarm output, and device capacity, etc. Click System and Maintenance → System Configuration → System → System Settings → Basic Information to enter the configuration page. -
Page 60: Account Security Settings
DS-K262X Series Access Controller User Manual Caution The password strength of the device can be automatically checked. We highly recommend you change the password of your own choosing (using a minimum of 8 characters, including at least three kinds of following categories: upper case letters, lower case letters, numbers, and special characters) in order to increase the security of your product. - Page 61 DS-K262X Series Access Controller User Manual If uncheck the function, you should set the IPv4 address, IPv4 subnet mask, IPv4 default gateway, IPv6 mode, IPv6 address, IPv6 subnet prefix length, IPv6 default gateway, Mac address, and MTU. If you check the function, the system will allocate the IPv4 address, IPv4 subnet mask, the IPv4 default gateway, IPv6 mode, IPv6 address, IPv6 subnet prefix length, and IPv6 default gateway automatically.
- Page 62 DS-K262X Series Access Controller User Manual HTTP Listening The device can send alarm information to the event alarm IP address or domain name via HTTP protocol/HTTPS protocol. Edit the event alarm IP address or domain name, URL, port, and protocol. Note The event alarm IP address or domain name should support the HTTP protocol/HTTPS protocol to receive the alarm information.
- Page 63 DS-K262X Series Access Controller User Manual Go to System and Maintenance → System Configuration → Network → Network Service → WebSocket(s) . View WebSocket and WebSockets port. SDK Service Settings Set the SDK server port. Steps 1. Go to System and Maintenance → System Configuration → Network → Device Access → SDK Server.
-
Page 64: Platform Access
DS-K262X Series Access Controller User Manual Figure 7-10 Set ISUP Parameters 2. Check Enable. 3. View the ISUP version, set server IP address, port, device ID, encryption key and view the ISUP status. 4. Optional: Click More to set the network connection priority. 1) Enable WLAN or Wired Network according to your actual needs. -
Page 65: Alarm Settings Via Pc Web
DS-K262X Series Access Controller User Manual Steps 1. Click System and Maintenance → System Configuration → Network → Device Access → Hik- Connect to enter the settings page. Note Hik-Connect is an application for mobile devices. With the App, you can view live image of the device, receive alarm notification and so on. -
Page 66: Alarm Input Settings
DS-K262X Series Access Controller User Manual Figure 7-11 Alarm Settings Continuous Alarm When the alarm is triggered, it will alarm continuously. Custom Alarm Duration You can set Alarm Duration for the device when the alarm is triggered. 7.11.8 Alarm Input Settings Set the device's alarm input parameters. -
Page 67: Set Wiegand Parameters
DS-K262X Series Access Controller User Manual After enabled, the access controller and access module will communicate via double lines wiring methods. RS-485 Protocol Choose a partition from the drop-down list. Select the serial port No. of the card reader based on the tag reader configured. Peripheral Type Select peripheral type. -
Page 68: Maintenance And Security
DS-K262X Series Access Controller User Manual If select Custom, you should set custom Wiegand parameters. Click Custom Wiegand Settings, and set the name, parity type, total length and Wiegand rule. Click OK. Wiegand Mapping Card Reader Select the Wiegand card reader related door and card reader direction. 4. -
Page 69: Restore Parameters
DS-K262X Series Access Controller User Manual Set the device, and click Restart. Upgrade Click System and Maintenance → Maintenance → Upgrade . Select an upgrade type from the drop-down list. Click and select the upgrade file from your local PC. Click Upgrade to start upgrading. If the device has been connected to Hik-Connect and network, when there is a new installation package in Hik-Connect, you can click Upgrade after Online Update to upgrade the device system. -
Page 70: View Exception Diagnosis
DS-K262X Series Access Controller User Manual 7.12.2 View Exception Diagnosis Click System and Maintenance → Maintenance → Exception Diagnosis to enter the settings page. You can view the exception diagnosis. 7.12.3 Device Debugging You can set device debugging parameters. Steps 1. - Page 71 DS-K262X Series Access Controller User Manual Test Protocol via PC Web Select a protocol address, and enter the protocol to test. You can debug the device according to the response header and returned value. Go to System and Maintenance → Maintenance → Device Debugging → Protocol Testing. Figure 7-12 Protocol Testing Select a protocol address, and enter the protocol.
-
Page 72: Log Query
DS-K262X Series Access Controller User Manual Steps 1. Go to System and Maintenance → Maintenance → Device Debugging → Network Penetration Service. 2. Slide Enable Penetration Service. 3. Set Server IP Address and Server Port. Create User Name and Password. 4. -
Page 73: Certificate Management
DS-K262X Series Access Controller User Manual Figure 7-13 Protocol Testing Select a protocol address, and enter the protocol. Click Execute. Debug the device according to the response header and returned value. 7.12.6 Certificate Management It helps to manage the server/client certificates and CA certificate. Note The function is only supported by certain device models. - Page 74 DS-K262X Series Access Controller User Manual Create and Import SYSLOG Certificate Steps 1. Go to Maintenance and Security → Security → Certificate Management . 2. In the SYSLOG Certificate area, click Create Certificate Request. 3. Input certificate information and click Save. Click View and the created certificate will be displayed.
-
Page 75: Chapter 8 Other Platforms To Configure
DS-K262X Series Access Controller User Manual Chapter 8 Other Platforms to Configure You can also configure the device via HikCentral Access Control. For details, see the platforms' user manual. HikCentral Access Control (HCAC) Click/tap the link to view the HCAC's user manual. http://enpinfodata.hikvision.com/analysisQR/showQR/f2f6cf42... -
Page 76: Appendix A. Legal Information
● Products described in this Document, which may include licenses obtained from third parties. Any part of the Document, including text, pictures, graphics, etc., belongs to Hikvision. No part ● of this Document may be excerpted, copied, translated, or modified in whole or in part by any means without written permission. -
Page 77: Data Protection
LOSS OF DOCUMENTATION, WHETHER BASED ON BREACH OF CONTRACT, TORT (INCLUDING NEGLIGENCE), PRODUCT LIABILITY, OR OTHERWISE, IN CONNECTION WITH THE USE OF THE PRODUCT, EVEN IF HIKVISION HAS BEEN ADVISED OF THE POSSIBILITY OF SUCH DAMAGES OR LOSS. YOU ACKNOWLEDGE THAT THE NATURE OF THE INTERNET PROVIDES FOR INHERENT SECURITY ●... -
Page 78: Appendix B. Symbol Conventions
DS-K262X Series Access Controller User Manual Appendix B. Symbol Conventions The symbols that may be found in this document are defined as follows. Symbol Description Indicates a hazardous situation which, if not avoided, will or could Danger result in death or serious injury. Indicates a potentially hazardous situation which, if not avoided, could Caution result in equipment damage, data loss, performance degradation, or... -
Page 79: Appendix C. Dimension
DS-K262X Series Access Controller User Manual Appendix C. Dimension Dimension of 1-Door/2-Door/4-Door Access Controller... - Page 80 UD37762B-B...
Need help?
Do you have a question about the DS-K2621 Series and is the answer not in the manual?
Questions and answers