
Related Manuals for AEG CKX6540ACB


Summary of Contents for AEG CKX6540ACB
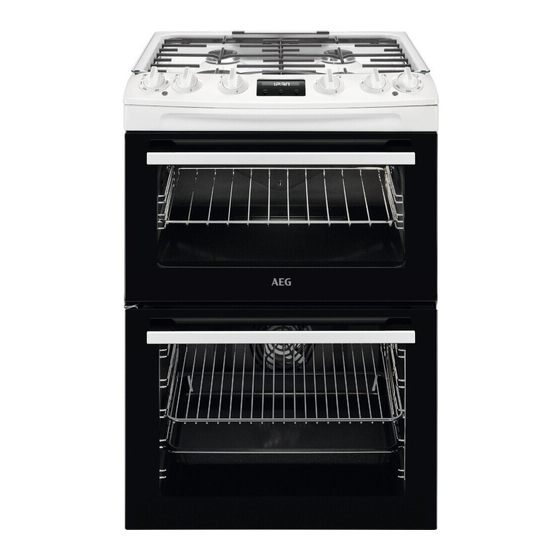
- Page 1 EN User Manual | Cooker CKX6540ACW CKX6540ACB CKX6540ACM aeg.com\register...
-
Page 2: Table Of Contents
Welcome to AEG! Thank you for choosing our appliance. Get usage advice, brochures, troubleshooting, service and repair information: www.aeg.com/support Subject to change without notice. CONTENTS 1. SAFETY INFORMATION................2 2. SAFETY INSTRUCTIONS................5 3. INSTALLATION....................8 4. PRODUCT DESCRIPTION................11 5. BEFORE FIRST USE..................12 6. -
Page 3: General Safety
be kept away from the appliance unless continuously supervised. • Children should be supervised to ensure that they do not play with the appliance. • Keep all packaging away from children and dispose of it appropriately. • WARNING: The appliance and its accessible parts become hot during use. - Page 4 • Never use water to extinguish the cooking fire. Switch off the appliance and cover flames with e.g. a fire blanket or lid. • CAUTION: The cooking process has to be supervised. A short term cooking process has to be supervised continuously.
-
Page 5: Safety Instructions
suitable or hob guards incorporated in the appliance. The use of inappropriate guards can cause accidents. 2. SAFETY INSTRUCTIONS • The appliance must be earthed. This appliance is suitable for the following • Make sure that the parameters on the markets: GB rating plate are compatible with the electrical ratings of the mains power... - Page 6 • The information about the gas supply is on • Use only accessories recommended for the rating plate. this appliance by the manufacturer. • This appliance is not connected to a • Always use glass and jars approved for device which evacuates the products of preserving purposes.
-
Page 7: Care And Cleaning
• Be careful not to let objects or cookware • If you use an oven spray, follow the safety fall on the appliance. The surface can be instructions on the packaging. damaged. • Do not clean the catalytic enamel (if •... -
Page 8: Installation
2.9 Disposal • Disconnect the appliance from the mains supply. • Cut off the mains electrical cable close to WARNING! the appliance and dispose of it. Risk of injury or suffocation. • Flat the external gas pipes. • Contact your municipal authority for information on how to dispose of the appliance. -
Page 9: Other Technical Data
3.5 Other technical data WARNING! These instructions are only valid in the countries whose symbols appear on this booklet's cover. 180 mm Gas category: 30 mm Gas supply: G20 (2H) 20 mbar Voltage: 220-240 V Frequency: 50 Hz 3.6 Gas burners BURNER NORMAL POWER Natural Gas... -
Page 10: Pressure Test
To light the hob burner refer to the "Ignition of the hob burners". Check if the flame is regular. Check each of the burners. 5. Turn the knob for the hob to the off position. 3.10 Checking the Lid Safety Device 1. -
Page 11: Covering Terminal Board
3.12 Covering terminal board • When you refit the mains terminal cover, make sure that the lower tabs are located inside the bottom edge of the aperture, before you fix the two screws into the top edge of the mains terminal cover. •... -
Page 12: Before First Use
4.2 Hob overview Knob for the top oven Knobs for the hob Display Knob for the main oven Temperature indicator for the main oven Temperature indicator for the top oven 4.4 Accessories • Wire shelf For cookware, cake tins, roasts. •... -
Page 13: Hob - Daily Use
5.3 Changing the time Only the top oven works without the set time. You cannot change the time of day if any of the functions operates. flashes when you connect the appliance to the electrical supply, when there Press again and again until the indicator was a power cut or when the timer is not set. -
Page 14: Burner Overview
6.2 Burner overview A. Burner cap B. Burner crown C. Ignition candle D. Thermocouple 6.3 Replacing burner parts WARNING! 1. Put carefully the burner crown on the Always turn the flame down or switch it burner body. Let the crown fall freely onto off before you remove the pans from the the body. -
Page 15: Hob - Care And Cleaning
WARNING! Do not put the same pan on two burners. WARNING! Do not put unstable or damaged pots on the burner to prevent spills and injuries. CAUTION! 7.2 Diameters of cookware Make sure that pot handles are not WARNING! above the front edge of the cooktop. Use cookware with diameters applicable CAUTION! to the size of burners. -
Page 16: Oven - Daily Use
8.4 Cleaning the spark plug these components well clean to prevent difficult lighting and check that the burner This feature is obtained through a ceramic crown holes are not obstructed. ignition candle with a metal electrode. Keep 9. OVEN - DAILY USE 9.3 Activating and deactivating the WARNING! top / main oven... -
Page 17: Trivet And Grill- / Roasting Pan
Wire shelf: Push the shelf between the guide bars of the shelf support. 2. Put the deep pan into the oven on the recommended shelf position. You can use the trivet to grill and toast thin pieces of food in large quantities. 1. -
Page 18: Clock Functions
10.2 Buttons Button Function Description MINUS To set the time. CLOCK To set a clock function. PLUS To set the time. 10.3 Clock functions Clock function Application TIME OF DAY To set, change or check the time of day. Only the top oven works without the set time. DURATION To set how long the oven works. -
Page 19: Oven - Hints And Tips
11. OVEN - HINTS AND TIPS WARNING! Refer to Safety chapters. The temperature and baking times in the tables are guidelines only. They depend on the recipes and the quality and quantity of the ingredients used. 11.1 Information for test institutes Main oven Food Function... -
Page 20: Oven - Care And Cleaning
Food Function Tempera‐ Time (min) Accesso‐ Shelf po‐ ture (°C) ries sition Apple pie, 2 tins (ø 20 cm) Conventional cooking 60 - 80 Grid on the grid, diagonally shif‐ Fatless sponge cake, 1 tin Conventional cooking 20 - 30 Grid (ø... -
Page 21: Cleaning The Top Oven
The walls with catalytic coating are self- cleaning. They absorb fat which collects on the walls while the appliance operates. To support the self-cleaning procedure, heat the empty oven on a regular basis. The oven cavities must be cleaned separately. 12.3 Cleaning the top oven 1. -
Page 22: Removing And Cleaning The Door Glasses - Main Oven
12.7 Removing and cleaning the 12.8 Replacing the lamp door glasses - main oven WARNING! Risk of electric shock. The lamp can be hot. The door glass in your product can be different in type and shape from the 1. Turn off the oven. Wait until the oven is example you see in the image. -
Page 23: Service Data
13.1 What to do if... Problem Possible cause Remedy You cannot activate the appliance. The appliance is not connected to Check if the appliance is correctly an electrical supply or it is connec‐ connected to the electrical supply. ted incorrectly. You cannot activate the appliance. -
Page 24: Energy Efficiency
14.3 Product Information Sheet and Product Information according to EU and UK Energy Labelling and Ecodesign Regulations for Oven Supplier's name CKX6540ACW 948905191 Model identification CKX6540ACB 948905192 CKX6540ACM 948905193 Top oven: 105.6 Energy Efficiency Index Main oven: 95.4... -
Page 25: Oven - Energy Saving
Heat source Electricity Top oven: 39 l Volume Main oven: 77 l Type of oven Oven inside Freestanding Cooker CKX6540ACW 62.4 kg Mass CKX6540ACB 62.4 kg CKX6540ACM 62.4 kg IEC/EN 60350-1 - Household electric cooking appliances - Part 1: Ranges, ovens, steam ovens and grills - Meth‐... - Page 26 Electrolux Appliances AB - Contact Address: Al. Powstancow Slaskich 26, 30-570 Krakow, Poland ENGLISH...
- Page 28 867364325-A-322024...
Need help?
Do you have a question about the CKX6540ACB and is the answer not in the manual?
Questions and answers