Table of Contents
Advertisement
Quick Links
Advertisement
Table of Contents

Related Manuals for AEG CIS6742ECM


Summary of Contents for AEG CIS6742ECM
- Page 1 EN User Manual | Cooker CIS6742ECM aeg.com\register...
-
Page 2: Table Of Contents
Welcome to AEG! Thank you for choosing our appliance. Get usage advice, brochures, trouble shooter, service and repair information: www.aeg.com/support Subject to change without notice. CONTENTS 1. SAFETY INFORMATION................2 2. SAFETY INSTRUCTIONS................5 3. INSTALLATION....................7 4. PRODUCT DESCRIPTION................9 5. - Page 3 be kept away from the appliance unless continuously supervised. • Children should be supervised to ensure that they do not play with the appliance. • Keep all packaging away from children and dispose of it appropriately. • WARNING: The appliance and its accessible parts become hot during use.
- Page 4 • WARNING: Unattended cooking on a hob with fat or oil can be dangerous and may result in fire. • Never use water to extinguish the cooking fire. Switch off the appliance and cover flames with e.g. a fire blanket or lid. •...
-
Page 5: Safety Instructions
• To remove the shelf supports first pull the front of the shelf support and then the rear end away from the side walls. Install the shelf supports in the opposite sequence. • The means for disconnection must be incorporated in the fixed wiring in accordance with the wiring rules. - Page 6 • The electrical installation must have an • Do not put flammable products or items isolation device which lets you disconnect that are wet with flammable products in, the appliance from the mains at all poles. near or on the appliance. The isolation device must have a contact •...
-
Page 7: Installation
• Before maintenance, deactivate the These lamps are intended to withstand appliance. extreme physical conditions in household Disconnect the mains plug from the mains appliances, such as temperature, socket. vibration, humidity, or are intended to • Make sure the appliance is cold. There is signal information about the operational the risk that the glass panels can break. - Page 8 WARNING! The power cable must not touch the part of the appliance shaded in the illustration. Minimum distances Dimension 3.5 Covering terminal board 3.3 Levelling of the appliance • The recommended cross-section area is six square millimetres (6 mm²). • When you refit the mains terminal cover, make sure that the lower tabs are located Use small feet on the bottom of appliance to inside the bottom edge of the aperture,...
-
Page 9: Product Description
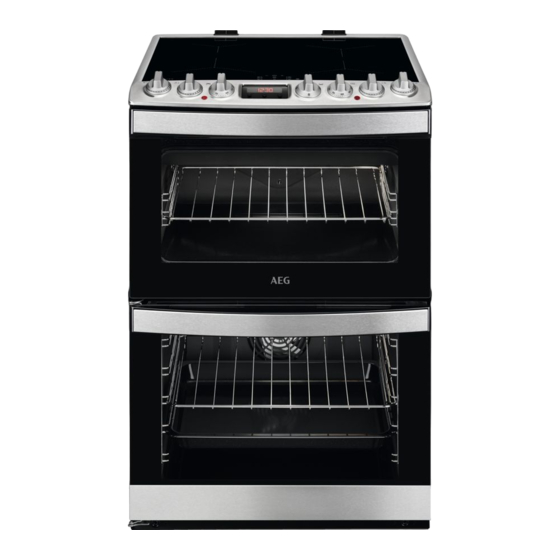
4. PRODUCT DESCRIPTION 4.1 General overview Control panel and hob Air vents for the cooling fan Heating element Lamp Shelf support, removable Cavity embossment Shelf positions 4.2 Hob overview Induction cooking zone Control Panel ENGLISH... -
Page 10: Before First Use
4.3 Cooker control panel Power lamp / symbol Knobs for the hob Temperature indicator / symbol for the top oven Knob for the top oven functions Display Knob for the main oven functions Knob for the main oven temperature Temperature indicator / symbol for the main oven 4.4 Accessories For roasting and grilling. -
Page 11: Hob - Daily Use
2. Let the oven operate for 1 hour. 3. Set the function . Set the temperature Preheat the two ovens before first use. to 250ºC. Heat up one oven at a time. 4. Let the oven operate for 15 minutes. Set the functions listed below, if 5. - Page 12 Sensor Function Comment field To increase or decrease the time. Hob²Hood To activate and deactivate the manual mode of the function. Lock / Child Safety Device To lock / unlock the control panel. Pause To activate and deactivate the function. PowerBoost To activate and deactivate the function.
- Page 13 6.6 Automatic Heat Up The indicator may also appear: • for the neighbouring cooking zones even if If you activate this function you can get a you are not using them, necessary heat setting faster. The function • when hot cookware is placed on cold sets the highest heat setting for some time cooking zone, and then decreases to the correct heat...
- Page 14 zone starts to flash quickly. The display To stop the sound: touch shows the remaining time. To deactivate the function: activate for a To change the time: set the cooking zone short time and deactivate left front cooking with . Touch zone.
- Page 15 To deactivate the function: the hob must be originally set to H5. The hood reacts whenever you operate the hob. The hob deactivated. Touch for 4 seconds until recognizes temperature of the cookware flashes. Touch comes on for 4 automatically and adjusts the speed of the seconds.
-
Page 16: Hob - Hints And Tips
When you finish cooking and deactivate The light on the hood deactivates 2 the hob, the hood fan may still operate minutes after deactivating the hob. for a certain period of time. After that time 6.14 Power management function the system deactivates the fan automatically and prevents you from •... - Page 17 • crack noise: cookware is made of different materials (a sandwich construction). • whistle sound: you use a cooking zone The bottom of the cookware must be as with a high power level and the cookware thick and flat as possible. is made of different materials (a sandwich Ensure pan bases are clean and dry construction).
-
Page 18: Hob - Care And Cleaning
Heat setting Use to: Time Hints (min) 4. - 5. Steam potatoes and other vegetables. 20 - 60 Cover the bottom of the pot with 1-2 cm of water. Check the water level during the process. Keep the lid on the pot. - Page 19 9.1 Top oven functions Symbol Oven function Application Off position The oven is off. Oven Lamp To turn on the lamp without a cooking function. 100 - 250 Conventional Cooking To bake and roast food on one shelf position. Dual Circuit Grill To grill flat food in medium quantities in the middle of the shelf.
- Page 20 9.3 Activating and deactivating the CAUTION! top / main oven Do not refill the cavity embossment with water during cooking or when the oven is hot. It depends on the model if your 6. To turn off the appliance, turn the knobs appliance has knob symbols, for the oven functions and temperature to indicators or lamps:...
-
Page 21: Oven - Clock Functions
2. Put the deep pan into the oven on the recommended shelf position. You can use the trivet to grill and toast thin pieces of food in large quantities. 1. Put the trivet into the deep pan. Make sure the supports of the wire shelf point down. - Page 22 A. Clock functions B. Timer 10.2 Buttons Button Function Description MINUS To set the time. CLOCK To set a clock function. PLUS To set the time. 10.3 Clock functions Clock function Application TIME OF DAY To set, change or check the time of day. Only the top oven works without the set time.
-
Page 23: Oven - Hints And Tips
11. OVEN - HINTS AND TIPS 11.3 Baking WARNING! For the first baking, use the lower Refer to Safety chapters. temperature. You can extend the baking time by 10 – 15 minutes if you bake cakes on more than one The temperature and baking times in the shelf position. - Page 24 11.5 Conventional Baking - Top Oven Food Temperature (°C) Time (min) Shelf position Biscuits 170 - 190 10 - 20 Bread 200 - 220 30 - 35 Bread rolls / buns 200 - 220 10 - 15 Cakes: Victoria Sandwich 160 - 170 18 - 25 Cakes: Madeira...
- Page 25 11.6 Thermaflow® Baking - Main Oven Shelf positions are not critical but ensure that the oven accessories are evenly spaced when more than one is used. Food Temperature (°C) Time (min) Shelf posi‐ tion Biscuits 180 - 190 10 - 20 1 –...
- Page 26 Cakes in baking tray Food Temperature (°C) Time (min) Shelf position Swiss roll 20 - 30 Brownie 30 - 40 Cakes in tin Food Temperature (°C) Time (min) Shelf position Soufflè 30 - 40 Sponge flan base 20 - 30 Victoria sandwich 25 - 35 Fish...
- Page 27 11.8 Steam Bake Bakery Food Temperature Water in the Preheating Time (min) Shelf (°C) cavity em‐ time (min) posi‐ bossment tion (ml) White bread 35 - 45 Bread rolls 20 - 25 Focaccia 20 - 25 Homemade pizza 15 - 20 Cookies, scones, 10 - 20 croissant...
- Page 28 Roasting Food Tempera‐ Water in the Preheating Time (min) Shelf ture (°C) cavity em‐ time (min) position bossment (ml) Chicken 65 - 75 Half chicken 35 - 50 Roast pork 65 - 70 Roast beef 1 - 1,5 kg 50 - 55 Rare 60 - 65 Medium...
- Page 29 11.12 Dual Grill - Top Oven Food Time (min) Shelf position Bacon Rashers 5 - 6 Chicken Joints 20 - 40 Chops - Lamb 15 - 25 2 - 3 Chops - Pork 20 - 25 2 - 3 Fish - Whole / Trout / Makarel 10 - 12 Fillets - Plaice / Cod 4 - 6...
-
Page 30: Oven - Care And Cleaning
Food Function Tempera‐ Time (min) Accesso‐ Shelf po‐ ture (°C) ries sition Shortbread/Pastry strip Conventional Cooking 20 - 30 Tray Shortbread/Pastry strip Thermaflow® 20 - 30 Tray Shortbread/Pastry strip Thermaflow® 15 - 25 Tray 1 / 4 Add 150 ml of water to the cavity embossment. Top oven Food Function... - Page 31 Clean all accessories after each use and let them dry. Use only a microfibre cloth with warm water and a mild detergent. Do not clean the accessories in a dishwasher. Do not clean the non-stick accessories using abrasive cleaner or sharp-edged objects. Accessories 12.2 Catalytic cleaning 3.
- Page 32 2. Pull the rear end of the shelf support away from the side wall and remove it. 3. Pull the door trim to the front to remove it. 4. Remove the glass panels. To install the panels, do the same steps in reverse.
-
Page 33: Troubleshooting
3. Put a cloth on the bottom of the cavity. The back lamp To replace the glass panels, do the same steps in reverse. Before you lower the trim, attach the A trim part to the door. Refer to the image. The lamp glass cover is at the back of the cavity. - Page 34 Problem Possible cause Remedy The heat setting changes between Power management function oper‐ Refer to "Hob - Daily use" chapter. two levels. ates. The sensor fields become hot. The cookware is too large or you put Put large cookware on the rear it too near to the controls.
-
Page 35: Energy Efficiency
Product number (PNC) ......... 14. ENERGY EFFICIENCY 14.1 Product Information according to EU and UK Ecodesign Regulations for hob Model identification CIS6742ECM Type of hob Hob inside Freestanding Cooker Number of cooking zones Heating technology Induction Diameter of circular cooking zones Left front 21.0 cm... -
Page 36: Environmental Concerns
Top oven: A Energy efficiency class Main oven: A Top oven: 0.75 kWh/cycle Energy consumption with a standard load, conventional mode Main oven: not applicable Top oven: not applicable Energy consumption with a standard load, fan-forced mode Main oven: 0.82 kWh/cycle Number of cavities Heat source Electricity... - Page 40 867363629-B-372023...
Need help?
Do you have a question about the CIS6742ECM and is the answer not in the manual?
Questions and answers