
Related Manuals for CAME TH/750 BK WIFI WALL


Summary of Contents for CAME TH/750 BK WIFI WALL
- Page 1 FA01568-EN TH/750 WH WIFI WALL TH/750 BK WIFI WALL USE AND INSTALLATION MANUAL EN English...
- Page 2 • Before carrying out any cleaning or maintenance, disconnect the device from the power supply. • Only use this product for its intended purpose. Any other use is hazardous. • Came S.p.A. is not liable for any damage caused by improper, erroneous or unreasonable use. • Only use soft, dry or slightly damp cloths to clean the device.
- Page 3 The cost of this consumption is borne by the user. Legislative references RED Directive CAME S.p.A. declares that the product described in this manual complies with Directive 2014/53/EU and the Radio Equipment Regulations 2017. The full EC declaration of conformity and UK Conformity Assessed (UKCA) marking information can be found at www.came.com.
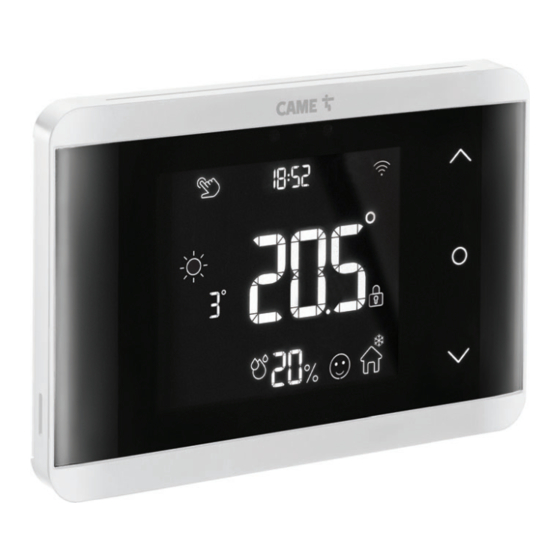
- Page 4 DESCRIPTION 845AA-0140 TH/750 WH WIFI WALL -Wall-mounted Wi-Fi programmable thermostat with soft-touch keys and double relay, white. Power supply 220-240 V AC. 845AA-0150 TH/750 BK WIFI WALL -Wall-mounted Wi-Fi programmable thermostat with soft-touch keys and double relay, black. Power supply 220-240 V AC.
-
Page 5: Technical Data
Technical data TH/750 WH TH/750 BK MODELS WIFI WALL WIFI WALL Protection rating (IP) Power supply (V) 220-240 AC Frequency (Hz) 50/60 Maximum absorption (mA) Autonomous life without power supply (hours) Operating temperature (°C) 0-40 Maximum relative operating humidity (%) 93 No condensation Regulatory compliance RED Directive... -
Page 6: Installation
INSTALLATION... -
Page 8: Electrical Connections
ELECTRICAL CONNECTIONS Make the electrical connections according to the device controlled by the programmable thermostat. Please consult the technical documentation for the device to be controlled. In the event of a loss of power, the relay maintains the status it had prior to the power outage. - Page 9 Example 2 Closed valve Open valve Load...
-
Page 10: Final Operations
FINAL OPERATIONS... -
Page 11: Getting Started
GETTING STARTED Download the THermo app from Google Play Store or the App store. Before accessing the THermo app, make sure that your smartphone/tablet is connected to the internet in 3G/4G or to a Wi-Fi network that allows you to browse correctly and view the CAMEConnect Cloud (ports 8883 and 1883). - Page 12 Icon key Icon Status Meaning Flashing icon (1 s ON, 1 s OFF) The programmable thermostat is generating a Wi-Fi network and is not yet confi gured. Flashing icon (1 short fl ash every 3 The programmable thermostat seconds) has been confi gured and is trying to connect to the set Wi-Fi home network.
- Page 13 Select the Wi-Fi connection. Enter a username and password to log in or create a new CAMEConnect account by tapping the icon.
- Page 14 Enter the required data to create a new CAMEConnect account. Log in.
- Page 15 Select the Wi-Fi connection type. Tap this icon to add a new programmable thermostat.
- Page 16 Select TH700/TH750WALL. Connect to the TH7x0WALLWiFi_ SNxxxxxxxx Wi-Fi network.
- Page 17 Enter the code that appears on the Choose the Wi-Fi network to which you programmable thermostat display. want to connect the device.
- Page 18 Enter the login details for your Wi-Fi Enter a description so you can identify the network. new programmable thermostat. Tap [Next].
- Page 19 If the programmable thermostat is not Reset the Wi-Fi confi guration (reset the connected, you need to set the network programmable thermostat NET menu). login details again. Connect your smartphone to the Select the programmable thermostat to be programmable thermostat’s Wi-Fi network confi...
- Page 20 Setting the second relay The default mode for the programmable Set the second relay in timer mode using thermostat is Cooling. the toggle To change the operating mode, tap [Cooling].
- Page 21 Set the weekly temperature profi le for the (back arrow) to save your changes. timer. The white areas indicate when the relay will be closed.
-
Page 22: Using The Device
USING THE DEVICE When fi rst switched on, the programmable thermostat is in automatic heating mode. The temperature measured appears on the display. Weekly preset temperature programming To get started quickly with the programmable thermostat, you can use the preset programming both for heating and cooling. -
Page 23: Operating Modes
Cooling Cooling programming table from Monday to Sunday Time Setpoint temperature level Midnight to 6 am T3 = 28°C 6 am to 10 pm T1 = 24°C 10 pm to midnight T3 = 28°C Operating modes Basic operation The following basic operation modes can be selected both from the THermo app and from the programmable thermostat itself. - Page 24 Set temperature Change mode key If the programmable thermostat is in Press to go to the next mode. standby, move your hand near it to activate If no keys are pressed, after a the screen. few seconds the time will show on the The set temperature will show in place of programmable thermostat.
- Page 25 BOOST mode In BOOST mode, you can activate heating or cooling for a limited period of 30, 60, 90 or 120 minutes, regardless of the programming set and the room temperature. Change mode key Navigation keys Thermal zone in BOOST mode Activation time Press and hold until the...
- Page 26 HOLIDAY mode With holiday mode, you can set a temperature to be maintained for a chosen number of days. Change mode key Navigation keys Thermal zone in holiday mode Change mode key Press until the icon appears. Set the number of days using the keys.
- Page 27 Navigation keys Change mode key Change mode key When the screen is activated, the remaining number of holiday days is displayed. Set the desired temperature using the When the set number of days have keys. passed, the programmable thermostat Press to confi...
- Page 28 OFF - Exclusion from thermal control Change mode key Thermal zone off Press until the icon appears. Press to go to the next mode. If the system is in COOLING mode, thermal control is excluded. For a few seconds the temperature is not shown, then the current time and temperature detected are displayed.
-
Page 29: Advanced Operation
Advanced operation The advanced operation modes can be selected from the THermo app only. Display mode You can choose between a simplifi ed view (temperature setpoint, internal temperature detected and system status) and a full view. To switch from the simplifi ed to the full view, press one of the navigation keys. - Page 30 Proportional-Integral algorithm For systems with signifi cant variations in the outdoor temperature. Optimise consumption and reduce boiler ignition times by setting a minimum boiler ignition time as part of a cycle. There are 3 pre-confi gured programmes and 1 manual programme available for setting parameters.
- Page 31 Example of thermal control with the Proportional-Integral algorithm Proportional band in degrees Internal temperature trend Centigrade Cycle Time in minutes Proportional band in degrees Temperature setpoint Centigrade...
- Page 32 Smart backlight The 3 smart backlight modes help you to understand the system status. Red smart backlight Blue smart backlight White smart backlight Heating is active. Cooling is active. The system is not active. MODE White screen Red smart Blue smart White smart backlighting backlight...
-
Page 33: Setup Menu
SETUP MENU Navigation keys Change mode key From the main screen, press and hold the Use the key to navigate through the keys to enter the [SETUP] menu. menu. Screen lock Navigation keys Change mode key Screen lock From the SETUP menu, choose [LOCK] using the key. - Page 34 Heating, cooling, OFF From the [SETUP] menu, choose [SEASON] Navigation keys using the key. Change mode key Use the keys to choose between the [SEASON] menu heating, cooling and OFF system operating Cooling mode modes. Heating mode Key sounds Navigation keys Change mode key [SET BIP] menu From the [SETUP] menu, choose [SET BIP]...
- Page 35 Date/Time Navigation keys Change mode key [CLOCK] menu From the [SETUP] menu, choose [CLOCK] using the key. Press one of the two keys to open the submenu. Set the desired value using the keys. Press and hold the keys to set the desired value more quickly.
- Page 36 Wi-Fi signal Navigation keys Change mode key From the [SETUP] menu, choose [SET] using the key. Use the keys to activate or deactivate the Wi-Fi. Press the key to go to the next mode. IP address Change mode key From the [SETUP] menu, choose [IP 1] using the key.
- Page 37 Firmware version Change mode key From the [SETUP] menu, choose [Ver] using the key. The screen shows the fi rmware version for the programmable thermostat. Resetting the programmable thermostat Navigation keys Change mode key From the [SETUP] menu, choose [RESET] using the key.
-
Page 38: Error Messages
ERROR MESSAGES SSID error not The programmable thermostat could not reconnect to the found Wi-Fi network. Switch on or try restarting the Wi-Fi router. Password error The password is incorrect. Enter the password again, taking care with the numbers and uppercase/lowercase letters. DHCP service The programmable thermostat has not been correctly error... - Page 40 CAME S.p.A. Via Martiri della Libertà, 15 31030 Dosson di Casier Treviso - Italy Tel. (+39) 0422 4940/Fax (+39) 0422 4941...
Need help?
Do you have a question about the TH/750 BK WIFI WALL and is the answer not in the manual?
Questions and answers