
Related Manuals for CAME TH/350


Summary of Contents for CAME TH/350
- Page 1 FA02074M04 FA02074-IT Cronotermostato programmabile IT Italiano EN English TH/350 FR Français DE Deutsch MANUALE DI INSTALLAZIONE ED USO...
-
Page 2: Avvertenze Generali
Avvertenze generali • Leggere attentamente le istruzioni prima di iniziare l’installazione ed eseguire gli inter- venti come specifi cato dal costruttore. • L’installazione, la programmazione, la messa in servizio e la manutenzione del prodotto devono essere eff ettuate soltanto da personale tecnico qualifi cato ed opportunamente addestrato nel rispetto delle normative vigenti ivi comprese le osservanze sulla preven- zione infortuni e lo smaltimento imballaggi. -
Page 3: Installazione
Installazione Contenuto della confezione Telaio Corpo principale Viti per fi ssaggio Alcuni controtelai e corrispondenti adattatori copriforo ☞ sono forniti assieme al prodotto. I controtelai e gli adattatori copriforo, opportunamente abbinati, permettono di adattare il dispositivo alle maggior parte delle serie civili. SCARICA LE ISTRUZIONI PER ABBINARE E/O ADATTARE I CONTROTELAI E GLI ADATTATORI COPRIFORO ALLE SERIE CIVILI IN COMMERCIO INQUADRANDO QUESTO QR-CODE. - Page 4 Installare l’apparecchio in posizione idonea a rilevare correttamente la temperatura dell’ambiente, possibilmente in una parete interna, evitando l’installazione in nicchie, dietro a porte, a tende o vicino a sorgenti di calore. Estrarre la linguetta L e quindi il corpo dell’apparecchio dal telaio fi no all’arresto Premere sulle alette laterali in corri- spondenza del simbolo per estrarre...
-
Page 5: Collegamenti Elettrici
Collegamenti elettrici I collegamenti vanno eff ettuati in funzione del tipo di apparecchiatura comandata dal cronotermostato. LEGENDA Conduttori di alimentazione da rete NCNA C N = neutro L = fase Contatti del relé C = comune NA = contatto normalmente aperto NC = contatto normalmente chiuso Carichi U1 = bruciatore, pompa di circolazione,... - Page 6 Installazione Una volta assemblati telaio e controtelaio scelti ed avere eseguito i collegamenti elettrici, assemblare il cronotermostato come mostrato in fi gura...
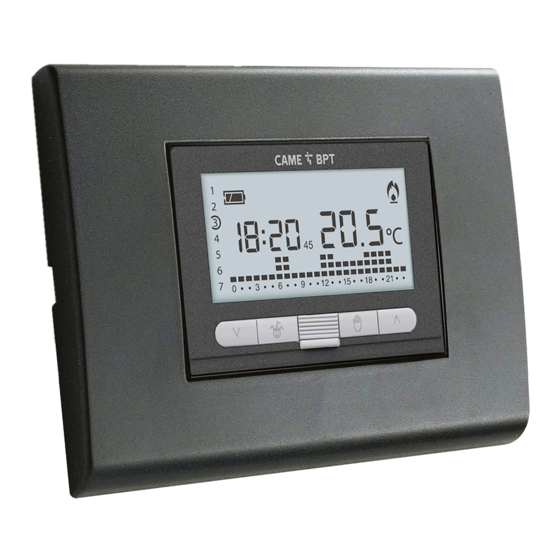
- Page 7 Descrizione dispositivo Descrizione delle icone sul display e funzione dei pulsanti frontali ① ② ③ ④ ⑤ ⑥ ⑦ ⑧ ⑨ ⑰ ⑩ ⑯ ⑪ ⑮ ⑭ ⑬ ⑫ ⑪ ① Stato di carica della batteria. ⑩ Temperatura rilevata. Zona termica esclusa dal Pulsanti per la variazione dei ②...
- Page 8 Funzione dei pulsanti interni Per accedere ai pulsanti di comando interni estrarre la linguetta ⑬ e quindi il corpo dell’apparecchio dal telaio. ⑱ ⑲ ⑳ ㉑ ㉒ ㉓ ㉔ ⑱ Pulsante di reset. Impostazione dell’orologio e del tempo di ritardo nell’accensione o ⑲...
-
Page 9: Impostazione Dell'orologio
Programmazione e uso del dispositivo Impostazione dell’orologio Estrarre il corpo dell’apparecchio. Premere il pulsante Le cifre dei minuti lampeggiano. Usare i pulsanti per imposta- re il valore esatto dei minuti Premere il pulsante Le cifre delle ore lampeggiano. Usare i pulsanti per imposta- re l’ora esatta... - Page 10 Premere il pulsante L’indicatore dei giorni della setti- mana lampeggia. Usare i pulsanti per imposta- re il giorno in corso Premere il pulsante per termi- nare la procedura di impostazione ora e giorno I due punti fra ore e minuti lam- peggeranno confermando la conclusione dell’operazione.
-
Page 11: Impostazione Della Modalità Di Funzionamento
Impostazione della modalità di funzionamento per Premere il pulsante scegliere la modalità di funziona- mento della zona termica. Riscaldamento. Raff rescamento. Off . Antigelo. Per un utilizzo più agevole del dispositivo sono stati pre-memorizzati due programmi per il funzionamento AUTOMATICO; uno per il riscaldamento ed uno per il raff rescamento dove i livelli di temperatura fi... - Page 12 I pulsanti permettono di impostare la temperatura am- bientale minima tollerata per la zona termica. ☞ Temperatura antigelo program- mabile minima 3.0°C - massima 16.0°C. Premere nuovamente il pulsante per ripristinare il programma di riscaldamento/raff resacamento Personalizzazione del programma giornaliero delle temperature Estrarre il corpo dell’apparecchio.
- Page 13 ☞ In fase di programmazione, l’orologio segna l’ora indicata dal segmento lampeggiante, i punti fra ore e minuti non lampeggiano e l’indicazione della temperatura assume il valore del livello selezionato. Mediante i pulsanti selezionare la fascia di tempera- tura desiderata; premere quindi il pulsante 0÷23 per passare all’ora successiva e selezionare...
- Page 14 per Premere il pulsante terminare la programmazione. La procedura termina automa- ticamente dopo 10 secondi di inattività. Aggiungere un ritardo ad una attivazione programmata La funzione è stata pensata per poter ritardare l'attivazione programmata per una data ora. Se si desidera, per esempio, avere una temperatura di comfort alle ore 7:00 è possibile fare in modo che l’impianto si attivi alle 6:30.
- Page 15 Premere ripetutamente il pulsante per variare ciclicamente il tempo di ritardo inserito tra 15, 30, 45, 0 minuti. La procedura termina automa- ticamente dopo 10 secondi di inattività. ☞ L'impostazione viene salvata nella memoria permanente del dispositivo. Personalizzazione dei valori di temperatura T1, T2, T3 Estrarre il corpo dell’apparecchio.
- Page 16 Premere il pulsante P per confer- mare il valore della temperatura visualizzata sul display e per passare al livello di temperatura successivo Procedere come descritto per impostare tutte le fasce di tem- peratura come desiderato. La ricomparsa dell’intero grafi co del programma giornaliero sul display conferma la conclusione della programmazione delle fasce di temperatura.
- Page 17 Il programma può essere personalizzato (vedi "Personalizzazione del programma gior- naliero delle temperature" a pagina 12). Allo scadere della mezzanotte il dispositivo torna a funzionare in modalità di funzionamento AUTOMATICO. Per uscire immediatamente dal programma JOLLY e riportare l’apparecchio in funziona- mento AUTOMATICO premere nuovamente il pulsante oppure .
- Page 18 Modalità di funzionamento manuale Nel caso si desideri disattivare momentaneamente il controllo automatico della temperatura, è possibile passare al funziona- mento MANUALE premendo il pulsante Sul display, oltre all'ora corrente, viene mostrato il set-point di temperatura manuale preimpo- stato (20°C). Usare i pulsanti per imposta- re il valore desiderato...
- Page 19 Premere il pulsante ed utiliz- zare i pulsanti per impostare le ore di attivazione desiderate Premere nuovamente il pulsante ed utilizzare i pulsanti impostare i giorni di attivazione desiderati Il programma così composto si attiva immediatamente e rimane attivo fino all'esaurimento del tempo impostato;...
- Page 20 Utilizzare i pulsanti impostare il valore di correzione desiderato. ☞ L'impostazione viene salvata nella memoria permanente del dispositivo. Abilitare / disabilitare l'anticipo automatico Questa funzione (attiva solo in modalità riscaldamento) permette al dispositivo di auto- adattare l'istante di accensione dell'impianto per avere la temperatura desiderata all’ora impostata.
- Page 21 Usare i pulsanti per attivare/ disattivare l'anticipo automatico = Non Attivo. = Attivo. ☞ L'impostazione viene salvata nella memoria permanente del dispositivo. Impostare il tipo di algoritmo di gestione termica Il dispositivo permette di scegliere il tipo di algoritmo da applicare per la gestione dell'im- pianto tra: diff erenziale e proporzionale Integrale.
- Page 22 C o n d i f f e r e n z i a l e a t t i v o ), premendo il pulsan- te P sullo schermo si può leggere il valore del diff erenziale termico impostato Usare i pulsanti per impo- stare il valore differenziale ad...
- Page 23 Usare i pulsanti per scegliere il programma desiderato tra: P1, (vedi grafi co e tabella P2, P3 ); premere il pulsante P per confermare la propria scelta e terminare la programmazione. Se si è scelto il programma P4 la pressione del pulsante P permette di accedere alla programmazione dei singoli parametri che compongono il programma P4 manuale Il primo parametro riguarda la durata dei cicli di accensione...
- Page 24 per Premere il pulsante P confermare il tempo minimo di ON impostato e passare alla regola- zione della banda proporzionale. Usare i pulsanti per regolare il valore della banda proporzio- nale in un valore compreso fra 1 e 3 °C. Il grafi...
- Page 25 Attivazioni da remoto Collegando un’apposita interfaccia ai morsetti 1-2 (vedi "Collegamenti elettrici" a pagina 5) è possibile: - forzare da remoto il funzionamento dell’apparecchio in modalità manuale, - attivare uno speciale programma a termine precedentemente programmato. Forzare da remoto il funzionamento dell’apparecchio in modalità manuale Mediante apposito comando da remoto l'utente può...
- Page 26 Generare un programma manuale a termine per attivazione da remoto Estrarre il corpo dell’apparecchio. Attivare la modalità di funzionamento MANUALE. Selezionare la modalità di funzionamento per la quale si sta creando il programma (RISCALDAMENTO o RAFFRESCAMENTO). Usare i pulsanti per regolare il valore di temperatura deside- rato Premere il pulsante...
-
Page 27: Ripristino Impostazioni Di Fabbrica
Conteggio ore di funzionamento Estrarre il corpo dell’apparecchio. Attivare la modalità di funziona- mento MANUALE Premere il pulsante C Sul display compare, per 5 se- condi, il tempo di funzionamento. Per azzerare il contatore, premere il pulsante mentre il dato è visibile. -
Page 28: Sostituzione Delle Pile
- Contatti disponibili: 1 contatto di scam- - Temperatura di funzionamento: da 0 °C bio NA-NC. a +40 °C. CAME S.p.A. Via Martiri Della Libertà, 15 31030 Dosson di Casier - Treviso - Italy tel. (+39) 0422 4940 - fax. (+39) 0422 4941... -
Page 29: Programmable Thermostat
FA02074-EN Programmable thermostat TH/350 EN English INSTALLATION AND USE MANUAL... -
Page 30: General Warnings
General warnings • Read the instructions carefully before starting installation and proceed as specifi ed by the manufacturer. • Installation, programming, commissioning and maintenance of the product must only be performed by qualifi ed technicians who have been properly trained in compliance with current standards, including health and safety and packaging disposal regulations. -
Page 31: Installation
Installation Package contents Main body Frame Fastening screws Some counter frames and corresponding hole-cover ☞ adapters are provided with the product. The counter frames and hole-cover adapters, when properly matched, can be used to adapt the device to most standard industry series. SCAN THIS QR CODE TO DOWNLOAD THE INSTRUCTIONS FOR MATCHING AND/OR ADAP- TING COUNTER FRAMES AND HOLE-COVER ADAPTERS TO INDUSTRY SERIES FOUND ON THE MARKET. - Page 32 Install the unit in a suitable position to correctly detect the temperature, possibly in an internal wall, avoiding installation in niches, behind doors, curtains or near heat sources. Pull out the tab L and then pull the unit body out from the frame as far as it will go Press on the side fl...
- Page 33 Wiring The connections are made depending on the type of equipment controlled by the programmable thermostat. Mains power supply wires NCNA C N = neutral L = phase Relay contacts C = common NO = normally open contact NC = normally closed contact Loads U1 = burner, circulation pump, solenoid valve etc.
- Page 34 Installation Once the chosen frame and subframe have been assembled and wiring has taken place, assemble the programmable thermostat as shown in the fi gure...
-
Page 35: Device Description
Device description Description of the icons on the display and function of the front buttons ① ② ③ ④ ⑤ ⑥ ⑦ ⑧ ⑨ ⑰ ⑩ ⑯ ⑪ ⑮ ⑭ ⑬ ⑫ ⑪ ① Battery charge status. ⑩ Temperature detected. Thermal zone excluded from ⑪... - Page 36 Function of internal buttons To access the internal command buttons, pull out the tab ⑬ and then the unit body from the frame. ⑱ ⑲ ⑳ ㉑ ㉒ ㉓ ㉔ ⑱ Reset button. ⑲ Setting the clock and power-on or power-off delay time. Programming the three temperature bands T1, T2, T3.
-
Page 37: Setting The Clock
Programming and using the device Setting the clock Pull out the unit body. Press button The minute digits fl ash. Use the buttons to set the exact minute value Press the button The hour digits fl ash. Use the buttons to set the exact hour value... - Page 38 Press the button The days of the week indicator fl ashes. Use the buttons to set the current day Press the button to fi nish the time and day setting procedure The colon between the hours and minutes will fl ash confi rming the operation has been completed.
-
Page 39: Setting The Operating Mode
Setting the operating mode to Press the button choose the operating mode for the thermal zone. Heating. Cooling. Off . Frost protection. To make the device easier to use, two programmes have been pre-set for AUTOMATIC operation; one for heating and one for cooling where the temperature levels set are: Heating Cooling T1 band... - Page 40 buttons can be used to set the minimum tolerated room temperature for the thermal zone. ☞ Minimum programmable frost protection temperatures 3.0 °C - maximum 16.0 °C. Press again to go back to the heating/cooling program Customising the daily temperature program Pull out the unit body.
- Page 41 ☞ During programming, the clock shows the time indicated by the fl ashing segment. The colon between the hours and minutes does not fl ash and the temperature indication shows the value of the selected level. Using the buttons, select the desired temperature band;...
- Page 42 to end programming. Press The procedure will automatically end after 10 seconds of inactivity. Adding a delay to a programmed activation This feature is designed to delay the activation programmed for a specifi c time. If, for example, you want a comfort temperature at 07:00, it is possible to make sure that the system comes on at 06:30.
- Page 43 Press repeatedly to choose the delay time - 15, 30, 45, 0 minutes (cyclically). The procedure will automatically end after 10 seconds of inactivity. ☞ The setting is saved in the permanent device memory. Customising the T1, T2, T3 temperature values Pull out the unit body.
- Page 44 Press button P to confirm the value of the temperature shown on the display and move on to the next temperature level Proceed as described to set all the temperature bands as desired. The reappearance of the entire daily program graph on the dis- play confi...
- Page 45 The program can be customised (see "Customising the daily temperature program" on page 15). At midnight, the device goes back to operating in AUTOMATIC mode. To exit the WILDCARD program immediately and return to AUTOMATIC operation, press again. Reserving the Wildcard program for a set day Pull out the unit body.
-
Page 46: Manual Operating Mode
Manual operating mode If you wish to temporarily disable automatic temperature control, you can switch to MANUAL opera- tion by pressing In addition to the current time, the display also shows the pre- set manual temperature setpoint (20°C). Use the buttons to set the desired value The set temperature will be kept constant until new adjustments are made or a new... - Page 47 Press and use the but- tons to set the desired activation times Press again and use the buttons to set the desired activa- tion days The programme set in this way is activated immediately and stays on until the end of the set time; then the device reverts back to operating in AUTOMATIC mode.
- Page 48 Use the buttons to set the desired compensation value. ☞ The setting is saved in the permanent device memory. Enabling/disabling automatic advance This function (only active in heating mode) enables the device to automatically adapt the exact moment when the system comes on in order to ensure the desired temperature at the set time.
- Page 49 Use the buttons to activate/ deactivate the automatic ad- vance = Not active. = Active. ☞ The setting is saved in the permanent device memory. Setting the type of temperature management algorithm The device allows you to choose the type of algorithm to be applied for system manage- ment from diff erential and integral proportional.
- Page 50 When the differential is active ), press button P on the screen to read the value of the temperature differential setting Use the buttons to set the diff erential value at a value be- tween 0 °C and 0.9 °C By setting the diff erential to 0 °C, during operation, a minimum switching on/off time of 1 minute is respected, regardless of the detected room temperature.
- Page 51 Use the buttons to choose the desired program from: P1, P2, P3, (see graph and table press button P to confi rm your choice and end programming. If you have chosen the P4 program, pressing button P gives access to the programming of the individual parameters that make up the manual P4 program.
- Page 52 Press button P to confi rm the minimum ON time and switch to adjusting the proportional band. Use the buttons to adjust the value of the proportional band to between 1 and 3 °C. The graph and table can help you decide on the type of program or value of the parameter to be added.
-
Page 53: Remote Activation
Remote activation By connecting a special interface to terminals 1-2 (see "Wiring" on page 8), it is possible to: - force unit operation in manual mode remotely, - activate a special fi xed-period program confi gured in advance. Forcing unit operation in manual mode remotely Using a special remote command, users can make the device cancel any program in progress and operate in manual mode. - Page 54 Generating a manual fi xed-period program for remote activation Pull out the unit body. Activate MANUAL operating mode. Select the operating mode for which you are creating the program (HEATING or COOLING). Use the buttons to adjust the desired temperature value Press the button Use the...
-
Page 55: Resetting The Device
Counting operating hours Pull out the unit body. Activate MANUAL operating mode Press button C The display shows the operating time for 5 seconds. To reset the counter, press the button while the figure is visible. Resetting the device Malfunctioning, interventions and other technical reasons may require the device to be reset. - Page 56 CAME S.p.A. Via Martiri Della Libertà, 15 31030 Dosson di Casier - Treviso - Italy tel. (+39) 0422 4940 - fax. (+39) 0422 4941...
-
Page 57: Thermostat Programmable
FA02074-FR Thermostat programmable TH/350 FR Français MANUEL D'INSTALLATION ET D'UTILISATION... -
Page 58: Instructions Générales
Instructions générales • Lire attentivement les instructions avant toute opération d'installation et eff ectuer les interventions comme indiqué par le fabricant. • L’installation, la programmation, la mise en service et la manutention du produit ne doivent être eff ectuées que par des techniciens qualifi és et dans le strict respect des normes en vigueur, y compris des règles sur la prévention des accidents et l'élimination des emballages. -
Page 59: Installation
Installation Contenu de l'emballage Châssis Corps principal Vis pour la fi xation Certains précadres et leurs adaptateurs cache-trou sont ☞ fournis avec le produit. Les précadres et les adaptateurs cache-trou opportunément combinés permettent d'a- dapter le dispositif à la plupart des séries domestiques. TÉLÉCHARGEZ LES INSTRUCTIONS POUR ASSORTIR ET/OU ADAPTER LES PRÉCADRES ET LES ADAPTATEURS CACHE-TROU AUX SÉRIES CIVILES DISPONIBLES SUR LE MARCHÉ... - Page 60 Installer l'appareil dans une position lui permettant de détecter correctement la température ambiante, si possible dans un mur interne, en évitant l'installation dans des ouvertures, derrière des portes, des rideaux ou près de sources de chaleur. Extraire du cadre la languette L puis le corps de l'appareil jusqu'à...
-
Page 61: Branchements Électriques
Branchements électriques Les connexions doivent être eff ectuées en fonction du type d'équipement commandé par le thermostat programmable. LÉGENDE Conducteurs d'alimentation réseau NCNA C N = neutre L = phase Contacts du relais C = commun NO = contact normalement ouvert NF = contact normalement fermé... - Page 62 Installation Après avoir assemblé le cadre et le précadre choisis et eff ectué les branchements électriques, assembler le thermostat programmable comme indiqué sur la fi gure...
- Page 63 Description dispositif Description des icônes sur l'afficheur et fonction des boutons du bandeau ① ② ③ ④ ⑤ ⑥ ⑦ ⑧ ⑨ ⑰ ⑩ ⑯ ⑪ ⑮ ⑭ ⑬ ⑫ ⑪ ① État de charge de la pile. ⑩ Température détectée. Zone thermique exclue du Boutons pour la modifi...
- Page 64 Fonction des boutons internes Pour accéder aux boutons de commande internes, extraire la languette ⑬ puis le corps de l'appareil du cadre. ⑱ ⑲ ⑳ ㉑ ㉒ ㉓ ㉔ ⑱ Bouton RàZ. Confi guration de l'horloge et du temps de retard à l'allumage ou à ⑲...
- Page 65 Programmation et utilisation du dispositif Configuration de l'horloge Extraire le corps de l'appareil. Appuyer sur le bouton Les chiffres des minutes cli- gnotent. Se servir des boutons pour confi gurer la valeur exacte des minutes Appuyer sur le bouton Les chiff res des heures clignotent. Se servir des boutons pour confi...
- Page 66 Appuyer sur le bouton L'indicateur des jours de la se- maine clignote. Se servir des boutons pour confi gurer le jour en cours Appuyer sur le bouton pour terminer la procédure de confi - guration de l'heure et du jour Les deux points entre les heures et les minutes clignoteront pour confi...
- Page 67 Configuration de la modalité de fonctionnement A Appuyer sur le bouton pour choisir la modalité de fonc- tionnement de la zone thermique. Chauff age. Rafraîchissement. Off . Antigel. Deux programmes ont été pré-mémorisés pour le fonctionnement AUTOMATIQUE de manière à faciliter l’utilisation du dispositif ; un pour le chauff age et l'autre pour le rafraîchissement avec les niveaux de température suivants : Chauff age Rafraîchissement...
- Page 68 Les boutons permettent de configurer la température ambiante minimum tolérée pour la zone thermique. ☞ empérature antigel program- mable minimum 3,0°C - maximum 16,0°C. Appuyer de nouveau sur le bou- pour réinitialiser le programme de chauff age/rafraî- chissement Personnalisation du programme journalier des températures Extraire le corps de l'appareil.
- Page 69 ☞ En phase de programmation, l'horloge indique l'heure signalée par le segment clignotant, les deux points entre les heures et les minutes ne clignotent pas et l'indication de la température prend la valeur du niveau sélectionné. À l'aide des boutons sélectionner la plage de tempéra- ture souhaitée ;...
- Page 70 pour Appuyer sur le bouton terminer la programmation. La procédure prend fi n automati- quement au bout de 10 secondes d'inactivité. Ajouter un retard à une activation programmée Cette fonction a été conçue pour retarder l'activation programmée à une heure bien précise. Pour obtenir par exemple une température confortable à...
- Page 71 Appuyer plusieurs fois sur le bouton pour modifi er cycli- quement le temps de retard entre 15, 30, 45, 0 minutes. La procédure prend fi n automati- quement au bout de 10 secondes d'inactivité. ☞ La confi guration est sauvegar- dée dans la mémoire permanente du dispositif.
- Page 72 Appuyer sur le bouton P pour confi rmer la valeur de la tempé- rature visualisée à l'écran et pour passer au niveau de température suivant Suivre les indications pour confi - gurer toutes les plages de tempé- rature comme souhaité. La réapparition de tout le graphique du programme journalier à...
- Page 73 Le programme peut être personnalisé (voir « Personnalisation du programme journalier des températures » page 15). À minuit pile le dispositif fonctionne à nouveau en mode AUTOMATIQUE. Pour sortir immédiatement du programme JOLLY et ramener l'appareil au mode de fonctionnement AUTOMATIQUE, appuyer de nouveau sur le bouton ou sur .
- Page 74 Mode de fonctionnement manuel Pour désactiver momentané- ment le contrôle automatique de la température, il est possible de passer au fonctionnement MANUEL en appuyant sur le bouton L'écran affi che aussi bien l'heure courante que la valeur de tem- pérature manuelle préconfi gurée (20°C).
- Page 75 Appuyer sur le bouton utiliser les boutons pour confi gurer les heures d'activation souhaitées Appuyer de nouveau sur le bouton et utiliser les boutons pour confi gurer les jours d'acti- vation souhaités Le programme ainsi composé est immédiatement activé et le reste jusqu'à...
- Page 76 Utiliser les boutons pour confi gurer la valeur de correction souhaitée. ☞ La confi guration est sauvegar- dée dans la mémoire permanente du dispositif. Activer / désactiver l'anticipation automatique Cette fonction (uniquement activée en mode chauff age) permet au dispositif d'adapter automatiquement l'instant d'allumage de l'installation pour obtenir la température souhaitée à...
- Page 77 Se servir des boutons pour activer/désactiver l'anticipation automatique = Désactivée. = Activée. ☞ La confi guration est sauvegar- dée dans la mémoire permanente du dispositif. Configurer le type d'algorithme de gestion thermique Le dispositif permet de choisir le type d'algorithme à appliquer pour la gestion de l'ins- tallation entre : diff érentiel et proportionnel intégral.
- Page 78 A v e c d i f f é r e n t i e l a c t i v é ), appuyer sur le bouton P à l'écran pour pouvoir lire la valeur du diff érentiel ther- mique confi guré Se servir des boutons pour confi...
- Page 79 Se servir des boutons pour choisir le programme souhaité (voir gra- entre : P1, P2, P3 phique et tableau ) ; appuyer sur le bouton P pour confi rmer la sélection et terminer la pro- grammation. En cas de sélection du programme P4, l'enfoncement du bouton P permet d'accéder à...
- Page 80 pour Appuyer sur le bouton P confi rmer le temps minimum de ON confi guré et passer au réglage de la bande proportionnelle. Se servir des boutons pour régler la valeur de la bande proportionnelle à une valeur comprise entre 1 et 3°C. Le graphique et le tableau peuvent faciliter le choix du type de programme ou de la valeur des paramètres à...
- Page 81 Activations à distance La connexion d'une interface spécifi que aux bornes 1-2 (voir « Branchements électriques » page 8) permet de/d' : - forcer à distance le fonctionnement de l'appareil en mode manuel, - activer un programme temporisé spécial précédemment programmé. Forcer à...
- Page 82 Générer un programme manuel temporisé pour l'activation à distance Extraire le corps de l'appareil. Activer le mode de fonctionnement MANUEL. Sélectionner le mode de fonctionnement pour lequel créer le programme (CHAUFFAGE ou RAFRAÎCHISSEMENT). Se servir des boutons pour régler la valeur de température souhaitée Appuyer sur le bouton Se servir des boutons...
- Page 83 Calcul des heures de fonctionnement Extraire le corps de l'appareil. Activer le mode de fonctionne- ment MANUEL Appuyer sur le bouton C L'écran visualise pendant 5 secondes le temps de fonction- nement. Pour remettre le compteur à zéro, appuyer sur le bouton avant que la donnée ne soit plus visualisée.
- Page 84 CAME S.p.A. Via Martiri Della Libertà, 15 31030 Dosson di Casier - Treviso - Italy tel. (+39) 0422 4940 - fax. (+39) 0422 4941...
- Page 85 FA02074-DE Programmierbare Thermostatsteuerung TH/350 DE Deutsch MONTAGE- UND BETRIEBSANLEITUNG...
-
Page 86: Allgemeine Hinweise
Allgemeine Hinweise • Lesen Sie die Anweisungen vor dem Einbau genau durch und führen Sie die vom Her- steller genannten Arbeiten aus. • Die Installation, Programmierung, Inbetriebnahme und Wartung des Produktes müssen ausschließlich von qualifi ziertem und entsprechend geschultem Fachpersonal unter Einhaltung der geltenden Normen, einschließlich der Unfallverhütungs- und Abfallent- sorgungsvorschriften, durchgeführt werden. -
Page 87: Inhalt Der Verpackung
Installation Inhalt der Verpackung Unterputzrahmen Hauptaggregat Schrauben für die Befestigung Einige Hilfsrahmen und Lochabdeckungsadapter sind im ☞ Lieferumfang des Produkts enthalten. Durch die Kombination verschiedener Hilfsrahmen und Lochabdeckungsadapter können Sie das Gerät in die meisten handelsüblichen Unterputzdosen einsetzen. SCANNEN SIE DIESEN QR-CODE UND LADEN SIE DIE ANLEITUNG HERUNTER, UM DIE HILFSRAHMEN UND LOCHABDECKUNGSADAPTER AN DIE HANDELSÜBLICHEN UNTER- PUTZDOSEN ANZUPASSEN. - Page 88 Das Gerät an einer für die Temperaturer- fassung geeigneten Stelle montieren (möglichst an einer Innenwand, nicht in Nischen, hinter Türen oder Gardinen oder in der Nähe von Wärmequellen anbringen). Die Lasche L und anschließend das Gerät herausziehen, bis es nicht mehr weiter hinausgeht Die seitlichen Laschen, in der Nähe des Symbols...
-
Page 89: Elektrische Anschlüsse
Elektrische Anschlüsse Die Anschlussweise hängt von den vom programmierbaren Thermostat gesteuerten Geräten ab. ZEICHENERKLÄRUNG Netzstromleiter NCNA C N = Neutralleiter L = Leiter Relaiskontakte C = allgemeiner NO = normalerweise off ener Kontakt NC = normalerweise geschlossener Kontakt Stromverbraucher U1 = Brenner, Umwälzpumpe, Magnet- ventil, usw. -
Page 90: Montage
Montage Zunächst den gewählten Rahmen und den Hilfsrahmen zusammenbauen und die Anschlüsse vornehmen, danach den programmierbaren Thermostat wie dargestellt zusammenbauen, siehe Abb. - Page 91 Beschreibung Beschreibung der Symbole auf dem Display und der vorderen Taster ① ② ③ ④ ⑤ ⑥ ⑦ ⑧ ⑨ ⑰ ⑩ ⑯ ⑪ ⑮ ⑭ ⑬ ⑫ ⑪ ① Ladestand der Batterie. ⑩ Ist-Temperatur. Taster, mit denen die Werte ②...
- Page 92 Funktion der Innentaster Um auf die Innentaster zuzugreifen, die Lasche ⑬ und anschließend das Gerät her- ausziehen. ⑱ ⑲ ⑳ ㉑ ㉒ ㉓ ㉔ ⑱ Reset-Taster ⑲ Uhrzeit und Ein-/Ausschaltverzögerung einstellen. Temperatureinstellung der 3 Bereiche T1, T2, T3. ⑳ Betriebsparameter einstellen. Betriebsart des Geräts auswählen.
-
Page 93: Uhrzeit Einstellen
Programmierung und Verwendung des Geräts Uhrzeit einstellen Das Gerät herausziehen. Drücken Sie die Taste Die Minuten blinken. Mit den Tastern die genaue Minutenzahl eingeben Auf den Taster drücken Die Stunden blinken. Mit den Tastern die genaue Stundenzahl eingeben... - Page 94 drücken Auf den Taster Die Wochentagsanzeige blinkt nun. Mit den Tastern den aktuel- len Wochentag eingeben Auf den Taster drücken, um die Einstellung der Uhrzeit und des Datums zu beenden Nach Beendigung der Einstel- lung blinken die beiden Punk- te zwischen der Stunden- und Minutenanzeige.
-
Page 95: Betriebsart Einstellen
Betriebsart einstellen A drücken, Auf den Taster um die Betriebsart der Tempe- raturzone zu wählen. Heizen. Kühlen. Off . Frostschutz. Für eine einfachere Verwendung wurden zwei AUTOMATISCHE Programme vorprogram- miert; eines zum Heizen und eines zum Kühlen, die festgelegten Temperaturen sind: Heizen Kühlen 16 °C... - Page 96 Mit den Tastern wird die niedrigste tolerierte Temperatur für die Temperaturzone einge- stellt. ☞ Programmierbar sind als nied- rigste tolerierte Temperatur 3,0°C und als höchste 16.0°C. Erneut auf den Taster drü- cken und das Heiz-/Kühlpro- gramm wieder zurücksetzen Individuelle Einstellung des Temperatur-Tagesplans Das Gerät herausziehen.
- Page 97 ☞ Während der Einstellung blinkt die Uhrzeit, der Doppelpunkt zwischen den Stunden und Minuten blinkt nicht und es wird die Soll-Temperatur angezeigt. Mit den Tastern den ge- wünschten Temperaturbereich wählen ; danach den Taster 0÷23 drücken, um auf die nächste Stunde zu wechseln und ebenfalls die Soll-Temperatur wählen Bis zur Uhrzeit 23:00 ebenso...
- Page 98 Durch Druck auf die Program- mierung beenden Wenn das Gerät 10 Sekunden lang nicht betätigt wird, wird der Vorgang automatisch beendet. Einer programmierten Betriebsart eine Zeitverzögerung hinzufügen Mit dieser Funktion kann die Aktivierung der eingestellten Betriebsart um eine bestimmte Zeitspanne verzögert werden. Wenn man z.B.
- Page 99 Mehrmals auf den Taster drücken und die Verzögerung zyklisch auf 15, 30, 45 oder 0 Minuten einstellen. Wenn das Gerät 10 Sekunden lang nicht betätigt wird, wird der Vorgang automatisch beendet. ☞ Die Einstellung wird im Per- manentspeicher des Geräts ge- speichert.
- Page 100 Mit dem Taster P die auf dem Display angezeigte Temperatur bestätigen und zum nächsten Temperaturniveau wechseln Wie oben beschrieben alle Tem- peraturbereiche beliebig ein- stellen. Wenn das Diagramm des Tagesplaners auf dem Display erscheint, ist die Einstellung der Temperaturbereiche abgeschlossen. In jedem Fall beendet das Gerät die Programmierung 10 Sekunden nach der letzten Einstellung und übernimmt die bis dahin eingestellten Werte.
- Page 101 Das Programm kann individuell eingestellt werden (siehe "Individuelle Einstellung des Temperatur-Tagesplans" auf Seite 15). Um Mitternacht schaltet das Gerät wieder auf AUTOMATISCHEN Betrieb um. Um das JOLLY-Programm sofort zu beenden und wieder auf AUTOMATISCHEN Betrieb umzuschalten, erneut den Taster oder drücken.
-
Page 102: Manueller Betrieb
Manueller Betrieb Wenn die automatische Tem- peratursteuerung momentan deaktiviert werden soll, kann man mit dem Taster auf MANUELLEN Betrieb umschalten Neben der aktuellen Uhrzeit zeigt das Display die von Hand vorein- gestellte Solltemperatur (20°C). Mit den Tastern den ge- wünschten Wert einstellen Die eingestellte Raumtemperatur bleibt konstant, bis neue Einstellungen vorgenommen werden oder eine andere Betriebsart gewählt wird. - Page 103 Auf den Taster drücken und mit den Tastern die Dauer der Aktivierung in Stunden ein- stellen Erneut auf den Taster drücken und mit den Tastern die Tage der Aktivierung einstellen Das Programm ist sofort aktiv und bleibt bis Ablauf der eingestell- ten Zeit eingeschaltet;...
- Page 104 Mit den Tastern den ge- wünschten Korrekturwert ein- stellen. ☞ Die Einstellung wird im Per- manentspeicher des Geräts ge- speichert. Die automatisch vorgezogene Aktivierung ein-/ausschalten Diese (nur im Heizbetrieb aktivierte) Funktion ermöglicht die automatische Anpassung der Einschalt-Uhrzeit, damit zur eingestellten Uhrzeit die programmierte Soll-Temperatur erreicht wird.
- Page 105 Mit den Tastern die auto- matisch vorgezogene Aktivierung ein-/ausschalten = Nicht aktiviert. = Aktiviert. ☞ Die Einstellung wird im Per- manentspeicher des Geräts ge- speichert. Den Temperatur-Regler festlegen Man kann zwei Reglertypen wählen: D-Regler und PI-Regler (d.h. Diff erential- bzw. Proportional-Integral-Regler).
- Page 106 Bei eingeschaltetem D-Regler ), kann man durch Druck auf den P-Taster auf dem Bildschirm das eingestellte Tem- peraturdiff erential ablesen Mit den Tastern das Tempe- raturdiff erential zwischen 0 °C und 0,9 °C einstellen Bei auf 0°C gestelltem Diff enrential wird während des Betriebs, unabhängig von der Ist-Temperatur eine Mindestein-/ausschaltzeit von 1 Minute eingehalten.
- Page 107 Mit den Tastern eines der Programme (P1, P2, P3) wählen (siehe Diagramm und die Tabelle ); mit P die Wahl be- stätigen und die Programmierung beenden. Wenn P4 gewählt wurde, öff net sich durch Druck auf P die Programmierseite, auf der die Parameter des Programms P4 manuell eingestellt werden können.
- Page 108 die ein- Durch Druck auf P gestellte Mindest-ON-Dauer be- stätigen und zum Menüpunkt Einstellung Proportionalband wechseln. Mit den Tastern das Propor- tionalband einstellen, der Wert muss zwischen 1 und 3 °C liegen. Das Diagramm und die Tabelle sind bei der Wahl des einzustellenden Programms bzw.
- Page 109 Aktivierung über Fernsteuerung Durch Anschluss einer entsprechenden Schnittstelle an den Klemmen 1-2 (siehe "Elektrische Anschlüsse" auf Seite 8) kann man: - die Aktivierung der Anlage in manuellem Betrieb über Fernsteuerung erzwingen, - einen bestimmten, zuvor programmierten Zeitplan aktivieren. Die Aktivierung der Anlage in manuellem Betrieb über Fernsteuerung erzwingen Mithilfe entsprechender Fernschaltbefehle kann der Benutzer alle laufenden Programmie- rungen unterbrechen und die Anlage auf manuellen Betrieb schalten.
- Page 110 Erstellung eines manuellen Zeitprogramms zur Fernaktivierung Das Gerät herausziehen. Den MANUELLEN Betrieb aktivieren. Die Betriebsart, für die das Programm erstellt wird, wählen (HEIZUNG oder KÜHLUNG). Mit den Tastern die ge- wünschte Soll-Temperatur ein- stellen Den Taster drücken Mit den Tastern die Aktivie- rungsdauer in Stunden eingeben.
- Page 111 Zählwerk Betriebsstunden Das Gerät herausziehen. Den MANUELLEN Betrieb akti- vieren Den Taster C drücken Auf dem Display wird die Be- triebsdauer 5 Sekunden lang angezeigt Wenn man bei sichtbarer Anzeige auf den Taster drückt, wird das Zählwerk auf Null gestellt. Geräte-Reset Nach Störungen, Eingriff en oder aus anderen technischen Grün-...
- Page 112 CAME S.p.A. Via Martiri Della Libertà, 15 31030 Dosson di Casier - Treviso - Italy tel. (+39) 0422 4940 - fax. (+39) 0422 4941...
Need help?
Do you have a question about the TH/350 and is the answer not in the manual?
Questions and answers