Table of Contents
Advertisement
Repair - Parts
Xtreme
High volume lowers for protective coatings. For professional use only.
See page 3 for model information. See page 34 for maximum working pressure.
Important Safety Instructions
Read all warnings and instructions in this
manual and related manuals before using
the equipment. Save these instructions.
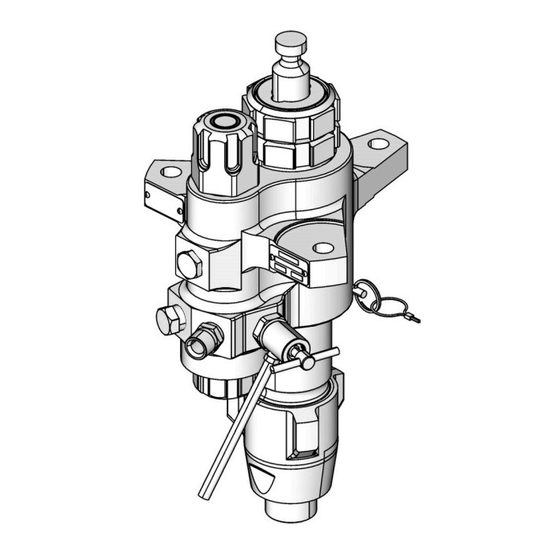
Model L220C2 Lower with Built-in Filter
®
Lowers
TI8630b
Model L220C1 Lower without Filter
311762ZAP
EN
TI8405a
Advertisement
Table of Contents

Related Manuals for Graco Xtreme L220C1


Summary of Contents for Graco Xtreme L220C1
- Page 1 Repair - Parts ® Xtreme Lowers 311762ZAP High volume lowers for protective coatings. For professional use only. See page 3 for model information. See page 34 for maximum working pressure. Important Safety Instructions Read all warnings and instructions in this manual and related manuals before using the equipment.
-
Page 2: Table Of Contents
Graco Standard Warranty ....36 406890 XP/Xtreme 145cc Lower, Repair-Parts Graco Information ......36 406891 XP/Xtreme 180c Lower, Repair-Parts... -
Page 3: Models
Models Models construction of your lower, based on the six digits. For example, Check the identification plate Lower Part Number L180C1 represents the lower (L), output (ID) on your lower volume (180), carbon steel construction (C), and no filter with for the 6-digit part ™... -
Page 4: Warnings
Warnings Warnings The following warnings are for the setup, use, grounding, maintenance, and repair of this equipment. The exclamation point symbol alerts you to a general warning and the hazard symbol refers to procedure-specific risk. Refer back to these warnings. Additional, product-specific warnings may be found throughout the body of this manual where applicable. - Page 5 Warnings WARNING EQUIPMENT MISUSE HAZARD Misuse can cause death or serious injury. • Do not operate the unit when fatigued or under the influence of drugs or alcohol. • Do not exceed the maximum working pressure or temperature rating of the lowest rated system component.
-
Page 6: Component Identification
Component Identification Component Identification (Shown with Built-in Filter) XP Sprayer Xtreme Lowers and e-Xtreme Sprayer Lowers r_b058C0_311762_6 TI8404b ◆ e-Xtreme Sprayer Lowers use opposite locations for the pipe plug and rupture disc. The pipe plug is installed at location (N), and the rupture disc is installed at location (L). -
Page 7: Repair
Repair Repair Required Tools 4. Loosen and remove inlet housing (14) from lower cylinder (11). • Set of adjustable wrenches • Torque wrench • Rubber mallet • Arbor press • Soft wooden block (approx. 1 square ft in size) • Large vise with soft jaws TI8286a •... - Page 8 Repair c. For XP Lowers 145cc and larger: Remove 8. Unscrew and lift outlet housing (8) straight up off inlet ball, bottom o-ring, and shim. Then remove cylinder. Be careful not to scratch displacement rod remaining o-rings from top and bottom grooves (1).
- Page 9 Repair 10. Stand lower cylinder (11) upright on a wooden block. 13. Remove displacement rod from piston valve. Be Using a rubber mallet or an arbor press, drive careful that piston ball (12*) does not fall as you displacement rod (1) out of the bottom until the separate piston valve and rod.
- Page 10 Repair Reassembly 4. Screw displacement rod (1) onto piston valve (13), and hand tight. Then torque per table on page 13. 1. Replace female gland on piston valve (13). Install the five v-packings (4) one at a time with lips facing NOTE: Position crowfoot of torque wrench at a 90°...
- Page 11 Repair 6. Lubricate inside of packing cartridge (7), outside 8. Assemble inlet housing. threads of packing nut (2), and throat packings (3). a. For XP Lowers 115cc and smaller: Install seat Install packing cartridge into housing. Place male (18), two shims (17), inlet ball (16), spring (43), gland and spring in packing cartridge.
- Page 12 Repair c. For Xtreme Lowers: Install inlet seat (18), inlet 12. Thread inlet housing (14) onto lower cylinder (11). Torque to 140-150 ft-lb (189-203 N•m). ball (16), and one o-ring (27*) into inlet housing (14). TI8290a TI8290a Shortest Ball Travel Longest Ball Travel ◆...
- Page 13 Repair Required Torque Pump Throat Packing (2) Piston Valve (13) L220C0 Pump Throat Packing (2) Piston Valve (13) L220C1 70-80 ft-lb L220C2 L036C0 (95-108 N•m) L22AC1 L22HC1 70-80 ft-lb L048C0 125 ft-lb L22CH2 (95-108 N•m) 85 ft-lb L22XC0 (168 N•m) (114 N•m) 70-80 ft-lb L220M2...
-
Page 14: Service Built-In Filter
Repair Service Built-in Filter Select models have a built-in filter in the lower housing. 4. Use wrench to loosen and remove bottom filter cap (26). Remove o-rings (22*, 25*). Disassembly To remove and clean the built-in filter: 1. Follow the Pressure Relief Procedure detailed in your sprayer manual, Related Manuals, page 2. - Page 15 Repair Reassembly 2. Reassemble o-ring (59*) onto top filter cap (20). NOTICE Install strainer (23), and filter support (24) in top To prevent leaking, ensure that the proper repair filter cap. Then use wrench to install and tighten top components are used for the appropriate series filter cap.
-
Page 16: Parts
Parts Parts XP Sprayer Lower Models 36cc, 48cc, 54cc, 58cc, 72cc, 85cc, 90cc, 97cc, and 115cc Torque per specifications in table on page 13. Torque to 140-150 ft-lb (189-203 N•m). Torque to 40-60 ft-lb (52-82 N•m). Apply lubricant to threads before assembly. Torque to 45-55 ft-lb (61-75 N•m). - Page 17 Parts 36cc, 48cc, 54cc, 58cc, and 72cc XP Models 36cc 48cc 54cc 58cc 72cc Descriptions Ref. L036C0 L048C0 L054C0 L058C0 L072C0 Qty. 16D458 16D459 16J900 16D460 16J901 ROD, displacement 16D468 16D468 16D468 16D468 15K029 NUT, packing See Repair Kits starting on page 27. PACKINGS, stack;...
- Page 18 Parts 85cc, 90cc, 97cc, and 115cc XP Models 85cc 90cc 97cc 115cc Descriptions Ref. L085C0 L090C0 L097C0 L115C0 Qty. • 24B819 16J902 16J903 ROD, displacement 15K029 15K029 15K029 15K029 NUT, packing See Repair Kits starting on page 27. PACKINGS, stack; throat See Repair Kits starting on page 27.
-
Page 19: Xp Sprayer Lower Models 145Cc, 180Cc, 220Cc, 250Cc, And 290Cc
Parts XP Sprayer Lower Models 145cc, 180cc, 220cc, 250cc, and 290cc Models L180C7, L145CP, and L145CR only. thick† 3* (Throat) medium† ti8746a 32*❊ thin† 55✖ thin† thin† 49 ✖ thin† medium† ti32088a (Piston) ❊ Blue o-ring for 220, 250, and 290 lowers. ✖... - Page 20 Parts 145cc, 180cc, 220cc, 250cc, and 290cc XP Models 145cc 180cc 220cc 220cc 250cc 290cc Descriptions Ref. L14AC0 L18AC0 L22AC0 L22XC0 L25AC0 L29AC0 Qty. 24B821 24B822 24B823 26A377 24B824 24B825 ROD, displacement 15K030 15K030 15K031 15K031 15K031 15K031 NUT, packing See Repair Kits starting on page 27.
-
Page 21: Xtreme, E-Xtreme, And King Sprayer Lower Models 85Cc 115Cc, 145Cc, 180Cc, 220Cc, 250Cc, And 290Cc
Parts Xtreme, e-Xtreme, and King Sprayer Lower Models 85cc 115cc, 145cc, 180cc, 220cc, 250cc, and 290cc Torque per table on page 13. Apply lubricant to threads before assembly. Thick, medium, and thin refers to the relative cross-section thickness of the o-ring seals. Torque to 140-150 ft-lb (189-203 N•m). - Page 22 Parts 85cc and 115cc Models 85cc 115cc L085C1 L085C2 L115C1 L115C2 Ref. Descriptions L085C3 L085C4 L115C3 L115C4 L115C5 L115C6 Qty. 24B819 24B819 See manual 406889 273270 273270 ROD, displacement 15K029 15K029 15K029 15K029 15K029 15K029 NUT, packing See Repair Kits starting on page 27. PACKINGS, stack;...
- Page 23 Parts 145cc Models 145cc L145C1 L145C2 L145C3 L145C4 Ref. Descriptions L145CP L145CR L145C8 L14AC1 L145M2 L145CL L145CN L145C5 L145C6 Qty. 24B821 24B821 24B821 24B821 25D349 24B821 24B821 24B821 24B821 ROD, displacement 15K030 15K030 15K030 15K030 15K030 15K030 15K030 15K030 15K030 NUT, packing See Repair Kits starting on page 27.
- Page 24 Parts 180cc Models 180cc L180C1 L180C3 L180C2 Ref. Descriptions L180C7 L180C9 L180C4 L18AC1 L180CL L180CN L180M2 Qty. 24B822 24B822 24B822 24B822 24B822 24B822 25D350 ROD, displacement 15K030 15K030 15K030 15K030 15K030 15K030 15K030 NUT, packing See Repair Kits starting on page 27. PACKINGS, stack;...
- Page 25 Parts 220cc and 250cc Models 220cc 250cc L220C1 L220C2 L220C2 L250C L250C Ref. Descriptions L220C3 L220C4 L220C7 L220C9 L220C4 L22AC1 L22HC1 L22HC2 L220M2 L250C3 L250C4 L250C8 L25HC1 L25HC2 25A710 Qty. 24B823 24B823 24B823 24B823 24B823 24B823 24X554 24X554 25D351 24B824 24B824 24B824 24X555 24X555 24B824 ROD, displacement 15K031 15K031 15K031 15K031 15K031 15K031 15K031 15K031 15K031 15K031 15K031 15K031 15K031 15K031 15K031 NUT, packing...
- Page 26 Parts 290cc Models 290cc L290C L290C2 Ref. Descriptions 24N942 L290C3 L290C4 L290C7 L29AC1 L29HC1 L29HC2 L290M2 Qty. 16R994 24B825 24B825 24B825 24B825 24X556 24X556 25D352 ROD, displacement 15K031 15K031 15K031 15K031 15K031 15K031 15K031 15K031 NUT, packing See Repair Kits, starting on page 27. PACKINGS, stack.
-
Page 27: Repair Kits
Repair Kits Repair Kits Repair Kits - Graco Formulated UHMWPE/Leather Repair kits contain a set of four UHMWPE and three and some 5.9 in. bolt pattern models. Kits also include leather packings for the throat, and a set of three items 9, 12, 16, 19, 22, 25, 27, 32, and 59. -
Page 28: Repair Kits - Ptfe
Repair Kits Repair Kits - PTFE models L_ _ _ C3, L _ _ _ C4, and some 5.9 in.bolt pattern models. Kits also include items 9, 12, 16, 19, 22, 25, 27, 32, and 59. See parts list for your lower model. Repair kits contain a set of seven PTFE packings for the throat, and five PTFE packings for the piston that are ideal for chemical resistance and higher temperatures. -
Page 29: Repair Kits - Graco Formulated Uhmwpe/Ptfe
Repair Kits Repair Kits - Graco Formulated UHMWPE/PTFE Repair kits contain a set of four UHWMPE and three models. Kits also include items 9, 12, 16, 19, 22, 25, 27, PTFE packings for the throat, and three UHWMPE and 29, 32, 43, and 59. See parts list for your lower model. -
Page 30: Kits
Kits Kits Inlet Ball Spring Kits Use to improve change over rates in longer ball travel configurations. Order kit that corresponds with your lower model. See manual 406527. NOTE: All XP Xtreme pumps include inlet springs. Lower Models 245190 115cc*, 145cc, 180cc sizes 245191 220cc, 250cc, 290cc sizes * 115 cc Series H and newer. - Page 31 Kits Filter Cap Repair Kit, 24F975 Use to improve sealing of Series A filters. See manual 406882 for more information. Ref. Description Qty. CAP, filter, top; all pumps SPRING O-RING; white, thin 23a STRAINER, 30 mesh, 5.65 in. (143.5 mm) 23b STRAINER, 60 mesh, 5.65 in.
-
Page 32: Dimensions
Dimensions Dimensions TI8405a TI8630b Lowers with Built-in Filters Lowers without Built-in Filters Lower Dimensions Weight lbs (kg) (Height) (Inlet) (Outlet) (Outlet) (Outlet) Lower in. (mm) in. npt(m) in. npt(m) in. npt(f) in. npt(f) Without Filter With Filter 36cc 17.0 (432) 1-1/4 36 (16.3) 48cc... -
Page 33: Outlet Housing Mounting Hole Layout
Outlet Housing Mounting Hole Layout Outlet Housing Mounting Hole Layout 5.9 in. (150 mm) Outlet Housing (example) Shown Applies to 36, 48, 54, 58, 72, 85, 90, 97, 115, 14A, 18A, 22A, 22X, and 29Acc Lowers 5.9 in. (150 mm) TI8616a 8.0 in. -
Page 34: Technical Specifications
Technical Specifications Technical Specifications Xtreme Lowers Metric Maximum operating temperature★ 180° F 82° C Wetted Parts Carbon Steel; Alloy Steel; 304, 440 and 17-4 PH Grades of Stainless Steel; Zinc and Nickel Plating; Ductile Iron; Tungsten Carbide; PTFE; Leather Stroke length 4.75 in. -
Page 35: California Proposition 65
California Proposition 65 Xtreme Lowers Metric L145C0, L145C1, L145C2, L145C3, L145C4, L145C8, L14AC1, 145cc L115C5, L115C6 L145M2, L145CP, L145CR, L145CL, L145CN, L180C0, L180C1, L180C2, L180C3, L180C4, L180C7, L180C9, 185cc L18AC1, L180M2, L180CL, L180CN L220C0, L220C1, L220C2, L220C3, L220C4, L220C7, L220C9, 220cc L22AC1, L22HC1, L22HC2, L22XC0, L220M2 L250C0, L250C1, L250C2, L250C3, L250C4, L250C8, L25HC1,... -
Page 36: Graco Standard Warranty
With the exception of any special, extended, or limited warranty published by Graco, Graco will, for a period of twelve months from the date of sale, repair or replace any part of the equipment determined by Graco to be defective.
Need help?
Do you have a question about the Xtreme L220C1 and is the answer not in the manual?
Questions and answers