Table of Contents
Advertisement
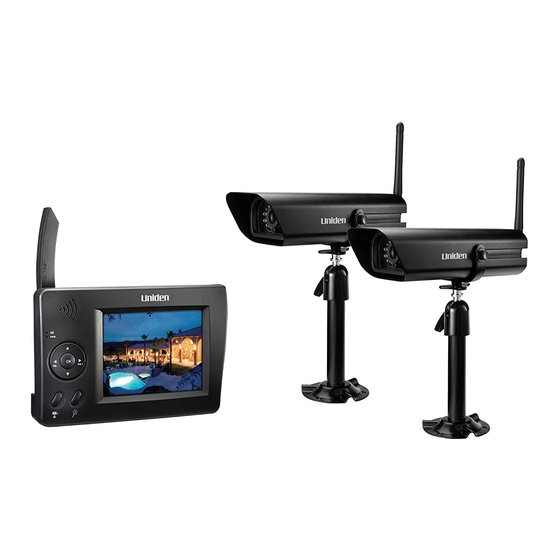
UDW10055 Video Surveillance System
What's in the Box
Portable receiver with a
3-1/2-inch color LCD display
AC adapter -
Receiver (1)
If any items are missing or damaged, contact our Customer Care Line immediately.
Need Help? Get answers 24/7 at our website: www.uniden.com.
If You...
have a question or problem
need a replacement part or accessory
need special help due to a disability
* During regular business hours, Central Standard Time. Visit our website for detailed business hours.
User's Manual
UWDC25 wireless
weatherproof camera
AC Adapters -
Software CD
Cameras (2)
Never use damaged products!
Contact Uniden's...
Customer Care Line*
Parts Department*
Accessibility Help Line
(2) Antenna (2)
AV cables
USB cable
Phone Number
817-858-2929 or 800-297-1023
800-554-3988
800-874-9314 (voice or TTY)
Camera stand (2)
Extension cord (2)
Advertisement
Table of Contents

Related Manuals for Uniden UDW10055


Summary of Contents for Uniden UDW10055
- Page 1 Receiver (1) Cameras (2) If any items are missing or damaged, contact our Customer Care Line immediately. Never use damaged products! Need Help? Get answers 24/7 at our website: www.uniden.com. If You... Contact Uniden’s... Phone Number have a question or problem...
-
Page 2: Important Safety Instructions
Important Safety Instructions! This manual contains important information about this product’s operation. If you are installing this product for others, you must leave this manual or a copy with the end user. When using your equipment, always follow basic safety precautions to reduce the risk of fire, electric shock and injury to persons, including the following: This equipment is NOT waterproof. -
Page 3: Table Of Contents
Clean only with a dry cloth. ► Failure to follow the instructions in this operating manual will void the warranty. Uniden assumes no liability for damages to property or injury to persons caused by improper handling or failure to comply with these safety instructions. -
Page 4: Getting Started
Getting Started Connect the Power 1. Connect the standard AC adapter to the receiver’s power input. 2. Attach an antenna to the rear of each camera and connect an AC adapter to the camera’s power input pigtail. (If necessary, connect the extension cord to the camera’s pigtail and connect POWER the AC adapter to the extension cord.) button... -
Page 5: Check The Video Signal
Check the Video Signal Signal Channel Charge status status status As soon as the receiver powers on, it detects the camera and shows the video on the display. The icons at the top of the screen tell you what’s going on with the camera and receiver. -
Page 6: Learning Your System
Learning Your System Get to Know the Camera Front view Back view Power connector Power status pigtail Sun shield Antenna Lens connector Link Mounting status bracket Grooves Bracket for sun screws shield Pairing button Mounting Camera screw What the lights mean brace Light State... -
Page 7: Switch The Bracket
Switch the bracket If you want to mount the camera in a hanging Flip the bracket upside down and slide it back position, you’ll need to flip onto the camera. the bracket to the top of the camera: 1. Remove the bolts Adjust the camera to on the side of the the desired angle... -
Page 8: Attach The Camera
Attach the camera 1. Attach the camera bracket to the mounting screw. Tighten it a few turns, then turn the camera to face the direction you want. Attach the camera Tighten the brace against to the mounting the camera to screw and turn it secure it to the desired... -
Page 9: Get To Know The Receiver
Get to Know the Receiver Front Side (right) Antenna Stand Status lights: Battery POWER Power Speaker BUTTONS USB output MENU LEFT RIGHT VOL− VOL+ Audio/video DOWN output SELECT ZOOM CAMERA Power input What the buttons do Button What it does - Open and close the menu MENU/ok - Decrease volume. -
Page 10: What The Lights Mean
The battery is fully charged. What the connections do Connector Use it to Connect the receiver to your computer for use with the Uniden Surveillance USB output System Software. (See the software manual for more information.) Audio/video output Send the signal from the camera to a standard TV (see page 13). -
Page 11: Using The Menu
Using the Menu The selected To open the menu, item is press LEFT highlighted RIGHT to scroll Audio Vol through the Scan Time options for CAM1 the item CAM2 DOWN CAM3 to move Brightness CAM4 the cursor TV out NTSC Pair CAM 1 2 3 4 Power Save... -
Page 12: Using Zoom Mode
Using Zoom Mode Normal view Zoomed-in view The receiver can zoom in so you can see the video better. In zoom mode, the receiver increases the pixel size and focuses on the center of the picture. You will also see the ZOOM icon in the upper right corner of the display. -
Page 13: Connecting To Your Tv
Connecting to Your TV You can connect the receiver to any standard television with RCA composite video inputs. Television with standard RCA composite inputs (maximum 32 inches diagonal recommended) Audio (white) Video (yellow) AV out AC adapter (already connected) To use bandwidth efficiently, the system compresses the video signal using Motion-JPEG; the system then digitizes the signal before transmitting it to provide a secure video link. -
Page 14: Multiple Camera Features
Multiple Camera Features Your receiver supports a total of four active cameras at a time. You can mix and match any of the accessory cameras. (See our website for compatible camera options.) Pairing Cameras Pairing is like introducing the camera and the receiver so they can communicate. You’ll perform the pairing procedure if you want to add a new camera to your system or if you are having trouble with a camera. -
Page 15: Changing To A Different Camera
Changing to a Different Camera On the receiver, press to cycle through the enabled channels from CAM1 through CAM4. After ► the last enabled channel, the receiver goes back to the first camera. Each time you press , the receiver goes to the next enabled channel, regardless of whether ►... -
Page 16: Setting Up A Scan
Setting Up a Scan You can have the receiver automatically cycle through the enabled channels. 1. Open the menu, and scroll down to select Scan time. 2. Use to select the amount of time you want the receiver to stay on each camera. RIGHT LEFT Choose 5 seconds, 10 seconds, 15 seconds, or 20 seconds. -
Page 17: Using Quad Display
Using Quad Display In quad display, the receiver puts all four channels on the screen at the same time. The channels appear in the positions shown to the right: If a channel is ► disabled or there is no signal from the camera, that channel's section of the quad display... -
Page 18: Solving Problems
Solving Problems If you have any trouble with your system, try these simple steps first. If you still have a question, call our Customer Care Line listed on the front cover. If… Try.. - Adjusting the brightness on the receiver (in the System Setup sub-menu). The image on the display is too bright. -
Page 19: Unstable Or Weak Signal
Unstable or Weak Signal If the video seems to lag and or the audio sounds weak, the camera and the receiver do not have a strong, clear signal between them. There are several causes for a weak signal: Possible Cause Solution - Adjust the antennas on the receiver and the camera. -
Page 20: Noise Or Static
Frames per second (approx) Signal Level Icon Data Rate (kbps) QVGA (Zoom) VGA (Normal) Fair 543~725 8~12 250~543 Zero 0~250 If the suggestions above don’t provide enough improvement in the the signal quality, you may want to run the camera at QVGA or zoom mode. When the camera is in zoom mode, it sends fewer pixels to the receiver, so the video performance is not as affected by the weak signal. -
Page 21: Resetting Your System
If the static is only on 1 camera If the static is on all cameras - Check near the camera for one of the common - Check near the receiver for the source of interference sources. interference. - Try moving the camera away from a suspected - Try moving the receiver away from a source, or try moving the suspected source so it’s suspected source, or turn off the source if... -
Page 22: Additional Information
Additional Information Product Specifications Radio Frequency Transceiver RF Frequency 2402 Mhz ~ 2483.5 Mhz Modulation GFSK Spread spectrum Frequency Hopping Anti Interference Clean Channel Dynamic Select Selectable camera channel Data rate 2 Mbps Channel bandwidth 2 MHz Transmitting range 500 feet (150 meters) in an open area (line of sight) Image Specification Output Image resolution 640 x 480 (VGA)/ 320 x 240 (QVGA) -
Page 23: Lithium-Polymer Battery Warning
Do not try to charge the battery in temperatures ► facilities in your area, please return this product to below 0° C (32° F) or higher than 45° C (113° F ) Uniden for recycling. Dispose of this equipment according to the ► FCC Compliance Information instructions. -
Page 24: Rf Exposure Information
frequency energy, and if not installed and used in accordance with the instructions, may cause harmful interference to radio communications. However, there is no guarantee that interference will not occur in a particular installation. If this equipment does cause interference to radio or television equipment reception, which can be determined by turning the equipment off and on, the user is encouraged to try to correct the interference by one or more of the following measures: Reorient or relocate the receiving antenna. - Page 25 WARRANTOR: UNIDEN AMERICA CORPORATION (“Uniden”) ELEMENTS OF WARRANTY: Uniden warrants, for one year, to the original retail owner, this Uniden Product to be free from defects in materials & craftsmanship with only the limitations or exclusions set out below. WARRANTY DURATION: This warranty to the original user shall terminate & be of no further effect 12 months after the date of original retail sale.
Need help?
Do you have a question about the UDW10055 and is the answer not in the manual?
Questions and answers