Table of Contents
Advertisement
Pepwave MAX and Pepxim
User Manual
Pepwave Products:
MAX 700/HD2/HD2 IP67/HD2 mini/HD4/Transit/CX4/BR1/BR1 Mini/BR1 Slim/BR1 ENT/BR1
Pro LTE/BR1 IP55/BR2 IP55//BR1 IP67/On-The-Go/MAX HD2/HD4 with MediaFast
Pepxim Products:
NPC/SD-PMU
Pepwave Firmware 7
January 2017
Copyright & Trademarks
Specifications are subject to change without notice. Copyright © 2017 Pepwave Ltd. All Rights Reserved. Pepwave and the Pepwave logo are trademarks
of Pepwave Ltd. Other brands or products mentioned may be trademarks or registered trademarks of their respective owners.
Advertisement
Table of Contents

Related Manuals for peplink Pepxim Series


Summary of Contents for peplink Pepxim Series
- Page 1 Pepwave MAX and Pepxim User Manual Pepwave Products: MAX 700/HD2/HD2 IP67/HD2 mini/HD4/Transit/CX4/BR1/BR1 Mini/BR1 Slim/BR1 ENT/BR1 Pro LTE/BR1 IP55/BR2 IP55//BR1 IP67/On-The-Go/MAX HD2/HD4 with MediaFast Pepxim Products: NPC/SD-PMU Pepwave Firmware 7 January 2017 Copyright & Trademarks Specifications are subject to change without notice. Copyright © 2017 Pepwave Ltd. All Rights Reserved. Pepwave and the Pepwave logo are trademarks of Pepwave Ltd.
-
Page 2: Table Of Contents
4.7 MAX HD4 / HD2 and HD4 with MediaFast 4.8 MAX BR1 4.9 MAX BR1 MK2 4.10 MAX BR1 Slim 4.11 MAX BR1 ENT 4.12 MAX BR1 Pro LTE 4.13 MAX Hotspot 4.14 BR1 Mini http://www.peplink.com Copyright @ 2017 Pepwave... - Page 3 7.3 IP67 Installation Guide 8 Connecting to the Web Admin Interface 9 Configuring the LAN Interface(s) 9.1 Basic Settings 9.2 Port Settings 9.3 Captive Portal 10 Configuring the WAN Interface(s) 10.1 Ethernet WAN 10.1.1 DHCP Connection http://www.peplink.com Copyright @ 2017 Pepwave...
- Page 4 15.1 Outbound Policy 15.2 Custom Rules for Outbound Policy 15.2.1 Algorithm: Weighted Balance 15.2.2 Algorithm: Persistence 15.2.3 Algorithm: Enforced 15.2.4 Algorithm: Priority 15.2.5 Algorithm: Overflow 15.2.6 Algorithm: Least Used 15.2.7 Algorithm: Lowest Latency 15.2.8 Expert Mode http://www.peplink.com Copyright @ 2017 Pepwave...
- Page 5 19.2.2 Web Blocking 19.2.3 Customized Domains 19.2.4 Exempted User Groups 19.2.5 Exempted Subnets 19.2.6 URL Logging 20 OSPF & RIPv2 21 Remote User Access Miscellaneous Settings 21.1 High Availability 21.2 PPTP Server 21.3 Certificate Manager http://www.peplink.com Copyright @ 2017 Pepwave...
- Page 6 23.5 Nearby Device 23.6 Event Log 24 Toolbox 25 System Settings 25.1 Admin Security 25.2 Firmware 25.3 Time 25.4 Schedule 25.5 Email Notification 25.6 Event Log 25.7 SNMP 25.8 InControl 25.9 Configuration 25.10 Feature Add-ons 25.11 Reboot http://www.peplink.com Copyright @ 2017 Pepwave...
- Page 7 27.4 Client List 27.5 WINS Client 27.6 UPnP / NAT-PMP 27.7 SpeedFusion Status 27.8 Event Log 28 Bandwidth Status 28.1 Real-Time 28.2 Hourly 28.3 Daily 28.4 Monthly Appendix A: Restoration of Factory Defaults Appendix B: Declaration http://www.peplink.com Copyright @ 2017 Pepwave...
-
Page 8: Introduction And Scope
This manual covers setting up Pepwave routers and provides an introduction to their features and usage. Tips Want to know more about Pepwave routers? Visit our YouTube Channel for a video introduction! http://youtu.be/UCkVQThLKO4 http://www.peplink.com Copyright @ 2017 Pepwave... -
Page 9: Glossary
Quality of Service SNMP Simple Network Management Protocol Transmission Control Protocol User Datagram Protocol Virtual Private Network VRRP Virtual Router Redundancy Protocol Wide Area Network WINS Windows Internet Name Service WLAN Wireless Local Area Network http://www.peplink.com Copyright @ 2017 Pepwave... -
Page 10: Product Features
SpeedFusion technology. This allows better reliability, larger bandwidth, and increased wireless coverage are comparing to use only one 4G LTE modem. Below is a list of supported features on Pepwave routers. Features vary by model. For more information, please see peplink.com/products. Supported Network Features 3.1.1 ●... -
Page 11: Lan
● Supports linking to outside page for captive portal 3.1.6 Outbound Policy ● Link load distribution per TCP/UDP service ● Persistent routing for specified source and/or destination IP addresses per TCP/UDP service ● Traffic prioritization and DSL optimization http://www.peplink.com Copyright @ 2017 Pepwave... -
Page 12: Ap Controller
● PPTP packet passthrough ● Event log ● Active sessions ● Client list ● WINS client list * ● UPnP / NAT-PMP ● Real-time, hourly, daily, and monthly bandwidth usage reports and charts ● IPv6 support http://www.peplink.com Copyright @ 2017 Pepwave... -
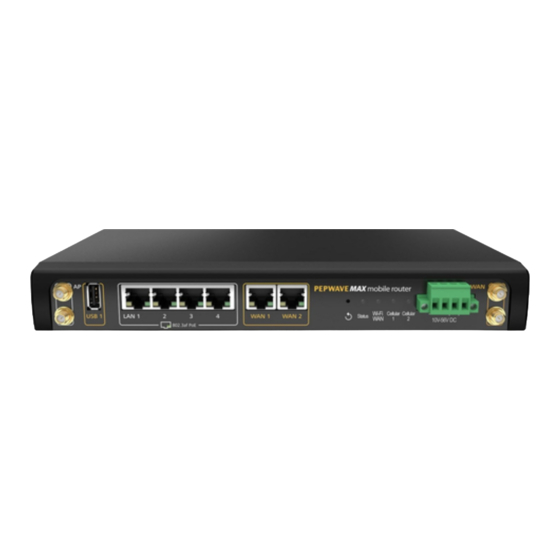
Page 13: Pepwave Max Mobile Router Overview
Pepwave MAX Mobile Router Overview MAX 700 4.1.1 Panel Appearance 4.1.2 LED Indicators The statuses indicated by the front panel LEDs are as follows: Status Indicators System initializing Status Booting up or busy Blinking red Boot up error http://www.peplink.com Copyright @ 2017 Pepwave... - Page 14 Client(s) connected to wireless network LAN and Ethernet WAN Ports 10 / 100/ 1000 Mbps Green LED Blinking Data is transferring Orange LED No data is being transferred or port is not connected Auto MDI/MDI-X ports Port Type http://www.peplink.com Copyright @ 2017 Pepwave...
-
Page 15: Max Hd2
MAX HD2 4.2.1 Panel Appearance http://www.peplink.com Copyright @ 2017 Pepwave... - Page 16 Connected to wireless network(s) without traffic LAN and Ethernet WAN Ports Green LED 10 / 100 / 1000 Mbps Blinking Data is transferring Orange LED No data is being transferred or port is not connected Auto MDI/MDI-X ports Port Type http://www.peplink.com Copyright @ 2017 Pepwave...
-
Page 17: Max Hd2 Ip67
MAX HD2 IP67 4.3.1 Panel Appearance The statuses indicated by the front panel LEDs are as follows: Status Indicators System initializing Booting up or busy Status Blinking Boot up error Green Ready http://www.peplink.com Copyright @ 2017 Pepwave... -
Page 18: Max Hd2 Mini
Connected to wireless network(s) without traffic LAN and Ethernet WAN Ports 10 / 100 / 1000 Mbps Green LED Blinking Data is transferring Orange LED No data is being transferred or port is not connected Auto MDI/MDI-X ports Port Type http://www.peplink.com Copyright @ 2017 Pepwave... -
Page 19: Max Transit
* For MAX-TST_DUO LAN and Ethernet WAN Ports 10 / 100 / 1000 Mbps Green LED Blinking Data is transferring Orange LED No data is being transferred or port is not connected Port Type Auto MDI/MDI-X ports http://www.peplink.com Copyright @ 2017 Pepwave... -
Page 20: Max Cx4
Connected to wireless network(s) without traffic LAN and Ethernet WAN Ports Green LED 10 / 100 / 1000 Mbps Blinking Data is transferring Orange LED No data is being transferred or port is not connected Auto MDI/MDI-X ports Port Type http://www.peplink.com Copyright @ 2017 Pepwave... -
Page 21: Max Hd4 / Hd2 And Hd4 With Mediafast
Connected to wireless network(s) without traffic LAN and Ethernet WAN Ports Green LED 10 / 100 / 1000 Mbps Blinking Data is transferring Orange LED No data is being transferred or port is not connected Auto MDI/MDI-X ports Port Type http://www.peplink.com Copyright @ 2017 Pepwave... -
Page 22: Max Br1
Booting up or busy Status Blinking red Boot up error Green Ready Wi-Fi Indicators Disabled intermittent Blinking slowly Connecting to wireless network(s) Wi-Fi Connected to wireless network(s) with traffic Blinking Connected to wireless network(s) without traffic http://www.peplink.com Copyright @ 2017 Pepwave... - Page 23 Connecting or connected to network(s) LAN and Ethernet WAN Ports 100 Mbps Green LED 10 Mbps Port is connected without traffic Orange LED Blinking Data is transferring Port is not connected Port Type Auto MDI/MDI-X ports http://www.peplink.com Copyright @ 2017 Pepwave...
-
Page 24: Max Br1 Mk2
Connected to wireless network(s) without traffic LAN and Ethernet WAN Ports Green LED 10 / 100 / 1000 Mbps Blinking Data is transferring Orange LED No data is being transferred or port is not connected Auto MDI/MDI-X ports Port Type http://www.peplink.com Copyright @ 2017 Pepwave... -
Page 25: Max Br1 Slim
Connected to wireless network(s) without traffic Cellular Indicators Disabled or no SIM card inserted Cellular Connecting or connected to network(s) LAN and Ethernet WAN Ports 100 Mbps Green LED 10 Mbps Orange LED Port is connected without traffic http://www.peplink.com Copyright @ 2017 Pepwave... - Page 26 Connecting or connected to network(s) LAN and Ethernet WAN Ports 100 Mbps Green LED 10 Mbps Port is connected without traffic Orange LED Blinking Data is transferring Port is not connected Port Type Auto MDI/MDI-X ports http://www.peplink.com Copyright @ 2017 Pepwave...
-
Page 27: Max Br1 Pro Lte
Connecting or connected to network(s) LAN and Ethernet WAN Ports 100 Mbps Green LED 10 Mbps Port is connected without traffic Orange LED Blinking Data is transferring Port is not connected Port Type Auto MDI/MDI-X ports http://www.peplink.com Copyright @ 2017 Pepwave... -
Page 28: Max Hotspot
4.13.2 LED Indicators LAN and Ethernet WAN Ports 10 / 100 / 1000 Mbps Green LED Blinking Data is transferring Orange LED No data is being transferred or port is not connected Port Type Auto MDI/MDI-X ports http://www.peplink.com Copyright @ 2017 Pepwave... -
Page 29: Br1 Mini
Connecting or connected to network(s) LAN and Ethernet WAN Ports 100 Mbps Green LED 10 Mbps Port is connected without traffic Orange LED Blinking Data is transferring Port is not connected Port Type Auto MDI/MDI-X ports http://www.peplink.com Copyright @ 2017 Pepwave... -
Page 30: Max Br1/2 Ip55
Disabled Intermittent Blinking slowly Connecting to wireless network(s) Wi-Fi Connected to wireless network(s) with traffic Blinking Connected to wireless network(s) without traffic Cellular Indicators Disabled or no SIM card inserted Cellular Connecting or connected to network(s) http://www.peplink.com Copyright @ 2017 Pepwave... -
Page 31: Max Br1 Ip67
4.16 MAX BR1 IP67 4.16.1 Panel Appearance 4.16.2 LED Indicators The statuses indicated by the front panel LEDs are as follows: Status Indicators System initializing Booting up or busy Status Blinking Boot up error Green Ready http://www.peplink.com Copyright @ 2017 Pepwave... -
Page 32: Max On-The-Go
Modem is not attached to the port Green Modem is attached to the port Wi-Fi Indicators Disconnected from AP Wi-Fi Green Connected to AP Status Indicators System initializing Booting up or busy Status Green Ready http://www.peplink.com Copyright @ 2017 Pepwave... -
Page 33: Npc (Network Power Controller)
Status Indicators System initializing Booting up or busy Status Green Ready LAN Ports 100 Mbps Green LED 10 Mbps Port is connected without traffic Orange LED Blinking Data is transferring Port Type Auto MDI/MDI-X ports http://www.peplink.com Copyright @ 2017 Pepwave... -
Page 34: Sd-Pmu
4.19 SD-PMU 4.19.1 Panel Appearance 4.19.2 LED Indicators Status Indicators System initializing Status Booting up or busy Green Ready http://www.peplink.com Copyright @ 2017 Pepwave... -
Page 35: Advanced Feature Summary
Peplink router to resume your original network connection. Compatible with: MAX 700, MAX HD2 (All variants), HD4 (All Variants) QoS: Clearer VoIP VoIP and videoconferencing are highly sensitive to latency. With QoS, Peplink routers can detect VoIP http://www.peplink.com Copyright @ 2017 Pepwave... -
Page 36: Per-User Bandwidth Control
With per-user bandwidth control, you can define bandwidth control policies for up to 3 groups of users to prevent network congestion. Define groups by IP address and subnet, and set bandwidth limits for every user in the group. High Availability via VRRP http://www.peplink.com Copyright @ 2017 Pepwave... -
Page 37: Usb Modem And Android Tethering
Compatible with: MAX 700, MAX HD2 (All variants), HD4 (All Variants) USB Modem and Android Tethering For increased WAN diversity, plug in a USB LTE modem as backup. Peplink routers are compatible with over 200 modem types. -
Page 38: Built-In Remote User Vpn Support
Use L2TP with IPsec to safely and conveniently connect remote clients to your private network. L2TP with IPsec is supported by most devices, but legacy devices can also connect using PPTP. Click here for full instructions on setting up L2TP with IPsec. http://www.peplink.com Copyright @ 2017 Pepwave... -
Page 39: Sim-Card Ussd Support
SIM-card USSD support Cellular-enabled routers can now use USSD to check their SIM card’s balance, process pre-paid cards, and configure carrier-specific services.Click here for full instructions on using USSD. http://www.peplink.com Copyright @ 2017 Pepwave... -
Page 40: Installation
● A computer installed with the TCP/IP network protocol and a supported web browser. Supported browsers include Microsoft Internet Explorer 8.0 or above, Mozilla Firefox 10.0 or above, Apple Safari 5.1 or above, and Google Chrome 18 or above. http://www.peplink.com Copyright @ 2017 Pepwave... -
Page 41: Constructing The Network
For advanced configuration, go to Section 9, Configuring the LAN Interface(s). ● WAN configuration For basic configuration, refer to Section 8, Connecting to the Web Admin Interface. For advanced configuration, go to Section 9.2, Captive Portal. http://www.peplink.com Copyright @ 2017 Pepwave... -
Page 42: Mounting The Unit
The Pepwave MAX700/HD2 can be mounted in a vehicle using the included mounting brackets. Place the mounting brackets by the two sides and screw them onto the device. IP67 Installation Guide Installation instructions for IP67 devices can be found here: http://download.peplink.com/manual/IP67_Installation_Guide.pdf http://www.peplink.com Copyright @ 2017 Pepwave... -
Page 43: Connecting To The Web Admin Interface
Username: admin Password: admin (This is the default username and password for Pepwave routers. The admin and read-only user passwords can be changed at System>Admin Security.) 4. After successful login, the Dashboard will be http://www.peplink.com Copyright @ 2017 Pepwave... - Page 44 Configuration changes (e.g. WAN, LAN, admin settings, etc.) will take effect only after clicking the Save button at the bottom of each page. The Apply Changes button causes the changes to be saved and applied. http://www.peplink.com Copyright @ 2017 Pepwave...
-
Page 45: Configuring The Lan Interface(S)
“X” Clicking any of the existing LAN interfaces (or creating a new one) will result in the following IP Settings IP Address The IP address and subnet mask of the Pepwave router on the LAN. http://www.peplink.com Copyright @ 2017 Pepwave... - Page 46 Enter a name for the LAN. Enter a number for your VLAN. VLAN ID Inter-VLAN Check this box to enable routing between virtual LANs. routing Captive Portal Check this box to turn on captive portals. http://www.peplink.com Copyright @ 2017 Pepwave...
- Page 47 Drop-in Mode Settings Drop-in mode eases the installation of Peplink routers on a live network between the existing Enable firewall and router, such that no configuration changes are required on existing equipment. Check the box to enable the drop-in mode feature, if available on your model.
- Page 48 Layer 2 PepVPN is up. Address when If you choose to override IP address when the VPN is connected, the device will not act as a router, bridge connected and most Layer 3 routing functions will cease to work. http://www.peplink.com Copyright @ 2017 Pepwave...
- Page 49 00:AA:BB:CC:DD:EE. Press to create a new record. Press to remove a record. Reserved client information can be imported from the Client List, located at Status>Client List. For more details, please refer to Section 22.3. http://www.peplink.com Copyright @ 2017 Pepwave...
- Page 50 Press to create a new route. Press to remove a route. WINS Server Settings Check the box to enable the WINS server. A list of WINS clients will be displayed at Enable Status>WINS Clients. http://www.peplink.com Copyright @ 2017 Pepwave...
- Page 51 Queries will be forwarded to the selected connections’ resolvers. If all of the selected connections are down, queries will be forwarded to all resolvers on healthy WAN connections. - Advanced feature, please click the button on the top right hand corner to activate. http://www.peplink.com Copyright @ 2017 Pepwave...
- Page 52 To add a new LAN, click the New LAN button. To change LAN settings, click the name of the LAN to change under the LAN heading. The following settings are displayed when creating a new LAN or editing an existing LAN. http://www.peplink.com Copyright @ 2017 Pepwave...
- Page 53 Enter a name for the LAN. Enter a number for your VLAN. VLAN ID Inter-VLAN Check this box to enable routing between virtual LANs. routing Captive Portal Check this box to turn on captive portals. http://www.peplink.com Copyright @ 2017 Pepwave...
- Page 54 Reserved clients information can be imported from the Client List, located at Status>Client List. For more details, please refer to Section 22.3 To configure DHCP relay, first click the button found next to the DHCP Server option to display the settings. http://www.peplink.com Copyright @ 2017 Pepwave...
-
Page 55: Port Settings
On this screen, you can enable specific ports, as well as determine the speed of the LAN ports, whether each port is a trunk or access port, can well as which VLAN each link belongs to, if any. http://www.peplink.com Copyright @ 2017 Pepwave... -
Page 56: Captive Portal
This authenticates your clients through a RADIUS server. After selecting this option, you will see the following fields: RADIUS Server Fill in the necessary information to complete your connection to the server and enable authentication. http://www.peplink.com Copyright @ 2017 Pepwave... - Page 57 Splash Page clients to a URL you define. The Portal Customization menu has two options: . Clicking displays a pop- up previewing the captive portal that your clients will see. Clicking displays the following menu: http://www.peplink.com Copyright @ 2017 Pepwave...
- Page 58 If you would like to use your own set of terms and conditions, please enter them here. If left Conditions empty, the built-in portal will display the default terms and conditions. Custom Landing Fill in this field to redirect clients to an external URL. Page http://www.peplink.com Copyright @ 2017 Pepwave...
-
Page 59: Configuring The Wan Interface(S)
You can also set priorities on the Dashboard. Click the Details button in the corresponding row to modify the connection setting. Important Note Connection details will be changed and become effective immediately after clicking the Save and Apply button. http://www.peplink.com Copyright @ 2017 Pepwave... -
Page 60: Ethernet Wan
If a health check test cannot be completed within the specified amount of time, the test will be treated Timeout as failed. Health Check This is the time interval between each health check test. Interval http://www.peplink.com Copyright @ 2017 Pepwave... - Page 61 Start Day This option allows you to select which day of the month a billing cycle starts. Monthly This field is to specify the bandwidth allowance for each billing cycle. Allowance http://www.peplink.com Copyright @ 2017 Pepwave...
-
Page 62: Dhcp Connection
Dynamic DNS ● no-ip.org Service Provider ● tzo.com ● DNS-O-Matic Select Disabled to disable this feature. See Section 9.5 for configuration details. 10.1.1 DHCP Connection There are four possible connection methods: DHCP Static IP PPPoE http://www.peplink.com Copyright @ 2017 Pepwave... -
Page 63: Static Ip Connection
WAN connection into the DNS Server 1 and DNS Server 2 fields. 10.1.2 Static IP Connection The static IP connection method is suitable if your ISP provides a static IP address to connect directly. http://www.peplink.com Copyright @ 2017 Pepwave... - Page 64 WAN IP address assigned from the DHCP server.) When Use the following DNS server address(es) is selected, you may enter custom DNS server addresses for this WAN connection into the DNS Server 1 and DNS Server 2 fields. http://www.peplink.com Copyright @ 2017 Pepwave...
-
Page 65: Pppoe Connection
(The DNS servers are obtained along with the WAN IP address assigned from the DHCP server.) When Use the following DNS server address(es) is selected, you may enter custom DNS server addresses for this WAN connection into the DNS Server 1 and DNS Server 2 fields. http://www.peplink.com Copyright @ 2017 Pepwave... -
Page 66: L2Tp Connection
(The DNS servers are obtained along with the WAN IP address assigned from the PPPoE server.) When Use the following DNS server address(es) is selected, you can enter custom DNS server addresses for this WAN connection into the DNS server 1 and DNS server 2 fields. http://www.peplink.com Copyright @ 2017 Pepwave... -
Page 67: Cellular Wan
This information is presented in hex and decimal format. This serves the same purpose as MEID HEX but uses an older format. IMEI This is the unique ID for identifying the modem in GSM/HSPA mode. http://www.peplink.com Copyright @ 2017 Pepwave... - Page 68 (The DNS servers are obtained along with the WAN IP address assigned from the PPPoE server.) When Use the following DNS server address(es) is selected, you can enter custom DNS server addresses for this WAN connection into the DNS server 1 and DNS server 2 fields. http://www.peplink.com Copyright @ 2017 Pepwave...
- Page 69 Copyright @ 2017 Pepwave...
- Page 70 Start Day This option allows you to define which day of the month each billing cycle begins. Monthly This field is for defining the maximum bandwidth usage allowed for the WAN connection each month. Allowance http://www.peplink.com Copyright @ 2017 Pepwave...
- Page 71 WAN connection to active makes it immediately available for use. When Internet traffic is not detected within the user-specified timeframe, the modem will automatically Idle Disconnect disconnect. Once the traffic is resumed by the LAN host, the connection will be re-activated. http://www.peplink.com Copyright @ 2017 Pepwave...
- Page 72 This field is for specifying the Maximum Transmission Unit value of the WAN connection. An excessive MTU value can cause file downloads stall shortly after connected. You may consult your ISP for the connection's MTU value. http://www.peplink.com Copyright @ 2017 Pepwave...
-
Page 73: Wi-Fi Wan
Select Auto and the appropriate MTU value will be automatically detected. The auto- detection will run each time the WAN connection establishes Reply to ICMP If this setting is disabled, the WAN connection will not respond to ICMP ping requests. By default, this setting is enabled. PING http://www.peplink.com Copyright @ 2017 Pepwave... - Page 74 This option is to specify whether the Wi-Fi WAN will connect to any open mode access points it finds. Open Mode AP Beacon Miss This sets the threshold for the number of missed beacons. Counter http://www.peplink.com Copyright @ 2017 Pepwave...
- Page 75 Start Day This option allows you to define which day of the month each billing cycle begins. Monthly This field is for defining the maximum bandwidth usage allowed for the WAN connection each month. Allowance http://www.peplink.com Copyright @ 2017 Pepwave...
- Page 76 Host 2 is optional. If Include public DNS servers is selected and no response is received from all specified DNS servers, DNS lookups will also be issued to some public DNS servers. A WAN connection will be http://www.peplink.com Copyright @ 2017 Pepwave...
- Page 77 This setting specifies the time interval in seconds between ping or DNS lookup requests. The default health check interval is 5 seconds. Interval Health Check This setting specifies the number of consecutive ping/DNS lookup timeouts after which the Peplink http://www.peplink.com Copyright @ 2017 Pepwave...
- Page 78 This setting specifies the number of consecutive successful ping/DNS lookup responses that must be received before the Peplink Balance treats a previously down WAN connection as up again. By Recovery Retries default, Recover Retries is set to 3. Using the default setting, a WAN connection that is treated as down will be considered as up again upon receiving three consecutive successful ping/DNS lookup responses.
-
Page 79: Creating Wi-Fi Connection Profiles
Due to dynamic DNS service providers’ policies, a dynamic DNS host expires automatically when the host record has not been not updated for a long time. Therefore, the Peplink Balance performs an update every 23 days, even if a WAN’s IP address did not change. -
Page 80: Wan Health Check
To ensure traffic is routed to healthy WAN connections only, the Pepwave router can periodically check the health of each WAN connection. The health check settings for each WAN connection can be independently configured via Network>WAN>Details. http://www.peplink.com Copyright @ 2017 Pepwave... - Page 81 DNS servers. Connections will be considered as up if DNS responses are received from any one of the health check DNS servers, regardless of a positive or negative result. By default, the first two DNS servers http://www.peplink.com Copyright @ 2017 Pepwave...
- Page 82 Recovery Retries default, Recover Retries is set to 3. Using the default setting, a WAN connection that is treated as down will be considered as up again upon receiving three consecutive successful ping/DNS lookup responses. http://www.peplink.com Copyright @ 2017 Pepwave...
-
Page 83: Dynamic Dns Settings
DNS service provider to perform an IP address update within the provider’s records. The settings for dynamic DNS service provider(s) and the association of hostname(s) are configured via Network>WAN>Details>Dynamic DNS Service Provider/Dynamic DNS Settings. http://www.peplink.com Copyright @ 2017 Pepwave... - Page 84 DHCP IP refresh, reconnection, etc.). Due to dynamic DNS service providers’ policy, a dynamic DNS host will automatically expire if the host record has not been updated for a long time. Therefore the Pepwave router performs an update every 23 days, even if a WAN’s IP address has not changed. http://www.peplink.com Copyright @ 2017 Pepwave...
-
Page 85: Advanced Wi-Fi Settings
Indicate the preferred frequency to use for clients to connect. Frequency Important Note Per FCC regulation, the country selection is not available on all models marketed in the US. All US models are fixed to US channels only. http://www.peplink.com Copyright @ 2017 Pepwave... - Page 86 Wi- Fi AP Settings section, which can be found at AP>Settings. Other models will display a separate section called Wi-Fi AP Advanced Settings, which can be found at Advanced>Wi-Fi Settings. http://www.peplink.com Copyright @ 2017 Pepwave...
- Page 87 By default, this field is set to 48 µs. Frame Aggregation This option allows you to enable frame aggregation to increase transmission throughput. Advanced feature, please click the button on the top right-hand corner to activate http://www.peplink.com Copyright @ 2017 Pepwave...
- Page 88 – Max, High, Mid, and Low. The actual output power will be Output Power bound by the regulatory limits of the selected country. Note that selecting the Boost option may cause the MAX’s radio output to exceed local regulatory limits. http://www.peplink.com Copyright @ 2017 Pepwave...
-
Page 89: Mediafast Configuration
Enter a file extension, such as JPG or DOC. Then enter a lifetime in days to specify how long files with that extension will be cached. Add or delete entries using the controls on the right. Settings http://www.peplink.com Copyright @ 2017 Pepwave... -
Page 90: Scheduling Content Prefetching
This field is also useful for quickly seeing which downloads are consuming the most storage space. Actions To begin a scheduled download immediately, click http://www.peplink.com Copyright @ 2017 Pepwave... - Page 91 Simply provide the requested information to create your schedule. Clear Web Cache To clear all cached content, click this button. Note that this action cannot be undone. Clear Statistics To clear all prefetch and status page statistics, click this button. http://www.peplink.com Copyright @ 2017 Pepwave...
-
Page 92: Viewing Mediafast Statistics
12.3 Viewing MediaFast Statistics To get details on storage and bandwidth usage, select Status>MediaFast. http://www.peplink.com Copyright @ 2017 Pepwave... -
Page 93: Bandwidth Bonding Speedfusiontm / Pepvpn
Pepwave bandwidth bonding SpeedFusionTM is our patented technology that enables our SD-WAN routers to bond multiple Internet connections to increase site-to-site bandwidth and reliability. SpeedFusion functionality securely connects your Pepwave router to another Pepwave or Peplink device (Peplink Balance 210/310/380/580/710/1350 only). Data, voice, or video communications between these locations are kept confidential across the public Internet. - Page 94 Click the New Profile button to create a new VPN connection profile for making a VPN connection to a remote Peplink Balance via the available WAN connections. Each profile is for making a VPN connection with one remote Peplink Balance.
- Page 95 Encryption connection, no encryption will be applied. Select from By Remote ID Only, Preshared Key, or X.509 to specify the method the Peplink Authentication Balance will use to authenticate peers. When selecting By Remote ID Only, be sure to enter a unique peer ID number in the Remote ID field.
- Page 96 Address / Host Names This field is optional. With this field filled, the Peplink Balance will initiate connection to each of the (Optional) remote IP addresses until it succeeds in making a connection. If the field is empty, the Peplink Balance will wait for connection from the remote peer.
- Page 97 Send All Traffic To This feature allows you to redirect all traffic to a specified PepVPN connection. Click the button to select your connection and the following menu will appear: http://www.peplink.com Copyright @ 2017 Pepwave...
- Page 98 ID must be entered in the remote unit's Remote ID field. Click the icon to edit Local ID. PepVPN Settings To designate a custom handshake port (TCP), click the custom radio button and enter the port Handshake Port number you wish to designate. http://www.peplink.com Copyright @ 2017 Pepwave...
- Page 99 Important Note Peplink proprietary SpeedFusion uses TCP port 32015 and UDP port 4500 for establishing VPN connections. If you have a firewall in front of your Pepwave devices, you will need to add firewall rules for these ports and protocols to allow inbound and outbound traffic to pass through the firewall.
-
Page 100: The Pepwave Router Behind A Nat Router
212.1.1.1, 212.2.2.2, and 212.3.3.3), and the field in Router A can be left blank. The two NAT routers on WAN1 and WAN3 connected to Router A should inbound port-forward TCP port 32015 to Router A so that all WANs will be utilized in establishing the VPN. http://www.peplink.com Copyright @ 2017 Pepwave... -
Page 101: Speedfusiontm Status
VPN peer. Please refer to Section 22.6 for details. IP Subnets Must Be Unique Among VPN Peers The entire interconnected SpeedFusion network is a single non-NAT IP network. Avoid duplicating subnets in your sites to prevent connectivity problems when accessing those subnets. http://www.peplink.com Copyright @ 2017 Pepwave... -
Page 102: Ipsec Vpn
14.1 IPsec VPN Settings Many Pepwave products can make multiple IPsec VPN connections with Peplink, Pepwave, Cisco, and Juniper routers. Note that all LAN subnets and the subnets behind them must be unique. Otherwise, VPN members will not be able to access each other. All data can be routed over the VPN with a selection of encryption standards, such as 3DES, AES-128, and AES-256. - Page 103 Copyright @ 2017 Pepwave...
- Page 104 For forced UDP encapsulation regardless of NAT-traversal, tick this checkbox. Encapsulation This defines the peer authentication pre-shared key used to authenticate this VPN connection. The Pre-shared Key connection will be up only if the pre-shared keys on each side match. http://www.peplink.com Copyright @ 2017 Pepwave...
- Page 105 This setting specifies the lifetime limit of this Phase 2 Security Association. By default, it is set at 28800 seconds. Lifetime WAN Connection Priority WAN Connection Select the appropriate WAN connection from the drop-down menu. http://www.peplink.com Copyright @ 2017 Pepwave...
-
Page 106: Outbound Policy Management
Outbound policies for managing and load balancing outbound traffic are located at Network>Outbound Policy> or Advanced>PepVPN>Outbound Policy. There are three main selections for the outbound traffic policy: ● High Application Compatibility ● Normal Application Compatibility ● Custom http://www.peplink.com Copyright @ 2017 Pepwave... -
Page 107: Custom Rules For Outbound Policy
The default policy is Normal Application Compatibility. Want to know more about creating outbound rules? Visit our YouTube Channel for a video tutorial! http://youtu.be/rKH4AS_bQnE http://www.peplink.com Copyright @ 2017 Pepwave... -
Page 108: Algorithm: Weighted Balance
15.2.1 Algorithm: Weighted Balance This setting specifies the ratio of WAN connection usage to be applied on the specified IP protocol and port. This setting is applicable only when Algorithm is set to Weighted Balance. http://www.peplink.com Copyright @ 2017 Pepwave... -
Page 109: Algorithm: Persistence
LAN client computer behind the Pepwave router may communicate using multiple Internet IP addresses. For example, a LAN client computer behind a Pepwave router with three WAN connections may communicate on the Internet using three different IP addresses. http://www.peplink.com Copyright @ 2017 Pepwave... -
Page 110: Algorithm: Enforced
WAN manually by using the sliders. 15.2.3 Algorithm: Enforced This setting specifies the WAN connection usage to be applied on the specified IP protocol and port. This setting is applicable only when Algorithm is set to Enforced. http://www.peplink.com Copyright @ 2017 Pepwave... -
Page 111: Algorithm: Priority
The traffic matching this rule will be routed through the healthy WAN connection that has the highest priority and is not in full load. When this connection gets saturated, new sessions will be routed to the next healthy WAN connection that is not in full load. http://www.peplink.com Copyright @ 2017 Pepwave... -
Page 112: Algorithm: Least Used
Connection and has the lowest latency. Latency checking packets are issued periodically to a nearby router of each WAN connection to determine its latency value. The latency of a WAN is the packet round trip time of the WAN connection. Additional network usage may be incurred as a result. http://www.peplink.com Copyright @ 2017 Pepwave... -
Page 113: Expert Mode
VPN peer. You can create custom Priority or Enforced rules and move them above the bar to override the SpeedFusion routes. Upon disabling Expert Mode, all rules above the bar will be removed. http://www.peplink.com Copyright @ 2017 Pepwave... -
Page 114: Inbound Access
When this setting is disabled, the inbound service does not take effect: the Pepwave router disregards the other parameters of the rule. This setting identifies the service to the system administrator. Valid values for this setting consist of only Service Name alphanumeric and underscore “_” characters. http://www.peplink.com Copyright @ 2017 Pepwave... - Page 115 This setting specifies the WAN connections and Internet IP address(es) from which the service can be accessed. Address(es) Server IP This setting specifies the LAN IP address of the server that handles the requests for the service. Address http://www.peplink.com Copyright @ 2017 Pepwave...
-
Page 116: Upnp / Nat-Pmp Settings
Check the corresponding box(es) to enable UPnP and/or NAT-PMP. Enable these features only if you trust the computers connected to the LAN ports. When the options are enabled, a table listing all the forwarded ports under these two protocols can be found at Status>UPnP / NAT-PMP. http://www.peplink.com Copyright @ 2017 Pepwave... -
Page 117: Nat Mappings
NAT mappings allow IP address mapping of all inbound and outbound NAT’d traffic to and from an internal client IP address. Settings to configure NAT mappings are located at Advanced>NAT Mappings. To add a rule for NAT mappings, click Add NAT Rule. http://www.peplink.com Copyright @ 2017 Pepwave... - Page 118 WAN connections in drop-in mode or IP forwarding mode are not shown here. Click Save to save the settings when configuration has been completed. Important Note Inbound firewall rules override the Inbound Mappings settings. http://www.peplink.com Copyright @ 2017 Pepwave...
-
Page 119: Qos
This field is to define which User Group the specified subnet / IP address belongs to. Once users have been assigned to a user group, their internet traffic will be restricted by rules defined for that particular group. Please refer to the following two sections for details. http://www.peplink.com Copyright @ 2017 Pepwave... -
Page 120: Bandwidth Control
Select an application by choosing a supported application, or by defining a custom application manually. The priority preference of supported applications is placed at the top of the table. Custom applications are at the bottom. http://www.peplink.com Copyright @ 2017 Pepwave... -
Page 121: Prioritization For Custom Applications
LAN side of the network. It can protect the local network from potential hacker attacks, access to offensive websites, and/or other inappropriate uses. The firewall functionality of Pepwave routers supports the selective filtering of data traffic in both directions: http://www.peplink.com Copyright @ 2017 Pepwave... -
Page 122: Outbound And Inbound Firewall Rules
VPN tunneled traffic. 19.1 Outbound and Inbound Firewall Rules 19.1.1 Access Rules The outbound firewall settings are located at Advanced>Firewall>Access Rules>Outbound Firewall Rules. Click Add Rule to display the following screen: http://www.peplink.com Copyright @ 2017 Pepwave... - Page 123 Rules are matched from top to bottom. If a connection matches any one of the upper rules, the matching process will stop. If none of the rules match, the Default rule will be applied. By default, the Default rule is set as Allow for both outbound and inbound access. http://www.peplink.com Copyright @ 2017 Pepwave...
- Page 124 This setting specifies the action to be taken by the router upon encountering traffic that matches the both of the following: ● Source IP & port Action ● Destination IP & port With the value of Allow for the Action setting, the matching traffic passes through the router (to be http://www.peplink.com Copyright @ 2017 Pepwave...
-
Page 125: Apply Firewall Rules To Pepvpn Traffic
19.1.2 Apply Firewall Rules to PepVpn Traffic When this option is enabled, Outbound Firewall Rules will be applied to PepVPN traffic. To turn on this feature, click , check the Enable check box, and press the Save button. http://www.peplink.com Copyright @ 2017 Pepwave... -
Page 126: Intrusion Detection And Dos Prevention
When this feature is enabled, the Pepwave router will detect and prevent the following kinds of intrusions and denial-of-service attacks. ● Port scan o NMAP FIN/URG/PSH o Xmas tree o Another Xmas tree o Null scan o SYN/RST o SYN/FIN ● SYN flood prevention ● Ping flood attack prevention http://www.peplink.com Copyright @ 2017 Pepwave... -
Page 127: Content Blocking
19.2 Content Blocking 19.2.1 Application Blocking Choose applications to be blocked from LAN/PPTP/PepVPN peer clients' access, except for those on the Exempted User Groups or Exempted Subnets defined below. http://www.peplink.com Copyright @ 2017 Pepwave... -
Page 128: Web Blocking
"www.foobar.co.jp," or "foobar.co.uk" will be blocked. Placing the wild card in any other position is not supported. The Peplink Balance will inspect and look for blocked domain names on all HTTP traffic. Secure web (HTTPS) traffic is not supported. 19.2.4 Exempted User Groups Check and select pre-defined user group(s) who can be exempted from the access blocking rules. -
Page 129: Ospf & Ripv2
20 OSPF & RIPv2 The Peplink Balance supports OSPF and RIPv2 dynamic routing protocols. Click the Network tab from the top bar, and then click the OSPF & RIPv2 item on the sidebar to reach the following menu: OSPF This field determines the ID of the router. By default, this is specified as the LAN IP address. If you Router ID want to specify your own ID, enter it in the Custom field. - Page 130 Choose an authentication method, if one is used, from this drop-down menu. Available options are Authentication MD5 and Text. Enter the authentication key next to the drop-down menu. Determine which interfaces this area will use to listen to and deliver OSPF packets Interfaces To access RIPv2 settings, click http://www.peplink.com Copyright @ 2017 Pepwave...
-
Page 131: Remote User Access
Determine which interfaces this group will use to listen to and deliver RIPv2 packets. Interfaces 21 Remote User Access a Networks routed by a Peplink Balance can be remotely accessed via L2TP with IPsec or PPTP. To configure this feature, navigate to Network > Remote User Access http://www.peplink.com... - Page 132 Remote User Access Settings Click the checkbox to enable Remote User Access. Enable http://www.peplink.com Copyright @ 2017 Pepwave...
-
Page 133: Miscellaneous Settings
In the event that the master unit is down, the slave unit becomes active. High availability will be disabled automatically where there is a drop-in connection configured on a LAN bypass port. http://www.peplink.com Copyright @ 2017 Pepwave... - Page 134 ● The slave Pepwave router initiates the WAN connections and binds to a previously configured LAN IP address. ● At a subsequent point when the master Pepwave router recovers, it will once again become active. You can configure high availability at Advanced>Misc. Settings>High Availability. http://www.peplink.com Copyright @ 2017 Pepwave...
- Page 135 This setting specifies a LAN IP address to be used for accessing administration functionality. This Administration address should be unique within the LAN. Subnet Mask This setting specifies the subnet mask of the LAN. http://www.peplink.com Copyright @ 2017 Pepwave...
- Page 136 For example, a firewall sitting behind the Pepwave router should set its default gateway as the virtual IP instead of the IP of the master router. In drop-in mode, no other configuration needs to be set. http://www.peplink.com Copyright @ 2017 Pepwave...
-
Page 137: Pptp Server
PPTP server settings are located at Advanced>Misc. Settings>PPTP Server. Check the box to enable PPTP server functionality. All connected PPTP sessions are displayed at Status>Client List. Please refer to Section 22.3 for details. Note that available options vary by model. http://www.peplink.com Copyright @ 2017 Pepwave... - Page 138 NTLM hashed. Active Directory is not supported. (You can choose to use RADIUS to authenticate with a Windows server.) RADIUS Server - Authenticate with an external RADIUS server. This has been tested with Microsoft Windows Internet Authentication Service and FreeRADIUS servers where passwords are http://www.peplink.com Copyright @ 2017 Pepwave...
-
Page 139: Certificate Manager
Web Proxy Interception Settings will be intercepted. These connections will be redirected to a specified web proxy server and port number. Web proxy interception settings Forwarding and proxy server settings for each WAN can be specified after selecting Enable. http://www.peplink.com Copyright @ 2017 Pepwave... -
Page 140: Smtp Forwarding
If the forwarding is disabled for a WAN connection, SMTP connections for the WAN will be simply be forwarded to the connection’s original destination. Note If you want to route all SMTP connections only to particular WAN connection(s), you should create a custom rule in outbound policy (see Section 14.2). http://www.peplink.com Copyright @ 2017 Pepwave... -
Page 141: Web Proxy Forwarding
21.4.4 Custom Service Forwarding After clicking the enable checkbox, enter your TCP port for traffic heading to the router, and then specify the IP Address and Port of the server you wish to forward to the service to. http://www.peplink.com Copyright @ 2017 Pepwave... -
Page 142: Service Passthrough
10000 are monitored by default. You may add more custom data ports that your IPsec system uses IPsec NAT-T by checking Define custom ports. If the VPN contains IPsec site-to-site VPN traffic, check Route IPsec Site-to-Site VPN and choose the WAN connection to route the traffic to. http://www.peplink.com Copyright @ 2017 Pepwave... -
Page 143: Gps Forwarding
If you’ve chosen to send GPS reports in TAIP format, select one or more sentence types for Type/TAIP ID sending the data (PV—Position / Velocity Solution and CP—Compact Velocity Solution). You can also optionally include an ID number in the TAIP ID field. (optional) http://www.peplink.com Copyright @ 2017 Pepwave... -
Page 144: Ap Controller
Each Pepwave router can control a limited number of routers without additional cost. To manage more, a Full Edition license is required. Please contact your Authorized Reseller or the Peplink Sales Team for more information and pricing details. To configure, navigate to the AP tab. - Page 145 Current SSID information appears in the SSID section. To edit an existing SSID, click its name in the list. To add a new SSID, click Add. Note that the following settings vary by model. http://www.peplink.com Copyright @ 2017 Pepwave...
- Page 146 5GHz band for better usage of bandwidth. To make steering mandatory, select Enforce. To Band Steering cause the Pepwave router to preferentially choose steering, select Prefer. The default for this setting is Disable. - Advanced feature. Click the button on the top right-hand corner to activate. http://www.peplink.com Copyright @ 2017 Pepwave...
- Page 147 The security level of this method is known to be weak. MAC Address Connection coming from the MAC addresses in this list will be either denied or accepted based the option selected in the previous field. List http://www.peplink.com Copyright @ 2017 Pepwave...
-
Page 148: Settings
In field, enter the UDP accounting port(s) used by your RADIUS server(s) or click the Default button to enter 1813. Port 22.2 Settings On many Pepwave models, the AP settings screen (AP>Settings) looks similar to the example below: http://www.peplink.com Copyright @ 2017 Pepwave... - Page 149 Copyright @ 2017 Pepwave...
- Page 150 AP Settings These buttons specify which wireless networks will use this AP profile. You can also select the frequencies at which each network will transmit. Please note that the Peplink Balance does not SSID detect whether the AP is capable of transmitting at both frequencies. Instructions to transmit at unsupported frequencies will be ignored by the AP.
- Page 151 This field is only available when Frame Aggregation is enabled. It specifies the frame length for Frame Length frame aggregation. By default, it is set to 50000. - Advanced feature. Click the button on the top right-hand corner to activate. http://www.peplink.com Copyright @ 2017 Pepwave...
- Page 152 This field allows you to specify a new administrator password. You may also click the Generate Admin Password button and let the system generate a random password automatically. Navigating to AP>Settings on some Pepwave models displays a screen similar to the one shown below: http://www.peplink.com Copyright @ 2017 Pepwave...
- Page 153 This option allows you to enable frame aggregation to increase transmission throughput. Aggregation Guard Interval This setting allows choosing a short or long guard period interval for your transmissions. - Advanced feature, please click the button on the top right-hand corner to activate. http://www.peplink.com Copyright @ 2017 Pepwave...
-
Page 154: Ap Controller Status
2.4GHz and 5 GHz frequencies. The colored boxes indicate the SSID to display information for. Clicking any colored box will SSID toggle the display of information for that SSID. By default, all the graphs show information for all SSIDs. http://www.peplink.com Copyright @ 2017 Pepwave... - Page 155 Events This event log displays all activity on your AP network, down to the client level. Click View Alerts to see only alerts, and click the More… link for additional records. http://www.peplink.com Copyright @ 2017 Pepwave...
-
Page 156: Access Point (Usage)
On the right of the table, you will see the following icons: Click the icon to see a usage table for each client: Managed Wireless Devices Click the icon to configure each client http://www.peplink.com Copyright @ 2017 Pepwave... - Page 157 SSID, at that point in time. On the Data Usage by menu, you can display the information by SSID or by AP send/receive rate. Click the Event tab next to Wireless Usage to view a detailed event log for that particular device: http://www.peplink.com Copyright @ 2017 Pepwave...
-
Page 158: Wireless Ssid
Wireless SSID 23.3 In-depth SSID reports are available under AP > Controller Status > Wireless SSID. Click the blue arrow on any SSID to obtain more detailed usage information on each SSID. http://www.peplink.com Copyright @ 2017 Pepwave... -
Page 159: Wireless Client
Here, you will be able to see your network’s heaviest users as well as search for specific users. Click the icon to bookmark specific users, and click the icon for additional details about each user: http://www.peplink.com Copyright @ 2017 Pepwave... - Page 160 Copyright @ 2017 Pepwave...
-
Page 161: Nearby Device
Hovering over the device MAC address will result in a popup with information on how this device was detected. Click the icons and the device will be moved to the bottom table of identified devices. http://www.peplink.com Copyright @ 2017 Pepwave... -
Page 162: Event Log
This event log displays all activity on your AP network, down to the client level. Use to filter box to search by MAC address, SSID, AP Serial Number, or AP Profile name. Click View Alerts to see only alerts, and click the More… link for additional records. http://www.peplink.com Copyright @ 2017 Pepwave... -
Page 163: Toolbox
The user level can access only the device's status information; users cannot make any changes on the device. Admin account UI User account UI http://www.peplink.com Copyright @ 2017 Pepwave... - Page 164 For security reasons, after logging in to the web admin Interface for the first time, it is recommended to change the administrator password. Configuring the administration interface to be accessible only from the LAN can further improve system security. Administrative settings configuration is located at System>Admin Security. http://www.peplink.com Copyright @ 2017 Pepwave...
- Page 165 This specifies the access address and port of the external accounting server. Server Accounting This field is for entering the secret key for accessing the accounting server. Server Secret Network This option is for specifying the network connection to be used for authentication. Users can http://www.peplink.com Copyright @ 2017 Pepwave...
- Page 166 If LAN/WAN is chosen, the WAN Connection Access Settings form will be displayed. LAN Connection Access Settings Allowed LAN This field allows you to permit only specific networks or VLANs to access the Web UI. Networks http://www.peplink.com Copyright @ 2017 Pepwave...
- Page 167 To define multiple subnets, separate each IP subnet one in a line. For example: ● 192.168.0.0/24 ● 10.8.0.0/16 This is to choose which WAN IP address(es) the web server should listen on. Allowed WAN IP Address(es) http://www.peplink.com Copyright @ 2017 Pepwave...
-
Page 168: Firmware
Consult the release notes for the particular firmware version before installing. Do not disconnect the power during firmware upgrade process. Do not attempt to upload a non-firmware file or a firmware file that is not supported by Peplink. -
Page 169: Time
The settings for this are located at System > Schedule Enable scheduling, and then click on your schedule name or on the New Schedule button to begin. http://www.peplink.com Copyright @ 2017 Pepwave... - Page 170 Click the drop-down menu to choose pre-defined schedules as your starting point. Please note that Schedule upon selection, previous changes on the schedule map will be deleted. Click on the desired times to enable features at that time period. You can hold your mouse for faster Schedule Map entry. http://www.peplink.com Copyright @ 2017 Pepwave...
-
Page 171: Email Notification
Click Default to restore the number to its default setting. SMTP User This setting specifies the SMTP username and password while sending email. These options are shown only if Require authentication is checked in the SMTP Server setting. Name / Password http://www.peplink.com Copyright @ 2017 Pepwave... - Page 172 After Test Email Notification is clicked, you will see this screen to confirm the settings: Click Send Test Notification to confirm. In a few seconds, you will see a message with detailed test results. http://www.peplink.com Copyright @ 2017 Pepwave...
-
Page 173: Event Log
Push Events Utility installed. Check the box to activate this feature. HYPERLINK For more information on the Router Utility, go to: "http://www.peplink.com/products/router-utility" www.peplink.com/products/router-utility 25.7 SNMP SNMP or simple network management protocol is an open standard that can be used to collect information about the Pepwave router. - Page 174 This option allows you to enable SNMP version 3. To add a community for either SNMPv1 or SNMPv2, click the Add SNMP Community button in the Community Name table, upon which the following screen is displayed: http://www.peplink.com Copyright @ 2017 Pepwave...
- Page 175 When MD5 or SHA is selected, an entry field will appear for the password. This setting specifies via a drop-down menu one of the following valid privacy protocols: ● NONE Privacy Protocol ● DES When DES is selected, an entry field will appear for the password. http://www.peplink.com Copyright @ 2017 Pepwave...
-
Page 176: Incontrol
25.8 InControl InControl is a cloud-based service which allows you to manage all of your Peplink and Pepwave devices with one unified system. With it, you can generate reports, gather statistics, and configure your devices automatically. All of this is now possible with InControl. - Page 177 HA counterpart. To do so, click the Upload button. After loading the settings, configure the LAN IP from High address of the Pepwve router so that it is different from the HA counterpart. Availability Pair http://www.peplink.com Copyright @ 2017 Pepwave...
-
Page 178: Feature Add-Ons
You can specify the number of pings in the field Number of times, to a maximum number of 10 times. Packet Size can be set to a maximum of 1472 bytes. The ping utility is located at System>Tools>Ping, illustrated below: http://www.peplink.com Copyright @ 2017 Pepwave... -
Page 179: Traceroute Test
A system administrator can use the ping utility to manually check the connectivity of a particular LAN/WAN connection. 26.2 Traceroute Test The traceroute test tool traces the routing path to the destination through a particular Ethernet interface or a SpeedFusion connection. The traceroute test utility is located at System>Tools>Traceroute. http://www.peplink.com Copyright @ 2017 Pepwave... -
Page 180: Pepvpn Test
The PepVPN Test tool can help to test the throughput between different VPN peers. You can define the Test Type, Direction, and Duration of the test, and press Go! to perform the throughput test. The VPN test utility is located at System>Tools>PepVPN Test, illustrated as follows: http://www.peplink.com Copyright @ 2017 Pepwave... -
Page 181: Wake-On-Lan
26.4 Wake-on-LAN Peplink routers can send special “magic packets” to any client specified from the Web UI. To access this feature, navigate to System > Tools > Wake-on-LAN Select a client from the drop-down list and click Send to send a “magic packet”... -
Page 182: Status
This shows the current PepVPN version. Modem Support This shows the modem support version. For a list of supported modems, click Modem Support List. Version Host Name The host name assigned to the Pepwave router appears here. http://www.peplink.com Copyright @ 2017 Pepwave... -
Page 183: Gps Data
LAN IP address at TCP port 60660. It is accessible from the LAN or over a SpeedFusion connection. To access the data via a virtual serial port, install a virtual serial port driver. Visit http://www.peplink.com/index.php?view=faq&id=294 to download the driver. 27.3 Active Sessions Information on active sessions can be found at Status>Active Sessions>Overview. - Page 184 In addition, you can see which clients are initiating the most sessions. You can also perform a filtered search for specific sessions. You can filter by subnet, port, protocol, and interface. To perform a search, navigate to Status>Active Sessions>Search. http://www.peplink.com Copyright @ 2017 Pepwave...
-
Page 185: Client List
(retrieved from the DHCP reservation table or defined by users), current download and upload rate, and MAC address. Clients can be imported into the DHCP reservation table by clicking the button on the right. You can update the record after import by going to Network>LAN. http://www.peplink.com Copyright @ 2017 Pepwave... -
Page 186: Wins Client
27.6 UPnP / NAT-PMP The table that shows the forwarded ports under UPnP and NAT-PMP protocols is located at Status>UPnP/NAT-PMP. This section appears only if you have enabled UPnP / NAT-PMP as mentioned in Section 16.1.1. http://www.peplink.com Copyright @ 2017 Pepwave... -
Page 187: Speedfusion Status
Current SpeedFusion status information is located at Status>SpeedFusion Details about SpeedFusion connection peers appears as below: Click on the corresponding peer name to explore the WAN connection(s) status and subnet information of each VPN peer. http://www.peplink.com Copyright @ 2017 Pepwave... - Page 188 Click the button for a chart displaying real-time throughput, latency, and drop-rate information for each WAN connection. When pressing the button, the following menu will appear: http://www.peplink.com Copyright @ 2017 Pepwave...
- Page 189 After clicking the icon, the following menu appears: Select the L2 protocol (TCP/UDP), direction, and duration and click the Start button to begin the general throughput test. http://www.peplink.com Copyright @ 2017 Pepwave...
- Page 190 PepVPN Analyzer will temporarily interrupt VPN connectivity and will restore after test. After clicking the icon, the analyzer will require several minutes to perform its analysis depending the number of WAN links in the SpeedFusion Tunnel. Once the test the complete, the report will appear: http://www.peplink.com Copyright @ 2017 Pepwave...
-
Page 191: Event Log
Event log information is located at Status>Event Log. The log section displays a list of events that has taken place on the Pepwave router. Check Auto Refresh to refresh log entries automatically. Click the Clear Log button to clear the log. http://www.peplink.com Copyright @ 2017 Pepwave... -
Page 192: Bandwidth Status
The Data transferred since installation table indicates how much network traffic has been processed by the device since the first bootup. The Data transferred since last reboot table indicates how much network traffic has been processed by the device since the last bootup. http://www.peplink.com Copyright @ 2017 Pepwave... -
Page 193: Hourly
28.2 Hourly This page shows the hourly bandwidth usage for all WAN connections, with the option of viewing each individual connection. Select the desired connection to check from the drop-down menu. http://www.peplink.com Copyright @ 2017 Pepwave... -
Page 194: Daily
Click on a date to view the client bandwidth usage of that specific date. This feature is not available if you have selected to view the bandwidth usage of only a particular WAN connection. The scale of the graph can be set to display megabytes (MB) or gigabytes (GB). All WAN Daily Bandwidth Usage http://www.peplink.com Copyright @ 2017 Pepwave... -
Page 195: Monthly
Click the first two rows to view the client bandwidth usage in the last two months. This feature is not available if you have chosen to view the bandwidth of an individual WAN connection. The scale of the graph can be set to display megabytes (MB) or gigabytes (GB). All WAN Monthly Bandwidth Usage http://www.peplink.com Copyright @ 2017 Pepwave... - Page 196 Ethernet WAN Monthly Bandwidth Usage By default, the scale of data size is in MB. 1GB equals 1024MB. http://www.peplink.com Copyright @ 2017 Pepwave...
-
Page 197: Appendix A: Restoration Of Factory Defaults
After the Pepwave router finishes rebooting, the factory default settings will be restored. Important Note All previous configurations and bandwidth usage data will be lost after restoring factory default settings. Regular backup of configuration settings is strongly recommended. http://www.peplink.com Copyright @ 2017 Pepwave... -
Page 198: Appendix B: Declaration
This transmitter must not be co-located or operating in conjunction with any other antenna or transmitter. Operations in the 5.15-5.25GHz band are restricted to indoor usage only. http://www.peplink.com Copyright @ 2017 Pepwave... - Page 199 This transmitter must not be co-located or operating in conjunction with any other antenna or transmitter. The availability of some specific channels and/or operational frequency bands are country dependent and are firmware programmed at the factory to match the intended destination. http://www.peplink.com Copyright @ 2017 Pepwave...
- Page 200 (iii).De plus, les utilisateurs devraient aussi être avisés que les utilisateurs de radars de haute puissance sont désignés utilisateurs principaux (c.-à-d., qu’ils ont la priorité) pour les bandes 5650-5850 MHz et que ces radars pourraient causer du brouillage et/ou des dommages aux dispositifs LAN-EL. http://www.peplink.com Copyright @ 2017 Pepwave...
- Page 201 Cet équipement est conforme aux limites d'exposition aux rayonnements ISED établies pour un environnement non contrôlé. Cet équipement doit être installé et utilisé avec un minimum de 25 cm de distance entre la source de rayonnement et votre corps. http://www.peplink.com Copyright @ 2017 Pepwave...
- Page 202 The disposal at the communal collecting point via private persons is for free. The owner of old appliances is responsible to bring the appliances to these collecting points. http://www.peplink.com Copyright @ 2017 Pepwave...
- Page 203 1999/5/EY oleellisten vaatimusten ja sitä koskevien direktiivin muiden ehtojen mukainen. Härmed intygar [företag] att denna [utrustningstyp] står I överensstämmelse med de väsentliga egenskapskrav och Svenska övriga relevanta bestämmelser som framgår av direktiv 1999/5/EG. [Swedish] http://www.peplink.com Copyright @ 2017 Pepwave...
- Page 204 For MAX Transit, MAX BR1 MK2, MAX BR1 MK2 LTE WLAN [警語] 「電磁波曝露量 MPE 標準值 1mW/cm2,本產品使用時建議應距離人體 24 cm」 電磁波 「減少電磁波影響,請妥適使用」。 [警語內容] (1) 電磁波警語標示:「減少電磁波影響,請妥適使用」。 標示方式:必須標示於設備本體適當位置及設備外包裝 及使用說明書上。 低功率電波輻射性電機管理辦法 第十二條 經型式認證合格之低功率射頻電機,非經許可,公司、商號或使用者均不得擅自變更頻率、加大功率或變 更原設計之特性及功能。 第十四條 低功率射頻電機之使用不得影響飛航安全及干擾合法通信;經發現有干擾現象時,應立即停用,並改善至 無干擾時方得繼續使用。前項合法通信,指依電信法規定作業之無線電通信。低功率射頻電機須忍受合法通信或工 業、科學及醫療用電波輻射性電機設備之干擾。 本行動寬頻設備的行動寬頻頻段(LTE900/LTE1800) 警告使用者: 此為甲類資訊技術設備,於居住環境中使用時,可能會造成射頻擾動,在此種情況下,使用者會被要求採取某些適 當的對策。 http://www.peplink.com Copyright @ 2017 Pepwave...
- Page 205 140% du pic pouvant être atteint. 5.3.4 Risque d’explosion. Ne connectez ou ne déconnectez pas le produit quand celle-ci est sous tension. 5.3 Temperature class Temperature class is T4. http://www.peplink.com Copyright @ 2017 Pepwave...
- Page 206 5.1 User should pay attention to use manufacturer supplied power adapter: ADAPTER TECH. AC ADAPTER INPUT: 100-240V~ 50-60Hz, 1.2A MAX, OUTPUT: 12V 4.2A LPS FOR INDOOR USE ONLY 5.2 USB port output rating:5VDC, 2A 5.3 Temperature suitable for use: ambient temp. Maximum 40 http://www.peplink.com Copyright @ 2017 Pepwave...
- Page 207 Additional information Module information: LTEA module: MC7455 (FCC ID: N7NMC7455) or LTE module: MC7354 (FCC ID: N7NMC7355) Operating frequency for the Pepwave MAX Mobile Router: Model: Operating frequency: 4.1 MAX 700 2.4GHz + 5GHz 4.2 MAX HD2 2.4GHz + 5GHz 4.3 MAX HD2 IP67 3G/4G cellular network, no Wi-Fi for MAX HD2 IP67 (Contains FCC ID: MC7455 / Contains FCC ID: MC7354)
- Page 208 4.16 MAX BR1 IP67 2.4GHz only 4.17 MAX On-The Go 2.4GHz + 5GHz 4.18 NPC (Network Power no wireless function for existing version of NPC Controller) 4.19 SD-PMU no wireless function for existing version of SD-PMU Remark: FCC ID of Item 4.16 MAX BR1 IP67 is U8G-P193067...
Need help?
Do you have a question about the Pepxim Series and is the answer not in the manual?
Questions and answers