peplink 20 User Manual
Balance multi-wan routers
For more information, please visit peplink.com
Table of Contents
Advertisement
Quick Links
Peplink Balance Multi-WAN Routers
Model 20/30/210/310/380/580/710/1350
User Manual
Firmware 5.3
May 2011
Copyright & Trademarks Specifications are subject to change without prior notice. Copyright © 2011 Peplink International Ltd. All
Rights Reserved. Peplink and the Peplink logo are trademarks of Peplink International Ltd. Other brands or products mentioned
may be trademarks or registered trademarks of their respective owners.
Advertisement
Table of Contents

Subscribe to Our Youtube Channel
Related Manuals for peplink 20


Summary of Contents for peplink 20
-
Page 1: User Manual
Firmware 5.3 May 2011 Copyright & Trademarks Specifications are subject to change without prior notice. Copyright © 2011 Peplink International Ltd. All Rights Reserved. Peplink and the Peplink logo are trademarks of Peplink International Ltd. Other brands or products mentioned... -
Page 2: Table Of Contents
PACKAGE CONTENTS ····································································································· 13 Peplink Balance 20 / 30 ················································································································ 13 Peplink Balance 210 / 310 ············································································································ 13 Peplink Balance 380 / 580 / 710 / 1350 ························································································ 13 PEPLINK BALANCE OVERVIEW ······················································································· 14 Peplink Balance 20 ······················································································································· 14 Peplink Balance 30 ······················································································································· 16 Peplink Balance 210 ·····················································································································... - Page 3 USER MANUAL Peplink Balance Series 12.1 Site-to-Site VPN Settings ·········································································································· 66 12.2 Peplink Balance Behind NAT Router ························································································ 69 12.3 VPN Status ································································································································ 70 MANAGEMENT OF OUTBOUND TRAFFIC TO WAN ······················································· 71 13.1 Outbound Policy ························································································································ 72 13.2 Custom Rules For Outbound Policy·························································································· 73 INBOUND ACCESS·······································································································...
- Page 4 Outbound Access Restriction ····································································································· 173 APPENDIX D. TROUBLESHOOTING ····················································································· 174 APPENDIX E. PRODUCT SPECIFICATIONS ············································································ 176 Peplink Balance 20 and 30 ········································································································· 176 Peplink Balance 210 and 310 ····································································································· 177 Peplink Balance 380 ··················································································································· 178 Peplink Balance 580 ··················································································································· 179 Peplink Balance 710 ···················································································································...
-
Page 5: Introduction And Scope
The Peplink Balance series provides link aggregation and load balancing across up to thirteen WAN connections. The Peplink Balance 20/30 provides a cost-effective solution suitable for power users and home offices. The Peplink Balance 210/310 provides advanced features for small business. -
Page 6: Glossary
Virtual Private Network VRRP Virtual Router Redundancy Protocol Wide Area Network WINS Windows Internet Name Service WLAN Wireless Local Area Network 210+ Refer to Peplink Balance 210/310/380/580/710/1350 380+ Refer to Peplink Balance 380/580/710/1350 http://www.peplink.com - 6 / 182- Copyright © 2011 Peplink... -
Page 7: Product Comparison Chart
Core Functionality Load Balancing & Failover Load Balancing Algorithms • Weighted • Enforced • Persistence • Priority • Overflow • Least Used • Lowest Latency Drop-In Mode Inbound Load Balancing http://www.peplink.com - 7 / 182 - Copyright © 2011 Peplink... - Page 8 Manage Pepwave AP One Access Point Configuration Number of AP Support Advanced QoS Functionality Bandwidth Usage Monitor QoS for VoIP and E-Commerce Application Prioritization Application Prioritization by User Group User Group Bandwidth Reservation http://www.peplink.com - 8 / 182 - Copyright © 2011 Peplink...
- Page 9 WINS Server Dynamic DNS Web Blocking Device Management Functionality Web Administrative Interface Email Notification Client List Bandwidth Usage Statistics Web Reporting Services Email Notification Syslog SNMP v1, v2c and v3 http://www.peplink.com - 9 / 182 - Copyright © 2011 Peplink...
- Page 10 4.4cm x 29.3cm x Dimension (H x W x D) 1U x 27.0cm 1U x 27.8cm 1U x 37.9cm 1U x 39.8cm 13.3cm 15.9cm Weight 1.0kg 1.0kg 1.2kg 1.2kg 3.5kg 5.5kg 5.5kg 6.5kg http://www.peplink.com - 10 / 182 - Copyright © 2011 Peplink...
-
Page 11: Product Features
USER MANUAL Peplink Balance Series Product Features Peplink Balance Series products enable all LAN users to share broadband Internet connections, and provide advanced features to enhance Internet access. The following is the list of supported features: Supported Network Features 4.1.1 WAN Multiple public IP support (DHCP, PPPoE, Static IP Address, or GRE) ... -
Page 12: Other Supported Features
Quality of Service for different applications and custom protocols User Group classification for different service levels (Available on Peplink Balance 380+) Bandwidth usage control and monitoring on group- and user- level (Available on Peplink Balance 380+) Application Prioritization for custom protocols and DSL optimization ... -
Page 13: Package Contents
USER MANUAL Peplink Balance Series Package Contents The contents of Peplink Balance product packages are as follows: Peplink Balance 20 / 30 Peplink Balance 20 / 30 Power adapter Information slip Peplink Balance 210 / 310 Peplink Balance 210 / 310 ... -
Page 14: Peplink Balance Overview
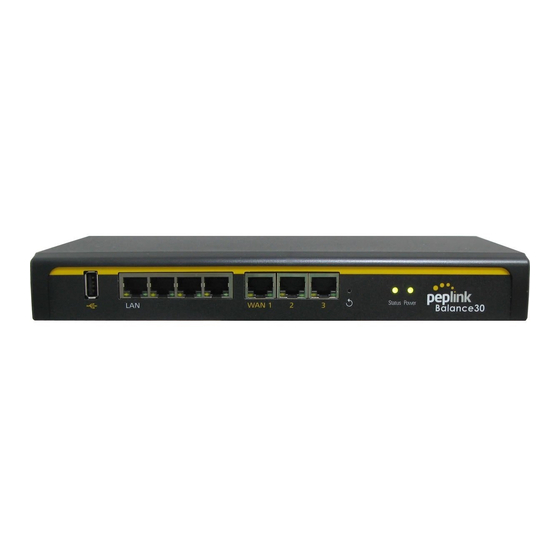
USER MANUAL Peplink Balance Series Peplink Balance Overview Peplink Balance 20 6.1.1 Front Panel Appearance USB Port WAN Ports Status LED Reset Button LAN Ports Power LED 6.1.2 LED Indicators The statuses indicated by the Front Panel LEDs are as follows: Power and Status Indicators OFF –... - Page 15 USER MANUAL Peplink Balance Series 6.1.3 Rear Panel Appearance Power Connector Kensington Security Slot 6.1.4 Unit Base Appearance Serial Number and LAN MAC Address http://www.peplink.com - 15 / 182 - Copyright © 2011 Peplink...
-
Page 16: Peplink Balance 30
Solid – Port is connected without traffic Yellow LED Blinking – Data is transferring OFF – Port is not connected Port Type Auto MDI/MDI-X ports USB Port USB Ports For connecting a USB based mobile modem. http://www.peplink.com - 16 / 182 - Copyright © 2011 Peplink... - Page 17 USER MANUAL Peplink Balance Series 6.2.3 Rear Panel Appearance Power Connector Kensington Security Slot 6.2.4 Unit Base Appearance Serial Number and LAN MAC Address http://www.peplink.com - 17 / 182 - Copyright © 2011 Peplink...
-
Page 18: Peplink Balance 210
Green LED OFF – 10 Mbps Solid – Port is connected without traffic Yellow LED Blinking – Data is transferring OFF – Port is not connected Port Type Auto MDI/MDI-X ports http://www.peplink.com - 18 / 182 - Copyright © 2011 Peplink... - Page 19 USER MANUAL Peplink Balance Series 6.3.3 Rear Panel Appearance Power Connector 6.3.4 Unit Base Appearance Serial Number and LAN MAC Address http://www.peplink.com - 19 / 182 - Copyright © 2011 Peplink...
-
Page 20: Peplink Balance 310
Green LED OFF – 10 Mbps Solid – Port is connected without traffic Yellow LED Blinking – Data is transferring OFF – Port is not connected Port Type Auto MDI/MDI-X ports http://www.peplink.com - 20 / 182 - Copyright © 2011 Peplink... - Page 21 USER MANUAL Peplink Balance Series 6.4.3 Rear Panel Appearance Power Connector 6.4.4 Unit Base Appearance Serial Number and LAN MAC Address http://www.peplink.com - 21 / 182 - Copyright © 2011 Peplink...
-
Page 22: Peplink Balance 380
Green LED OFF – 100/10 Mbps Solid – Port is connected without traffic Yellow LED Blinking – Data is transferring OFF – Port is not connected Port Type Auto MDI/MDI-X ports http://www.peplink.com - 22 / 182 - Copyright © 2011 Peplink... - Page 23 > Factory default? (Yes/No) (to restore factory defaults) > LAN config (shows port speed: Auto, 10baseT-FD, 10baseT-HD, > Port speed > LAN 100baseTx-FD, 100baseTx-HD, 1000baseTx-FD) > WAN1 > WAN2 > WAN3 http://www.peplink.com - 23 / 182 - Copyright © 2011 Peplink...
- Page 24 To hold pressing the key for 4 seconds will power down the unit Power Switch When the unit is powered off, press it will power on the unit 6.5.5 Unit Label Appearance Serial Number and LAN MAC Address http://www.peplink.com - 24 / 182 - Copyright © 2011 Peplink...
-
Page 25: Peplink Balance 580
Green LED OFF – 100/10 Mbps Solid – Port is connected without traffic Yellow LED Blinking – Data is transferring OFF – Port is not connected Port Type Auto MDI/MDI-X ports http://www.peplink.com - 25 / 182 - Copyright © 2011 Peplink... - Page 26 > Factory default > Factory default? (Yes/No) (to restore factory defaults) > LAN config > Port speed (shows port speed: Auto, 10baseT-FD, 10baseT-HD, > LAN 100baseTx-FD, 100baseTx-HD, 1000baseTx-FD) > WAN1 > WAN2 > … > WAN5 http://www.peplink.com - 26 / 182 - Copyright © 2011 Peplink...
- Page 27 To hold pressing the key for 4 seconds will power down the unit Power Switch When the unit is powered off, press it will power on the unit 6.6.5 Unit Label Appearance Serial Number and LAN MAC Address http://www.peplink.com - 27 / 182 - Copyright © 2011 Peplink...
-
Page 28: Peplink Balance 710
Green LED OFF – 10 Mbps Solid – Port is connected without traffic Yellow LED Blinking – Data is transferring OFF – Port is not connected Port Type MDI ports http://www.peplink.com - 28 / 182 - Copyright © 2011 Peplink... - Page 29 > Factory default > Factory default? (Yes/No) (to restore factory defaults) > LAN config > Port speed (shows port speed: Auto, 10baseT-FD, > LAN 10baseT-HD, 100baseTx-FD, 100baseTx-HD, > WAN1 1000baseTx-FD) > WAN2 > … > WAN7 http://www.peplink.com - 29 / 182 - Copyright © 2011 Peplink...
- Page 30 When the unit is powered off, press it will power on the unit Reset Switch Press and release once to reset the system 6.7.4 Unit Label Appearance Serial Number and LAN MAC Address http://www.peplink.com - 30 / 182 - Copyright © 2011 Peplink...
-
Page 31: Peplink Balance 1350
Green LED OFF – 10 Mbps Solid – Port is connected without traffic Yellow LED Blinking – Data is transferring OFF – Port is not connected Port Type MDI ports http://www.peplink.com - 31 / 182 - Copyright © 2011 Peplink... - Page 32 > Factory default > Factory default? (Yes/No) (to restore factory defaults) > LAN config > Port speed (shows port speed: Auto, 10baseT-FD, 10baseT-HD, > LAN 100baseTx-FD, 100baseTx-HD, 1000baseTx-FD) > WAN1 > WAN2 > … > WAN7 http://www.peplink.com - 32 / 182 - Copyright © 2011 Peplink...
- Page 33 When the unit is powered off, press it will power on the unit Reset Switch Press and release once to reset the system 6.8.4 Unit Label Appearance Serial Number and LAN MAC Address http://www.peplink.com - 33 / 182 - Copyright © 2011 Peplink...
-
Page 34: Installation
At the high level, construct the network according to the following steps: With an Ethernet cable, connect a computer to one of the LAN ports on the Peplink Balance. For Peplink Balance 20, 30, 210 and 310, repeat with different cables for up to 4 computers to be connected. -
Page 35: Configuring The Network Environment
USER MANUAL Peplink Balance Series Configuring the Network Environment To ensure that Peplink Balance works properly in the LAN environment and can access the Internet via the WAN connections, please refer to the following setup procedures: LAN Configuration For basic configuration, refer to Section 8, Basic Configuration. -
Page 36: Basic Configuration
Connecting to Web Admin Interface Start a web browser on a computer that is connected with Peplink Balance through LAN. To connect to Web Admin of Peplink Balance, enter the following LAN IP address in the address field of the web browser: http://192.168.1.1... -
Page 37: Configuration With Setup Wizard
USER MANUAL Peplink Balance Series Configuration with Setup Wizard The Setup Wizard of Peplink Balance simplifies the task of configuring WAN connection(s) by guiding the configuration process step by step. To begin, click Setup Wizard after connecting to Web Admin Interface. - Page 38 If Custom Mobile Operator Settings is selected, APN parameters are required to be entered. Some service providers may charge a fee for connecting to a different APN. Please consult the service provider for the correct settings. http://www.peplink.com - 38 / 182 - Copyright © 2011 Peplink...
- Page 39 Check in the following screen to make sure all settings have been configured correctly, and then click Save Settings to confirm. After finishing the last step in the Setup Wizard, please click Apply Changes on the page header to allow the configuration changes to take effect. http://www.peplink.com - 39 / 182 - Copyright © 2011 Peplink...
-
Page 40: Advanced Setup
WAN connections can be configured by entering the corresponding WAN connection information at: Network > Interfaces > WAN Please refer to Section 11, Configuration of WAN Interface(s), for details on setting up DHCP, Static IP, PPPoE, GRE, and Mobile Internet Connection. http://www.peplink.com - 40 / 182 - Copyright © 2011 Peplink... -
Page 41: Configuration Of Lan Interface
USER MANUAL Peplink Balance Series Configuration of LAN Interface The LAN Interface settings are located at: Network > Interfaces > LAN http://www.peplink.com - 41 / 182 - Copyright © 2011 Peplink... - Page 42 Advertise Speed checkbox. Drop-in Mode Settings (Available on Peplink Balance 210+) Drop-in Mode eases the installation of Peplink Balance on a live network between the existing Firewall and Router, such that no configuration changes are required Enable on existing equipment.
- Page 43 This option allows you to input the DNS server addresses to be offered to the DNS Servers DHCP clients. If Assign DNS server automatically is selected, the Peplink Balance’s built-in DNS server address (i.e. LAN IP address) will be offered.
- Page 44 This table is for defining custom local DNS records. A static local DNS record consists of a Host Name and an IP Address. When Local DNS looking up the Host Name from the LAN to LAN IP of Peplink Balance, the Records corresponding IP Address will be returned.
-
Page 45: Drop-In Mode
WAN segments have to be flushed once or the hosts have to be rebooted. Otherwise, hosts on one side may not be able to reach hosts on the other side of Peplink Balance until the old ARP records expire. Units without enabling Drop-in Mode are not affected. - Page 46 Balance IP subnet is the same as the Firewall’s WAN port and the Router’s LAN port. If there are hosts other than the router existing on the WAN segment of Peplink Balance, check the I have other host(s) on WAN segment box, enter the IP address(es) of the host(s), and then click the down-arrow to add the hosts.
- Page 47 Balance 580) as the WAN for Drop-in Mode, High Availability feature will be DISABLED automatically. Want to know more about Drop-in mode? Visit our YouTube Channel for video tutorials! http://www.youtube.com/PeplinkChannel#p/u/9/xHTLcCXsqTc http://www.peplink.com - 47 / 182 - Copyright © 2011 Peplink...
-
Page 48: Configuration Of Wan Interface(S)
Static IP Connection Method PPPoE Mobile Internet Connection (available on Peplink Balance 20/30, 380+) See Sections 11.1.1, 11.1.2, 11.1.3, 11.1.4, 11.1.5 for configuration details of each connection method. This field shows that NAT (Network Address Translation) will be applied to the traffic routing over this WAN connection. - Page 49 This value is referenced as the default weight value when using the custom rule Default (Auto), the algorithm Least Used, or the algorithm Persistence (Auto) in Outbound Policy with Managed by Custom Rules chosen (see Section 13.2). http://www.peplink.com - 49 / 182 - Copyright © 2011 Peplink...
-
Page 50: Connection Method(S)
Static IP PPPoE Mobile Internet Connection (available on Peplink Balance 20/30, 380+, please refer to Section 11.1.5 for details.) 11.1.1 DHCP Connection The DHCP connection method is suitable if the ISP provides an IP address automatically by DHCP (e.g. Cable, Metro Ethernet, etc.). -
Page 51: Static Ip Connection
DNS server 2 fields. If no address is entered here, this link will not be used for DNS lookups. Please refer to Section 11.2, 11.4, 11.5, and 11.6 for details about WAN Health Check, Bandwidth Allowance Monitor, Additional Public IP Settings, and Dynamic DNS Settings respectively. http://www.peplink.com - 51 / 182 - Copyright © 2011 Peplink... -
Page 52: Pppoe Connection
Please refer to Section 11.2, 11.4, 11.5, and 11.6 for details about WAN Health Check, Bandwidth Allowance Monitor, Additional Public IP Settings, and Dynamic DNS Settings respectively. Note PPPoE connection made from a firewall does not work with Drop-in mode. http://www.peplink.com - 52 / 182 - Copyright © 2011 Peplink... - Page 53 DNS server 2 fields. If no address is entered here, this link will not be used for DNS lookups. Please refer to Section 11.2, 11.4, 11.5, and 11.6 for details about WAN Health Check, Bandwidth Allowance Monitor, Additional Public IP Settings, and Dynamic DNS Settings respectively. http://www.peplink.com - 53 / 182 - Copyright © 2011 Peplink...
- Page 54 Peplink Balance Series 11.1.4.1 Routing under GRE via Network Address Translation (NAT) The following figure shows a typical scenario with Peplink Balance under the GRE connection mode and NAT routing mode: In this scenario, the IP address settings are as follows: WAN IP Address: 172.23.2.123...
- Page 55 Peplink Balance Series 11.1.4.2 Routing under GRE via IP Forwarding The following figure shows a typical scenario with Peplink Balance under the GRE connection mode and IP Forwarding routing mode: In this scenario, the IP address settings are as follows: WAN IP Address: 172.23.2.123...
- Page 56 The Mobile Internet Connection method is suitable for USB modem mobile connection such as 3G, EVDO, EDGE, and GPRS, etc. Currently it only applies to USB mobile WAN port. For the list of supported modems, please refer to Peplink 3G Modem Support page: http://www.peplink.com/3g...
- Page 57 This setting applies to 3G / EDGE / GPRS modem only. It does not apply to EVDO / EVDO Rev. A modem. This allows you to configure the APN settings of your connection. If Auto is selected, Peplink Operator Balance will automatically detect the APN, configure the modem, and make connection. You Settings may change the APN settings by selecting Custom Mobile Operator Settings.
- Page 58 GSM900 / GSM1800 / GSM2100 are used in Europe, Middle East, Africa, Asia, Band Oceania, and Brazil. If All Bands is chosen, the appropriate frequency band will be used automatically. The default GSM Frequency Band is All Bands. http://www.peplink.com - 58 / 182 - Copyright © 2011 Peplink...
-
Page 59: Physical Interface Settings
This setting specifies port speed and duplex configurations of the WAN Port. By default, Auto is selected and the appropriate data speed is automatically detected by Peplink Balance. Speed In the event of negotiation issues, the port speed can be manually specified to circumvent the issues. -
Page 60: Wan Health Check
Peplink Balance Series 11.3 WAN Health Check To ensure traffic is routed to healthy WAN connections only, Peplink Balance provides the functionality to periodically check the health of each WAN connection. The Health Check settings for each WAN connection can be independently configured via Network >... - Page 61 Health Check DNS Servers. Health Check Method: SmartCheck SmartCheck applies only to the Peplink Balance 20/30/380 or above Mobile Internet connection. It monitors the link status, and is optimized for mobile networks with high traffic latency. Other Health Check Settings This setting specifies the timeout, in seconds, for ping/DNS lookup requests.
- Page 62 USER MANUAL Peplink Balance Series This setting specifies the number of consecutive successful ping/DNS lookup responses that must be received before Peplink Balance treats a previously down WAN connection to be up again. Recovery Retries By default, Recover Times is set to 3. For example, a WAN connection that is treated as down will be considered to be up again upon receiving 3 consecutive successful ping/DNS lookup responses.
-
Page 63: Bandwidth Allowance Monitor
USER MANUAL Peplink Balance Series 11.4 Bandwidth Allowance Monitor Bandwidth Allowance Monitor helps keep track of your network usage. Please refer to section 20.8 to view the usage statistics. Bandwidth Allowance Monitor If the feature Email Notification is enabled, you will be notified through email when usage hits 75% and 95% of the monthly allowance. -
Page 64: Additional Public Ip Settings
IP Address List Enter the fixed Internet IP addresses and the corresponding subnet mask, and then click the Down Arrow button to populate IP address entries to the IP Address List. http://www.peplink.com - 64 / 182 - Copyright © 2011 Peplink... -
Page 65: Dynamic Dns Settings
Due to dynamic DNS service providers’ policy, a dynamic DNS host would expire automatically because the host record was not updated for a long time. Therefore Peplink Balance performs an update every 23 days even if a WAN’s IP address did not change. -
Page 66: Site-To-Site Vpn
The Site-to-Site VPN of the Peplink Balance is specifically designed for multi-WAN environment. The Peplink Balance can aggregate all WAN connections’ bandwidth for routing Site-to-Site VPN traffic. Unless all the WAN connections of one site are down, the Peplink Balance can still maintain VPN up and running. - Page 67 Click the Add VPN Connection button to create a new VPN connection profile for making VPN connection to a remote Peplink Balance via the available WAN connections. Each profile is for making VPN connection with one remote Peplink Balance. Click a connection name on the leftmost column to edit the profile.
- Page 68 Peplink proprietary Site-to-Site VPN used TCP and UDP port 32015 for establishing VPN connections. If you have a firewall in front of the Peplink Balance devices, you will need to add firewall rules for these port and protocols which will allow inbound and outbound traffic pass-through the firewall.
-
Page 69: Peplink Balance Behind Nat Router
NAT (Network Address Translation) router. To be able for a WAN connection behind a NAT router to accept VPN connections, you can configure the NAT router in front of the WAN connection to inbound port forward TCP port 32015 to the Peplink Balance. -
Page 70: Vpn Status
VPN Status is shown in the Dashboard. The connection status of each connection profile is shown as below. VPN connection status is also shown on the LCD panel of Peplink Balance 380, 580, 710 and 1350. By clicking the Details button at the top-right hand corner of Site-to-Site VPN table, you will be forwarded to Status >... -
Page 71: Management Of Outbound Traffic To Wan
USER MANUAL Peplink Balance Series 13 Management of Outbound Traffic to WAN Peplink Balance provides the functionality to flexibly manage and load balance outbound traffic among the WAN connections. Important Note Outbound Policy is applied only when more than one WAN connection is active. -
Page 72: Outbound Policy
USER MANUAL Peplink Balance Series 13.1 Outbound Policy There are three main selections for the Outbound Traffic Policy of Peplink Balance: High Application Compatibility Normal Application Compatibility Managed by Custom Rules The selections are explained as follows:... -
Page 73: Custom Rules For Outbound Policy
Algorithm to be used. Please refer to the upcoming sections for the details of the available algorithms. To create a custom rule, click Add Rule at the bottom of the table, and the following window will be displayed: http://www.peplink.com - 73 / 182 - Copyright © 2011 Peplink... - Page 74 Enable taken, by Peplink Balance based on the other parameters of the rule. With an Enable value of No, the rule does not take effect: Peplink Balance disregards the other parameters of the rule. This setting specifies the source IP Address, IP Network or MAC Address for traffic that Source matches the rule.
- Page 75 Internet IP depends on the WAN connections over which communication actually takes place. As a result, a LAN client computer behind Peplink Balance may communicate using multiple Internet IP addresses. For example, a LAN client computer behind a Peplink Balance 310 with three WAN connections may communicate on the Internet using three different IP addresses.
- Page 76 Starting from firmware 5.2, outbound traffic can be prioritized to go through Site-to-Site VPN connection(s). By default, VPN connections are not included in the priority list. (Available on Peplink Balance 210+) Configure multiple distribution rules to accommodate different kinds of services.
- Page 77 13.2.6 Algorithm: Least Used (Available on Peplink Balance 210+) The traffic matching this rule will be routed through the healthy WAN connection that is selected in the field Connection and has the most available download bandwidth. The available download bandwidth of a WAN connection is calculated from the total download bandwidth specified in the WAN settings page and the current download usage.
-
Page 78: Expert Mode
VPN peer. You can create custom Priority or Enforced rules and move them above the bar to override the Site-to-Site VPN Routes. Upon disabling the Expert Mode, all rules above the bar will be removed. http://www.peplink.com - 78 / 182 - Copyright © 2011 Peplink... -
Page 79: Inbound Access
Enable are taken, by Peplink Balance based on the other parameters of the rule. With an Enable value of No, the inbound service does not take effect: Peplink Balance disregards the other parameters of the rule. This setting identifies the service to the System Administrator. - Page 80 Any Port, Single Port, Port Range, Port Map and Range Mapping Any Port: all traffic that is received by Peplink Balance via the specified protocol is forwarded to the servers specified by the Servers setting.
-
Page 81: Definition Of Servers On Lan
USER MANUAL Peplink Balance Series 14.2 Definition of Servers on LAN (Available on Peplink Balance 210+) The settings to configure servers on the LAN are located at the following location: Network > Inbound Access > Servers Inbound connections from the Internet will be forwarded to the specified Inbound IP Address(es) base on the protocol and port number . -
Page 82: Inbound Access Services
This setting specifies whether the inbound service rule takes effect. When Yes is selected, the inbound service rule takes effect. If the inbound traffic matches the specified IP Protocol and Port, action will be taken by Peplink Balance based on the other Enable parameters of the rule. - Page 83 Any Port, Single Port, Port Range, Port Map and Range Mapping Any Port: all traffic that is received by Peplink Balance via the specified protocol is forwarded to the servers specified by the Servers setting.
-
Page 84: Upnp / Nat-Pmp Settings
LAN. When the options are enabled, a table listing all the forwarded ports under these two protocols can be found at Status > UPnP / NAT-PMP. http://www.peplink.com - 84 / 182 - Copyright © 2011 Peplink... -
Page 85: Definition Of Dns Records
Upon receiving the DNS query, Peplink Balance returns, as an “A” record, the IP address for www.mycompany.com on WAN1 because WAN1 is the most appropriate healthy link. The settings for defining the DNS records to be hosted by Peplink Balance are located at: Network > Inbound Access > DNS Settings... - Page 86 Each WAN connection is associated with a priority number. Click Save to save the settings when configuration is complete. This section shows a list of domain names to be hosted by the Peplink Balance. Each domain can have its “NS”, “MX” and “TXT” records, and its or its sub-domains’ “A” and Domain name “CNAME”...
- Page 87 This page is for defining the domain’s SOA, NS, MX, CNAME, A, TXT and SRV records. Seven tables are presented in this page for defining the five types of records. http://www.peplink.com - 87 / 182 - Copyright © 2011 Peplink...
- Page 88 Min Time: Is the negative caching time which defines the time (in seconds) after an error record is cached TTL (Time-to-Live): Defines the duration (in seconds) that the record may be cached http://www.peplink.com - 88 / 182 - Copyright © 2011 Peplink...
- Page 89 Name Server. After finishing adding NS records, click the Save button. (Before clicking the Save button, all NS record changes are not yet saved to the Peplink Balance.) 14.5.4 MX Records The MX Record table shows the domain’s MX records.
- Page 90 To add an A record, click the New A Record button. The screen resembles the one below: An A record may be automatically added for the SOA records with a Name Server IP Address provided. http://www.peplink.com - 90 / 182 - Copyright © 2011 Peplink...
- Page 91 USER MANUAL Peplink Balance Series A Record Editing This field specifies the A record of this sub-domain to be served by the Peplink Balance. *.domain.name The wildcard character “*” is supported. The IP addresses of " " will be Host Name .domain.name...
- Page 92 For example, if the IP address range 11.22.33.0 to 11.22.33.255 is delegated to the DNS server on the Peplink Balance, you will also have to create a domain 33.22.11.in-addr.arpa and have its NS records pointing to your DNS server’s (the Peplink Balance) public IP addresses.
- Page 93 Weight: A relative weight for records with the same priority. • Target: The canonical hostname of the machine providing the service. • Port: Enter the TCP or UDP port number on which the service is to be found. http://www.peplink.com - 93 / 182 - Copyright © 2011 Peplink...
- Page 94 Domain Delegation These are the steps to be used when you host your domain at your ISP or a domain registrar and want to delegate a sub-domain to be resolved and managed at Peplink Balance. New Domain Name button to add a domain name. e.g. www.mycompany.com. Click the Click corresponding domain name to view and edit record details.
- Page 95 Testing the DNS Configuration The following steps can be used to test the DNS configuration: From a host on the Internet, use an IP address of Peplink Balance and nslookup to lookup the corresponding host name. Check the information that is returned for the expected results.
-
Page 96: Reverse Lookup Zones
11.22.33.0/24, the Zone Name should be 33.22.11.in-arpa.addr. PTR records for 11.22.33.1, 11.22.33.2, ... 11.22.33.254 should be defined in this zone where the Host IP Numbers are 1, 2, ... 254 respectively. http://www.peplink.com - 96 / 182 - Copyright © 2011 Peplink... - Page 97 When creating an NS record for the Reverse Lookup Zone itself (not a sub-domain or dedicated zone), the Host field should be left blank. Name Server field must be an FQDN. http://www.peplink.com - 97 / 182 - Copyright © 2011 Peplink...
- Page 98 11.22.33.44, where the Reverse Lookup Zone is 33.22.11.in-arpa.addr, the Host IP Number should be 44. Points To field defines the host name which the PTR record should be pointed to. It must be an FQDN. http://www.peplink.com - 98 / 182 - Copyright © 2011 Peplink...
-
Page 99: Dns Record Import Wizard
In the blank space, enter the Domain Names (Zones) which you would like to assign with the IP • address entered in the previous step. Enter one domain name per line. • Select Next>> to continue. http://www.peplink.com - 99 / 182 - Copyright © 2011 Peplink... - Page 100 1. After the Fetching zone records process has completed, the fetch results would be shown as above. You can view import details by clicking the corresponding hyperlink on the right hand size. http://www.peplink.com - 100 / 182 - Copyright © 2011 Peplink...
-
Page 101: Nat Mappings
The IP range is a contiguous group of private IP addresses used by the LAN host. The system maps these addresses to a number of public IP addresses, specified Range below, to facilitate outbound traffic. This option is only available when IP Range is selected. http://www.peplink.com - 101 / 182 - Copyright © 2011 Peplink... - Page 102 Note 2: WAN connections in drop-in or IP forwarding mode are not shown here. Click Save to save the settings when configuration has been completed. Important Note Inbound firewall rules override Inbound Mapping settings. http://www.peplink.com - 102 / 182 - Copyright © 2011 Peplink...
-
Page 103: Wlan Controller
To configure, navigate to Network > WLAN Controller and the following options will be shown. Special Note For demo and testing purposes, two Pepwave AP One devices can be controlled by a Peplink Balance without extra costs. To manage more than two units, a Full Edition license is required. Please contact our Authorized Reseller or Peplink Sales Team to obtain more information and price details. - Page 104 To view the device detail, click the corresponding device’s name and you will see the following screen. Device’s Name, Location and Channel can be changed in here. http://www.peplink.com - 104 / 182 - Copyright © 2011 Peplink...
- Page 105 USER MANUAL Peplink Balance Series A customized Captive Portal page can be configured for each Peplink Balance device. To start, click the link Captive Portal Settings and you will be forwarded to the configuration page. For details, please refer to section 16.4.
-
Page 106: Ap Management
WLAN controller will manage any AP that reports to it. If Access points listed be Managed below is selected, only APs with a serial number listed in the text box will be managed. http://www.peplink.com - 106 / 182 - Copyright © 2011 Peplink... -
Page 107: Wireless Networks
This setting specifies whether or not the SSID of this wireless network can be Broadcast SSID scanned by Wi-Fi clients. Broadcast SSID is enabled by default. Multicast Filter This setting enables the filtering of multicast network traffic to the wireless SSID. http://www.peplink.com - 107 / 182 - Copyright © 2011 Peplink... - Page 108 When this option is enabled, web redirection will be applied to all unauthenticated Wi-Fi clients associated with this wireless network. Requests by unauthenticated Wi- Fi clients will be redirected to this Peplink Balance's built-in captive portal site. Enable To configure the captive portal site, click the link “configure your Captive Portal”...
- Page 109 Upon expiration of Re-keying Period, the broadcast key will no longer be valid and the renewal of the broadcast key will be required. Re-keying Period The default is 14400 seconds (i.e. 4 hours). A value of 0 disables re-keying. http://www.peplink.com - 109 / 182 - Copyright © 2011 Peplink...
-
Page 110: Radius Server Settings
By default, it is set as 1812. This specifies the UDP port number for the Accounting port of the Radius Accounting Port server. By default, it is set as 1813. http://www.peplink.com - 110 / 182 - Copyright © 2011 Peplink... -
Page 111: Captive Portal Management
Click the link configure your Captive Portal to start configuration. Once the configuration is complete, click the button Save to save settings. Important Note Only one portal page customization is available for each Peplink Balance device, multiple wireless networks with captive portal enabled will be redirected to the same portal page. 16.4.1 General... - Page 112 Time Quota account. Creation Date This shows the date of creation of the corresponding guest account. There are two different methods to create new guest account: Create Account and Generate Accounts http://www.peplink.com - 112 / 182 - Copyright © 2011 Peplink...
- Page 113 Email must be set to use with this feature. For details please refer to section Information to Email 16.3.4 16.4.2.2 Generate Accounts With this method, multiple accounts will be created in batch with the same settings. http://www.peplink.com - 113 / 182 - Copyright © 2011 Peplink...
- Page 114 A customized portal page will be shown each time a user access the wireless network that has captive portal enabled. The portal page can be customized under the Portal Page customization tab. http://www.peplink.com - 114 / 182 - Copyright © 2011 Peplink...
- Page 115 To specify the custom landing page opened once the clients login as a user. Page Click Preview to preview the custom portal page, and click Publish to save settings. An example of custom portal page is shown as below. http://www.peplink.com - 115 / 182 - Copyright © 2011 Peplink...
-
Page 116: Email Settings
This setting specifies the SMTP username and password while sending email. SMTP User Name / These options are shown only if Require authentication check box is checked Password in SMTP Server setting. http://www.peplink.com - 116 / 182 - Copyright © 2011 Peplink... - Page 117 This is to specify the password of the account. ${EXP_DATE} This is to specify the expiry date of the account. Once the settings are complete, press the Save button to save and activate settings. http://www.peplink.com - 117 / 182 - Copyright © 2011 Peplink...
-
Page 118: Ap Profile
You can define an AP profile by clicking the New AP Profile button. Click the Clone button of an existing profile to create a new profile based on it. To change the settings of an existing profile, click the profile name and the following screen will be shown. http://www.peplink.com - 118 / 182 - Copyright © 2011 Peplink... - Page 119 This setting is only available when the protocol is selected as 802.11bgn or 802.11n Only. There are three options: 20 MHz, 20/40 MHz and 40 MHz Channel Bonding With this feature enabled, it allows the Wi-Fi system to use two channels at once.
- Page 120 Frame Length the frame length for frame aggregation. By default, it is set as 50000. Web Administration Settings Check the box to allow Peplink Balance to manage the web admin access Enable information of the Pepwave AP One. This option specifies the web access protocol used for accessing the web admin Web Access Protocol of Pepwave AP One.
-
Page 121: Qos
17 QoS 17.1 User Groups (Available on Peplink Balance 380+) LAN and PPTP clients can be categorized into three user groups - Manager, Staff, and Guest. This table allows you to define rules and assign client IP addresses or subnets to a user group. You can apply different bandwidth and traffic prioritization policies on each user group in the Bandwidth Control and Application sections. -
Page 122: Bandwidth Control
By default, 50% of bandwidth has been reserved for Manager, 30% for Staff, and 20% for Guest. You can define a maximum download speed (over all WAN connections) and upload speed (for each WAN connection) that each individual Staff and Guest member can consume. -
Page 123: Application
Three priority levels can be set for application prioritization: ↑High, ━ Peplink Balance can detect various application traffics by inspecting the packets' content. Select an application by choosing a supported application, or by defining a custom application manually. The priority preference of supported applications is placed at the top of the table. Custom applications are at the bottom. - Page 124 Action column to delete the custom application in the corresponding row. When Supported Applications is selected, the Peplink Balance will inspect network traffic and prioritize the selected application. Alternatively, select Custom Applications and define the application by providing the protocol, scope, port number, and DSCP value.
-
Page 125: Firewall
LAN side of the network. It can protect the local network from potential hacker attacks, offensive Web sites, and/or other inappropriate uses. The firewall functionality of Peplink Balance supports the selective filtering of data traffic in both directions: Outbound (LAN to WAN) ... - Page 126 Protocol/IP/Port, actions will be taken by Peplink Balance based on the other parameters of Enable the rule. When No is selected, the firewall rule does not take effect. Peplink Balance will disregard the other parameters of the rule. This setting is applicable to Inbound Firewall Rules only.
- Page 127 Destination IP & Port Action With the value of Allow for the Action setting, the matching traffic passes through Peplink Balance (to be routed to the destination). If the value of the Action setting is set to Deny, the matching traffic does not pass through Peplink Balance (and is discarded).
- Page 128 If the default inbound rule is set as Allow for NAT enabled WANs, no inbound Allow firewall rules will be required for inbound Port Forwarding and inbound NAT Mapping rules. However, if the default inbound rule is set as Deny, a corresponding Allow firewall rules will be required. http://www.peplink.com - 128 / 182 - Copyright © 2011 Peplink...
- Page 129 • Port Scan: • NMAP FIN/URG/PSH • Xmas Tree • Another Xmas Tree • Null Scan • SYN/RST • SYN/FIN • SYN Flood Prevention • Ping Flood Attack Prevention http://www.peplink.com - 129 / 182 - Copyright © 2011 Peplink...
-
Page 130: Web Blocking
For example, If you enter "foobar.*," then "www.foobar.com," "www.foobar.co.jp," or "foobar.co.uk" will be blocked. Placing the wild card in any other position is not supported. The Peplink Balance will inspect and look for blocked domain names on all HTTP traffic. Secure web (HTTPS) traffic is not supported. 18.2.2 Exempted User Group Check and select pre-defined user group(s) who can exempt from the access blocking rules. -
Page 131: Miscellaneous Settings
The following diagram illustrates an HA configuration with two Peplink Balance 210 units, and two Internet connections: In the diagram, the WAN ports on each Peplink Balance unit connect to the router and modem; and Peplink Balance unit connects to the same LAN switch via a LAN port. - Page 132 USER MANUAL Peplink Balance Series High Availability Settings Checking this box specifies that the Peplink Balance unit is part of a High Availability High Availability configuration. This setting specifies a number that identifies a pair of Peplink Balance units that Group Number operate in a High Availability configuration.
- Page 133 IP of Master Balance. In Drop-in mode, no other configuration needs to be set. Please be noted that Drop-in WAN cannot be configured in LAN Bypass port when it is configuring High Availability. http://www.peplink.com - 133 / 182 - Copyright © 2011 Peplink...
-
Page 134: Pptp Server
19.2 PPTP Server (Available on Peplink Balance 210+) Peplink Balance has a built-in PPTP Server, which enables remote computers to conveniently and securely access the local network. PPTP server setting is located at: Network > Misc. Settings > PPTP Server Simply check the box to enable the PPTP server function. - Page 135 Click the button to delete the account in its corresponding row. Important Note PPTP server will be disabled automatically if the Balance is deployed in Drop-in mode. http://www.peplink.com - 135 / 182 - Copyright © 2011 Peplink...
-
Page 136: Service Forwarding
Some ISPs require their users to send e-mails via the ISP’s SMTP server. All outgoing SMTP connections are blocked except those connecting to the ISP’s. The Peplink Balance supports to intercept and redirect all outgoing SMTP connections (destined for TCP port 25) via a WAN connection to the WAN’s corresponding SMTP server. - Page 137 Outbound Policy (see Section 13.1). 19.3.2 Web Proxy Forwarding When this feature is enabled, the Peplink Balance will intercept all outgoing connections destined for the proxy server specified in "Web Proxy Server Interception Settings", choose a WAN connection with reference of Outbound Policy, and then forward them to the specified web proxy server and port number.
-
Page 138: Service Passthrough
Service Passthrough settings can be found at: Network > Misc. Settings > Service Passthrough Some Internet services required to be specially handled in a multi-WAN environment. The Peplink Balance supports handling such services correctly such that Internet applications do not notice it is behind a multi-WAN router. -
Page 139: System Settings
USER MANUAL Peplink Balance Series 20 System Settings 20.1 Admin Security There are two user accounts available for accessing the Web Admin. Usernames are admin and user. They represent two user levels - admin has full administration access, while user is a read-only account. - Page 140 USER MANUAL Peplink Balance Series Admin Settings This field allows you to define a name for this Peplink Balance unit. Router Name By default, Router Name is set as Balance_XXXX, where XXXX refers to the last 4 digits of the serial number of that balance unit.
- Page 141 IP subnets. When this is chosen, a text input area will be displayed beneath: Allowed Source IP Subnets The allowed IP subnet addresses should be entered into this text area. Each IP subnet w.x.y.z/m must be in form of http://www.peplink.com - 141 / 182 - Copyright © 2011 Peplink...
- Page 142 To define multiple subnets, separate each IP subnet one in a line. For example: 192.168.0.0/24 10.8.0.0/16 This is to choose which WAN IP address(es) the web server should listen on. Allowed WAN IP Address(es) http://www.peplink.com - 142 / 182 - Copyright © 2011 Peplink...
-
Page 143: Firmware Upgrade
Do not disconnect the power during firmware upgrade process. Do not attempt to upload a non-firmware file, or a firmware file that is not qualified, or not supported, by Peplink. Upgrading a Peplink Balance unit with an invalid firmware file will damage the unit, and may void the warranty. -
Page 144: Time
This specifies the time zone (along with the corresponding Daylight Savings Time scheme) in which Peplink Balance operates. Time Zone The Time Zone value affects the time stamps in the Event Log of Peplink Balance and E- mail notifications. Checked the box Show all to show all time zone options. -
Page 145: Email Notification
Email Notification Administrator when the WAN status changes, or when new firmware is available. If the box Enable is not checked, Email Notification is disabled and Peplink Balance will not send email messages. This setting specifies the SMTP server to be used for sending email. If the Server requires SMTP Server authentication, check the box Require authentication. - Page 146 After it is clicked, you will see this screen to confirm the settings: Click Yes to confirm. Wait a few seconds. You will see a returned message and the detailed test result. http://www.peplink.com - 146 / 182 - Copyright © 2011 Peplink...
-
Page 147: Remote Syslog
USER MANUAL Peplink Balance Series 20.5 Remote Syslog The Remote Syslog functionality of Peplink Balance enables event logging at a specified remote Syslog server. The settings for configuring Remote System Log are found at: System > Remote Syslog Remote Syslog Settings Remote Syslog This setting specifies whether or not to log events at the specified remote Syslog server. -
Page 148: Snmp
USER MANUAL Peplink Balance Series 20.6 SNMP SNMP, or Simple Network Management Protocol, is an open standard that can be used to collect information about the Peplink Balance unit. SNMP configuration is located at: System > SNMP SNMP Settings SNMP Device This field shows the router name defined in System >... - Page 149 This setting specifies via a drop-down menu the one of the following valid privacy protocols: Privacy Protocol • NONE • This setting specifies the privacy password, and is applicable only if the DES privacy Privacy Password protocol is selected. http://www.peplink.com - 149 / 182 - Copyright © 2011 Peplink...
-
Page 150: Reporting Server
This setting specifies the Internet IP address or host name of the reporting server. Reporting Server By default, the Reporting Server value is report.Peplink.com. Click the link to register a login ID on Peplink’s Reporting Server. Each login ID can “create a login” associate with multiple Peplink Balance devices. - Page 151 “view reports” Important Note The registration process will establish contact to the reporting server to associate the Peplink Balance unit with the specified user account on the server. Prior to registration, please ensure that the user account to be entered is valid.
-
Page 152: Configuration
In a High Availability (HA) configuration, to quickly load onto the Peplink Balance unit the configuration of its HA counterpart, click the Upload button. After loading the settings, configure the LAN IP address of the Peplink Balance unit to be different from the HA counterpart. -
Page 153: Reboot
This page provides a Reboot button for restarting the system. For highest reliability, Peplink Balance series are equipped with two copies of firmware of different version. You can select the firmware version you would like the device to reboot with. -
Page 154: Ping Test
Peplink Balance Series 20.10 Ping Test The Ping Test tool in Peplink Balance performs Pings through a specified Ethernet interface or a Site-to- Site VPN connection (VPN connections are only available on Peplink Balance 210 or above). You can specify the number of pings in the field Number of times to a maximum of 10 times, and Packet Size can be specified in the field Packet Size to a maximum of 1472 bytes. -
Page 155: Traceroute Test
USER MANUAL Peplink Balance Series 20.11 Traceroute Test The Traceroute Test tool in Peplink Balance traces the routing path to the destination through a particular Ethernet interface or a Site-to-Site VPN connection (VPN connections are available on Peplink Balance 210+). -
Page 156: Status
USER MANUAL Peplink Balance Series 21 Status This section displays the information of Peplink Balance on the Device, Active Sessions, Client List, WINS Client List, Site-to-Site VPN, UPnP / NAT-PMP, Event Log, and Bandwidth. 21.1 Device System information is located at Status > Device:... -
Page 157: Active Sessions
(retrieved from DHCP reservation table or defined by users), current Download and Upload rate and MAC address that the Peplink Balance has offered IP addresses to since it is powered up. Clients can be imported into DHCP Reservation table by clicking the button on the right-most column. -
Page 158: Access Point
Peplink Balance Series 21.4 Access Point (Available on Peplink Balance 380+) The Status of connected access point devices can be found at Status > Access Point. It lists all connected or detected Pepwave access point devices and their IP address, firmware version, assigned AP profile, number of connected clients and broadcasting channel. - Page 159 USER MANUAL Peplink Balance Series http://www.peplink.com - 159 / 182 - Copyright © 2011 Peplink...
-
Page 160: Upnp / Nat-Pmp
Delete All on the right-hand side below the table. Important Note or Delete All UPnP / NAT-PMP records would be deleted immediately after clicking the button without the need to click Save or Confirm. http://www.peplink.com - 160 / 182 - Copyright © 2011 Peplink... -
Page 161: Event Log
21.8.1 Device Event Log The log section displays a list of events that has taken place on the Peplink Balance unit. Click the Refresh button to retrieve log entries again. Click the Clear Log button to clear the log. Select 50, 100, or all to show the corresponding number of events in the log. -
Page 162: Bandwidth
Click on a date to view the client bandwidth usage of that specific date. This feature is not available if you have selected to view the bandwidth usage of only a particular WAN connection. The Scale of the graph can be set to show in Megabyte (MB) or Gigabyte (GB). http://www.peplink.com - 162 / 182 - Copyright © 2011 Peplink... - Page 163 USER MANUAL Peplink Balance Series All WAN Daily Bandwidth Usage WAN3 Daily Bandwidth Usage http://www.peplink.com - 163 / 182 - Copyright © 2011 Peplink...
- Page 164 WAN connection. The Scale of the graph can be set to show in Megabyte (MB) or Gigabyte (GB). All WAN Monthly Bandwidth Usage WAN3 Monthly Bandwidth Usage http://www.peplink.com - 164 / 182 - Copyright © 2011 Peplink...
-
Page 165: Appendix A. Restoration Of Factory Defaults
USER MANUAL Peplink Balance Series Appendix A. Restoration of Factory Defaults To restore the factory default settings on a Peplink Balance unit, perform the following: For Balance 20/30/210/310: Locate the reset button on the Peplink Balance unit. With a paper clip, press and keep the reset button pressed for at least 10 seconds, until the unit reboots itself. -
Page 166: Appendix B. Routing Under Dhcp, Static Ip, And Pppoe
Peplink Balance Series Appendix B. Routing under DHCP, Static IP, and PPPoE The information in this appendix applies only to situations where Peplink Balance operates with to a WAN connection under DHCP, Static IP, and PPPoE. For information that applies to GRE, please refer to: Section 11.1.4.1, Routing under GRE via Network Address Translation (NAT) -
Page 167: Routing Via Ip Forwarding
USER MANUAL Peplink Balance Series Routing via IP Forwarding When Peplink Balance is operating under IP Forwarding mode, the IP addresses of IP packets are unchanged; Peplink Balance forwards both inbound and outbound IP packets without changing their IP addresses. -
Page 168: Appendix C. Case Studies
Add a new outbound traffic rule for SMTP. In general, to add a new outbound traffic rule: Click here and Select Managed by Custom Rules Click Add Rule to add a new load distribution rule. http://www.peplink.com - 168 / 182 - Copyright © 2011 Peplink... - Page 169 Set the weight of WAN1 and WAN2 for HTTP to 3 and 4, respectively Settings for SMTP: Set the weight of WAN1 and WAN2 for SMTP to 1 and 8, respectively http://www.peplink.com - 169 / 182 - Copyright © 2011 Peplink...
-
Page 170: Maintaining The Same Ip Address Throughout A Session
WAN connection for source-destination pairs of IP addresses, and prevents sessions from being dropped. With Persistence is configured and the option By Source is selected, Peplink Balance uses a consistent WAN connection for same source IP addresses. This option offers even higher application compatibility but the outbound traffic load will be distributed more evenly only if more users use the Internet. -
Page 171: Bypassing The Firewall To Access Hosts On Lan
WAN connections, via Network > NAT Mappings > Add NAT Rule For example, the following settings add the host, with IP address 192.168.1.102, to an Inbound Mapping and bind the host to the default IP and 211.123.123.100 of WAN1: http://www.peplink.com - 171 / 182 - Copyright © 2011 Peplink... -
Page 172: Inbound Access Restriction
C.4.2 Solution Firewall functionality is built into Peplink Balance. By default, inbound access is unrestricted. Enabling a basic level of protection involves setting up firewall rules. For example, to set up a firewall rule between the Internet and the private network that monitors Web... -
Page 173: Outbound Access Restriction
For security reasons, it may be appropriate to disallow LAN users to use ftp to transfer files to and from the Internet, or otherwise restrict outbound access. This can easily be achieved by setting up an outbound firewall rule with Peplink Balance. C.5.2 Solution... -
Page 174: Appendix D. Troubleshooting
Try to test with a web site that does not enable Keep Alive. For example, try http://private.dnsstuff.com/tools/aboutyou.ch (This third-party web site is provided only for reference. Peplink has no association with the site and does not guarantee the site's validity or availability.) - Page 175 You can test the WAN connection by Ping, which is similar to problem 4. As we want to isolate the problems from the LAN, Ping will be performed from Peplink Balance. By using the Ping/Traceroute under the tab Status of the Peplink Balance, you may able to find out the source of problem.
-
Page 176: Appendix E. Product Specifications
Rules-based Stateful Firewall, with IP, Protocol, and Port filtering • Intrusion Detection System Physical Interface • Two (Balance 20) / Three (Balance 30) RJ-45 for an IEEE 802.3u 10/100M WAN • Four RJ-45 for an IEEE 802.3u 10/100M LAN Power Specification •... -
Page 177: Peplink Balance 210 And 310
USER MANUAL Peplink Balance Series Peplink Balance 210 and 310 Routing Drop-in Mode and NAT Flexible Custom Outbound Routing Policy WAN Support DHCP, PPPoE, GRE, and Static IP Inbound and Outbound Link Load Balance Device Management Wizard &... -
Page 178: Peplink Balance 380
One RJ-45 Console / Serial (modem / TA) Port Power Specification AC input 110/220V Operating Environment Temperature: 0°C - 40°C Humidity: 10% - 90% (non-condensing) http://www.peplink.com - 178 / 182 - Copyright © 2011 Peplink... -
Page 179: Peplink Balance 580
One RJ-45 Console / Serial (modem / TA) Port LAN Bypass from WAN5 to LAN Power Specification AC input 110/220V Operating Environment Temperature: 0°C - 40°C Humidity: 10% - 90% (non-condensing http://www.peplink.com - 179 / 182 - Copyright © 2011 Peplink... -
Page 180: Peplink Balance 710
One RJ-45 for an IEEE 802.3ab 10/100/1000M LAN RS-232 Console / Serial (modem / TA) Port Power Specification AC input 110/220V Operating Environment Temperature: 0°C - 40°C Humidity: 10% - 90% (non-condensing) http://www.peplink.com - 180 / 182 - Copyright © 2011 Peplink... -
Page 181: Peplink Balance 1350
One RJ-45 Console / Serial (modem / TA) Port LAN Bypass from WAN1 to LAN Power Specification AC input 110/220V Operating Environment Temperature: 0°C - 40°C Humidity: 10% - 90% (non-condensing) http://www.peplink.com - 181 / 182 - Copyright © 2011 Peplink... - Page 182 What are we doing at the moment? Want to know more about us? Follow us on Twitter! Add us on Facebook! http://twitter.com/Peplink http://www.facebook.com/peplink Difficulties when configuring the device? Anything want to share with everyone? Visit our YouTube Channel! Discuss on...
Need help?
Do you have a question about the 20 and is the answer not in the manual?
Questions and answers