peplink 20 User Manual
Peplink balance multi-wan bonding routers
For more information, please visit peplink.com
Table of Contents
Advertisement
Quick Links
Peplink Balance Multi-WAN Bonding Routers
User Manual
For Model 20/30/210/310/305/380/580/710/1350/2500
Peplink Balance Firmware 5.4
December 2013
Copyright & TrademarksSpecifications are subject to change without prior notice. Copyright © 2013Peplink International Ltd. All
Rights Reserved. Peplink and the Peplink logo are trademarks of Peplink International Ltd. Other brands or products mentioned
may be trademarks or registered trademarks of their respective owners.
Advertisement
Table of Contents

Subscribe to Our Youtube Channel
Related Manuals for peplink 20


Summary of Contents for peplink 20
-
Page 1: User Manual
Copyright & TrademarksSpecifications are subject to change without prior notice. Copyright © 2013Peplink International Ltd. All Rights Reserved. Peplink and the Peplink logo are trademarks of Peplink International Ltd. Other brands or products mentioned may be trademarks or registered trademarks of their respective owners. -
Page 2: Table Of Contents
PACKAGE CONTENTS········································································································14 Peplink Balance 20 / 30 ···························································································· 14 Peplink Balance 210 / 310 ························································································· 14 Peplink Balance305 / 380 / 580 / 710 / 1350 / 2500 ························································ 14 PEPLINK BALANCE OVERVIEW ·························································································15 Peplink Balance 20 ·································································································· 15 Peplink Balance 30 ·································································································· 17 Peplink Balance 210 ································································································... - Page 3 USER MANUAL Peplink Balance Series BANDWIDTH BONDING SPEEDFUSION ·········································································74 12.1 SpeedFusion Settings ························································································· 74 12.2 Peplink Balance Behind NAT Router ········································································ 79 12.3 SpeedFusion Status ··························································································· 80 IPSEC VPN ························································································································81 13.1 IPsec VPN Settings ······························································································ 81 13.2 IPsec Status········································································································ 84 MANAGEMENT OF OUTBOUND TRAFFIC TO WAN ··························································84...
- Page 4 Outbound Access Restriction ··················································································· 194 APPENDIX D. TROUBLESHOOTING ·························································································· 195 APPENDIX E. PRODUCT SPECIFICATIONS ················································································ 197 Peplink Balance 20 and 30 ······················································································ 197 Peplink Balance 210 and 310 ·················································································· 198 Peplink Balance 380 ······························································································ 199 Peplink Balance 305 ······························································································ 200 Peplink Balance 380 ······························································································...
-
Page 5: Introduction And Scope
Important Note to Users of Peplink Balance 30 (Classic Edition) Firmware 5.0 or above is NOT applicable to Peplink Balance 30 (Classic Edition). For more information of identifying the generation of your Peplink Balance 30, please visit our knowledge base at <http://www.peplink.com/index.php?view=faq&id=231&path=16>. -
Page 6: Glossary
Virtual Private Network VRRP Virtual Router Redundancy Protocol Wide Area Network WINS Windows Internet Name Service WLAN Wireless Local Area Network 210+ Refer to Peplink Balance 210/310/380/580/710/1350/2500 380+ Refer to Peplink Balance 380/580/710/1350/2500 http://www.peplink.com -6 / 207- Copyright © 2013 Peplink... -
Page 7: Product Comparison Chart
Load Balancing & Failover Load Balancing Algorithms • Weighted • Enforced • Persistence • Priority • Overflow • Least Used • Lowest Latency Drop-In Mode Inbound Load Balancing 4G/3G Modem Support http://www.peplink.com -7 / 207 - Copyright © 2013 Peplink... - Page 8 AP Firmware Update Number of AP Support 100* 250* 500* Advanced QoS Functionality Bandwidth Usage Monitor QoS for VoIP and E- Application Prioritization Application Prioritization by User Group Bandwidth Individual Bandwidth Limit http://www.peplink.com -8 / 207 - Copyright © 2013 Peplink...
- Page 9 WINS Server Dynamic DNS Web Blocking Device Web Administrative Interface Email Notification Active Client List Active Session List Bandwidth Usage Statistics Web Reporting Services Email Notification Syslog SNMP v1, v2c and v3 http://www.peplink.com -9 / 207 - Copyright © 2013 Peplink...
- Page 10 1U x 55cm Dimension (H x W x D) 1U x 15.9cm 1U x 27.8cm 1U x 37.9cm 1U x 39.8cm 13.3cm Weight 1.0kg 1.0kg 1.2kg 1.2kg 3.5kg 5.5kg 5.5kg 6.5kg 12kg http://www.peplink.com -10 / 207 - Copyright © 2013 Peplink...
-
Page 11: Product Features
SpeedFusion Throughput, Ping and Traceroute Test Built-in PPTP VPN Server Authenticate PPTP clients by RADIUS and LDAP servers (Available on Peplink Balance 210+) IPsec VPN for Network-to-Network connection (Works with Cisco, Juniper only) PPTP and IPsecpassthrough 4.1.4 Inbound Traffic Management... -
Page 12: Other Supported Features
Hardware High Availability via VRRP, with automatic configuration synchronization(Available on Peplink Balance 210+) Real-Time, Hourly, Daily and Monthly Bandwidth Usage reports and charts Hardware backup via LAN bypass (Available on Peplink Balance 580, 710, 1350 and 2500) Built-in WINS server Time server synchronization ... - Page 13 WINS Client List UPnP / NAT-PMP Improved Active Sessions Page Event Log is persistent across reboots IPv6 support Support USB tethering on Android 2.2+ phones http://www.peplink.com -13 / 207 - Copyright © 2013 Peplink...
-
Page 14: Package Contents
Peplink Balance 210 / 310 Power adapter Information slip Rackmount kit Peplink Balance305 / 380 / 580 / 710 / 1350 / 2500 Peplink Balance 305/380/580/710/1350/2500 Power cord Information slip Rackmount kit http://www.peplink.com... -
Page 15: Peplink Balance Overview
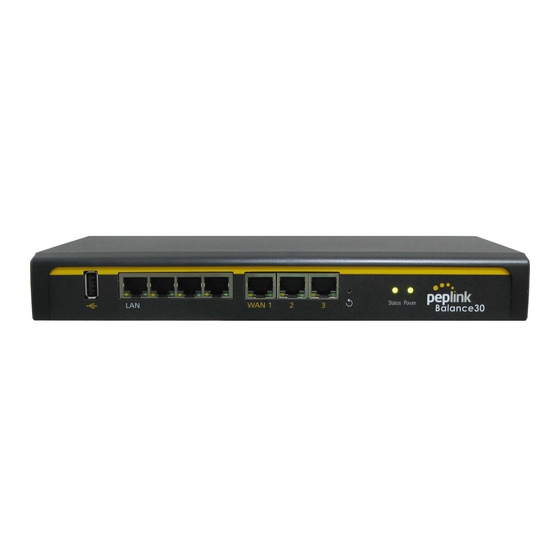
USER MANUAL Peplink Balance Series Peplink Balance Overview Peplink Balance 20 6.1.1 Front Panel Appearance USB Port WAN Ports Status LED Reset Button LAN Ports Power LED 6.1.2 LED Indicators The statuses indicated by the Front Panel LEDs are as follows: Power and Status Indicators OFF –... - Page 16 USER MANUAL Peplink Balance Series 6.1.3 Rear Panel Appearance Power Connector Kensington Security Slot 6.1.4 Unit Base Appearance Serial Number and LAN MAC Address http://www.peplink.com -16 / 207 - Copyright © 2013 Peplink...
-
Page 17: Peplink Balance 30
Blinking – Data is transferring Orange LED OFF – No data is being transferred or port is not connected Port Type Auto MDI/MDI-X ports USB Port USB Ports For connecting a 4G/3G USB modem. http://www.peplink.com -17 / 207 - Copyright © 2013 Peplink... - Page 18 USER MANUAL Peplink Balance Series 6.2.3 Rear Panel Appearance Power Connector Kensington Security Slot 6.2.4 Unit Base Appearance Serial Number and LAN MAC Address http://www.peplink.com -18 / 207 - Copyright © 2013 Peplink...
-
Page 19: Peplink Balance 210
Blinking – Data is transferring Orange LED OFF – No data is being transferred or port is not connected Port Type Auto MDI/MDI-X ports USB Port USB Ports For connecting a 4G/3G USB modem. http://www.peplink.com -19 / 207 - Copyright © 2013 Peplink... - Page 20 USER MANUAL Peplink Balance Series 6.3.3 Rear Panel Appearance Power Connector 6.3.4 Unit Base Appearance Serial Number and LAN MAC Address http://www.peplink.com -20 / 207 - Copyright © 2013 Peplink...
-
Page 21: Peplink Balance 310
Blinking – Data is transferring Orange LED OFF – No data is being transferred or port is not connected Port Type Auto MDI/MDI-X ports USB Port USB Ports For connecting a 4G/3G USB modem. http://www.peplink.com -21 / 207 - Copyright © 2013 Peplink... - Page 22 USER MANUAL Peplink Balance Series 6.4.3 Rear Panel Appearance Power Connector 6.4.4 Unit Base Appearance Serial Number and LAN MAC Address http://www.peplink.com -22 / 207 - Copyright © 2013 Peplink...
-
Page 23: Peplink Balance 305
Blinking – Data is transferring OFF – Port is not connected Port Type Auto MDI/MDI-X ports Console and USB Ports Console Port Reserved for engineering use USB Ports For connecting a 4G/3G USB modem. http://www.peplink.com -23 / 207 - Copyright © 2013 Peplink... - Page 24 > Factory default? (Yes/No) (to restore factory defaults) > LAN config > Port speed (shows port speed: Auto, 10baseT-FD, 10baseT-HD, > LAN 100baseTx-FD, 100baseTx-HD, 1000baseTx-FD) > WAN1 > WAN2 > WAN3 http://www.peplink.com -24 / 207 - Copyright © 2013 Peplink...
- Page 25 To hold pressing the key for 4 seconds will power down the unit Power Switch When the unit is powered off, press it will power on the unit 6.5.5 Unit Label Appearance Serial Number and LAN MAC Address http://www.peplink.com -25 / 207 - Copyright © 2013 Peplink...
-
Page 26: Peplink Balance 380
Blinking – Data is transferring OFF – Port is not connected Port Type Auto MDI/MDI-X ports Console and USB Ports Console Port Reserved for engineering use USB Ports For connecting a 4G/3G USB modem. http://www.peplink.com -26 / 207 - Copyright © 2013 Peplink... - Page 27 > Factory default? (Yes/No) (to restore factory defaults) > LAN config > Port speed (shows port speed: Auto, 10baseT-FD, 10baseT-HD, > LAN 100baseTx-FD, 100baseTx-HD, 1000baseTx-FD) > WAN1 > WAN2 > WAN3 http://www.peplink.com -27 / 207 - Copyright © 2013 Peplink...
- Page 28 To hold pressing the key for 4 seconds will power down the unit Power Switch When the unit is powered off, press it will power on the unit 6.6.5 Unit Label Appearance Serial Number and LAN MAC Address http://www.peplink.com -28 / 207 - Copyright © 2013 Peplink...
-
Page 29: Peplink Balance 580
Blinking – Data is transferring OFF – Port is not connected Port Type Auto MDI/MDI-X ports Console and USB Ports Console Port Reserved for engineering use USB Ports For connecting a 4G/3G USB modem. http://www.peplink.com -29 / 207 - Copyright © 2013 Peplink... - Page 30 > Factory default > Factory default? (Yes/No) (to restore factory defaults) > LAN config > Port speed (shows port speed: Auto, 10baseT-FD, 10baseT-HD, > LAN 100baseTx-FD, 100baseTx-HD, 1000baseTx-FD) > WAN1 > WAN2 > … >WAN5 http://www.peplink.com -30 / 207 - Copyright © 2013 Peplink...
- Page 31 To hold pressing the key for 4 seconds will power down the unit Power Switch When the unit is powered off, press it will power on the unit 6.7.5 Unit Label Appearance Serial Number and LAN MAC Address http://www.peplink.com -31 / 207 - Copyright © 2013 Peplink...
-
Page 32: Peplink Balance 710
Blinking – Data is transferring OFF – Port is not connected Port Type Auto MDI/MDI-X ports Console & USB Ports Console Port Reserved for engineering use USB Ports For connecting a 4G/3G USB modem. http://www.peplink.com -32 / 207 - Copyright © 2013 Peplink... - Page 33 > Factory default > Factory default? (Yes/No) (to restorefactory defaults) > LAN config > Port speed (shows port speed: Auto, 10baseT-FD, > LAN 10baseT-HD, 100baseTx-FD, 100baseTx-HD, > WAN1 1000baseTx-FD) > WAN2 > … > WAN7 http://www.peplink.com -33 / 207 - Copyright © 2013 Peplink...
- Page 34 When the unit is powered off, press it will power on the unit Reset Switch Press and release once to reset the system 6.8.4 Unit Label Appearance Serial Number and LAN MAC Address http://www.peplink.com -34 / 207 - Copyright © 2013 Peplink...
-
Page 35: Peplink Balance 1350
Blinking – Data is transferring OFF – Port is not connected Port Type Auto MDI/MDI-X ports Console & USB Ports Console Port Reserved for engineering use USB Ports For connecting a 4G/3G USB modem. http://www.peplink.com -35 / 207 - Copyright © 2013 Peplink... - Page 36 > Factory default > Factory default? (Yes/No) (to restore factory defaults) > LAN config > Port speed (shows port speed: Auto, 10baseT-FD, 10baseT-HD, > LAN 100baseTx-FD, 100baseTx-HD,1000baseTx-FD) > WAN1 > WAN2 > … > WAN13 http://www.peplink.com -36 / 207 - Copyright © 2013 Peplink...
- Page 37 To hold pressing the key for 4 seconds will power down the unit Power Switch When the unit is powered off, press it will power on the unit 6.9.4 Unit Label Appearance Serial Number and LAN MAC Address http://www.peplink.com -37 / 207 - Copyright © 2013 Peplink...
-
Page 38: Peplink Balance 2500
USER MANUAL Peplink Balance Series 6.10 Peplink Balance 2500 6.10.1 Front Panel Appearance Console Port BPL-2500 USB Ports WAN Ports Power LED LCD Display LAN Port LCD Controls Console Port BPL-2500-SFP USB Ports WAN Ports Power LED LCD Display LAN Port LCD Controls http://www.peplink.com... - Page 39 Blinking – Data is transferring OFF – Port is not connected Port Type Auto MDI/MDI-X ports Console & USB Ports Console Port Reserved for engineering use USB Ports For connecting a 4G/3G USB modem. http://www.peplink.com -39 / 207 - Copyright © 2013 Peplink...
- Page 40 > Factory default > Factory default? (Yes/No) (to restore factory defaults) > LAN config > Port speed (shows port speed: Auto, 10baseT-FD, 10baseT-HD, > LAN 100baseTx-FD, 100baseTx-HD,1000baseTx-FD) > WAN1 > WAN2 > … > WAN13 http://www.peplink.com -40 / 207 - Copyright © 2013 Peplink...
- Page 41 When the unit is powered off, press it will power on the unit 6.10.4 Unit Label Appearance BPL-2500 Serial Number and LAN MAC Address BPL-2500-SFP Serial Number and LAN MAC Address http://www.peplink.com -41 / 207 - Copyright © 2013 Peplink...
-
Page 42: Installation
At the high level, construct the network according to the following steps: With anEthernetcable, connect a computer to one of the LAN ports on the Peplink Balance. For Peplink Balance 20, 30, 210 and 310, repeat with different cables for up to 4computers to be connected. - Page 43 USER MANUAL Peplink Balance Series http://www.peplink.com -43 / 207 - Copyright © 2013 Peplink...
-
Page 44: Configuring The Network Environment
USER MANUAL Peplink Balance Series Configuring the Network Environment To ensure that Peplink Balance works properly in the LAN environment and can access the Internet via the WAN connections, please refer to the following setup procedures: LAN Configuration For basic configuration, refer to Section 8, Basic Configuration. -
Page 45: Basic Configuration
Connecting to Web Admin Interface Start a web browser on a computer that is connected with Peplink Balance through LAN. To connect to Web Adminof Peplink Balance, enter the following LAN IP address in the address field of the web browser: http://192.168.1.1... -
Page 46: Configuration With Setup Wizard
USER MANUAL Peplink Balance Series Configuration with Setup Wizard The Setup Wizard of Peplink Balance simplifies the task of configuring WAN connection(s) by guiding the configuration process step by step. To begin, click Setup Wizard after connecting to Web Admin Interface. - Page 47 If Custom Mobile Operator Settingsis selected, APN parameters are required to be entered. Some service providers may charge a fee for connecting to a different APN. Please consult the service provider for the correct settings. http://www.peplink.com -47 / 207 - Copyright © 2013 Peplink...
-
Page 48: Advanced Setup
Advanced Setup Advanced settings can be configured from the Network menu. WAN connections can be configured by entering the corresponding WAN connection informationat: Network> Interfaces >WAN http://www.peplink.com -48 / 207 - Copyright © 2013 Peplink... - Page 49 USER MANUAL Peplink Balance Series Please refer to Section 11,Configuration of WAN Interface(s), for details on setting up DHCP, Static IP, PPPoE, and Mobile Internet Connection http://www.peplink.com -49 / 207 - Copyright © 2013 Peplink...
-
Page 50: Configuration Of Lan Interface
USER MANUAL Peplink Balance Series Configuration of LAN Interface The LAN Interface settings are located at:Network> Interfaces > LAN http://www.peplink.com -50 / 207 - Copyright © 2013 Peplink... - Page 51 Advertise Speed checkbox. Drop-in Mode Settings (Available on Peplink Balance 210+) Drop-in Mode eases the installation of Peplink Balance on a live network between the existing Firewall and Router, such that no configuration changes are required on existing Enable equipment.
- Page 52 DNS lookup time by storing all received DNS results for a faster DNS response time. However, it cannot return the most updated result for those frequently updated DNS records. http://www.peplink.com -52 / 207 - Copyright © 2013 Peplink...
- Page 53 This table is for defining custom local DNS records. A static local DNS record consists of a Host Name and an IP Address. When looking up the Local DNS Host Name from the LAN to LAN IP of Peplink Balance, the corresponding IP Address will Records be returned.
-
Page 54: Drop-In Mode
Otherwise, hosts on one side may not be able to reach hosts on the other side of Peplink Balance until the old ARP records expire. Units without enabling Drop-in Mode are not affected. - Page 55 Enable box, most network settings for WAN1 will be hidden from Web Administration Interface.) Put the IP address of the WAN1 router in the WAN Default Gateway field. Ensure that the Peplink Balance IP subnet is the same as the Firewall’s WAN port and the Router’s LAN port.
- Page 56 If you have selected the LAN Bypass port (which is currently available on WAN1 of Balance 1350 and WAN5 of Balance 580) as the WAN for Drop-in Mode, High Availability feature will be DISABLED automatically. Want to know more about Drop-in mode? Visit our YouTube Channel for video tutorials! http://youtu.be/lZG2-VPml5w http://www.peplink.com -56 / 207 - Copyright © 2013 Peplink...
-
Page 57: Configuration Of Wan Interface
Routing Mode routing over this WAN connection. IP Forwarding is also available when you click the link in the help text. For further details, please refer to Appendix B, Routing under DHCP, http://www.peplink.com -57 / 207 - Copyright © 2013 Peplink... - Page 58 Auto configuration advertisements and DHCPv6 requests. IPv6 clients on the LAN will acquire their IPv6, gateway, and DNS server addresses from it. The device will also acquire an IPv6 address for performing ping/traceroute checks and accepting web admin accesses. http://www.peplink.com -58 / 207 - Copyright © 2013 Peplink...
-
Page 59: Connection Method(S)
Please refer to Section11.3, 11.4, 11.5, and 11.6 for details aboutWAN Health Check,Bandwidth Allowance Monitor, Additional Public IP Settings, and Dynamic DNS Settings respectively. http://www.peplink.com -59 / 207 - Copyright © 2013 Peplink... -
Page 60: Static Ip Connection
2 fields. If no address is entered here, this link will not be used for DNS lookups. Please refer to Section 11.3, 11.4, 11.5, and 11.6 for details about WAN Health Check, Bandwidth Allowance Monitor, Additional Public IP Settings, and Dynamic DNS Settings respectively. http://www.peplink.com -60 / 207 - Copyright © 2013 Peplink... -
Page 61: Pppoe Connection
Please refer to Section 11.3, 11.4, 11.5, and 11.6 for details about WAN Health Check, Bandwidth Allowance Monitor, Additional Public IP Settings, and Dynamic DNS Settings respectively. Note PPPoE connection made from a firewall does not work with Drop-in mode. http://www.peplink.com -61 / 207 - Copyright © 2013 Peplink... - Page 62 This setting applies to 3G / LTE / EDGE / GPRS modem only. It does not apply to EVDO / EVDO Rev. A modem. Operator This allows you to configure the APN settings of your connection. If Auto is selected, Peplink Settings Balance will automatically detect the APN, configure the modem, and make connection. You may change the APN settings by selecting Custom Mobile Operator Settings.
- Page 63 If no address is entered here, this link will not be used for DNS lookups. Please refer to Section 11.3, 11.4, 11.5, and 11.6 for details about WAN Health Check, Bandwidth Allowance Monitor, Additional Public IP Settings, and Dynamic DNS Settings respectively. http://www.peplink.com -63 / 207 - Copyright © 2013 Peplink...
- Page 64 GSM900 / GSM1800 / GSM2100 are used in Europe, Middle East, Africa, Asia, Band Oceania, and Brazil. If All Bands is chosen, the appropriate frequency band will be used automatically. The default GSM Frequency Band is All Bands. http://www.peplink.com -64 / 207 - Copyright © 2013 Peplink...
-
Page 65: Physical Interface Settings
You may adjust the MTU value by editing the text field. Click Default to restore the default MTU value. Select Auto and the appropriate MTU value will be automatically detected. The auto-detection will run each time when the WAN connection establishes. http://www.peplink.com -65 / 207 - Copyright © 2013 Peplink... - Page 66 Some service providers require the router to enable VLAN tagging for Internet traffic. If it is required by your service provider, you can enable this field and enter the VLAN ID that the VLAN provider requires. Note: Leave this field disabled if you are not sure. http://www.peplink.com -66 / 207 - Copyright © 2013 Peplink...
-
Page 67: Wan Health Check
Peplink Balance Series 11.3 WAN Health Check To ensure traffic is routed to healthy WAN connections only, Peplink Balance provides the functionality to periodically check the health of each WAN connection. The Health Check settings for each WAN connection can be independently configured via Network >... - Page 68 WAN Settings > WAN Edit > Health Check Settings >URL2 URL 2 If URL2 is also provided, a health check will pass if either one of the tests passed. http://www.peplink.com -68 / 207 - Copyright © 2013 Peplink...
- Page 69 For example, with the default Health Retries setting of 3, after consecutive 3 timeouts, the corresponding WAN connection will be treated as down. This setting specifies the number of consecutive successful ping/DNS lookup responses that must be received before Peplink Balance treats a previously down WAN connection to be up again. Recovery Retries By default, Recover Times is set to 3.
-
Page 70: Bandwidth Allowance Monitor
Disclaimer Due to different network protocol overheads and conversions, the amount of data as reported by this Peplink device is not representative of actual billable data usage as metered by your network provider. Peplink disclaims any obligation or responsibility for any events arising out of the use of the numbers shown here. -
Page 71: Additional Public Ip Settings
IP Address List Enter the fixed Internet IP addresses and the corresponding subnet mask, and then click the Down Arrow button to populate IP address entries to the IP Address List. http://www.peplink.com -71 / 207 - Copyright © 2013 Peplink... -
Page 72: Dynamic Dns Settings
IP of each WAN will be automatically reported to the DNS service provider. Either upon a change in IP addresses or every 23 days without link reconnection, Peplink Balance will connect to the dynamic DNS service provider to perform an IP address update within the provider’s records. - Page 73 Due to dynamic DNS service providers’ policya dynamic DNS host wouldexpire automatically because the host record was not updated for a long time. ThereforePeplink Balance performs an update every 23 days even if a WAN’s IP address did not change. http://www.peplink.com -73 / 207 - Copyright © 2013 Peplink...
-
Page 74: Bandwidth Bonding Speedfusion
Peplink Balance is specifically designed for multi-WAN environment. The Peplink Balance canbond all WAN connections’ bandwidth for routingSpeedFusion traffic. Unless all the WAN connections of one site are down, the Peplink Balance can still maintain VPN up and running.Bandwidth Bonding is enabled by default. - Page 75 Connection profiles and Link Failure Detection Time option will be shown. Click the New Profile button to create a new VPN connection profile for making VPN connection to a remote Peplink Balance via the available WAN connections.Each profile is for making VPN connection with one remote Peplink Balance http://www.peplink.com...
- Page 76 Peer IP Addresses This field is optional. With this field filled, the Peplink Balance will initiate connection to each / Host Names of the remote IP addressesuntil success. If the field is empty, the Peplink Balance will wait (Optional) for connection from the remote peer.
- Page 77 TCP port 32015 and UDP port 4500 for establishing VPN connections. If you have a firewall in front of the Peplink Balance devices, you will need to add firewall rules for these port and protocols which will allow inbound and outbound traffic pass-through the firewall.
- Page 78 USER MANUAL Peplink Balance Series Watch a video walkthrough of setting up a SpeedFusion on our YouTube Channel for a video tutorial! http://youtu.be/xNaq13FWu_g http://www.peplink.com -78 / 207 - Copyright © 2013 Peplink...
-
Page 79: Peplink Balance Behind Nat Router
NAT (Network Address Translation) router. To be able for a WAN connection behind a NAT router to accept VPN connections, you can configure the NAT router in front of the WAN connection to inbound port forward TCP port 32015 to the Peplink Balance. -
Page 80: Speedfusion Tm Status
Status is shown in the Dashboard. The connection status of each connection profile is shownas below. SpeedFusion connection status is also shown on the LCD panel of Peplink Balance 380, 580, 710, 1350 and 2500. By clicking the Details button at the top-right hand corner of SpeedFusion table, you will be forwarded to Status >SpeedFusion... -
Page 81: Ipsec Vpn
WAN2 and WAN3 accordingly, as failover purposes. 13.1 IPsec VPN Settings All of our Peplink products can makemultiple IPsec VPN connections with Peplink as well as Cisco or Juniper Routers. Note that all LAN subnet and subnets behind it have to be unique. Otherwise, VPN members will not be able to access each other. - Page 82 Enter the remote peer’s public IP address.For Aggressive Mode, this is optional. Address Enter the local LAN subnets here. If you have defined “static routes”, they will be shown Local Networks here too. http://www.peplink.com -82 / 207 - Copyright © 2013 Peplink...
- Page 83 Group 5 - 1536-bit is the third option. Phase 2 SA This setting specifies the lifetime limit of this Phase 2 Security Association. By default, it is Lifetime set at 28800 seconds. http://www.peplink.com -83 / 207 - Copyright © 2013 Peplink...
-
Page 84: Ipsec Status
IPsec Status shows the current connection status ofeach connection profile and is displayed in Status > IPsec. Management of Outbound Traffic to WAN Peplink Balance provides the functionality to flexibly manage and load balance outbound traffic among the WAN connections. 1. Important Note Outbound Policy is applied only when more than one WAN connection is active. - Page 85 The default policy is Normal Application Compatibility. Want to know more about how-to create outbound rules? Visit our YouTube Channel for a video tutorial! http://youtu.be/rKH4AS_bQnE http://www.peplink.com -85 / 207 - Copyright © 2013 Peplink...
-
Page 86: Custom Rules For Outbound Policy
Algorithm to be used. Please refer to the upcoming sections for the details of the available algorithms. To create a custom rule, click Add Rule at the bottom of the table, and the following window will be displayed: http://www.peplink.com -86 / 207 - Copyright © 2013 Peplink... - Page 87 This setting specifies the IP Protocol and Port of traffic that matches this rule. You may Protocol and Port select some common protocol from the Protocol Selection Tool drop-down menu. This setting specifies the behavior of Peplink Balance for the custom rule. One of the following values can be selected: ...
- Page 88 Internet IP depends on the WAN connections over which communication actually takes place. As a result, a LAN client computer behind Peplink Balance may communicate using multiple Internet IP addresses. For example, a LAN client computer behind a Peplink Balance 310 with three WAN connections may communicate on the Internet using three different IP addresses.
- Page 89 Starting from firmware 5.2, outbound traffic can be prioritized to go through SpeedFusion connection(s). By default, VPN connections are not included in the priority list. (Available on Peplink Balance 210+) Configure multiple distribution rules to accommodate different kinds of services.
- Page 90 14.2.6 Algorithm: Least Used (Available on Peplink Balance 210+) The traffic matching this rule will be routed through the healthy WAN connection that is selected in the field Connectionand has the most available download bandwidth. The available download bandwidth of a WAN connection is calculated from the total download bandwidth specified in the WAN settings page and the current download usage.
- Page 91 VPN peer. You can create custom Priority or Enforced rules and move them above the bar to override the SpeedFusion Routes. Upon disabling the Expert Mode, all rules above the bar will be removed. http://www.peplink.com -91 / 207 - Copyright © 2013 Peplink...
-
Page 92: Inbound Access
Enable are taken by Peplink Balance based on the other parameters of the rule. With an Enable value of No, the inbound service does not take effect: Peplink Balance disregards the other parameters of the rule. This setting identifies the service to the System Administrator. - Page 93 Any Port, Single Port, Port Range, Port Map and Range Mapping Any Port: all traffic that is received by Peplink Balance via the specified protocol is forwarded to the servers specified by the Servers setting.
-
Page 94: Definition Of Servers On Lan
USER MANUAL Peplink Balance Series 15.2 Definition of Servers on LAN (Available on Peplink Balance 210+) The settings to configure servers on the LAN are located at the following location: Network> Inbound Access > Servers Inbound connections from the Internet will be forwarded to the specified Inbound IP Address(es) base on the protocol and port number . -
Page 95: Inbound Access Services
This setting specifies whether the inbound service rule takes effect. When Yes is selected, the inbound service rule takes effect. If the inbound traffic matches the specified IP Protocol and Port, action will be taken by Peplink Balance based on the other Enable parameters of the rule. - Page 96 Any Port, Single Port, Port Range, Port Map and Range Mapping Any Port: all traffic that is received by Peplink Balance via the specified protocol is forwarded to the servers specified by the Servers setting.
- Page 97 NS/SOA DNS records for a domain name can be delegated to Internet IP address(es) of Peplink Balance. Upon receiving a DNS query, Peplink Balance supports returning, as an “A” record, the corresponding IP address for the domain name on the most appropriate healthy WAN connection.It also supports acting as a generic DNS server for hosting “A”, “CNAME”, “MX”, “TXT”...
- Page 98 USER MANUAL Peplink Balance Series DNS Settings This setting specifies the WAN IP addresses on which the DNS server of Peplink Balance should listen. If no addressesare selected, the Inbound Link Load Balancing feature will be disabled;Peplink Balance will not respond to DNS requests.
- Page 99 Each WAN connection is associated with a priority number. Click Save to save the settings when configuration is complete. This section shows a list of domain names to be hosted by the Peplink Balance. Each domain can have its “NS”, “MX” and “TXT” records, andits sub-domains’ “A” and Domain name “CNAME”records.Add a new record by clicking the New Domain Name button.
- Page 100 Then click on the newly created domain name and the following screen will be displayed: This page is for defining the domain’s SOA, NS, MX, CNAME, A, TXT and SRV records. Seven tables are presented in this page for defining the five types of records. http://www.peplink.com -100 / 207 - Copyright © 2013 Peplink...
- Page 101 Retry: Defines the duration (in seconds)between retries if the slave (secondary) fails to contact the master when refresh (above) has expired. Expire: Indicates the time (in seconds) when the zone data is no longer authoritative. This option applies to Slaves DNS servers only. http://www.peplink.com -101 / 207 - Copyright © 2013 Peplink...
- Page 102 For each record, PriorityandMail Server name must be entered.Priority typically ranges from 10 to 100. Smaller numbers have a higher a priority. After finishing adding MX records, click the Save button. http://www.peplink.com -102 / 207 - Copyright © 2013 Peplink...
- Page 103 The TTL field tells the time to live of the record in external DNS caches. 15.3.9 A Records This table shows the A records of the domain name. To add an A record, click the NewA Record button. The screen resembles the one below: http://www.peplink.com -103 / 207 - Copyright © 2013 Peplink...
- Page 104 A record may be automatically added for the SOA records with a Name Server IP Address provided. A Record Editing This field specifies the A record of this sub-domain to be served by the Peplink Balance. *.domain.name The wildcard character “*” is supported. The IP addresses of "...
- Page 105 For example, if the IP address range 11.22.33.0 to 11.22.33.255is delegated to the DNS server on the Peplink Balance, you will also have to create a domain 33.22.11.in-addr.arpa and have its NS records pointing to your DNS server’s (the Peplink Balance) public IP addresses.
- Page 106 Weight: A relative weight for records with the same priority. • Target: The canonical hostname of the machine providing the service. • Port: Enter the TCP or UDP port number on which the service is to be found. http://www.peplink.com -106 / 207 - Copyright © 2013 Peplink...
- Page 107 Domain Delegation These are the steps to be used when you host your domain at your ISP or a domain registrar and want to delegate a sub-domain to be resolved and managed at Peplink Balance. • Click New Domain Name button to add a domain name.e.g.www.mycompany.com. Click the corresponding domain name to view and edit record details.
- Page 108 Testing the DNS Configuration The following steps can be used to test the DNS configuration: From a host on the Internet, use an IP address of Peplink Balance and nslookupto lookup the corresponding hostname. Check the information that is returned for the expected results.
-
Page 109: Reverse Lookup Zones
11.22.33.0/24, the Zone Name should be 33.22.11.in-arpa.addr.PTR records for 11.22.33.1, 11.22.33.2, ... 11.22.33.254 should be defined in this zone where the Host IP Numbers are 1, 2, ... 254 respectively. http://www.peplink.com -109 / 207 - Copyright © 2013 Peplink... - Page 110 When creating an NS record for the Reverse Lookup Zone itself (not a sub-domain or dedicated zone), the Host field should be left blank. Name Server field must be an FQDN. http://www.peplink.com -110 / 207 - Copyright © 2013 Peplink...
- Page 111 11.22.33.44, where the Reverse Lookup Zone is 33.22.11.in-arpa.addr, the Host IP Number should be 44. Points To field defines the host name which the PTR record should be pointed to. It must be an FQDN. http://www.peplink.com -111 / 207 - Copyright © 2013 Peplink...
-
Page 112: Dns Record Import Wizard
In the blank space, enter the Domain Names (Zones) which you would like to assign with the IP address entered in the previous step. Enter one domain name per line. • Select Next>>to continue. http://www.peplink.com -112 / 207 - Copyright © 2013 Peplink... - Page 113 After the Fetching zone records process has completed, the fetch results would be shown as above. You can view import details by clicking the corresponding hyperlink on the right hand size. http://www.peplink.com -113 / 207 - Copyright © 2013 Peplink...
- Page 114 USER MANUAL Peplink Balance Series http://www.peplink.com -114 / 207 - Copyright © 2013 Peplink...
-
Page 115: Nat Mappings
The IP network refers to all private IP addresses and ranges managed by the LAN host. The system maps these addresses to a number of public IP addresses, specified below, Network to facilitate outbound traffic. This option is only available when IP Network is selected. http://www.peplink.com -115 / 207 - Copyright © 2013 Peplink... - Page 116 Note 2: WAN connections in drop-in or IP forwarding mode are not shown here. Click Save to save the settings when configuration has been completed. Important Note Inbound firewall rules override Inbound Mapping settings. http://www.peplink.com -116 / 207 - Copyright © 2013 Peplink...
-
Page 117: Wlan Controller
To configure, navigate to Network >WLAN Controller and the following options will be shown. Special Note 10 and 20Pepwave AP One / AP One Mini devices can be controlled by a Peplink Balance305/380/580 and 710/1350/2500 respectively without extra costs.To manage more, a Full Edition license is required. Please contact our Authorized Reseller or Peplink Sales Team to obtain more information and price details. - Page 118 Once the change is confirmed, the new AP Profile will be applied to the selected device(s). Changes will be activated immediately. To view the device detail, click the corresponding device’s name and you will see the following screen. http://www.peplink.com -118 / 207 - Copyright © 2013 Peplink...
- Page 119 Device’s Name, Location and Channel can be changed here. A customized Captive Portal page can be configured for each Peplink Balance device. Tostart, click the link Captive Portal Settingsand you will be forwarded to the configuration page.For details, please refer to section 17.4.
- Page 120 Additional features available in the firmware pack screen include the Check for Updatesbutton which will check and download (the latest firmware pack updates) from our server. Click the Details button to view the firmware image(s) included and their release notes. http://www.peplink.com -120 / 207 - Copyright © 2013 Peplink...
- Page 121 Default firmware will be assigned to the device. If theoperational firmware is an older version than the assigned one, the AP will automatically download the firmware and perform an upgrade. http://www.peplink.com -121 / 207 - Copyright © 2013 Peplink...
-
Page 122: Ap Management
AP that reports to it. If Access points listed below is selected, be Managed only APs with a serial number listed in the text box will be managed. http://www.peplink.com -122 / 207 - Copyright © 2013 Peplink... -
Page 123: Wireless Networks
After defining a wireless network, users can choose the network in AP Profiles. Click the button New Network to create a new Network profile, or click the existing network profile to modify its settings. http://www.peplink.com -123 / 207 - Copyright © 2013 Peplink... - Page 124 For details on the other options, please refer to the following sections. Security Policy 17.3.1 - Static WEP 17.3.2 - 802.1X Parameters 17.3.3 - WPA parameters 17.3.4 - RADIUS Server Settings http://www.peplink.com -124 / 207 - Copyright © 2013 Peplink...
-
Page 125: Static Wep
When this option is enabled, web redirection will be applied to all unauthenticated Wi-Fi clients associated with this wireless network. Requests by unauthenticated Wi-Fi clients will be redirected to this Peplink Balance's built-in captive portal site. To configure the captive portal site, click the link “configure your Captive Portal”... - Page 126 Under this configuration, the Shared Key option should be enabled. Key length must be between 8 and 63 characters (inclusive). The security level of this method is known to be high. http://www.peplink.com -126 / 207 - Copyright © 2013 Peplink...
- Page 127 This specifies the UDP port number for the Authentication port of the RADIUS server.By Authentication Port default, it is set as 1812. This specifies the UDP port number for the Accounting port of the RADIUSserver.By Accounting Port default, it is set as 1813. http://www.peplink.com -127 / 207 - Copyright © 2013 Peplink...
-
Page 128: Captive Portal Management
Click the link configure your Captive Portal to start configuration. Once the configuration is complete, click the button Save to save settings. Important Note Only one portal page customization is available for each Peplink Balance device, multiple wireless networks with captive portal enabled will be redirected to the same portal page. 17.4.1 General... - Page 129 This shows the time quota of the connection of the corresponding guest account. Creation Date This shows the date of creation of the corresponding guest account. There are two different methods to create new guest account: Create Account and Generate Accounts http://www.peplink.com -129 / 207 - Copyright © 2013 Peplink...
- Page 130 For details please refer to section 17.4.4 17.4.2.2 Generate Accounts With this method, multiple accounts will be created in batch with the same settings. http://www.peplink.com -130 / 207 - Copyright © 2013 Peplink...
- Page 131 A customized portal page will be shown each time a user access the wireless network that has captive portal enabled. The portal page can be customized under the Portal Page customization tab. http://www.peplink.com -131 / 207 - Copyright © 2013 Peplink...
- Page 132 To specify the custom landing page opened once the clients login as a user. Page Click Preview to preview the custom portal page, and click Publish to save settings. An example of custom portal page is shown as below. http://www.peplink.com -132 / 207 - Copyright © 2013 Peplink...
- Page 133 This setting specifies the SMTP username and password while sending email. These SMTP User Name / options are shown only if Require authentication check box is checked in SMTP Server Password setting. http://www.peplink.com -133 / 207 - Copyright © 2013 Peplink...
- Page 134 This is to specify the password of the account. ${EXP_DATE} This is to specify the expiry date of the account. Once the settings are complete, press the Save button to save and activate settings. http://www.peplink.com -134 / 207 - Copyright © 2013 Peplink...
-
Page 135: Ap Profile
You can define an AP profile by clicking the New AP Profile button. Click the Clone button of an existing profile to create a new profile based on it.To change the settings of an existing profile, click the profile name and the following screen will be shown. http://www.peplink.com -135 / 207 - Copyright © 2013 Peplink... - Page 136 This setting is only available when the protocol is selected as 802.11bgn or 802.11n Only. Channel Bonding There are three options: 20 MHz, 20/40 MHz and 40 MHz With this feature enabled, it allows the Wi-Fi system to use two channels at once. Using two channels improves the performance of the Wi-Fi connection •...
- Page 137 Frame Length length for frame aggregation. By default, it is set as 50000. Web Administration Settings Check the box to allow Peplink Balance to manage the web admin access information of Enable the Pepwave AP One. This option specifies the web access protocol used for accessing the web admin of Web Access Protocol Pepwave AP One.
-
Page 138: Qos
Peplink Balance Series 18.1 User Groups (Available on Peplink Balance 305 and380+) LAN and PPTP clients can be categorized into three user groups - Manager, Staff, and Guest.This table allows you to define rules and assign client IP addresses or subnets to a user group. You can apply different bandwidth and traffic prioritization policies on each user group in the Bandwidth Control and Application sections. -
Page 139: Bandwidth Control
By default, 50% of bandwidth has been reserved for Manager, 30% for Staff, and 20% for Guest. You can define a maximum download speed (over all WAN connections) and upload speed (for each WAN connection) that each individual Staff and Guest member can consume. -
Page 140: Application
Three priority levels can be set for application prioritization: Normal, and↓Low. Peplink Balance can detectvarious application traffics by inspecting the packets' content. Select an application by choosing a supported application, or by defining a custom application manually. The priority preference of supported applications is placed at the top of the table. Custom applications are at the bottom. - Page 141 Action column to delete the custom application in the corresponding row. WhenSupported Applications is selected, the Peplink Balance will inspect network traffic and prioritize the selected application. Alternatively, select Custom Applicationsand define the application by providingthe protocol, scope, port number, and DSCP value.
-
Page 142: Firewall
LAN side of the network.It can protect the local network from potential hacker attacks, offensive Web sites, and/or other inappropriate uses. The firewall functionality of Peplink Balance supports the selective filtering of data traffic in both directions: Outbound (LAN to WAN) ... - Page 143 USER MANUAL Peplink Balance Series The Inbound firewall settings are located at:Network > Firewall> Inbound Firewall Rule. Once you click on Add Rule the following window will appear. http://www.peplink.com -143 / 207 - Copyright © 2013 Peplink...
- Page 144 Protocol/IP/Port, actions will be taken by Peplink Balance based on the other parameters of Enable the rule. When No is selected, the firewall rule does not take effect. Peplink Balance will disregard the other parameters of the rule. This setting is applicable to Inbound Firewall Rules only.
- Page 145 Destination IP & Port Action With the value of Allow for the Action setting, the matching traffic passes through Peplink Balance (to be routed to the destination). If the value of the Action setting is set to Deny, the matching traffic does not pass through Peplink Balance (and is discarded).
- Page 146 USER MANUAL Peplink Balance Series To create an additional firewall rule, click Add Rule and repeat the above steps. http://www.peplink.com -146 / 207 - Copyright © 2013 Peplink...
- Page 147 If the default inbound rule is set as Allow for NAT enabled WANs, no inbound Allow firewall rules will be required for inbound Port Forwarding and inbound NAT Mapping rules. However, if the default inbound rule is set as Deny, a corresponding Allow firewall rules will be required. http://www.peplink.com -147 / 207 - Copyright © 2013 Peplink...
- Page 148 • Port Scan: • NMAP FIN/URG/PSH • Xmas Tree • Another Xmas Tree • Null Scan • SYN/RST • SYN/FIN • SYN Flood Prevention • Ping Flood Attack Prevention http://www.peplink.com -148 / 207 - Copyright © 2013 Peplink...
-
Page 149: Web Blocking
For example, If you enter "foobar.*," then "www.foobar.com," "www.foobar.co.jp," or "foobar.co.uk" will be blocked. Placing the wild card in any other position is not supported. The Peplink Balance will inspect and look for blocked domain names on all HTTP traffic. Secure web (HTTPS) traffic is not supported. 19.2.2 Exempted User Group Check and select pre-defined user group(s) who can exempt from the access blocking rules. -
Page 150: Miscellaneous Settings
Peplink Balance supports High Availability (HA) configurations via an open standard Virtual Router Redundancy Protocol (VRRP, RFC 3768). In an HA configuration, two same-model Peplink Balance units (e.g. a pair of Peplink Balance 210 units, or a pair of Peplink Balance 710 units) provide redundancy and failover in a master-slave arrangement. - Page 151 Checking this box specifies that the Peplink Balance unit is part of a High Availability High Availability configuration. This setting specifies a number that identifies a pair of Peplink Balance units that operate in a Group Number High Availability configuration.
- Page 152 Master Balance. In Drop-in mode, no other configuration needs to be set. Please be noted that Drop-in WAN cannot be configured in LAN Bypass port when it is configuring High Availability. http://www.peplink.com -152 / 207 - Copyright © 2013 Peplink...
-
Page 153: Pptp Server
This setting is for specifying the source of user database for PPTP authentication. There are three sources can be selected: Local User Accounts, LDAP Server, RADIUS Server. Local User Accounts - User accounts are stored in the Peplink Balance locally. You can add/modify/delete the accounts in the User Accounts table below. - Page 154 USER MANUAL Peplink Balance Series Important Note PPTP server will be disabled automatically if the Balance is deployed in Drop-in mode. http://www.peplink.com -154 / 207 - Copyright © 2013 Peplink...
-
Page 155: Service Forwarding
Some ISPs require their users to send e-mails via the ISP’s SMTP server.All outgoing SMTP connections are blocked except those connecting to the ISP’s. The Peplink Balance supports to intercept and redirect all outgoing SMTP connections (destined for TCP port 25) via a WAN connection to the WAN’s corresponding SMTP server. - Page 156 Outbound Policy (see Section 14.1). 20.3.2 Web Proxy Forwarding When this feature is enabled, the Peplink Balance will intercept all outgoing connections destined for the proxy server specified in "Web Proxy Server Interception Settings", choose a WAN connection with reference of Outbound Policy, and then forward them to the specified web proxy server and port number.
-
Page 157: Service Passthrough
20.4 Service Passthrough Service Passthrough settings can be found at:Network >Misc. Settings> Service Passthrough Some Internet services required to be specially handled in a multi-WAN environment.The Peplink Balance supports handling such services correctly such that Internet applications do not notice it is behind a multi-WAN router. -
Page 158: System Settings
For security reason, after logging in to the Web Admin Interface for the first time, it is recommended to change the administrator password. Configuring the administration interface to be accessible only from the LAN can further improve system security. Administrative Settings configuration is located at:System>Admin Security http://www.peplink.com -158 / 207 - Copyright © 2013 Peplink... - Page 159 USER MANUAL Peplink Balance Series Admin Settings This field allows you to define a name for this Peplink Balance unit. Router Name By default, Router Name is set as Balance_XXXX, where XXXX refers to the last 4 digits of the serial number of that balance unit.
- Page 160 These fields are for specifying the port number at which the Web Admin Interface can be Web Admin Port accessible. This option is for specifying the network interfaces through which the Web Admin Interface Web Admin can be accessible: Access • LAN only http://www.peplink.com -160 / 207 - Copyright © 2013 Peplink...
- Page 161 To define multiple subnets, separate each IP subnet one in a line. For example: 192.168.0.0/24 10.8.0.0/16 This is to choose which WAN IP address(es) the web server should listen on. Allowed WAN IP Address(es) http://www.peplink.com -161 / 207 - Copyright © 2013 Peplink...
-
Page 162: Firmware Upgrade
Do not disconnect the power during firmware upgrade process. Do not attempt to upload a non-firmware file, or a firmware file that is not qualified,or not supported, by Peplink. Upgrading Peplink Balance with an invalid firmware file will damage the unit, and may void the warranty. -
Page 163: Time
This specifies the time zone (along with the corresponding Daylight Savings Time scheme) in which Peplink Balance operates. Time Zone The Time Zone value affects the time stamps in the Event Log of Peplink Balance and E- mail notifications. Checked the box Show all to show all time zone options. -
Page 164: Email Notification
Email Notification Administrator when the WAN status changes, or when new firmware is available. If the box Enable is not checked, Email Notification is disabled and Peplink Balance will not send email messages. This setting specifies the SMTP server to be used for sending email. If the Server requires SMTP Server authentication, check the box Require authentication. - Page 165 After it is clicked, you will see this screen to confirm the settings: ClickYes to confirm.Wait a few seconds. You will see a returned message and the detailed test result. http://www.peplink.com -165 / 207 - Copyright © 2013 Peplink...
-
Page 166: Remote Syslog
This setting specifies the IP address or hostname of the remote Syslog server. Host This setting specifies the port number of the remote Syslog service. Port By default, the Port setting value is 514. http://www.peplink.com -166 / 207 - Copyright © 2013 Peplink... -
Page 167: Snmp
USER MANUAL Peplink Balance Series 21.6 SNMP SNMPor Simple Network Management Protocolis an open standard that can be used to collect information about the Peplink Balance unit. SNMP configuration is located at:System> SNMP SNMP Settings SNMP Device This field shows the router name defined in System > Admin Security. - Page 168 This setting specifies via a drop-down menu the one of the following valid privacy protocols: • Privacy Protocol NONE • This setting specifies the privacy password, and is applicable only if the DES privacy Privacy Password protocol is selected. http://www.peplink.com -168 / 207 - Copyright © 2013 Peplink...
-
Page 169: Incontrol
21.7 InControl When this check box is checked, the device’s status information, usage data, and configuration will be sent to Peplink’s InControl system. You can sign up for an InControl account athttps://incontrol.peplink.com/ . You can register devices under the account, monitor device status and usage reports, and download backed up configuration files. -
Page 170: Configuration
In a High Availability (HA) configuration, to quickly load onto the Peplink Balance unit the configuration of its HA counterpart, click theUploadbutton. After loading the settings, configure the LAN IP address of the Peplink Balance unit to be different from the HA counterpart. -
Page 171: Reboot
This page provides a Reboot button for restarting the system. For highest reliability, Peplink Balance series are equipped with two copies of firmware of different version. You can select the firmware version you would like the device to reboot with. - Page 172 USER MANUAL Peplink Balance Series A System Administrator can use the Ping utility to manually check the connectivity of a particular LAN/WAN connection. http://www.peplink.com -172 / 207 - Copyright © 2013 Peplink...
-
Page 173: Traceroute Test
USER MANUAL Peplink Balance Series 22.2 Traceroute Test The Traceroute Test tool in Peplink Balance traces the routing path to the destination through a particular Ethernet interface or a SpeedFusion connection(VPN connections are available on Peplink Balance 210+). The Traceroute Test utility is located at System> Tools >Traceroute, illustrated as follows: A System Administrator can use the Traceroute utility to analyze the connection path of a LAN/WAN connection. -
Page 174: Cli (Command Line Interface Support)
DB-9 end to a terminal's serial port. The port setting will be 115200,8N1. The serial console connector with the Peplink Balance 305, 380 HW rev 1 to 4, Peplink Balance 710 HW rev 1 is DB-9 male connector. To access the serial console port, connect a null modem cable with a DB-9 connector on both ends to a terminal with the port setting of 115200,8N1. -
Page 175: Status
The second table shows the MAC address of each LAN/WAN interface connected. Important Note If you encounter issues and would like to contact Peplink Support Team (http://www.peplink.com/contact/), please download the diagnostic report file and attach it along with a description of your encountered issue. -
Page 176: Active Sessions
USER MANUAL Peplink Balance Series 23.2 Active Sessions Information on Active Sessions is at: Status > Active Sessions> Overview http://www.peplink.com -176 / 207 - Copyright © 2013 Peplink... - Page 177 This Active Sessions section displays the active inbound / outbound sessions of each WAN connection on Peplink Balance. A filter is available to help sort out the active session information.Enter a keyword in the field or check one of the WAN connection boxes for filtering. http://www.peplink.com -177 / 207 - Copyright © 2013 Peplink...
-
Page 178: Client List
(retrieved from DHCP reservation table or defined by users), current Download and Upload rate and MAC address that the Peplink Balance has offered IP addressesto since it is powered up. Clients can be imported into DHCP Reservation table by clicking the button on the right-most column. -
Page 179: Access Point
Peplink Balance Series 23.4 Access Point (Available on Peplink Balance 305 and 380+) The Status of connected access point devices can be found at Status > Access Point. It lists all connected or detected Pepwave access point devices and their IP address, firmware version, assigned AP profile, number of connected clients and broadcasting channel. -
Page 180: Event Log
23.7.1 Device Event Log The log section displays a list of events that has taken place on the Peplink Balance unit.Click the Refresh button to retrieve log entries again. Click the Clear Log button to clear the log. Select 50, 100, or allto show the corresponding number of events in the log. -
Page 181: Bandwidth
Peplink Balance Series 23.7.2 AP Event Log (Available on Peplink Balance 305,380+) This section displays a list of events that has taken place on the connected/detected Pepwave AP devices. Select 50 or 100 to show the corresponding number of events in the log. Check the box next to Auto Refresh and the log will be refreshed automatically. - Page 182 Click ona date to view the client bandwidth usage of that specific date. This feature is not available if you have selected to view the bandwidth usage of only a particular WAN connection. The Scale of the graph can be set to show in Megabyte (MB) or Gigabyte (GB). http://www.peplink.com -182 / 207 - Copyright © 2013 Peplink...
- Page 183 USER MANUAL Peplink Balance Series Status All WAN Daily Bandwidth Usage http://www.peplink.com -183 / 207 - Copyright © 2013 Peplink...
- Page 184 USER MANUAL Peplink Balance Series WAN3 Daily Bandwidth Usage http://www.peplink.com -184 / 207 - Copyright © 2013 Peplink...
- Page 185 WAN connection. The Scale of the graph can be set to show in Megabyte (MB) or Gigabyte(GB). All WAN Monthly Bandwidth Usage WAN3Monthly Bandwidth Usage http://www.peplink.com -185 / 207 - Copyright © 2013 Peplink...
-
Page 186: Appendix A. Restoration Of Factory Defaults
USER MANUAL Peplink Balance Series Appendix A. Restoration of Factory Defaults To restore the factory default settings on a Peplink Balance unit, perform the following: For Balance 20/30/210/310: Locate the reset button on the Peplink Balance unit. With a paper clip, press and keep the reset button pressed for at least 10 seconds, until the unit reboots itself. -
Page 187: Appendix B. Routing Under Dhcp, Static Ip, And Pppoe
Peplink Balance Series Appendix B. Routing under DHCP, Static IP, and PPPoE The information in this appendix applies only to situations where Peplink Balance operates with to a WAN connection under DHCP, Static IP, and PPPoE. Routing via Network Address Translation (NAT) When Peplink Balance is operating under NAT mode, the source IP addresses of outgoing IP packets are translated to the WAN IP address of Peplink Balance. -
Page 188: Routing Via Ip Forwarding
USER MANUAL Peplink Balance Series Routing via IP Forwarding When Peplink Balance is operating under IP Forwarding mode, the IP addresses of IP packets are unchanged; Peplink Balance forwards both inbound and outbound IP packets without changing their IP addresses. -
Page 189: Appendix C. Case Studies
Add a new outbound traffic rule for SMTP. In general, to add a new outbound traffic rule: Click here and Select Managed by Custom Rules Click Add Rule to add a new load distribution rule. http://www.peplink.com -189 / 207 - Copyright © 2013 Peplink... - Page 190 Set the weight of WAN1 and WAN2 for HTTP to 3 and 4, respectively Settings for SMTP: Set the weight of WAN1 and WAN2 for SMTP to 1 and 8, respectively http://www.peplink.com -190 / 207 - Copyright © 2013 Peplink...
-
Page 191: Maintaining The Same Ip Address Throughout A Session
WAN connection for source-destination pairs of IP addresses,and prevents sessions from being dropped. With Persistence is configured and the option By Sourceis selected, Peplink Balance uses a consistent WAN connection for same source IP addresses. This option offers even higher application compatibility but the outbound traffic load will be distributed more evenly only if more users use the Internet. -
Page 192: Bypassing The Firewall To Access Hosts On Lan
WAN connections, via Network>NAT Mappings> AddNAT Rule For example, the following settingsadd the host, with IP address 192.168.1.102, to an Inbound Mapping and bind the host tothe default IP and 211.123.123.100 of WAN1: http://www.peplink.com -192 / 207 - Copyright © 2013 Peplink... -
Page 193: Inbound Access Restriction
C.4.2 Solution Firewall functionality is builtinto Peplink Balance. By default, inbound access is unrestricted. Enabling a basic level of protection involves setting up firewall rules. For example, to set up a firewall rule between the Internet and the private network that monitors Web... -
Page 194: Outbound Access Restriction
For security reasons, it may be appropriate to disallow LAN usersto use ftp to transfer files to and from the Internet, or otherwise restrict outbound access. This can easily be achieved by setting up an outbound firewall rule with Peplink Balance. C.5.2 Solution... -
Page 195: Appendix D. Troubleshooting
Try to test with a web site that does not enable Keep Alive. For example, tryhttp://private.dnsstuff.com/tools/aboutyou.ch(This third-party web site is provided only for reference.Peplink has no association with the site and does not guarantee the site's validity or availability.) Problem 4... - Page 196 You can test the WAN connection by Ping, which is similar to problem 4. As we want to isolate the problems from the LAN, Ping will be performed from Peplink Balance. By using the Ping/Tracerouteunder the tab Status of the Peplink Balance, you may able to find out the source of problem.
-
Page 197: Appendix E. Product Specifications
Rules-based Stateful Firewall, with IP, Protocol, and Port filtering • Intrusion Detection System Physical Interface • Two (Balance 20) / Three (Balance 30) RJ-45 for an IEEE 802.3u 10/100/1000M WAN • Four RJ-45 for an IEEE 802.3ab 10/100/1000M LAN Power Specification ... -
Page 198: Peplink Balance 210 And 310
USER MANUAL Peplink Balance Series Peplink Balance 210 and 310 Routing Drop-in Mode and NAT Flexible Custom Outbound Routing Policy WAN Support DHCP, PPPoE and Static IP Inbound and Outbound Link Load Balance Device Management ... -
Page 199: Peplink Balance 380
One RJ-45 for an IEEE 802.3ab 10/100M/1000M LAN One RJ-45 Console / Serial Port Power Specification AC input 100-240V Operating Environment Temperature: 0°C - 40°C Humidity: 10% - 90% (non-condensing) http://www.peplink.com -199 / 207 - Copyright © 2013 Peplink... -
Page 200: Peplink Balance 305
One RJ-45 for an IEEE 802.3ab 10/100M/1000M LAN • One RJ-45 Console / Serial Port Power Specification AC input 100-240V Operating Environment Temperature: 0°C - 40°C Humidity: 10% - 90% (non-condensing) http://www.peplink.com -200 / 207 - Copyright © 2013 Peplink... -
Page 201: Peplink Balance 380
One RJ-45 for an IEEE 802.3ab 10/100M/1000M LAN One RJ-45 Console / Serial Port Power Specification AC input 100-240V Operating Environment Temperature: 0°C - 40°C Humidity: 10% - 90% (non-condensing) http://www.peplink.com -201 / 207 - Copyright © 2013 Peplink... -
Page 202: Peplink Balance 580
One RJ-45 Console / Serial (modem / TA) Port LAN Bypass from WAN5 to LAN Power Specification AC input 100-240V Operating Environment Temperature: 0°C - 40°C Humidity: 10% - 90% (non-condensing) http://www.peplink.com -202 / 207 - Copyright © 2013 Peplink... -
Page 203: Peplink Balance 710
One RJ-45 for an IEEE 802.3ab 10/100/1000M LAN One RJ-45 Console / Serial Port Power Specification AC input 100-240V Operating Environment Temperature: 0°C - 40°C Humidity: 10% - 90% (non-condensing) http://www.peplink.com -203 / 207 - Copyright © 2013 Peplink... -
Page 204: Peplink Balance 1350
One RJ-45 Console / Serial (modem / TA) Port LAN Bypass from WAN1 to LAN Power Specification AC input 100-240V Operating Environment Temperature: 0°C - 40°C Humidity: 10% - 90% (non-condensing) http://www.peplink.com -204 / 207 - Copyright © 2013 Peplink... -
Page 205: Peplink Balance 2500
Eight RJ-45 for an IEEE 802.3ab 10/100/1000M LAN /Two SFP+ for an IEEE 802.3ae 10G LAN One RJ-45 Console / Serial Port Power Specification AC input 100-240V Operating Environment Temperature: 0°C - 40°C Humidity: 10% - 90% (non-condensing) http://www.peplink.com -205 / 207 - Copyright © 2013 Peplink... -
Page 206: Appendix F. Declaration
USER MANUAL Peplink Balance Series Appendix F. Declaration CAUTION: RISK OF EXPLOSION IF BATTERY IS REPLACED BY AN INCORRECT TYPE. DISPOSE OF USED BATTERIES ACCORDING TO THE INSTRUCTIONS http://www.peplink.com -206 / 207 - Copyright © 2013 Peplink... - Page 207 481 Castle Peak Road, CA 94040 http://www.peplink.com/contact/ Cheung Sha Wan, Hong United States Kong Tel: +1 (650) 450 9668 Certified Peplink Partner Tel: +852 2990 7600 Fax: +1 (866) 625 4664 http://www.peplink.com/partners/chann Fax: +852 3007 0588 el-partner-program/ Italy Office Saudi Arabia Office...
Need help?
Do you have a question about the 20 and is the answer not in the manual?
Questions and answers