
Related Manuals for Asus AAM6010EV-T4


Summary of Contents for Asus AAM6010EV-T4
- Page 1 AAM6010EV-T4 CPE User Manual AAM6010EV-T4 User Manual Rev. 1.02 Version date: Sep. 15, 2004...
-
Page 2: Table Of Contents
AAM6010EV-T4 User Manual Table of Contents Introduction Features & System Requirements Your CPE at a glance Ports and buttons (Back panel) LED description (Front panel) LED table & parts list Getting Start Connecting the Hardware 3.1.1 Connect the ADSL line 3.1.2... - Page 3 AAM6010EV-T4 User Manual 4.7.1 System Commands 4.7.2 Remote Log 4.7.3 User Management 4.7.4 Update Gateway 4.7.5 Ping Test 4.7.6 Modem Test Status 4.8.1 Network Statistics 4.8.2 Connection Status 4.8.3 DHCP Clients 4.8.4 Modem Status 4.8.5 Product Information 4.8.6 System Log...
-
Page 4: Introduction
Your LAN (Local Area Network) will now be able to access the Internet via the CPE’s ADSL connection. This User Manual will show you how to set up the AAM6010EV-T4 CPE, and how to customize its configuration to get the most out of this product. -
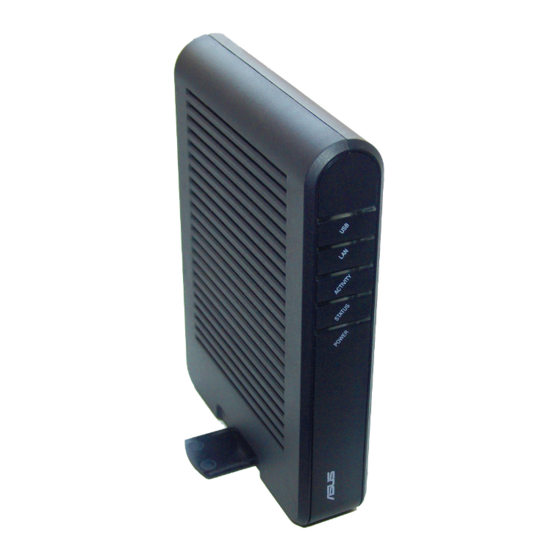
Page 5: Your Cpe At A Glance
LAN port. If the LED is flickering, it is an indication of any network activity. LED table & parts list LED Table The LEDs can help diagnose problems. If you are using an AAM6010EV-T4 CPE, you will have the LEDs shown in Table 1 Label Color... - Page 6 On: USB is connected Flashing: Indication of any network activity Table 1 (Front Panel & LEDs) Parts List In addition to this document, your AAM6010EV-T4 should come with the following: AAM6010EV-T4 ADSL Combo Router Power adapter Ethernet cable (RJ45), Phone cable (RJ-11) and USB cable...
-
Page 7: Getting Start
AAM6010EV-T4 User Manual Getting Start This chapter provides basic instructions for connecting the CPE to a computer or a LAN and to the Internet via ADSL. Part 1 provides instructions to set up the hardware. Part 2 describes how to configure Internet properties on your computer(s). -
Page 8: Configuring Your Pc
2 and 254. The subnet mask must be 255.255.255.0. Your CPE’s default IP address is 192.168.1.1. If you use Ethernet cable to connect your AAM6010EV-T4 and PC, you don’t need any specific driver installation and you can skip this section 3.2.1. But if you use USB cable under Windows operation system, you should install provided USB driver as soon as you plug the USB cable to your PC. - Page 9 AAM6010EV-T4 User Manual The Windows will ask you to confirm the hardware installation. Choose ”Continue Anyway” then it will start to install the supplied USB driver to your PC automatically (Figure 3.4 and Figure 3.5). Figure 3.4 Hardware Installation Confirmation Figure 3.5 Hardware Installation...
-
Page 10: Windows Xp
Figure 3.6 Completing the Found New Hardware Wizard Before you start to access AAM6010EV-T4 via Ethernet or USB, you have to configure your PC TCP/IP address to be 192.168.1.x, where x could be any number between 2 and 254, subnet mask is 255.255.255.0. Your AAM6010EV-T4 default IP address is “192.168.1.1”. -
Page 11: Windows 2000
AAM6010EV-T4 User Manual In the Internet Protocol (TCP/IP) Properties dialog box, click in the radio button labeled Use the following IP address and type 192.168.1.x (where x is any number between 2 and 254) and 255.255.255.0 in the IP address field and Subnet Mask field, respectively. -
Page 12: Windows 95, 98
AAM6010EV-T4 User Manual The Network Properties dialog box is displayed with a list of currently installed network components. If the list includes Internet Protocol (TCP/IP), the protocol has already been enabled, in which case you can skip to Step 11. -
Page 13: Windows Nt 4.0
AAM6010EV-T4 User Manual Select the network component labeled TCP/IP, and then click on If you have multiple TCP/IP listings, select the listing associated with your network card or adapter. 10. In the TCP/IP Properties dialog box, click on the IP Address tab. -
Page 14: Setting Up Your Cpe
AAM6010EV-T4 User Manual Setting up your CPE This section will guide you through your CPE’s configuration. The CPE is shipped with a standard default bridge configuration; for most users, you may want to change the CPE from a bridge to a router. -
Page 15: Setup
AAM6010EV-T4 User Manual Figure 2 (Home page) Setup To setup your CPE with a basic configuration, from the Home page, select Setup. Figure 3 illustrates the setup page. The page is broken into two subsections the WAN configuration and the LAN configuration. -
Page 16: Wide Area Network Connection
AAM6010EV-T4 User Manual 4.3.1 Wide Area Network connection On the other side of the router is where your Wide Area Network (WAN) connection; also referred to as a broadband connection. This WAN connection is different for every WAN supplier. Most of the configuration you will perform will be in this area. - Page 17 AAM6010EV-T4 User Manual provider is using 0,35. Also select the quality of service (QOS); leave the default value if you are unsure or the ISP did not provide this information. Figure 4 (Bridge Connection Setup) To complete the connection you must now click the apply button. The apply button will temporarily save this connection.
- Page 18 AAM6010EV-T4 User Manual On-Demand: Enables on-demand mode. The connection will disconnect if no activity is detected after the specified idle timeout value. d. Idle Timeout: Specifies that PPPoA connection should disconnect if the link has no activity detected for n seconds. This field is used in conjunction with the On-Demand feature. To ensure that the link is always active, enter a 0 in this field.
- Page 19 AAM6010EV-T4 User Manual service provider is using 0,30. Also select the quality of service (QOS); leave the default value if you are unsure or the ISP did not provide this information. Following is a description of the different options: Username: The username for the PPPoE access; this is provided by your DSL service provider or your ISP.
- Page 20 AAM6010EV-T4 User Manual 4.4.1.4 DHCP Connection Setup Dynamic Host Configuration Protocol (DHCP) allows the CPE to automatically obtain the IP address from the server. This option is commonly used in situations where IP is dynamically assigned and is not known prior to assignment.
- Page 21 AAM6010EV-T4 User Manual name; the name must not have spaces and cannot begin with numbers. In this case the unique name is called STATIC1. Select the encapsulation type (LLC or VC); if you are not sure just use the default mode.
-
Page 22: Modify An Existing Connection
AAM6010EV-T4 User Manual Figure 9 (CLIP Connection Setup) To complete the connection you must now click the apply button. The apply button will temporarily save this connection. To make the change permanent you need to click on Tools (at the top of the page) and select System Commands. - Page 23 AAM6010EV-T4 User Manual The Start IP Address is where the DHCP server starts issuing IP addresses and the End IP Address is where the DHCP server stops issuing IP addresses. The Lease Time is the amount of time a network user will be allowed connection to the Router with their current dynamic IP address.
-
Page 24: Changing The Cpes Ip Address
AAM6010EV-T4 User Manual The apply button will temporarily save this connection. To make the change permanent you need to click on Tools (at the top of the page) and select System Commands. At the system commands page, click on Save All. -
Page 25: Advanced
AAM6010EV-T4 User Manual The apply button will temporarily save this connection. To make the change permanent you need to click on Tools (at the top of the page) and select System Commands. At the system commands page, click on Save All. -
Page 26: Ip Qos/Ip Filters
AAM6010EV-T4 User Manual To configure a service, game, or other application select the external connection (for example the Internet connection), from the Home screen, click Advanced and under Advanced, select Port Forwarding. Next select the computer hosting the service and add the corresponding firewall rule. If you want to add a custom application, select the User category, click New and fill in the port, protocols and description for your application. -
Page 27: Access Control
AAM6010EV-T4 User Manual In "Trusted mode" all the rules will be applied first, regardless of the setting of the TOS bits. After the rules have been exhausted the existing TOS bit settings will be honored. The "Un-trusted" mode will match first against all rules as in "Trusted"... -
Page 28: Bridge Filters
AAM6010EV-T4 User Manual The apply button will temporarily save this connection. To make the change permanent you need to click on Tools (at the top of the page) and select System Commands. At the system commands page, click on Save All. -
Page 29: Multicast/Igmp Snooping
AAM6010EV-T4 User Manual to go through. The third rule allows all IPv4 frames with the source MAC address of the bridge to go through. Note: On a windows based machine, to find a MAC address, ad a dos prompt type ipconfig /all. -
Page 30: Static Routing
AAM6010EV-T4 User Manual Figure 18 (IGMP SNOOPING) 4.6.8 Static Routing If the CPE is connected to more than one network, you may need to set up a static route between them. A static route is a pre-defined pathway that network information must travel to reach a specific host or network. -
Page 31: Dynamic Routing
AAM6010EV-T4 User Manual Figure 19 (Static Routing) The apply button will temporarily save this connection. To make the change permanent you need to click on Tools (at the top of the page) and select System Commands. At the system commands page, click on Save All. -
Page 32: Tools
AAM6010EV-T4 User Manual Figure 20 (Dynamic Routing) The apply button will temporarily save this connection. To make the change permanent you need to click on Tools (at the top of the page) and select System Commands. At the system commands page, click on Save All. -
Page 33: User Management
AAM6010EV-T4 User Manual Table 1 defines the different severity levels. To forward logging information, you need to click on Tools (at the top of the page) and select Remote Log. Table 1 (Severity Level) 4.7.3 User Management You can change your CPE’s username and password by going to the Home screen, under the tools menu, click User Management. -
Page 34: Ping Test
AAM6010EV-T4 User Manual Figure 21 (Update Gateway) 4.7.5 Ping Test Once you have your CPE configured, it is a good idea to make sure you can Ping the network. You can get to the Ping web page by going to the Home screen, under the Tools title, click Ping Test. Type the target address that you want to pin. -
Page 35: Modem Test
AAM6010EV-T4 User Manual 4.7.6 Modem Test The Modem Test is used to check whether your Modem is properly connected to the WAN Network. This test may take a few seconds to complete. To perform the test, select your connection from the list and press the Test button. -
Page 36: Appendix A: Troubleshooting
AAM6010EV-T4 User Manual Appendix A: Troubleshooting Below is a list of commonly asked questions. Before calling technical support, please look through these issues to see if they help solve your problem. The CPE is not functional Check to see that the power LED is green and than the network cables are installed correctly. -
Page 37: The Dsl Link Led Continues To Blink But Does Not Go Solid
AAM6010EV-T4 User Manual memory, the CPE should be functional and the LEDs should light correctly. The DSL Link LED continues to blink but does not go solid 1. This means that the DSL line is trying to train but for some reason it cannot establish a valid connection. -
Page 38: Router Terms
AAM6010EV-T4 User Manual Router terms What is a firewall? A firewall is protection between the Internet and your local network. It acts similarly to the firewall in your car, protecting the interior of the car from the engine. Your car's firewall has very small opening that allow desired connections from the engine into the cabin (gas pedal connection, etc), but if something happens to your engine, you are protected.
Need help?
Do you have a question about the AAM6010EV-T4 and is the answer not in the manual?
Questions and answers