Denon DN-X300 Operating Instructions Manual
Denon dj equipment user manual
Hide thumbs
Also See for DN-X300:
- Operating instructions manual (17 pages) ,
- Service manual (35 pages) ,
- Service manual (34 pages)
Table of Contents
Advertisement
Available languages
Available languages
Quick Links
Download this manual
See also:
Service Manual
DJ MIXER / DJ 混音台
DN-X300
OPERATING INSTRUCTIONS
BEDIENUNGSANLEITUNG
MODE D'EMPLOI
ISTRUZIONI PER L'USO
INSTRUCCIONES DE OPERACION
GEBRUIKSAANWIJZING
BRUKSANVISNING
操作說明書
FOR ENGLISH READERS
PAGE
5 ~ PAGE
FÜR DEUTSCHE LESER
SEITE
11 ~ SEITE
POUR LES LECTEURS FRANCAIS
PAGE
17 ~ PAGE
PER IL LETTORE ITALIANO
PAGINA 23 ~ PAGINA 28
PARA LECTORES DE ESPAÑOL
PAGINA 29 ~ PAGINA 34
VOOR NEDERLANDSTALIGE LEZERS
PAGINA 35 ~ PAGINA 40
FOR SVENSKA LÄSARE
SIDA
41 ~ SIDA
中
文
第 47 頁
10
16
22
46
~
第 53 頁
Advertisement
Chapters
Table of Contents

Related Manuals for Denon DN-X300


Summary of Contents for Denon DN-X300
-
Page 1: Operating Instructions
DJ MIXER / DJ 混音台 DN-X300 OPERATING INSTRUCTIONS BEDIENUNGSANLEITUNG MODE D’EMPLOI ISTRUZIONI PER L’USO INSTRUCCIONES DE OPERACION GEBRUIKSAANWIJZING BRUKSANVISNING 操作說明書 FOR ENGLISH READERS FÜR DEUTSCHE LESER POUR LES LECTEURS FRANCAIS PER IL LETTORE ITALIANO PARA LECTORES DE ESPAÑOL VOOR NEDERLANDSTALIGE LEZERS FOR SVENSKA LÄSARE... -
Page 2: Safety Instructions
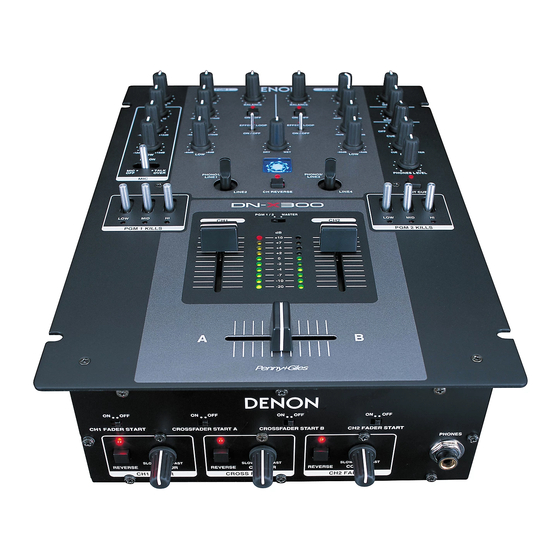
In order to prevent electric shock, do not open the top cover. POUR ÉVITER LES CHOCS ÉLECTRIQUES, If problems occur, contact your DENON dealer. INTERODUIRE LA LAME LA PLUS LARGE 3. Do not place anything inside Do not place metal objects or spill liquid inside the DJ CORRESPONDANTE DE LA PRISE ET mixer. - Page 3 ENGLISH DEUTSCH FRANÇAIS ITALIANO TOP PANEL DIAGRAM / OBERES BEDIENFELD-SCHEMA / SCHEMA DU PANNEAU SUPERIEUR / SCHEMA PANNELLO SUPERIORE/ DIAGRAMA DEL PANEL SUPERIOR / OVERZICHT VAN BOVENPANEEL / BILD ÖVER ÖVERSTA PANELEN / 頂面板視圖 !0 ! 0 ESPAÑOL NEDERLANDS SVENSKA REAR PANEL DIAGRAM / HINTERES ANSCHLUSSFELD-SCHEMA / SCHEMA DU PANNEAU ARRIERE / SCHEMA PANNELLO POSTERIORE / DIAGRAMA DEL PANEL POSTERIOR / OVERZICHT VAN ACHTERPANEEL /...
- Page 4 • Ta inte isär apparaten och försök inte bygga the instructions contained in this manual, om den. meets FCC requirements. Modification not expressly approved by DENON may void • Please be care the environmental aspects of battery your authority, granted by the FCC, to use disposal.
-
Page 5: Table Of Contents
Thank you very much for purchasing the DENON DN-X300 DJ MIXER. DENON proudly presents this advanced DJ MIXER to audiophiles and music lovers as a further proof of DENON’s non-compromising pursuit of the ultimate in sound quality. The high quality performance and easy operation are certain to provide you with many hours of outstanding listening pleasure. - Page 6 ENGLISH Input select switch (2) Rear panel • Switches between the PHONO/LINE and LINE inputs. • When the lever of switch is vertical position, the LINE2 or LINE4 input is selected. • When the lever of switch is slope, the PHONO1/LINE1 or PHONO2/lINE3 input is selected.
-
Page 7: Connections
“zero” and the unit is off. Take care to connect only one cable at a time. pay attention to L and R position of jacks, on both the DN-X300 and outboard gear. 5. Connect the stereo outputs to the power amplifier(s) and/or tape deck(s) and/or MD recorder(s) and/or CD recorder(s). -
Page 8: Specifications
ENGLISH SPECIFICATIONS • Phono Inputs: 2 Stereo Input Impedance 50 kΩ/kohms Level –50 dBV (3 mV) • Line Inputs: 2 Stereo Input Impedance 20 kΩ/kohms Level –14 dBV (200 mV) • EQ Control (Line): 3 Bands Control Range HI : –30 dB to +10 dB (at 16 kHz), –38 dB to +10 dB (at 20 kHz) MID : –38 dB to +10 dB (at 01 kHz) LOW : –38 dB to +06 dB (at 060 Hz) -
Page 9: Fader Start
FADER PGM2 LINE4 LINE2 FADER FADER FADER PGM1 PGM2 DN-X300 CD player (DN-S3000) (1)-2, 5 (2)-1 (1)-1 (1)-4 Channel Fader Start Turn the CH 1/2 FADER START switches #8 . Move the Channel fader @1 of CH-1 or CH-2 control all the way to the bottom. -
Page 10: Rotating Input Select Switches
ENGLISH ROTATING INPUT SELECT SWITCHES 1. Disconnect the power. 2. Remove knobs from the top panel. 3. Remove the 6 screws attaching the top panel. 4. Remove the 2 screws attaching the switch unit. 5. Rotate the switch unit to the desired location. 6. -
Page 11: Hauptmerkmale
2 EINFÜHRUNG Wir danken Ihnen sehr für den Kauf des DENON DN-X300 DJ MIXER. DENON ist stolz darauf, Audio-Freunden und Musikliebhabern diesen erweiterten DJ MIXER als einen weiteren Beweis der kompromisslosen Bestrebungen von DENON nach Erreichen der ultimativen Klangqualität zu präsentieren. - Page 12 DEUTSCH SPLIT CUE-Taste (2) Hinteres anschlussfeld • Im STEREO-Modus wird der Stereosound von MASTER und CUE in beide Ohrenkappen Netzbetriebschalter (POWER) eingespeist. Im SPLIT CUE-Modus liefert der • Zur Auswahl der Stromversorgung “ON” oder Kopfhörer-Schaltkreis einen monauralen CUE- Sound zur linken und einen monauralen HINWEIS: MASTER-Sound zur rechten Ohrenkappe.
-
Page 13: Verbindungen
Stellen Sie sicher, dass alle Fader auf Null stehen und diese Einheit abgeschaltet ist. Achten Sie darauf, immer Kabel gleicheitig anzuschließen und beachten Sie die L- und R- Position der Buchsen an dem DN-X300 und an den externen Geräte. 5. Verbinden Stereoausgänge Endverstärkern, Tapedecks, MD-Recordern und/oder CD-Recordern. -
Page 14: Technische Daten
DEUTSCH TECHNISCHE DATEN • Phono-Eingänge: 2 Stereo Eingangsimpedanz 50 kΩ/kOhm Pegel –50 dBV (3 mV) • Leitungseingänge: 2 Stereo Eingangsimpedanz 20 kΩ/kOhm Pegel –14 dBV (200 mV) • EQ-Kontrolle (Leitung): 3 Bänder Steuerbereich HI : –30 dB bis +10 dB (bei 16 kHz), –38 dB bis +10 dB (bei 20 kHz) MID : –38 dB bis +10 dB (bei 01 kHz) LOW : –38 dB bis +06 dB (bei 060 Hz) •... -
Page 15: Fader-Start
Crossfaders gestartet werden; dies allerdings nur, wenn die 3,5-mm-Stereo-Minikabel angeschlossen wurden. LINE FADER PGM2 LINE4 LINE2 FADER FADER FADER PGM1 PGM2 DN-X300 CD-Player (DN-S3000) (1)-2, 5 (2)-1 (1)-1 (1)-4 Channel-Fader-Start Drehen Sie die CH 1/2 FADER START-Schalter #8 . Schieben Sie den Channel- Fader @1 der CH-1- oder CH-2- Regler ganz nach unten. -
Page 16: Drehen Der Eingangswahlschalter
DEUTSCH DREHEN DER EINGANGSWAHLSCHALTER 1. Trennen Sie das Netzkabel ab. 2. Entfernen Sie die Knöpfe vom oberen Bedienfeld. 3. Entfernen Sie die 6 Schrauben zur Befestigung des oberen Bedienfeldes. 4. Entfernen Sie die 2 Schrauben zur Befestigung der Schaltereinheit. 5. Drehen Sie die Schaltereinheit in die gewünschte Stellung. - Page 17 PROFESSIONAL BUSINESS COMPANY 7-35-1 Sagamiono, Sagamihara-shi, Kanagawa 228-8505, JAPAN Printed in China 511 4269 004...
Need help?
Do you have a question about the DN-X300 and is the answer not in the manual?
Questions and answers