Table of Contents
Advertisement
Quick Links
Advertisement
Table of Contents

Subscribe to Our Youtube Channel
Related Manuals for Denon DN X1700 - PROFESSIONAL DIGITAL DJ MIXER


Summary of Contents for Denon DN X1700 - PROFESSIONAL DIGITAL DJ MIXER
- Page 1 Professional DIGITAL DJ Mixer DN-X1700 Owner’s Manual...
-
Page 2: Important Safety Instructions
FCC requirements. Modifi cation not expressly which you should be particularly aware of. REFER SERVICING TO QUALIFIED SERVICE PERSONNEL. approved by DENON may void your authority, granted by the FCC, to use Read these instructions. the product. - Page 3 NOTE ON USE / HINWEISE ZUM GEBRAUCH / OBSERVATIONS RELATIVES CAUTION: • DECLARATION OF CONFORMITY • The ventilation should not be impeded by covering the ventilation We declare under our sole responsibility that this product, A L’UTILISATION / NOTE SULL’USO / NOTAS SOBRE EL USO / openings with items, such as newspapers, tablecloths, curtains, to which this declaration relates, is in conformity with the etc.
- Page 4 A NOTE ABOUT RECYCLING: CAUTION: This product’s packaging materials are recyclable and can be reused. Please dispose of any materials To completely disconnect this product from the mains, disconnect the plug from the wall socket in accordance with the local recycling regulations. outlet.
-
Page 5: Table Of Contents
n Contents Getting Started Getting Started USB Settings Installation ·····················································································1 Selecting the USB mode ·····························································13 Installation Main Features ················································································2 USB audio ····················································································13 Part Names and Functions ····························································3 Setting the USB audio output ·····················································13 When the DN-X1700 is mounted inside a coffi n or DJ booth, we Top Panel ·······················································································3 Setting the USB audio input ························································13 recommend leaving a 20 mm (Bottom 2.5 mm) blank space above the... -
Page 6: Main Features
• A low-noise R-core transformer is employed for the analog power audio inputs using one button transformer. Large-capacity DENON DJ custom electrolytic • Also available is a MIDI layer function for controlling the DJ software capacitors are used in the power supply unit. Furthermore, film on a channel by channel basis. -
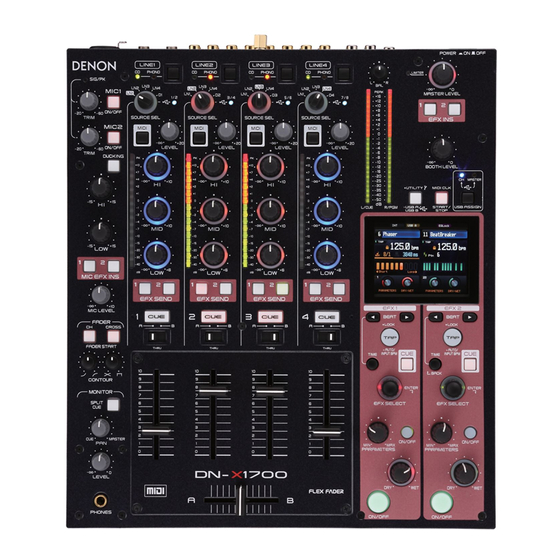
Page 7: Part Names And Functions
MASTER LEVEL control TAP LOCK/AUTO/INPUT BPM button Part Names and Functions Adjusts the level of the MASTER outputs. TAP: The LIMITER LED indicates the operating status When this button is tapped repeatedly, the BPM For further details on the functions and other aspects of the parts, refer to the page numbers in of the master output limiter. - Page 8 Effect ON/OFF button MIC SEND LEVEL control MIDI layer selector buttons L/CUE, R/PGM master level meter This sets the effects of EFX 1 or EFX 2 to ON This is used to adjust the level at which the mic When these buttons are set to ON, the controls One of two modes can be selected for display or OFF.
-
Page 9: Rear Panel
BOOTH OUT (BALANCED) connectors Rear Panel These TRS terminals are balanced line output terminals whose signal levels are adjusted using the BOOTH LEVEL control provided on the top panel. Pin layout (TRS): Tip: Hot, Ring: Cold, Sleeve: GND SEND/ RETURN terminals •... -
Page 10: Display
Display q INT/EXT indicator e EQ Lock indicator This indicates the location of the Preset currently This fl ashes when the equalizers and faders are being used. locked. INT: The internal Preset information is being used. r MIDI indicator This appears when MIDI communication is EXT: The Preset information stored on a USB being performed. -
Page 11: Connections
DN-S3700 DN-S3700 DN-S3700 DN-S3700 Connections Balanced Microphones Refer to the Connection Diagram below. Preparations 1. Make certain AC power is off while making connections. 2. Quality cables make a big difference in fi delity Cables Used for Connections and punch. Use high-quality, audio cables. 3. -
Page 12: Basic Operations
Basic Operations Preparations MIC (mic input) MONITOR (headphones output) POWER switch MIC1 MIC2 Set the to ON. When using a microphone, press the Select the source to be monitored using the button to set it to ON. buttons of the channels. When a source is selected, the LED in the button lights. -
Page 13: Effector Function
ON, the block being played lights up blue. Initiates the same kind of loop sampler processing as the LOOP function of Loop Example: other Denon DJ products. Rev. Loop Initiates the reverse play processing of the above loop signals. Pattern... -
Page 14: Effecter Screen
Effecter Screen Effecter Operations Selecting the effector units and channels With the input channels: EFX SEND 1 and 2 Using the buttons, select the effect units to be used. The same effect can be selected for a multiple number of channels. -
Page 15: Setting The Beat
Setting the beat Fader Start BEAT Press the buttons to set the number of beats. Channel Fader Start Crossfader Start TIME When button pressed, mode is changed to the time input mode. channel input source selector channel input source selector Using the controls Using the... -
Page 16: Fader (Setting The Fader Curve)
FADER (setting the fader curve) How to adjust the Crossfader torque Channel Fader Remove the rubber cap of the front panel. CH FADER CONTOUR When the control is turned counterclockwise, the curve will have characteristics Crossfader Move the to the far right until the screw that rise gradually;... -
Page 17: Usb Settings
• Version upgrading Utility settings. The adjustment values are stored on a Vista or a similar operating system, install DENON DJ ASIO driver USB B : mode by mode basis. Ver2 contained on the CD-ROM provided. If the Ver1 driver is already •... -
Page 18: Midi
MIDI layer operations MIDI The unit incorporates a MIDI layer function for the input channels. This unit comes with USB MIDI input/output and 5-pin DIN MIDI This function controls the external devices and software as the MIDI output functions. controller. These functions support the MIDI control functions of almost all the controls as well as the MIDI clock. - Page 19 MIDI Command List Send commands MIDI command MIDI command Items Items Command Number Value Command Number Value EQ HIGH VR 0xBn 0x02 0x00 to 0x7F BEAT UP SW ON : 0x9n / SW OFF : 0x8n 0x16 SW ON : 0x40 / SW OFF : 0x00 EQ MID VR 0xBn 0x03...
- Page 20 Receive commands MIDI command MIDI command Items Items Command Number Value Command Number Value 0xBn 0xBn ON TRG : 0x50 Level Meter -40dB 0x31 Level Meter -40dB 0x01 OFF TRG : 0x51 Level Meter -30dB 0x32 ...
-
Page 21: Utility Settings
Preset Items and Data Utility settings Default Category Item Parameter Value Settings 1 Master Setting 1 MONO ON / OFF 1 Ducking Level -20dB to -40dB -30dB 1 Hi 1kHz to 4kHz 2kHz Utility operations 2 Mic Setting 2 Mic EQ 2 Low 500Hz to 2kHz 1kHz... -
Page 22: Owner Setting Mode
Owner Setting Mode Preset Export Preset Import When the POWER switch is set to the ON position while the Connect the USB memory device to the unit and, In the Owner Setting mode, insert the USB memory UTILITY/–USB A/USB B button is held down, the Owner Setting mode using the Utility settings, execute Preset Export. -
Page 23: Specifi Cations
• BOOTH output Stereo Balanced 1/4" TS terminal Specifi cations (Tip: hot; ring: cold, sleeve: ground) Load impedance: More than 600 Ω/ohms Level: +4 dBu n AUDIO (0 dBu = 0.775 Vrms, 0 dBV = 1 Vrms) • SEND output Monaural x 2 Unbalanced 1/4"... -
Page 24: Block Diagram
Block Diagram... -
Page 25: Troubleshooting
Troubleshooting n Are all the parts connected properly? n DN-X1700 does not operate normally or no sound is produced n Have the operations been performed properly according to the owner’s • Are the USB cable, audio cables, etc., properly connected? manual? •... - Page 26 TOKYO, JAPAN www.denon.com Professional Business Company, D&M Holdings Inc.
Need help?
Do you have a question about the DN X1700 - PROFESSIONAL DIGITAL DJ MIXER and is the answer not in the manual?
Questions and answers