National Geographic 9070300 Manual
- Instruction manual (56 pages) ,
- Instruction manual (64 pages) ,
- Instruction manual (80 pages)
Advertisement
- 1 Features
- 2 About this Instruction Manual
- 3 Parts overview and scope of delivery
- 4 Screen display
- 5 Setting up power supply
- 6 Automatic time setting
- 7 Manual time setting
- 8 Time zone setting
- 9 Alarm setting
- 10 Snooze function
- 11 Temperature alarm setting
- 12 Receiving measurements automatically
- 13 Manual measurement display
- 14 Weather trend
- 15 Connecting remote sensors
- 16 Technical data
- 17 General safety instructions
- 18 Documents / Resources
Features
- Graphical 12-hours weather trend display
- Radio-controlled clock with DCF signal reception and display
- Alarm with snooze function
- Outdoor temperature alarm (frost warning)
- Outdoor temperature (in °C or °F)
- Indoor temperature (in °C or °F)
- Relative humidity (indoor) in %
- Highest and lowest value display
- Up to 3 thermo remote sensors connectable (1 sensor included)
- Control elements on the backside
- Semi-transparent display
- Can be placed on a flat surface
About this Instruction Manual
NOTICE

These operating instructions are to be considered a component of the device.
Read the safety instructions and the instruction manual carefully before using this device.
Keep these instruction manual in a safe place for future reference. If the device is sold or passed on, the instruction manual must be passed on to any subsequent owner/user of the product.
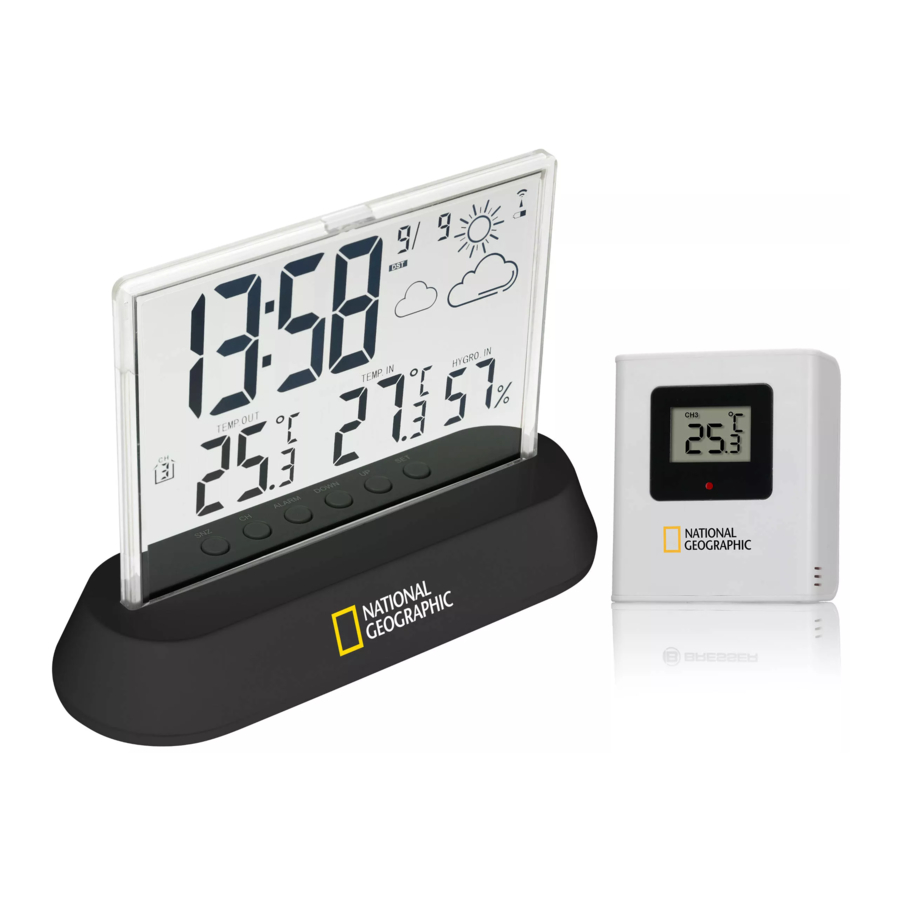
Parts overview and scope of delivery
Illustration 1: Parts overview for base station (top) and remote sensor (bottom)

- Display (base station)
- Base
- SNZ button (snooze funcion)
- CH button (channel control)
- ALARM button (Alarm setting)
- DOWN button (Value setting downwards)
- UP button (Value setting upwards)
- Set button (Basic settings)
- Battery compartment cover (Base station)
- Battery compartment (Base station)
- Display (Remote sensor)
- Battery compartment cover (Remote sensor)
- Battery compartment (Remote sensor)
- CH button (Channel setting)
- °C/°F button (temperature format setting)
- Wall mount
- Stand, fold-out
Scope of delivery
Base station (A), remote sensor (B)
Recommended batteries (not included)
4 pcs. Micro batteries (1.5V, AAA type)
Screen display
Illustration 2: Screen display for base station (left) and remote sensor (right)

- AM/PM information in 12-hour time mode
- Standard: Current time; Alarm: Alarm time
- Symbol for active alarm
- Symbol for active time zone
- Symbol for active daylight saving time (DST)
- Current date
- Graphical weather trend display
- Symbol for radio signal
- Battery level indicator (Base station)
- Indoor humidity information
- Indoor humidity value
- Indoor temperature information
- Indoor temperature value
- Battery level indicator (Remote sensor)
- Outdoor temperature value
- Symbol for temperature alarm (highest or lowest value)
- Selected channel for remote sensor
- Outdoor temperature information
- Symbol when snooze function is activated
- Battery level indicator (Remote sensor)
- Symbol for radio signal
- Outdoor temperature value
 NOTICE
Avoid connection faults!
In order to avoid connection problems between the devices, the following points must be observed during commissioning.
- Place the base unit (receiver) and sensor (transmitter) as close together as possible.
- Connect the power supply to the base unit and wait until the indoor temperature is displayed.
- Establish power supply for the sensor.
- Set up/operate the base unit and sensor within the effective transmission range.
- Make sure that the base unit and the radio sensor are set to the same channel.
When changing the batteries, always remove the batteries from both the base unit and the sensor and reinsert them in the correct order so that the radio link can be re-established. If one of the two devices is operated via a mains power connection, the power connection must also be briefly disconnected for this device when the batteries are changed. If, for example, only the batteries in the sensor are replaced, the signal may subsequently not be received at all or not be received correctly.
Note that the actual range depends on the respective construction materials used for the buildings as well as the respective position of the base unit and the outdoor sensor. External influences (various radio transmitters and other sources of interference) can greatly reduce the possible range. In such cases, we recommend finding other locations for both the base unit and the outdoor sensor. Sometimes moving the sensor by just a few centimeters is enough! Though the remote unit is weather proof, it should be placed away from direct sunlight, rain or snow.
Setting up power supply
Base station
- Remove the battery compartment cover.
- Insert the batteries into the battery compartment. Ensure that the battery polarity (+/-) is correct.
- Replace the battery compartment cover.
- Wait until the indoor temperature is displayed on the base station.
Remote sensor
- Remove the battery compartment cover.
- Insert the batteries into the battery compartment. Ensure that the battery polarity (+/-) is correct.
- Push the CH button to set the desired transmission channel (setting CH1, CH2 or CH3 on screen display).
- Push the °C/°F button to set the desired temperature format (setting °C or °F on screen display).
- Replace the battery compartment cover.
Automatic time setting
After the power has been restored, the unit automatically searches for the radio signal. It takes approximately 3-8 minutes for this process to be completed.
If the radio signal is received correctly, the date and time are set automatically and the reception symbol is displayed.
If no radio signal has been received, proceed as follows:
- Press the UP button for approx. 2 seconds to initiate the reception of the radio signal again.
- Press the UP button for approx. 2 seconds to initiate the reception of the radio signal again.
- If still no radio signal is received, the time must be set manually.
Manual time setting
- Press and hold SET button for approx. 2 seconds to change to time setting mode.
- Digits to be set are flashing.
- Press UP or DOWN button to change the value.
- Press SET button to confirm and continue to the next setting.
- Settings order: Year > Month > Day > Time zone > 12/24-hour mode > Hours > Minutes
- Finally press the SET button to save the settings and exit the setting mode.
Time zone setting
If this weather station is to be used in an area where the UTC time standard is used (e.g. parts of the UK and Portugal), the time zone can be set manually to -1h UTC. To do this, follow the next steps.
- Press and hold the SET button for about 2 seconds to switch to time setting mode.
- The year digits flash.
- Sequence of settings: Year > Month > Day >Time zone > 12/24 hour mode > Hours > Minutes.
- Press the SET button until thetime zone setting flashes.
- Press the DOWN button to change the value to -1.
- Press the SET button repeatedly until the time setting mode is completed.
Alarm setting
- Press Press ALARM button to show the alarm time.
- Press and hold ALARM button for approx. 2 seconds to change to alarm time setting mode.
- Digits to be set are flashing.
- Press UP or DOWN button to change the value.
- Press ALARM button to confirm and continue to the next setting.
- Settings order: Hours > Minutes
- Finally press the ALARM button to save the settings and exit the setting mode.
- Press SET button to activate the alarm. The
![]() symbol will be displayed. The alarm is activated.
symbol will be displayed. The alarm is activated. - Press SET button again to disable the alarm. The
![]() symbol will not be displayed. The alarm is disabled.
symbol will not be displayed. The alarm is disabled.
Snooze function
- When the alarm sounds, press SNZ button to activate the snooze function. The alarm will sound again in 5 minutes.
- Press any other button when the alarm sounds to interrupt the alarm until the alarm time will be reached again.
Temperature alarm setting
- In normal time display mode, press DOWN button for approx. 2 seconds to enter temperature alarm time setting mode.
- Digits to be set are flashing.
- Settings order: ON/OFF (Temperature alarm on/off) > Temperature highest limit > Temperature lowest limit > Exit
- Press UP or DOWN button to change the value.
- Press SET button to confirm and continue to the next setting.
- The temperature settings mode will be quit automatically after 30 seconds of inactivity. All settings done before will be saved.
- When outdoor temperature reaches highest or lowest limit, the temperature alarm symbol will flash and an alarm will sound for approx. 3 seonds. This will be repeated with an interval of 1 minute until the temperature has fallen below the limit again.
NOTICE! NOTICE! Select temperature alarm OFF from the temperature settings mode to disabled the temperature alarm permanently.
Receiving measurements automatically
Once batteries are installed, the base station will display the measurement readings. Readings from the remote sensor will be displayed within 3 minutes after powering it on.
Manual measurement display
- Press UP button several times to display the saved values one after another.
- Display order: Current values > MAX (highest values) > MIN (lowest values)
- Press UP button for approx. 2 seconds during highest or lowest value display to irrevocable delete all saved values.
NOTICE! Saved highest and lowest values will be deleted automatically every day on 0:00!
Weather trend
The weather station will calculate a weather trend for the next 12 hours on basis of the measured values. It will be displayed as follows:
Illustration 3: Weather trend indicators

- Sunny
- Partly cloudy
- Cloudy
- Rain
Connecting remote sensors
The measurements of up to 3 remote sensors* of the same type can be displayed on the weather station's screen.
- Remove the battery compartment cover from the remote sensor.
- Press the CH button repeatedly until the desired channel is shown on the sensor display (CH1, CH2 or CH3).
- Re-attach the battery compartment cover.
- Press the CH button on the base station repeatedly to display the measurements of the different channels. The selected channel is shown on the display.
- Press CHANNEL button for about 3 seconds to reset the values and search for a wireless sensor (RF signal).
*one remote sensor included, more optionally available
Technical data
Base station
| Batteries | 2x AAA, 1.5V |
| Radio controlled signal | DCF |
| Maximum number of sensors | 3 |
| Temperature unit | °C / °F |
| Time display | HH:MM |
| Time format | 12 or 24 hours |
| Dimensions | 140 x 105 x 50 mm (W x H x D) |
| Weight | 117 g (without batteries) |
Wireless Rain gauge sensor
| Batteries | 2x AAA, 1.5V |
| Transmission frequency | 433 MHz |
| Maximum radio-frequency power under 10mW | |
| Temperature unit | °C / °F |
| Dimensions | 60 x 96 x 27 mm (W x H x D) |
| Weight | 52 g (without batteries) |
General safety instructions

Danger of suffocation!
Improper use of this product may result in suffocation, especially for children. It is therefore imperative that you observe the following safety information.
- Keep packaging materials (plastic bags, rubber bands, etc.) away from children! There is a danger of choking!
- This product contains small parts that can be swallowed by children! Choking hazard!

Risk of an electric shock!
This device contains electronic parts that are powered by a power source (AC adapter and/or batteries). Improper use of this product may result in electric shock. Electric shock can cause serious or fatal injuries. It is therefore imperative that you observe the following safety information.
- Never leave children unattended when handling the device! Follow the instructions carefully and do not attempt to power this device with anything other than power sources recommended in this instruction manual, otherwise there is a danger of an electric shock!

Explosion hazard!
Improper use of this product may result in fire. It is essential that you observe the following safety information in order to avoid fires.
- Do not expose the device to high temperatures. Use only the recommended batteries. Do not short-circuit the device or batteries, or throw them into a fire! Excessive heat or improper handling could trigger a short-circuit, a fire or an explosion!
NOTICE
Danger of material damage!
Improper handling may result in damage to the unit and/or accessories. Therefore, use the device only in accordance with the following safety information.
- Do not disassemble the device! In the event of a defect, please contact your dealer. They will contact the Service Center and can arrange the return of this device for repair if necessary.
- Do not immerse the unit in water!
- Do not expose the device to impacts, vibrations, dust, constant high temperatures or excessive humidity. This can result in malfunctions, short-circuits or damage to the batteries and components.
- Use only the recommended batteries. Always replace weak or empty batteries with a new, complete set of batteries at full capacity. Do not use batteries from different brands or types or with different capacities. Remove batteries from the device if it is not to be used for a longer period of time!
 NOTICE
Risk of voltage damage!
The manufacturer is not liable for damage related to improperly installed batteries!
Documents / ResourcesDownload manual
Here you can download full pdf version of manual, it may contain additional safety instructions, warranty information, FCC rules, etc.
Advertisement


Need help?
Do you have a question about the 9070300 and is the answer not in the manual?
Questions and answers