Chapters
Table of Contents

Related Manuals for National Geographic Bresser 9070700


Summary of Contents for National Geographic Bresser 9070700
- Page 1 Wetterstation · Weather Station · Station météo · Estación meteorológica · VA Colour Thermo-Hygro Station Bedienungsanleitung Instruction manual Mode d’emploi Manual de instrucciones...
- Page 2 Besuchen Sie unsere Website über den folgenden QR Code oder Weblink um weitere Informationen zu diesem Produkt oder die verfügbaren Übersetzungen dieser Anleitung zu finden. Visit our website via the following QR Code or web link to find further information on this product or the available translations of these instructions.
- Page 3 Deutsch ........................English ........................Français ......................... Español ........................
-
Page 4: Table Of Contents
Inhaltsverzeichnis 1 Impressum .............................. 5 2 Gültigkeitshinweis............................ 5 3 Eigenschaften.............................. 5 4 Zu dieser Anleitung............................ 6 5 Allgemeine Sicherheitshinweise........................ 6 6 Teileübersicht und Lieferumfang........................ 8 7 Displayanzeigen ............................. 9 8 Vor der Inbetriebnahme .......................... 10 9 Stromversorgung herstellen ........................ 10 10 Automatische Zeiteinstellung ........................ -
Page 5: Impressum
Allgemeinen in Deutschland, der Europäischen Union und/oder weiteren Ländern waren-, mar- ken- und/oder patentrechtlich geschützt. © National Geographic Partners LLC. All rights reserved. NATIONAL GEOGRAPHIC and Yellow Border Design are trademarks of National Geographic Society, used under license. Visit our website www.nationalgeographic.com 2 Gültigkeitshinweis... -
Page 6: Zu Dieser Anleitung
• Zum Aufstellen und für die Wandmontage 4 Zu dieser Anleitung HINWEIS Diese Bedienungsanleitung ist als Teil des Gerätes zu betrachten! Lesen Sie vor der Benutzung des Geräts aufmerksam die Sicherheitshinweise und die Bedienungsan- leitung. Bewahren Sie diese Bedienungsanleitung für die erneute Verwendung zu einem späteren Zeitpunkt auf. - Page 7 GEFAHR Explosionsgefahr! Bei unsachgemäßer Verwendung dieses Produkts besteht Explosionsgefahr. Beachten Sie unbedingt die nachfolgenden Sicherheitsinformationen, um eine Explosion zu vermeiden. • Setzen Sie das Gerät keinen hohen Temperaturen aus. Benutzen Sie nur das mitgelieferte Netz- teil oder die empfohlenen Batterien. Gerät und Batterien nicht kurzschließen oder ins Feuer wer- fen! Durch übermäßige Hitze und unsachgemäße Handhabung können Kurzschlüsse, Brände und sogar Explosionen ausgelöst werden! HINWEIS...
-
Page 8: Teileübersicht Und Lieferumfang
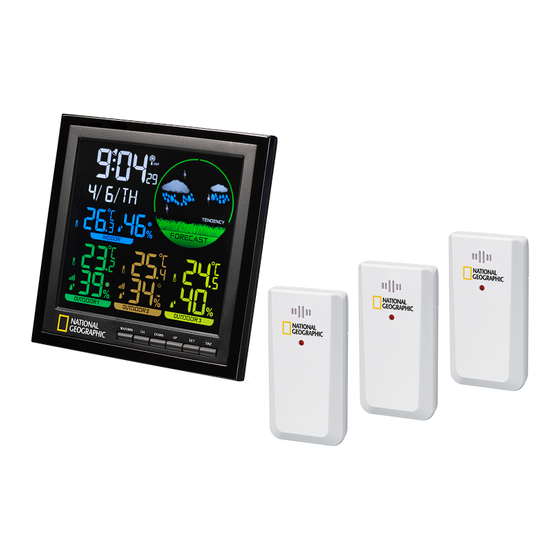
6 Teileübersicht und Lieferumfang MAX/MIN DOWN Abb. 1: Alle Teile der Basisstation (oben) und des Funksensors (unten) 1 SNOOZE/LIGHT-Taste (Schlummerfunktion / 2 Display Displayhelligkeit einstellen) 3 MAX/MIN-Taste 4 CHANNEL-Taste (Kanalwahl) 5 DOWN-Taste (Wert verringern) 6 UP-Taste (Wert erhöhen) 7 SET-Taste 8 SNZ-Taste 9 Vorrichtung für Wandmontage 10 DC-Netzadapter mit EU-Netzstecker 11 DC-Hohlstecker... -
Page 9: Displayanzeigen
Lieferumfang: Wetterstation (A), Netzteil (B), Thermo-/Hygrosensor (C) (3 Stück) Außerdem erforderlich (nicht im Lieferumfang enthalten): Station: 3 Stck. Micro-Batterien (1.5V, Typ AAA) Sensor: 2 Stck. Micro-Batterien (1.5V, Typ AAA) (6 Stck. insgesamt benötigt) 7 Displayanzeigen 1 Aktuelle Uhrzeit 2 Tag, Monat, Wochentag 3 Wettertrend-Pfeil nach oben 4 Innentemperatur (in °C oder °F) 5 Luftfeuchtigkeit innen (in %) -
Page 10: Vor Der Inbetriebnahme
13 Batteriestandanzeige (Außensensor) 14 Außentemperatur (in °C oder °F) für Kanal 2 15 Luftfeuchtigkeit außen (in %) für Kanal 2 16 Außentemperatur (in °C oder °F) für Kanal 3 17 Luftfeuchtigkeit außen (in %) für Kanal 3 18 Grafik für die Wettervorhersage (12 Stunden) 19 Funksignalempfang 20 Alarmunterbrechung (Schlummern) aktiv 21 Alarm aktiv... -
Page 11: Automatische Zeiteinstellung
HINWEIS! Nach 7 Sekunden wechselt das Display im Batteriebetrieb in den Stromsparmo- dus. Bei Batteriebetrieb die SNOOZE/LIGHT-Taste drücken, um das Display für etwa 7 Sekun- den zu aktivieren. HINWEIS! Beim Wechsel der Stromversorgungsart (Netzstrom oder Batterien) wird die Stromversorgung technisch bedingt kurzzeitig unterbrochen. Dabei gehen alle zuvor vorge- nommenen Einstellungen verloren. -
Page 12: Schlummerfunktion
3. Die einzustellenden Ziffern blinken. 4. UP- oder DOWN-Taste drücken, um den Wert zu verändern. 5. SET-Taste drücken, um die Eingabe zu bestätigen und zur nächsten Einstellung zu wechseln. 6. Reihenfolge der Einstellungen: Stunden > Minuten 7. SET-Taste abschließend drücken, um die Einstellungen zu speichern und den Einstellmodus zu verlassen. -
Page 13: Trendpfeile
16 Trendpfeile 1 steigend 2 fallend Der Temperatur- und Luftfeuchtigkeits-Trendindikator zeigt die Trends der Wetterveränderung für die kommenden Minuten an. Die Pfeile zeigen einen steigenden oder fallenden Trend an. 17 Anschluss von Funksensoren Die Wetterstation kann die Messwerte von bis zu 3 Funksensoren des gleichen Typs anzeigen. Dabei muss jeder Funksensor auf einen separaten Kanal eingestellt sein. -
Page 14: Entsorgung
2. Im Netzbetrieb (DC 5V) die SNOOZE/LIGHT-Taste mehrmals drücken, um die gewünschte Dis- playhelligkeit in Stufen einzustellen: schwach – hell – aus 3. HINWEIS! Im Batteriebetrieb ist keine Regulierung der Displayhelligkeit möglich. 19 Entsorgung Entsorgen Sie die Verpackungsmaterialien sortenrein. Informationen zur ordnungsgemäßen Entsorgung erhalten Sie beim kommunalen Entsorgungsdienstleister oder Umweltamt. -
Page 15: Garantie
21 Garantie Die reguläre Garantiezeit beträgt 2 Jahre und beginnt am Tag des Kaufs. Um von einer verlängerten, freiwilligen Garantiezeit wie auf dem Geschenkkarton angegeben zu profitieren, ist eine Registrierung auf unserer Website erforderlich. Die vollständigen Garantiebedingungen sowie Informationen zu Garantiezeitverlängerung und Ser- viceleistungen können Sie unter www.bresser.de/garantiebedingungen einsehen. - Page 16 Table of contents 1 Imprint ................................ 17 2 Validity note .............................. 17 3 Features ................................ 17 4 About this Instruction Manual........................ 18 5 General safety instructions ......................... 18 6 Parts overview and scope of delivery ...................... 20 7 Screen display .............................. 21 8 Before commissioning..........................
-
Page 17: Imprint
Germany, the European Union and/or other countries. © National Geographic Partners LLC. All rights reserved. NATIONAL GEOGRAPHIC and Yellow Border Design are trademarks of National Geographic Society, used under license. Visit our website: www.nationalgeographic.com... -
Page 18: About This Instruction Manual
• Table stand or wall mounting 4 About this Instruction Manual NOTICE These operating instructions are to be considered a component of the device. Read the safety instructions and the instruction manual carefully before using this device. Keep these instruction manual in a safe place for future reference. If the device is sold or passed on, the instruction manual must be passed on to any subsequent owner/user of the product. - Page 19 DANGER Explosion hazard! Improper use of this product may result in fire. It is essential that you observe the following safety in- formation in order to avoid fires. • Do not expose the device to high temperatures. Use only the supplied AC adapter or the recom- mended batteries.
-
Page 20: Parts Overview And Scope Of Delivery
6 Parts overview and scope of delivery MAX/MIN DOWN Illustration 1: All parts of base station (top) and wireless sensor (bottom) 1 SNOOZE/LIGHT button (set snooze function / 2 Display display brightness) 3 MAX / MIN button 4 CHANNEL button (channel selection) 5 DOWN button (decrease value) 6 UP button (increase value) 7 SET button... -
Page 21: Screen Display
Scope of delivery: Weather station (A), power supply (B), thermo/hygro sensor (C) (3 pieces) Also required (not included): Station: 3 pcs. Micro batteries (1.5V, type AAA) Sensor: 2 pcs. Micro batteries (1.5V, type AAA) (6 pcs. total required) 7 Screen display 1 Current time 2 Day, month, weekday 3 Weather trend arrow up... -
Page 22: Before Commissioning
13 Battery level indicator (Outdoor sensor) 14 Outdoor temperature (in °C or °F) for channel 15 Outdoor humidity (in %) for channel 2 16 Outdoor temperature (in °C or °F) for channel 17 Outdoor humidity (in %) for channel 3 18 Graphic for weather forecast (12 hours) 19 Radio signal reception 20 Alarm interruption (snooze) activated... -
Page 23: Automatic Time Setting
NOTICE! When switching from mains power supply to battery power supply or vice versa, the power supply is being disabled for a short moment for technical reasons. Exception: per- manent battery operation. Remote sensor 9. Remove the battery compartment cover. 10. Insert the batteries into the battery compartment. Ensure that the battery polarity (+/-) is correct. 11. -
Page 24: Snooze Function
8. In normal display mode, press SET button to switch to alarm time display (AL). 9. Press DOWN button to enable the alarm. The symbol will be displayed. 10. Press DOWN button again to disable the alarm. The symbol will disappear from the display. 13 Snooze function 1. -
Page 25: Trend Arrow Indicators
16 Trend arrow indicators 1 rising 2 falling The temperature and humidity trend indicator shows the trends of weather change for the coming minutes. The arrows indicate a rising or falling trend. 17 Connecting remote sensors The Weather Station can display the readings from up to 3 wireless sensors of the same type. Each radio sensor must be set to a separate channel. -
Page 26: Technical Data
Batteries and accumulators are marked with a crossed-out dustbin and the chemical symbol of the pollutant, "Cd" stands for cadmium, "Hg" stands for mercury and "Pb" stands for lead. 20 Technical data Base unit Power supply 5V DC 150mA USB power plug Backup: 3x AAA Temperature unit °C/°F... -
Page 27: Ukca Declaration Of Conformity
23 UKCA declaration of conformity A "Declaration of Conformity" in accordance with the applicable directives and relevant standards has been issued by Bresser GmbH The full text of the UKCA Declaration of Conformity is available at the following web address: www.bresser.de/download/9070700/ UKCA/9070700_UKCA.pdf Bresser UK Ltd. - Page 28 Table des matières 1 Impressum .............................. 29 2 Note de validité............................. 29 3 Caractéristiques ............................ 29 4 A propos de ce mode d’emploi ........................ 30 5 Consignes générales de sécurité ....................... 30 6 Vue d'ensemble des pièces et étendue de la livraison................ 32 7 Affichage à...
-
Page 29: Impressum
Visit our website www.nationalgeographic.com © National Geographic Partners LLC. All rights reserved. NATIONAL GEOGRAPHIC and Yellow Border Design are trademarks of National Geographic Society, used under license. 2 Note de validité Cette documentation est valable pour les produits portant les numéros d'article suivants :... -
Page 30: Propos De Ce Mode D'emploi
• Support de table ou montage mural 4 A propos de ce mode d’emploi INFORMATION Ce mode d’emploi fait partie intégrante de l’appareil. Lire attentivement les consignes de sécurité et le mode d'emploi avant d'utiliser l'appareil. Conservez ce manuel d'instructions dans un endroit sûr pour pouvoir le consulter ultérieurement. En cas de vente ou de cession de l'appareil, le manuel d'instructions doit être transmis à... - Page 31 DANGER RISQUE D'INCENDIE/EXPLOSION Une utilisation incorrecte de ce produit peut entraîner un incendie. Il est essentiel que vous observiez les informations de sécurité suivantes afin d'éviter les incendies. • N'exposez pas l'appareil à des températures élevées. Utilisez uniquement l'adaptateur secteur fourni ou les piles recommandées.
-
Page 32: Vue D'ensemble Des Pièces Et Étendue De La Livraison
6 Vue d'ensemble des pièces et étendue de la livraison MAX/MIN DOWN Fig. 1: Toutes les parties de la station de base (en haut) et des capteurs sans fil (en bas) 1 Bouton SNOOZE/LIGHT (fonction de répéti- 2 Écran d'affichage tion / réglage de la luminosité de l'écran) 3 Bouton MAX / MIN 4 Bouton CHANNEL (sélection du canal) 5 Bouton DOWN (diminuer la valeur) -
Page 33: Affichage À L'écran
19 Bouton RESET (réinitialiser tous les para- 20 Curseur pour la sélection du canal mètres) 21 Compartiment des piles Contenu de la livraison : Station météo (A), alimentation électrique (B), capteur thermo/hygro (C) (3 pièces) Également requis (non inclus) : Station : 3 pcs. -
Page 34: Avant La Mise En Service
7 Symbole de la température intérieure 8 Tendance météo en baisse 9 Puissance du signal du capteur extérieur 10 Symbole d'humidité extérieure 11 Température extérieure (en ° C ou ° F) pour le 12 Humidité extérieure (en %) pour le canal 1 canal 1 13 Indicateur de niveau de batterie Sonde exté- 14 Température extérieure (en °... -
Page 35: 10 Réglage Automatique De L'heure
5. Retirez le couvercle du compartiment des piles. 6. Insérez les piles dans le compartiment des piles. Assurez-vous que la polarité de la batterie (+/-) est correcte. 7. Replacez le couvercle du compartiment des piles. 8. Attendez que la température intérieure soit affichée sur la base. INFORMATION ! Après 7 secondes, l'écran passe en mode économie d'énergie en mode bat- terie. -
Page 36: 12 Réglage De L'alarme
12 Réglage de l'alarme Réglage de l'heure de l'alarme 1. En mode d'affichage normal, appuyez sur le bouton SET pour passer à l'affichage de l'heure de l'alarme (AL). 2. Appuyez et maintenez enfoncé le bouton SET pendant environ 3 secondes pour entrer en mode de réglage de l'heure de l'alarme. -
Page 37: Indicateurs De Flèche De Tendance
16 Indicateurs de flèche de tendance 1 En hausse 2 Chute L'indicateur de tendance de la température et de l'humidité montre les tendances de l'évolution du temps pour les prochaines minutes. Les flèches indiquent une tendance à la hausse ou à la baisse. 17 Raccordement de capteurs sans fil La station météo peut afficher les relevés de 3 capteurs sans fil* maximum du même type. -
Page 38: Recyclage
2. En fonctionnement sur secteur (DC 5V), touchez la surface tactile SNOOZE/LIGHT plusieurs fois pour régler la luminosité de l'écran souhaitée par paliers : faible - lumineux - éteint 3. REMARQUE : il n'est pas possible de régler la luminosité de l'écran lors du fonctionnement sur batterie. -
Page 39: Garantie
Poids (piles incluses) 47 gr 21 Garantie La période de garantie normale est de 2 ans et commence le jour de l'achat. Pour bénéficier d'une pé- riode de garantie prolongée (prestation non obligatoire) telle qu'indiquée sur la boite cadeau, une ins- cription sur notre site internet est nécessaire. - Page 40 Índice de contenidos 1 Aviso legal .............................. 41 2 Nota de validez ............................. 41 3 Características.............................. 41 4 Sobre este manual de instrucciones de uso ..................... 42 5 Instrucciones generales de seguridad....................... 42 6 Descripción de las partes.......................... 44 7 Pantalla................................ 45 8 Antes de la puesta en marcha........................
-
Page 41: Aviso Legal
Unión Europea y/o en otros países. Visit our website www.nationalgeographic.com © National Geographic Partners LLC. All rights reserved. NATIONAL GEOGRAPHIC and Yellow Border Design are trademarks of National Geographic Society, used under license. 2 Nota de validez Esta documentación es válida para los productos con los siguientes números de artículo: 9070700 Versión del manual: v052023a... -
Page 42: Sobre Este Manual De Instrucciones De Uso
• Soporte para mesa o pared 4 Sobre este manual de instrucciones de uso ¡AVISO! El presente manual de instrucciones debe considerarse parte integrante del aparato. Lea atentamente las instrucciones de seguridad y el manual antes de utilizar este dispositivo. Guarde este manual de instrucciones en un lugar seguro para futuras consultas. - Page 43 PELIGRO Peligro de explosión El uso inadecuado de este producto puede provocar un incendio. Es esencial que observe la siguien- te información de seguridad para evitar incendios. • No exponga el dispositivo a altas temperaturas. Utilice únicamente el adaptador de CA suministra- do o las pilas recomendadas.
-
Page 44: Descripción De Las Partes
6 Descripción de las partes MAX/MIN DOWN Fig. 1: Partes de la estación base (arriba) y del sensor inalámbrico (abajo) 1 Botón SNOOZE/LIGHT (función de repetición 2 Pantalla de la alarma y brillo de la pantalla) 3 Botón MAX/MIN 4 Botón CHANNEL (selección de canal) 5 Botón DOWN (disminuye el valor) 6 Botón UP (aumenta el valor) 7 Botón SET... -
Page 45: Pantalla
Piezas incluidas: Estación meteorológica (A), fuente de alimentación (B) y termohigrosensor (C) Se necesitan pilas (no incluidas): 3 pilas de 1,5V, tipo AAA, para la estación base 2 pilas de 1,5V, tipo AAA, para cada sensor (6 en total) 7 Pantalla 1 Hora actual 2 Día, mes, día de la semana 3 Flecha de tendencia del tiempo... -
Page 46: Antes De La Puesta En Marcha
13 Indicador de nivel de batería (sensor externo) 14 Temperatura exterior (en °C o °F) en el canal 15 Humedad exterior (en %) en el canal 2 16 Temperatura exterior (en °C o °F) en el canal 17 Humedad exterior (en %) en el canal 3 18 Gráfico para el pronóstico del tiempo (12 ho- ras) 19 Recepción de la señal de radio... -
Page 47: Ajuste Automático De Hora
¡AVISO! Después de 7 segundos, la pantalla cambia al modo de ahorro de energía en el mo- do de batería. Cuando funcione a pilas (5V CC), presione el botón SNOOZE/LIGHT para acti- var la pantalla durante unos 7 segundos. ¡AVISO! Si se cambia el tipo de alimentación (red eléctrica o pilas) se interrumpe brevemente la alimentación de corriente por razones técnicas. -
Page 48: Función De Repetición De La Alarma
3. Los dígitos a ajustar parpadean. 4. Pulse el botón UP o DOWN para cambiar el valor. 5. Pulse el botón SET para confirmar y continuar con el siguiente ajuste. 6. Orden de configuración: Horas > Minutos 7. Finalmente, pulse el botón SET para guardar los ajustes y salir del modo de ajuste. Activar/desactivar alarma 8. -
Page 49: Flechas Indicadoras De Tendencia
16 Flechas indicadoras de tendencia 1 Ascendente 2 Descendente El indicador de tendencia de la temperatura y la humedad muestra las tendencias del tiempo para los próximos minutos. Las flechas indican una tendencia ascendente o descendente. 17 Conexión de sensores inalámbricos La estación meteorológica puede mostrar datos de hasta 3 sensores inalámbricos*. -
Page 50: Reciclaje
2. Cuando funcione enchufada a la luz, pulse la tecla SNOOZE/LIGHT varias veces para configurar brillo deseado de la pantalla de tenue a brillante o apagado. 3. NOTA: No es posible ajustar el brillo de la pantalla cuando funcione a pilas 19 Reciclaje Elimine los materiales de embalaje de acuerdo con su clase. -
Page 51: Garantía
Peso (incluye pilas) 47 g 21 Garantía El periodo de garantía normal es de 2 años y comienza el día de la compra. Para beneficiarse de un periodo de garantía voluntario ampliado, como se indica en la caja de regalo, es necesario registrarse en nuestro sitio web. - Page 55 Service DE AT CH BE NL BE Bei Fragen zum Produkt und eventuellen Als u met betrekking tot het product vragen Reklamationen nehmen Sie bitte zunächst mit of eventuele klachten heeft kunt u contact dem Service-Center Kontakt auf, vorzugsweise opnemen met het service centrum (bij voorkeur per E-Mail.
- Page 56 Bresser GmbH Gutenbergstraße 2 46414 Rhede · Germany www.bresser.de @BresserEurope...
Need help?
Do you have a question about the Bresser 9070700 and is the answer not in the manual?
Questions and answers