
Related Manuals for National Geographic VA Colour RC


Summary of Contents for National Geographic VA Colour RC
- Page 1 Wetterstation · Weather Station · VA Colour RC Weather station Bedienungsanleitung Instruction manual...
- Page 2 Besuchen Sie unsere Website über den folgenden QR Code oder Weblink um weitere Informationen zu diesem Produkt oder die verfügbaren Übersetzungen dieser Anleitung zu finden. Visit our website via the following QR Code or web link to find further information on this product or the available translations of these instructions.
- Page 3 Deutsch ......................... English........................
-
Page 4: Table Of Contents
Inhaltsverzeichnis 1 Impressum .............................. 5 2 Gültigkeitshinweis............................ 5 3 Eigenschaften .............................. 5 4 Zu dieser Anleitung ............................ 6 5 Teileübersicht und Lieferumfang........................ 7 6 Displayanzeigen ............................. 8 7 Vor der Inbetriebnahme .......................... 9 8 Die ersten Schritte............................ 9 9 Stromversorgung herstellen ......................... 9 10 Automatische Zeiteinstellung ........................ 10 11 Manuelle Zeiteinstellung.......................... 10 12 Anzeigenwechsel............................ 11 13 Weckrufeinstellung ............................ 11 14 Schlummerfunktion............................ 11... -
Page 5: Impressum
Allgemeinen in Deutschland, der Europäischen Union und/oder weiteren Ländern waren-, mar- ken- und/oder patentrechtlich geschützt. © National Geographic Partners LLC. All rights reserved. NATIONAL GEOGRAPHIC and Yellow Border Design are trademarks of National Geographic Society, used under license. -
Page 6: Zu Dieser Anleitung
• Zum Aufstellen und für die Wandmontage 4 Zu dieser Anleitung HINWEIS Diese Bedienungsanleitung ist als Teil des Gerätes zu betrachten! Lesen Sie vor der Benutzung des Geräts aufmerksam die Sicherheitshinweise und die Bedienungsan- leitung. Bewahren Sie diese Bedienungsanleitung für die erneute Verwendung zu einem späteren Zeitpunkt auf. -
Page 7: Teileübersicht Und Lieferumfang
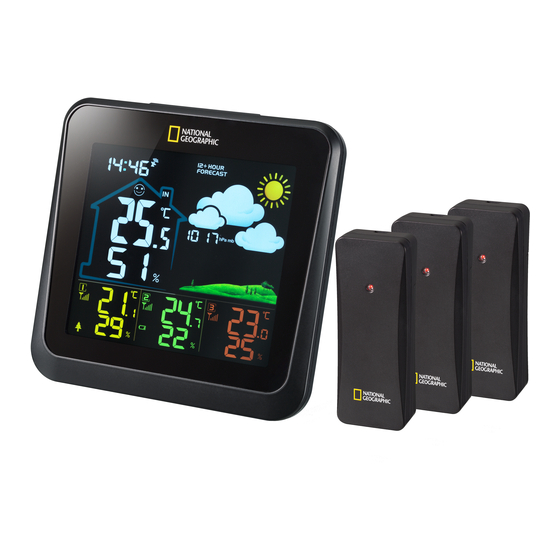
5 Teileübersicht und Lieferumfang ▲ ALARM 3 2 1 Abb. 1: Alle Teile der Basisstation (oben) und der Funksensoren (unten) 1 SNOOZE/LIGHT-Taste (Schlummerfunktion / 2 Bildschirm Displayhelligkeit einstellen) 3 Vorrichtung für Wandmontage 4 SET-Taste 5 CHANNEL-Taste (Kanalwahl) 6 MEM-Taste 7 UP-Taste (Wert erhöhen) 8 DOWN-Taste (Wert verringern) 9 ALARM-Taste 10 Batteriefach... -
Page 8: Displayanzeigen
Lieferumfang: Wetterstation (A), Netzteil (B), Thermo-/Hygrosensor (C) (3 Stück) Außerdem erforderlich (nicht im Lieferumfang enthalten): Station: 3 Stck. Micro-Batterien (1.5V, Typ AAA) Sensor: 2 Stck. Mignon-Batterien (1.5V, Typ AA) (6 Stck. insgesamt benötigt) 6 Displayanzeigen 1 Uhrzeit 2 Raumklimaindikator 3 Innentemperatur (in °C oder °F) und Luftfeuch- 4 Empfangssignalstärke Außensensor Kanal 1 tigkeit (in %) 5 Batteriestatus (Sensor Kanal 1) -
Page 9: Vor Der Inbetriebnahme
9 Anzeigebereich für Kanal 2 (grün) Außentem- 10 Empfangssignalstärke Außensensor Kanal 3 peratur und Luftfeuchtigkeit 11 Batteriestatus (Sensor Kanal 3) 12 Anzeigebereich für Kanal 3 (rot) Außentempe- ratur und Luftfeuchtigkeit 13 Luftdruck (mmHg, inHg oder hPa mb) 14 Grafische Wettertrend-Anzeige für die nächs- ten 12 Stunden 15 Batteriestatus (Basisstation) 16 Symbol für das Funksignal... -
Page 10: Automatische Zeiteinstellung
1. DC-Stecker in die Anschlussbuchse am Basisgerät stecken. 2. Netzstecker in die Steckdose stecken. 3. Das Gerät wird direkt mit Strom versorgt. 4. Warten bis die Innentemperatur auf dem Basisgerät angezeigt wird. HINWEIS! Für einen dauerhaften Betrieb wird die Stromversorgung über Netzstrom empfoh- len. -
Page 11: Anzeigenwechsel
5. Reihenfolge der Einstellungen: Stunden > Minuten > Jahr > Tag/Monat, Monat/Tag > Monat > Tag > Luftdruckeinheit > Exit 6. SET-Taste abschließend drücken, um Einstellungen zu speichern und den Einstellungsmodus zu verlassen. 12 Anzeigenwechsel • Im normalen Anzeigemodus die DOWN-Taste drücken, um bei der Zeitanzeige zwischen dem 12- oder 24-Stunden-Modus zu wechseln. -
Page 12: Wettervorhersage
1 DRY: Trocken (Luftfeuchtigkeit <40%) 2 COMFORT: Optimal (Luftfeuchtigkeit zwi- schen 40% und 70%) 3 WET: Feucht (Luftfeuchtigkeit >70%) Der Klimaindikator ist eine bildliche Anzeige, die auf der Lufttemperatur und Luftfeuchtigkeit basiert, um das Komfortniveau zu bestimmen. Hinweis: • Die Komfortanzeige kann bei gleicher Temperatur unterschiedlich ausfallen, abhängig von der Luftfeuchtigkeit. -
Page 13: Max/Min Wetterdaten
4. HINWEIS! Jeder angeschlossene Funksensor muss auf einen anderen Kanal eingestellt wer- den. Ist nur ein Funksensor angeschlossen, sollte dieser auf CH1 eingestellt werden. 5. CHANNEL-Taste ca. 3 Sekunden drücken, um die Werte zurückzusetzen und nach einem Funk- sensor (RF-Signal) zu suchen. 18 MAX/MIN Wetterdaten Die Basisstation speichert die Höchst- und Tiefstwerte für die Innen- und Außentemperatur sowie die Innenraum-Luftfeuchtigkeit über einen Zeitraum von 24 Stunden:... -
Page 14: Eg-Konformitätserklärung
Gewicht (inkl. Batterien) 33 g 21 EG-Konformitätserklärung Hiermit erklärt Bresser GmbH, dass der Funkanlagentyp mit Artikelnummer 9070710 der Richtlinie 2014/53/EU entspricht. Der vollständige Text der EG-Konformitätserklärung ist unter der folgenden Internetadresse verfügbar: www.bresser.de/download/9070710/CE/9070710_CE.pdf 22 Entsorgung Entsorgen Sie die Verpackungsmaterialien sortenrein. Informationen zur ordnungsgemäßen Entsorgung erhalten Sie beim kommunalen Entsorgungsdienstleister oder Umweltamt. - Page 15 Table of contents 1 Imprint ................................ 16 2 Validity note .............................. 16 3 Features................................. 16 4 About this Instruction Manual........................ 17 5 Parts overview and scope of delivery ...................... 17 6 Screen display .............................. 19 7 Before commissioning.......................... 20 8 The first steps ............................... 20 9 Setting up power supply.......................... 20 10 Automatic time setting.......................... 21 11 Manual time setting ............................ 21 12 Display change ............................. 21...
-
Page 16: Imprint
The designations and brand names of the respective companies used in this documentation are gen- erally protected by trade, trademark and/or patent law in Germany, the European Union and/or other countries. © National Geographic Partners LLC. All rights reserved. NATIONAL GEOGRAPHIC and Yellow Border Design are trademarks of National Geographic Society, used under license. -
Page 17: About This Instruction Manual
• Table stand or wall mounting 4 About this Instruction Manual NOTICE These operating instructions are to be considered a component of the device. Read the safety instructions and the operating manual carefully before using this device. Keep this instruction manual in a safe place for future reference. When the device is sold or given to someone else, the instruction manual must be provided to the new owner/user of the product. - Page 18 1 SNOOZ/LIGHT button (set snooze function / 2 Display display brightness) 3 Wall mount fixture 4 SET button 5 CHANNEL button (channel selection) 6 MEM button 7 UP button (increase value) 8 DOWN button (decrease value) 9 ALARM button 10 Battery compartment 11 Battery compartment cover 12 Screw thread for stand 13 Stand...
-
Page 19: Screen Display
6 Screen display 1 Time 2 Indoor climate indicator 3 Indoor temperature (in °C or °F) and humidity 4 Signal strength for outdoor sensor channel 1 (in %) 5 Battery status (sensor channel 1) 6 Display section for channel 1 (yellow) Outdoor temperature and humidity 7 Signal strength for outdoor sensor channel 2 8 Battery status (sensor channel 2) -
Page 20: Before Commissioning
7 Before commissioning NOTICE Avoid connection faults! In order to avoid connection problems between the devices, the following points must be observed during commissioning. 1. Place the base unit (receiver) and sensor (transmitter) as close together as possible. 2. Connect the power supply to the base unit and wait until the indoor temperature is displayed. 3. -
Page 21: Automatic Time Setting
8. Wait until the indoor temperature is displayed on the base station. NOTICE! When switching from mains power supply to battery power supply or vice versa, the power supply is being disabled for a short moment for technical reasons. Exception: per- manent battery operation. -
Page 22: Alarm Setting
• During the Max/Min display, press the MEM button for about 3 seconds to clear the Max/Min data. Every day at 0:00 a.m. the max/min data record is automatically deleted. • In normal display mode, press the ALARM button to display the currently set alarm time. 13 Alarm setting 1. -
Page 23: Connecting Remote Sensors
• The weather forecast is intended for the next 12 hours, it does not necessarily reflect the current situation. • The accuracy of a pressure-based weather forecast is about 70% to 75%. • The pressure unit is selectable in time setting mode (hPa mb, mmHg, inHg). 17 Connecting remote sensors The Weather Station can display the readings from up to 3 wireless sensors of the same type. -
Page 24: Display Brightness Regulation
19 Display brightness regulation 1. When using battery power, press the SNOOZE/LIGHT button to activate the display for about 7 seconds. 2. In mains operation (DC 5V), touch the SNOOZE/LIGHT touch surface several times to set the de- sired display brightness in steps: dim - bright - off 3. - Page 25 Do not dispose of electronic devices in the household garbage! According to the European Directive 2012/19/EU on Waste Electrical and Electronic Equip- ment and its transposition into national law, used electrical equipment must be collected sep- arately and recycled in an environmentally sound manner. Batteries and rechargeable batteries must not be disposed of with household waste.
- Page 28 Service DE AT CH BE NL BE Bei Fragen zum Produkt und eventuellen Als u met betrekking tot het product vragen Reklamationen nehmen Sie bitte zunächst mit of eventuele klachten heeft kunt u contact dem Service-Center Kontakt auf, vorzugsweise opnemen met het service centrum (bij voorkeur per E-Mail.
Need help?
Do you have a question about the VA Colour RC and is the answer not in the manual?
Questions and answers