CyberView RKP115 User Manual
1u rackmount lcd monitor keyboard drawer
Hide thumbs
Also See for RKP115:
- Specifications (2 pages) ,
- User manual (16 pages) ,
- User manual (28 pages)
Table of Contents
Advertisement
Quick Links
Download this manual
See also:
User Manual
Advertisement
Table of Contents

Subscribe to Our Youtube Channel
Related Manuals for CyberView RKP115


Summary of Contents for CyberView RKP115
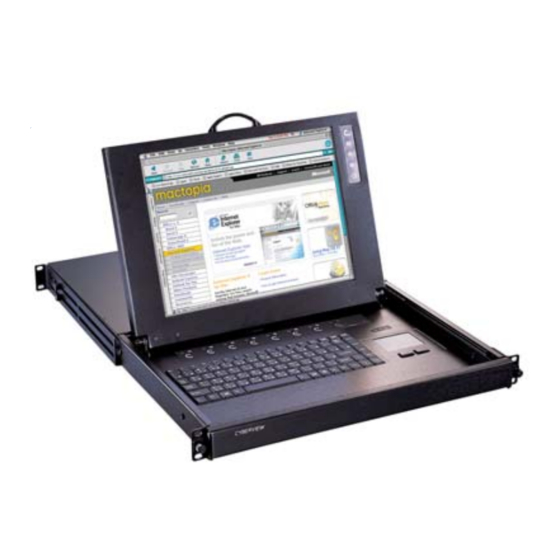
- Page 1 CyberView User Manual RKP115 RKP117 Rackmount LCD monitor Keyboard drawer Version 1.0 20 March 2004...
-
Page 2: Table Of Contents
User Manual Table of Contents General......................3 Unit Introduction................... 3 Unit Photograph.................... 3 Unit Features ....................3 Unit Packing Contents ................... 3 Important Information & Safeguards ............... 3 Preparation for Use..................4 LCD On Screen Display ..................5 Display & Navigation Using Membrane Keys ........... 5 Customizing the LCD Settings................. -
Page 3: General
Single external 12V 5A remote power adaptor, easy to replace and ensures only a single power source is required to the unit , reducing the capacity of UPS outputs required Unit Packing Contents Model Number RKP115 / 117 LCD Keyboard Drawer User Manual CD Quick Reference Guide... -
Page 4: Preparation For Use
User Manual • Refer to section of this user manual regarding recommended storage and operating conditions for the unit • Refer to sections of this user manual regarding troubleshooting of the unit • Refer to section of this user manual regarding improper use of the unit Preparation for Use •... -
Page 5: Lcd On Screen Display
User Manual 2. LCD On Screen Display Display & Navigation Using Membrane Keys The On screen display built into the unit provides users with an efficient method of adjusting to the display input signal. This section explains clearly how to navigate the OSD using the membrane keys, shown below, that you will find on the unit to the right side of the LCD screen. -
Page 6: Customizing The Lcd Settings
User Manual 2.1.2 To Select a Menu Item Simply press the key to scroll 2.1.3 To Enter the Sub Menu Simply press the key marked 2.1.4 To Change an Input Value Simply use the key marked 2.1.5 To Save the setting Simply press the key marked 2.1.6 To Exit the Main Menu... -
Page 7: Miscellaneous Sub Menu
User Manual 2.2.3 Phase / Clock To optimize display qualities - follow the steps 2.1.1 through 2.1.5 2.2.4 Horizontal Screen Position To adjust horizontal screen position - follow the steps 2.1.1 through 2.1.5 2.2.5 Vertical Screen Position To adjust horizontal screen position - follow the steps 2.1.1 through 2.1.5 2.2.6... - Page 8 User Manual 3.1.1 Information To select information sub menu - follow the steps 2.1.1 through 2.1.5 3.1.2 OSD Timeout To select OSD Timeout sub menu - follow the steps 2.1.1 through 2.1.5 3.1.3 Color To select Color sub menu - follow the steps 2.1.1 through 2.1.5 www.austin-hughes.co.uk...
-
Page 9: Setting Os Refresh Rate - Microsoft Windows
User Manual 3.1.4 OSD language To select the OSD language sub menu - follow the steps 2.1.1 through 2.1.5 4. Setting OS Refresh Rate - Microsoft Windows® On the windows desktop ‘right click’ the mouse key and then select ‘properties’ Select ‘Settings’... -
Page 10: Lcd Technical Specification
User Manual 5. LCD Technical Specification 15" Size Screen Area TFT Active Matrix Display Area 304.1mm (h) x 228.1mm (V) Contrast Ratio 300:1 130 deg (H) z 115 deg (V) TYP Viewing Angle Resolution 1024 x 768 XGA 0.297mm (H) x 0.297mm (W) Pixel Pitch Response Time Tr = 5ms, TF = 20ms TYP... - Page 11 User Manual Size 17" Screen Area TFT Active Matrix Display Area 337:92mm (h) x 270.336mm (V) Contrast Ratio 350:1 Viewing Angle 150 deg (H) z 125 deg (V) TYP Resolution 1280 x 1024 SXGA Pixel Pitch 0.264mm (H) x 0.264mm (W) Response Time Tr = 5ms, TF = 20ms TYP Brightness...
-
Page 12: Lcd Troubleshooting
User Manual 6. LCD Troubleshooting The LCD does not function, the PC input is operational • Ensure that the Power adaptor is securely plugged in at both ends and has power feed from the supply source; check that the Green led light is on on the adaptor unit •... -
Page 13: Warranty
User Manual 7. Warranty Period & Conditions Warranty is from the date of sale of the unit, subject to the terms and conditions of the Austin Hughes Europe Authorised channel partner who supplied the unit, please refer to your authorised channel partner for terms &...
Need help?
Do you have a question about the RKP115 and is the answer not in the manual?
Questions and answers