CyberView RKP-115 User Manual
1u 15” / 17” / 19” lcd console drawer
Hide thumbs
Also See for RKP-115:
- User manual (13 pages) ,
- Specifications (2 pages) ,
- User manual (28 pages)
Table of Contents
Advertisement
Quick Links
Advertisement
Table of Contents

Related Manuals for CyberView RKP-115


Summary of Contents for CyberView RKP-115
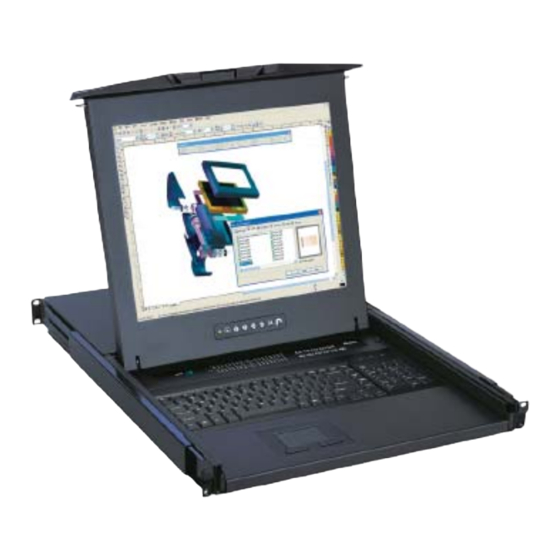
- Page 1 KVM switch and rackmount screen technology User Manual RKP-115 / RKP-117 / RKP-119 1U 15” / 17” / 19” LCD Console Drawer Options : - AV / DVI-D / Audio / DC power - Full range KVM - Touchscreen...
-
Page 2: Legal Information
Legal Information First English printing, October 2002 Information in this document has been carefully checked for accuracy; however, no guarantee is given to the correctness of the contents. The information in this document is subject to change without notice. We are not liable for any injury or loss that results from the use of this equipment. - Page 3 Contents RKP-115 RKP-117 RKP-119 < Part 1 > Package Contents Structure Diagram & Dimension P.3 - 6 Installation Connection to External KVM Switch or Server On-screen Display Operation ( OSD ) P.9 - 10 LCD / Keyboard / Mouse Specifi cation P.11 - 12...
-
Page 4: Before Installation
< Part 1 > RKP-115 / 117 / 119 < 1.1 > Package Content - RKP-115 or RKP-117 or RKP-119 X 1 - CE-6 6ft Combo KVM cable X 1 - Power cord X 1 - M6 screw, cage nut & cup washer X 6 The above package content is only for the single console models. -
Page 5: Structure Diagram & Dimension
< 1.2 > Structure Diagram & Dimension RKP-115 / 117 / 119 Carry handle to release the 2-pt lock Membrane switch (KVM option) LCD interchangeable module kit Micro switch for screen auto power off “One Man” Installation Slides Keyboard interchangeable module kit... - Page 6 < 1.3 > Installation - How to install One Man Installation Slides Step Rear side ■ Attach the left and right mounting bracket to rack Right bracket 19” mounting rails. ■ Adjust the rear mounting bracket to fi t your rack. ■...
- Page 7 < 1.3 > Installation- How to install L-bracket RKP-115 / 117 / 119 Step ■ Install left & right rear L-brackets with two fasteners shown above. ■ Leave the fasteners slightly loose. Step ■ Measure the depth of the front and rear mounting rails.
- Page 8 < 1.3 > Installation - How to Use the Slides Figure 1. ■ A black arrow release button is located on the front of each slide. (shown in Figure 1). ■ Pull and hold the black arrow button on either side Figure 2.
- Page 9 < 1.3 > Installation- How to use the drawer RKP-115 / 117 / 119 ■ Press the handle button and slide out the drawer. ■ Flip up the LCD to a suitable angle. ■ Operate the LCD console drawer. UM-CV-RKP117-Q411V2...
- Page 10 < 1.4 > Connection to PS/2 or USB Server LCD console drawer LCD console drawer CE-6 Combo CE-6 Combo KVM cable KVM cable PS/2 server USB server < 1.4 > Connection to external KVM LCD console drawer LCD console drawer CE-6 Combo CE-6 Combo CE-6 KVM Cable...
-
Page 11: On-Screen Display Operation ( Osd )
< 1.5 > On-screen Display Operation ( OSD ) RKP-115 / 117 / 119 Power light Green = On Orange = Power saving Membrane Switch Function Power on / off LCD Display the OSD menu Scrolls through menu options and adjusts the displayed control... - Page 12 < 1.6 > LCD / Keyboard / Mouse Specifi cation Item Description LCD Manufacturer 15" TFT 17" TFT 19" TFT Diagonal Size 1024 x 768 1280 x 1024 1280 x 1024 Max. Resolution Brightness (cd/m²) 16.2 M 16.7 M 16.7 M Color Support 700:1 1000:1...
- Page 13 < 1.6 > LCD / Keyboard / Mouse Specifi cation N keyboard integrated with touchpad N keyboard integrated with trackball 55 ± 5g Key force 3 ± 0.3mm Travelling distance > 10 million life cycle time Switch life MS Windows 7 / 2008 / 2003 / 2000 / XP / ME / 98 / DOC Software support Linux / Mac Supporting layouts...
-
Page 14: Dc Power Option
< 1.7 > Options : DVI-D / BNC + S-Video / Audio / DC power ■ DVI-D Option Option includes 1 x 6ft DVI-D cable DVI-D ■ BNC + S-Video Option Option includes 1 x 6ft S-Video cable S-Video ■ Audio input is 35mm audio plug ■... - Page 15 Please follow the below steps to setup the touch screen:- Step 1. Run the bundled CD disc or download the driver from the link below : http://www.austin-hughes.com > Downloads > CyberView > Driver & Software Step 2. Double click the Setup.exe Step 3.
- Page 16 The company reserves the right to modify product specifi cations without prior notice and assumes no responsibility for any error which may appear in this publication. All brand names, logo and registered trademarks are properties of their respective owners. Copyright 2011 Austin Hughes Electronics Ltd. All rights reserved. UM-CV-RKP117-Q411V2 www.austin-hughes.com...
Need help?
Do you have a question about the RKP-115 and is the answer not in the manual?
Questions and answers